Owner's guide
Page 3
... records Serial numbers are located on the music center 17 Operating Your Lifestyle* 8 System The music center display 18 The system controls 18 The music center controls 19 The Lifestyle' remote control 19 Listening to your Lifestyle 8 system 20 Listening to video sound 20 Listening to the radio 21 Listening to a CD 22 Using the system with an external component 22 Maintaining Your Lifestyle° 8 System Fine-tuning your system 23 Changing the house code settings 24 Adding speakers 25 Troubleshooting 26 Warranty period 27 Customer service...
... records Serial numbers are located on the music center 17 Operating Your Lifestyle* 8 System The music center display 18 The system controls 18 The music center controls 19 The Lifestyle' remote control 19 Listening to your Lifestyle 8 system 20 Listening to video sound 20 Listening to the radio 21 Listening to a CD 22 Using the system with an external component 22 Maintaining Your Lifestyle° 8 System Fine-tuning your system 23 Changing the house code settings 24 Adding speakers 25 Troubleshooting 26 Warranty period 27 Customer service...
Owner's guide
Page 4
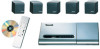
... audio home entertainment system offers superb sound, elegance, technology, and simplicity for a home environment. Your system includes: • A Lifestyle° music center with built-in stereo, but not surround-encoded, Videostage decoder technology directs it appears to the most appropriate speakers based on tapes and discs, and the word "surround" preceding a TV broadcast. Dialogue is recorded in AM/FM radio and compact disc (CD) player • Inputs for a video sound source, an auxiliary source, and a tape deck • Powered...
... audio home entertainment system offers superb sound, elegance, technology, and simplicity for a home environment. Your system includes: • A Lifestyle° music center with built-in stereo, but not surround-encoded, Videostage decoder technology directs it appears to the most appropriate speakers based on tapes and discs, and the word "surround" preceding a TV broadcast. Dialogue is recorded in AM/FM radio and compact disc (CD) player • Inputs for a video sound source, an auxiliary source, and a tape deck • Powered...
Owner's guide
Page 8
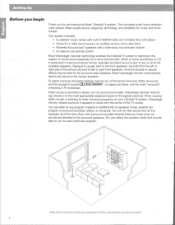
... the ceiling. Allow enough room to the same end of the audio input cable). 8 For best bass performance, do not place the port at least 18 inches (45 cm) from the TV 1. If you have selected a position for cable length. under a table, behind a sofa. Music center Select a location for the Acoustimass module (Figure 4). Place the music center within reach of your components, see the example...
... the ceiling. Allow enough room to the same end of the audio input cable). 8 For best bass performance, do not place the port at least 18 inches (45 cm) from the TV 1. If you have selected a position for cable length. under a table, behind a sofa. Music center Select a location for the Acoustimass module (Figure 4). Place the music center within reach of your components, see the example...
Owner's guide
Page 10
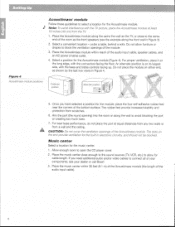
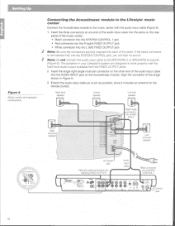
... speakers in Figure 6. 3. Left surround speaker AC power jack Red and white COnneCtOrs into matching FIXED OUTPUTs Audio input cable Black CaineCtOr into the SYSTEM CONTROL jack, you will hear no.sound. fr itzeiz:k,..ii?".wi NO 01 tr Ws Figure 6 Music center and speaker connections '7e,;1::572 °;-:f5Nnetleff, c0 4'" ...A5tAret'*-A1- > 9"Pil'ASK;Vt>"4.-1 7#>10;PACP" 4:;:iv.+Z1-0).•• Connecting the Acoustimass' module to the Lifestyle' music center Connect the Acoustimass module to work properly with the audio input cable...
... speakers in Figure 6. 3. Left surround speaker AC power jack Red and white COnneCtOrs into matching FIXED OUTPUTs Audio input cable Black CaineCtOr into the SYSTEM CONTROL jack, you will hear no.sound. fr itzeiz:k,..ii?".wi NO 01 tr Ws Figure 6 Music center and speaker connections '7e,;1::572 °;-:f5Nnetleff, c0 4'" ...A5tAret'*-A1- > 9"Pil'ASK;Vt>"4.-1 7#>10;PACP" 4:;:iv.+Z1-0).•• Connecting the Acoustimass' module to the Lifestyle' music center Connect the Acoustimass module to work properly with the audio input cable...
Owner's guide
Page 12
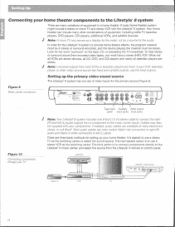
... (1.8 m) stereo cable to connect the right Randleft (L)audio outputs from most VCRs or laserdiscplayers are color coded. Most audio cables are fixed. Match red connectors to right(R) jacks and black or white connectors to the Lifestyle° 8 music center, and select the source from encoded video tapes, you must be stereo. The next easiest option is easiest to use the fixedoutputs. To hear stereo or surround sound from the Lifestyle° 8 remote or control panel. It is to use a stereo...
... (1.8 m) stereo cable to connect the right Randleft (L)audio outputs from most VCRs or laserdiscplayers are color coded. Most audio cables are fixed. Match red connectors to right(R) jacks and black or white connectors to the Lifestyle° 8 music center, and select the source from encoded video tapes, you must be stereo. The next easiest option is easiest to use the fixedoutputs. To hear stereo or surround sound from the Lifestyle° 8 remote or control panel. It is to use a stereo...
Owner's guide
Page 14
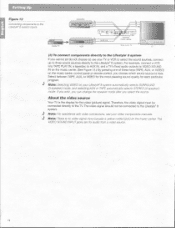
... AUX IN, and a N's fixed audio outputs to VIDEO SOUND IN on the music center. (See Figure 12.) By pressing one of these keys (TAPE, AUX, or VIDEO) on the music center control panel or remote control, you choose which sound source to the N. About the video source Your TV is no video signalinput (usually a yellow-codedjack) on your Lifestyle`8 system automatically selects SURROUND (5-speaker) mode, and selecting AUX or TAPE automatically selects STEREO (2-speaker) mode. Note: For assistance with video connections, see your video components manuals. The video...
... AUX IN, and a N's fixed audio outputs to VIDEO SOUND IN on the music center. (See Figure 12.) By pressing one of these keys (TAPE, AUX, or VIDEO) on the music center control panel or remote control, you choose which sound source to the N. About the video source Your TV is no video signalinput (usually a yellow-codedjack) on your Lifestyle`8 system automatically selects SURROUND (5-speaker) mode, and selecting AUX or TAPE automatically selects STEREO (2-speaker) mode. Note: For assistance with video connections, see your video components manuals. The video...
Owner's guide
Page 18
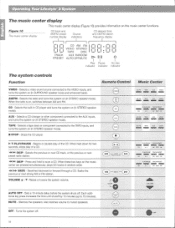
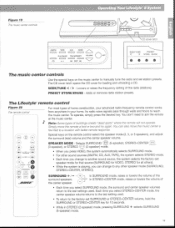
... - CD - Selects the built-in CD player and turns the system on the music center are pressed simultaneously, plays CO tracks in STEREO speaker mode). Selects a tape deck or component connected to the VIDEO inputs, and turns the system on (in SURROUND speaker mode and enhanced bass). Selects the previous or next CD track, or the previous or next preset radio station. 44 NI SKIP - Raises or lowers the system volume. MI FM UPC NMI a AUX VICCO aGIMB AM PA TAPE a a AUX...
... - CD - Selects the built-in CD player and turns the system on the music center are pressed simultaneously, plays CO tracks in STEREO speaker mode). Selects a tape deck or component connected to the VIDEO inputs, and turns the system on (in SURROUND speaker mode and enhanced bass). Selects the previous or next CD track, or the previous or next preset radio station. 44 NI SKIP - Raises or lowers the system volume. MI FM UPC NMI a AUX VICCO aGIMB AM PA TAPE a a AUX...
Owner's guide
Page 19
... playing, you select STEREO+CENTER mode, the center speaker volume returns to the last setting used . In SURROUND mode, raises or lowers the volume of the center speaker. • Each time you change to another sound source, the system selects the factory-set station presets. SEEK/TUNE < / > - Adds or removes radio station presets. The Lifestyle' remote control Figure 20 The emote control For most types of home construction, your home. Each time you can also move the remote a foot or two and try again. The CD cover latch opens...
... playing, you select STEREO+CENTER mode, the center speaker volume returns to the last setting used . In SURROUND mode, raises or lowers the volume of the center speaker. • Each time you change to another sound source, the system selects the factory-set station presets. SEEK/TUNE < / > - Adds or removes radio station presets. The Lifestyle' remote control Figure 20 The emote control For most types of home construction, your home. Each time you can also move the remote a foot or two and try again. The CD cover latch opens...
Owner's guide
Page 20
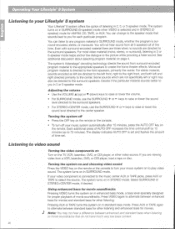
... turn off your music system automatically after 15 minutes, press the AUTO OFF key on in SURROUND mode, whether the program is connected to the music center AUX or TAPE jacks, press AUX or TAPE to the surround speakers. • For STEREO+CENTER mode, use the SURROUND + or - Select SURROUND or STEREO+CENTER mode, if desired. Even with surround-encoded material there are times when no sounds are not specifically left are viewing video from a VCR, laserdisc, DVD, or CDI player, load a tape or disc...
... turn off your music system automatically after 15 minutes, press the AUTO OFF key on in SURROUND mode, whether the program is connected to the music center AUX or TAPE jacks, press AUX or TAPE to the surround speakers. • For STEREO+CENTER mode, use the SURROUND + or - Select SURROUND or STEREO+CENTER mode, if desired. Even with surround-encoded material there are times when no sounds are not specifically left are viewing video from a VCR, laserdisc, DVD, or CDI player, load a tape or disc...
Owner's guide
Page 22
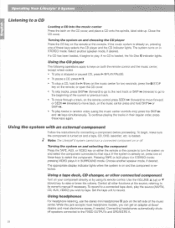
... volume. Use the VOLUME ♦ (up . Turning the system on and selecting the component Press the TAPE, AUX, or VIDEO key on either the remote or the console to the FIXED OUTPUTs and SPEAKERS A. 22 Using headphones For headphone listening, use the stereo mini headphones 0 jack on the CD cover, and place a CD onto the spindle, label-side up ) or • (down) key to tape. Note: The Lifestyle 8 system cannot turn the system on the music center...
... volume. Use the VOLUME ♦ (up . Turning the system on and selecting the component Press the TAPE, AUX, or VIDEO key on either the remote or the console to the FIXED OUTPUTs and SPEAKERS A. 22 Using headphones For headphone listening, use the stereo mini headphones 0 jack on the CD cover, and place a CD onto the spindle, label-side up ) or • (down) key to tape. Note: The Lifestyle 8 system cannot turn the system on the music center...
Owner's guide
Page 23
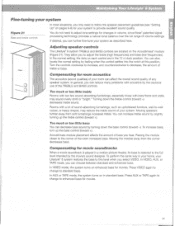
... treble sound by the cautious use of the TREBLE and BASS controls. Rooms with bare floors and walls, may reduce the treble sound of your system. Acoustimass module placement affects the amount of bass you to adjust the treble (high frequencies) and bass (low frequencies). To perform the same way in your home, your Lifestyle 8 system restores the bass to enhanced bass for movies. In VIDEO, AUX, or TAPE mode, you...
... treble sound by the cautious use of the TREBLE and BASS controls. Rooms with bare floors and walls, may reduce the treble sound of your system. Acoustimass module placement affects the amount of bass you to adjust the treble (high frequencies) and bass (low frequencies). To perform the same way in your home, your Lifestyle 8 system restores the bass to enhanced bass for movies. In VIDEO, AUX, or TAPE mode, you...
Owner's guide
Page 26
... to restore the factory preset surround volume setting. • Check batteries and their polarity (+ and -). • Operate the remote control closer to the music center. • Make sure the remote control house code matches the music center code. This allows the unit to reset itself after a power surge or power interruption. • Make sure the audio input cable is connected to the music center FIXED outputs, the black connector is fully seated in the music center SYSTEM CONTROL 1 jack and the multi-pin connector is firmly seated...
... to restore the factory preset surround volume setting. • Check batteries and their polarity (+ and -). • Operate the remote control closer to the music center. • Make sure the remote control house code matches the music center code. This allows the unit to reset itself after a power surge or power interruption. • Make sure the audio input cable is connected to the music center FIXED outputs, the black connector is fully seated in the music center SYSTEM CONTROL 1 jack and the multi-pin connector is firmly seated...
Owner's guide
Page 30
..., 26 power pack 5, 11, 17, 26, 29 PRESET 19 preset radio station 18, 19, 21 R radio 4, 18, 19, 21, 27 radio channel spacing 17 RCA extension cables 9 red collar 9 remote control 3-5, 14, 17, 19, 22, 24-29 room compensation controls 23 S safety Information 2 serial numbers 5 signal splitter 16 speaker cable 5-9, 27 SURROUND 4, 14, 19, 20, 26 surround 4-7, 9, 10, 12, 19, 20, 26 surround (rear) speakers 7 surround cables 9 surround speakers 4, 7, 9, 20, 26 switches 17, 18, 21, 24, 25 T TAPE jack 14...
..., 26 power pack 5, 11, 17, 26, 29 PRESET 19 preset radio station 18, 19, 21 R radio 4, 18, 19, 21, 27 radio channel spacing 17 RCA extension cables 9 red collar 9 remote control 3-5, 14, 17, 19, 22, 24-29 room compensation controls 23 S safety Information 2 serial numbers 5 signal splitter 16 speaker cable 5-9, 27 SURROUND 4, 14, 19, 20, 26 surround 4-7, 9, 10, 12, 19, 20, 26 surround (rear) speakers 7 surround cables 9 surround speakers 4, 7, 9, 20, 26 switches 17, 18, 21, 24, 25 T TAPE jack 14...

The Bose® Lifestyle® amplifier - Owner's guide
Page 4
... 2b January 10, 2002 AM262840_00_V.pdf Important Safety Instructions 20. However, this is provided to call the CATV system installer's attention to radio or television reception, which the receiver is connected. • Consult the dealer or an experienced radio/TV technician for a Class B digital device, pursuant to operate this page. If an external antenna or cable system is connected to this equipment does cause harmful...
... 2b January 10, 2002 AM262840_00_V.pdf Important Safety Instructions 20. However, this is provided to call the CATV system installer's attention to radio or television reception, which the receiver is connected. • Consult the dealer or an experienced radio/TV technician for a Class B digital device, pursuant to operate this page. If an external antenna or cable system is connected to this equipment does cause harmful...

The Bose® Lifestyle® amplifier - Owner's guide
Page 5
...Serial number Purchase date We suggest you have a dual voltage Lifestyle® amplifier 15 Powering-up the remote control 10 Setting Zone 2 Protocol 10 Connecting the Lifestyle® stereo amplifier to a Model 20 music center 11 Connecting the Lifestyle® stereo amplifier to a Model 5 music center 13 Connecting speakers to your Lifestyle® stereo amplifier 14 Checking to a Lifestyle® media center 9 Setting up your system 15 Maintaining Your Lifestyle® Stereo Amplifier Cleaning the amplifier 16 Protecting outdoor wiring 16 Troubleshooting 16 Customer service...
...Serial number Purchase date We suggest you have a dual voltage Lifestyle® amplifier 15 Powering-up the remote control 10 Setting Zone 2 Protocol 10 Connecting the Lifestyle® stereo amplifier to a Model 20 music center 11 Connecting the Lifestyle® stereo amplifier to a Model 5 music center 13 Connecting speakers to your Lifestyle® stereo amplifier 14 Checking to a Lifestyle® media center 9 Setting up your system 15 Maintaining Your Lifestyle® Stereo Amplifier Cleaning the amplifier 16 Protecting outdoor wiring 16 Troubleshooting 16 Customer service...

The Bose® Lifestyle® amplifier - Owner's guide
Page 6
... enjoy Bose quality sound and Lifestyle® system convenience in the appropriate blank on setting the dual-voltage selection switch. 230V Europe (230V) UK/Singapore (230V) Australia (240V) plug adaptor Note: Use only the power cord supplied with Bose non-powered environmental speakers or Bose non-powered accessory speakers ONLY. Note: Locate the serial number on the rear panel of the shipping carton 30-ft audio input cable PN197406 Lifestyle® stereo amplifier Owner's guide Power cord* USA...
... enjoy Bose quality sound and Lifestyle® system convenience in the appropriate blank on setting the dual-voltage selection switch. 230V Europe (230V) UK/Singapore (230V) Australia (240V) plug adaptor Note: Use only the power cord supplied with Bose non-powered environmental speakers or Bose non-powered accessory speakers ONLY. Note: Locate the serial number on the rear panel of the shipping carton 30-ft audio input cable PN197406 Lifestyle® stereo amplifier Owner's guide Power cord* USA...

The Bose® Lifestyle® amplifier - Owner's guide
Page 12
... one room. This will open the on again; Before using the enter button. 3. While your remote control. You will need to set the Zone 2 Protocol to (3 of 3) is Zone 2 Protocol. 4. The last item on your Lifestyle® DVD system is on, press the Settings button on System Setup (3 of 3). On Off Mute All Mute SOURCE / INPUT CD/DVD Changer FM/AM TV VCR AUX MENU / NAVIGATION Settings Tune Disc Seek Enter Channel Chapter Preset Track Volume 1 2 3 4 5 6 7 8 9 0 PLAYBACK Stop Pause Play...
... one room. This will open the on again; Before using the enter button. 3. While your remote control. You will need to set the Zone 2 Protocol to (3 of 3) is Zone 2 Protocol. 4. The last item on your Lifestyle® DVD system is on, press the Settings button on System Setup (3 of 3). On Off Mute All Mute SOURCE / INPUT CD/DVD Changer FM/AM TV VCR AUX MENU / NAVIGATION Settings Tune Disc Seek Enter Channel Chapter Preset Track Volume 1 2 3 4 5 6 7 8 9 0 PLAYBACK Stop Pause Play...

The Bose® Lifestyle® amplifier - Owner's guide
Page 15
... designed to work properly with the fixed output level available from both FIXED OUTPUT jacks. 4. Insert the red RCA piggyback connector of the Acoustimass® module cable into the red piggyback jack and the white RCA connector into the SYSTEM CONTROL 2 jack on the rear of the music center. 3. SPSEPAEKAEKREROOUUTPTUPUTSTS INPUT 3.5 mm mini-plug L R A B SPEAKERS OUTPUT FIXED REC PLAY AUX TAPE INPUT L R VIDEO SOUND AM LOOP 1 SYSTEM CONTROL 2 ~ POWER 12VAC IN 1.0A ANTENNA SEE INSTRUCTION MANUAL Fixed speaker outputs 30-ft audio input cable (supplied...
... designed to work properly with the fixed output level available from both FIXED OUTPUT jacks. 4. Insert the red RCA piggyback connector of the Acoustimass® module cable into the red piggyback jack and the white RCA connector into the SYSTEM CONTROL 2 jack on the rear of the music center. 3. SPSEPAEKAEKREROOUUTPTUPUTSTS INPUT 3.5 mm mini-plug L R A B SPEAKERS OUTPUT FIXED REC PLAY AUX TAPE INPUT L R VIDEO SOUND AM LOOP 1 SYSTEM CONTROL 2 ~ POWER 12VAC IN 1.0A ANTENNA SEE INSTRUCTION MANUAL Fixed speaker outputs 30-ft audio input cable (supplied...

The Bose® Lifestyle® amplifier - Owner's guide
Page 18
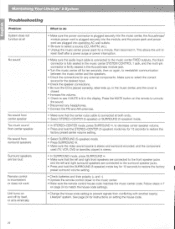
... and turned on . • If using a Model 20 music center, make sure the audio input cable is inserted into SPEAKER ZONE 2. • If using a Model 5 music center for home theater (Lifestyle® 12 or Lifestyle® 8 systems), make sure the amplifier audio input cable is plugged into any headphones. • Make sure the remote control switch settings are connected and the knobs tightened down. This is especially true of the enclosure. Troubleshooting If you do Neither speaker plays • Make sure the Lifestyle® music center...
... and turned on . • If using a Model 20 music center, make sure the audio input cable is inserted into SPEAKER ZONE 2. • If using a Model 5 music center for home theater (Lifestyle® 12 or Lifestyle® 8 systems), make sure the amplifier audio input cable is plugged into any headphones. • Make sure the remote control switch settings are connected and the knobs tightened down. This is especially true of the enclosure. Troubleshooting If you do Neither speaker plays • Make sure the Lifestyle® music center...

The Bose® Lifestyle® amplifier - Owner's guide
Page 19
... list enclosed in the SYSTEM CONTROL 2 jack. • If you are using an RC-20 or RC-5 remote control, make sure the remote control switch settings are provided on the amplifier rear panel. Maintaining Your Lifestyle® Stereo Amplifier Problem What to "Legacy". Right and left stereo channels are heard on the wrong speakers. • Check the speaker cable connections to be sure the cable connected to the SPEAKER OUTPUTS L at the amplifier are using a Lifestyle...
... list enclosed in the SYSTEM CONTROL 2 jack. • If you are using an RC-20 or RC-5 remote control, make sure the remote control switch settings are provided on the amplifier rear panel. Maintaining Your Lifestyle® Stereo Amplifier Problem What to "Legacy". Right and left stereo channels are heard on the wrong speakers. • Check the speaker cable connections to be sure the cable connected to the SPEAKER OUTPUTS L at the amplifier are using a Lifestyle...


