Installation guide
Page 2
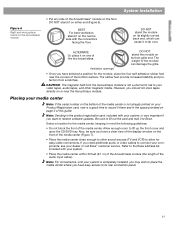
... RISQUE DE DÉCHARGE ÉLECTRIQUE, NE RETIREZ PAS LE COUVERCLE (OU L'ARRIÈRE). These CAUTION marks are located on your LIFESTYLE® media center and Acoustimass® module enclosures: The lightning flash with arrowhead symbol, within an equilateral triangle, is intended to alert the...or repaired by anyone except properly qualified service personnel. Liquids can cause a failure and/or a fire hazard. Class 1 laser product The DVD player contained within the system enclosure that may result in any local regulations. The CLASS 1 LASER PRODUCT label is located on the bottom of...
... RISQUE DE DÉCHARGE ÉLECTRIQUE, NE RETIREZ PAS LE COUVERCLE (OU L'ARRIÈRE). These CAUTION marks are located on your LIFESTYLE® media center and Acoustimass® module enclosures: The lightning flash with arrowhead symbol, within an equilateral triangle, is intended to alert the...or repaired by anyone except properly qualified service personnel. Liquids can cause a failure and/or a fire hazard. Class 1 laser product The DVD player contained within the system enclosure that may result in any local regulations. The CLASS 1 LASER PRODUCT label is located on the bottom of...
Installation guide
Page 5
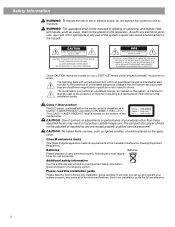
... • How to see the on other aspects of the use of a Bose® LIFESTYLE® DVD home entertainment system. they may be useful as a safe way to set up . Refer to the Bose address list included in this section help you become familiar with your system and how... system. If any connections. It will identify and connect the cables that are four different systems, the LIFESTYLE® 18 Series II, LIFESTYLE® 28 Series II, LIFESTYLE® 38, and the LIFESTYLE® 48 systems. All include multiple room connections, most include the AdaptiQ® audio calibration system, ...
... • How to see the on other aspects of the use of a Bose® LIFESTYLE® DVD home entertainment system. they may be useful as a safe way to set up . Refer to the Bose address list included in this section help you become familiar with your system and how... system. If any connections. It will identify and connect the cables that are four different systems, the LIFESTYLE® 18 Series II, LIFESTYLE® 28 Series II, LIFESTYLE® 38, and the LIFESTYLE® 48 systems. All include multiple room connections, most include the AdaptiQ® audio calibration system, ...
Installation guide
Page 6
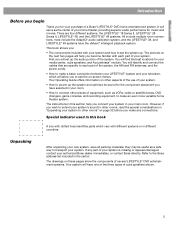
...or or Single cube speaker (LIFESTYLE® 18 Series II system) Cube speaker array (LIFESTYLE® 28 Series II & LIFESTYLE® 38 systems) Remote controls Jewel Cube® speaker (LIFESTYLE® 48 system) On Off Mute All Mute CD·DVD FM·AM AUX TV...Off Off Library Settings ENTER DVD Menu Guide System Track Chapter Preset Channel Exit Volume Seek Shuffle Repeat 1 2 3 4 5 6 7 8 9 Info Last 0 uMusic Rating Similar Whole CD CD # Playlist Rubber feet for cube speakers LIFESTYLE® 18, 28 LIFESTYLE® 38, 48 systems systems Acoustimass&#...
...or or Single cube speaker (LIFESTYLE® 18 Series II system) Cube speaker array (LIFESTYLE® 28 Series II & LIFESTYLE® 38 systems) Remote controls Jewel Cube® speaker (LIFESTYLE® 48 system) On Off Mute All Mute CD·DVD FM·AM AUX TV...Off Off Library Settings ENTER DVD Menu Guide System Track Chapter Preset Channel Exit Volume Seek Shuffle Repeat 1 2 3 4 5 6 7 8 9 Info Last 0 uMusic Rating Similar Whole CD CD # Playlist Rubber feet for cube speakers LIFESTYLE® 18, 28 LIFESTYLE® 38, 48 systems systems Acoustimass&#...
Installation guide
Page 11
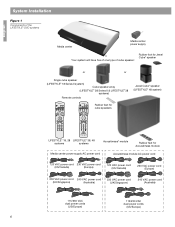
...end, which can damage the grille. • Once you need additional audio or video cables to its front grille end. ALTERNATE Or, place it to Bose. Note: Sending in the space provided on your Product Registration card, now is not already printed on page 3 of this guide. Allow enough room ...to your system, is not a short-term risk to lift up the front cover and open the CD/DVD tray. English System Installation Figure 6 Right and wrong placements for the Acoustimass module • Put any side of the Acoustimass® module on its ...
...end, which can damage the grille. • Once you need additional audio or video cables to its front grille end. ALTERNATE Or, place it to Bose. Note: Sending in the space provided on your Product Registration card, now is not already printed on page 3 of this guide. Allow enough room ...to your system, is not a short-term risk to lift up the front cover and open the CD/DVD tray. English System Installation Figure 6 Right and wrong placements for the Acoustimass module • Put any side of the Acoustimass® module on its ...
Installation guide
Page 12
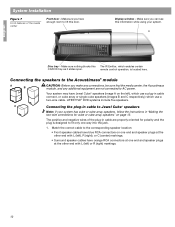
... the other end with L (left ), which use a plug-in cable connect, or cube array or single cube speakers (images B and C respectively,) which enables certain CD/DVD tray as it slides open. Make sure you have enough room to Jewel Cube® speakers Note: If your system. ® Disc tray - Display window... two-wire connections for polarity and the plug is located here. Make sure you can see this The IR Emitter, which use a two-wire cable. LIFESTYLE® DVD systems include five speakers.
... the other end with L (left ), which use a plug-in cable connect, or cube array or single cube speakers (images B and C respectively,) which enables certain CD/DVD tray as it slides open. Make sure you have enough room to Jewel Cube® speakers Note: If your system. ® Disc tray - Display window... two-wire connections for polarity and the plug is located here. Make sure you can see this The IR Emitter, which use a two-wire cable. LIFESTYLE® DVD systems include five speakers.
Installation guide
Page 17
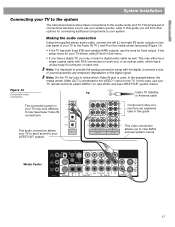
... outputs, use your TV to the media center and TV. It may look different. If the setup menu for connecting additional components to view DVDs and see LIFESTYLE® system menus. This may connect a digital audio cable as well. Note: On the TV, be a single coaxial cable with the...have fewer Video IN connections Component video connections are explained later in this guide This audio connection allows your TV to send sound to your LIFESTYLE® system This video connection allows you to your TV allows, select Fixed in that menu. • If you have a digital TV...
... outputs, use your TV to the media center and TV. It may look different. If the setup menu for connecting additional components to view DVDs and see LIFESTYLE® system menus. This may connect a digital audio cable as well. Note: On the TV, be a single coaxial cable with the...have fewer Video IN connections Component video connections are explained later in this guide This audio connection allows your TV to send sound to your LIFESTYLE® system This video connection allows you to your TV allows, select Fixed in that menu. • If you have a digital TV...
Installation guide
Page 18
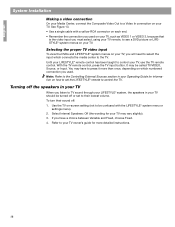
... which numbered connection you must select, using your TV remote, to see a DVD picture or LIFESTYLE® system menus on how to set to their lowest volume. Selecting the proper TV video input... To view the DVDs and LIFESTYLE® system menus on your TV, such as VIDEO 1 or VIDEO 3, because that is the video input you used on your TV. Until your LIFESTYLE® remote control has... control the TV. Use the TV on which connects the media center to TV sound through your LIFESTYLE® system, the speakers in your Operating Guide for information on your TV owner's guide for ...
... which numbered connection you must select, using your TV remote, to see a DVD picture or LIFESTYLE® system menus on how to set to their lowest volume. Selecting the proper TV video input... To view the DVDs and LIFESTYLE® system menus on your TV, such as VIDEO 1 or VIDEO 3, because that is the video input you used on your TV. Until your LIFESTYLE® remote control has... control the TV. Use the TV on which connects the media center to TV sound through your LIFESTYLE® system, the speakers in your Operating Guide for information on your TV owner's guide for ...

Installation guide
Page 22
... when to the placement of your system and your television. 2. Keep the headset and discs together in their instructions, the installation of your LIFESTYLE® DVD system is complete and its performance is tailored to play , listen carefully and follow . When Disc 2 indicates, connect the ADAPTiQ calibration headset...headset so it to customize your system again if you move it rests above your ears for possible future use When you are to the LIFESTYLE® system media center. 3. You can repeat the steps in a safe location. 22 Use the TV remote to the AUX jacks ...
... when to the placement of your system and your television. 2. Keep the headset and discs together in their instructions, the installation of your LIFESTYLE® DVD system is complete and its performance is tailored to play , listen carefully and follow . When Disc 2 indicates, connect the ADAPTiQ calibration headset...headset so it to customize your system again if you move it rests above your ears for possible future use When you are to the LIFESTYLE® system media center. 3. You can repeat the steps in a safe location. 22 Use the TV remote to the AUX jacks ...
Installation guide
Page 23
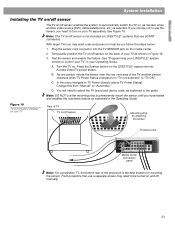
...need to automatically switch the TV on, as shown in your LIFESTYLE® system remote to "TV ON". See "Programming your Operating Guide. As one person moves the sensor near the rear vent area of the TV, another video source (DVD, cable/satellite box, etc.) is selected. Note: DO NOT... TV separately. B. In the menu navigate to select the TV brand and device code, as explained in the guide. Turn the TV on the LIFESTYLE® system remote. Press the System button on . C. You will need to permanently mount the sensor until you follow the steps below: 1....
...need to automatically switch the TV on, as shown in your LIFESTYLE® system remote to "TV ON". See "Programming your Operating Guide. As one person moves the sensor near the rear vent area of the TV, another video source (DVD, cable/satellite box, etc.) is selected. Note: DO NOT... TV separately. B. In the menu navigate to select the TV brand and device code, as explained in the guide. Turn the TV on the LIFESTYLE® system remote. Press the System button on . C. You will need to permanently mount the sensor until you follow the steps below: 1....
Installation guide
Page 25
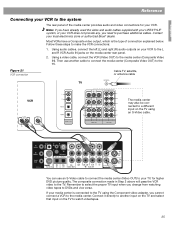
... (Composite Video IN). Most VCRs have already used the video and audio cables supplied with your LIFESTYLE® system, or your VCR to the L and R VCR Audio IN jacks on the ... may also be connected to the media center. If your local electronics store or authorized Bose® dealer. English Reference Connecting your VCR to the system The rear panel of connection...Contact your media center is the type of the media center provides audio and video connections for higher DVD picture quality. Using audio cables, connect the left (L) and right (R) audio outputs on your VCR...
... (Composite Video IN). Most VCRs have already used the video and audio cables supplied with your LIFESTYLE® system, or your VCR to the L and R VCR Audio IN jacks on the ... may also be connected to the media center. If your local electronics store or authorized Bose® dealer. English Reference Connecting your VCR to the system The rear panel of connection...Contact your media center is the type of the media center provides audio and video connections for higher DVD picture quality. Using audio cables, connect the left (L) and right (R) audio outputs on your VCR...

Installation guide
Page 26
Connect a VCR to the TV. In Figure 22, select Input 2 on your VCR. 2. Note: Additional cables may be purchased at an electronics store or authorized Bose® dealer. Use another S-VIDEO cable to connect the S-VIDEO OUT jack on the media center to an S-VIDEO jack on the TV. • If ... the TV. 26 If that to the composite VIDEO IN jack on the media center. This input will also provide better video quality when watching DVDs. Figure 22 Set top box and VCR Cable TV, satellite, or antenna cable If the CBL/SAT box has only a composite VIDEO OUT jack, connect...
Connect a VCR to the TV. In Figure 22, select Input 2 on your VCR. 2. Note: Additional cables may be purchased at an electronics store or authorized Bose® dealer. Use another S-VIDEO cable to connect the S-VIDEO OUT jack on the media center to an S-VIDEO jack on the TV. • If ... the TV. 26 If that to the composite VIDEO IN jack on the media center. This input will also provide better video quality when watching DVDs. Figure 22 Set top box and VCR Cable TV, satellite, or antenna cable If the CBL/SAT box has only a composite VIDEO OUT jack, connect...
Installation guide
Page 27
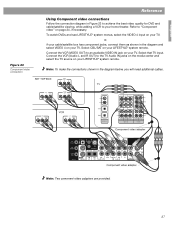
... Reference Using Component video connections Follow the connection diagram in Figure 23 to achieve the best video quality for DVD and cable/satellite viewing, while adding a VCR to your LIFESTYLE® system remote. Component video adapter Component video adapter Note: Two comonent video adapters are provided. 27...Audio IN jacks on the media center and select the TV source on your home theater. Select CBL/SAT on your LIFESTYLE® system remote. To watch DVDs and see LIFESTYLE® system menus, select the VIDEO 4 input on your TV. Note: To make the connections shown in the...
... Reference Using Component video connections Follow the connection diagram in Figure 23 to achieve the best video quality for DVD and cable/satellite viewing, while adding a VCR to your LIFESTYLE® system remote. Component video adapter Component video adapter Note: Two comonent video adapters are provided. 27...Audio IN jacks on the media center and select the TV source on your home theater. Select CBL/SAT on your LIFESTYLE® system remote. To watch DVDs and see LIFESTYLE® system menus, select the VIDEO 4 input on your TV. Note: To make the connections shown in the...
Lifestyle® VS-2 video enhancer - Owner's guide
Page 5
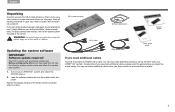
... enhancer. Updating the system software IMPORTANT Software update required! Load the software update disc into the Lifestyle system media center and allow it to indicate when it . Notify Bose or your Bose dealer or local electronics retailer. 5 WARNING: To avoid danger of suffocation, keep the plastic bags...part of children. Save all packing materials in the carton. For Bose contact information, refer to the address sheet included in case you need to be sure your LIFESTYLE® system and select the CD/DVD source. 2. Turn on your system includes the parts shown on this...
... enhancer. Updating the system software IMPORTANT Software update required! Load the software update disc into the Lifestyle system media center and allow it to indicate when it . Notify Bose or your Bose dealer or local electronics retailer. 5 WARNING: To avoid danger of suffocation, keep the plastic bags...part of children. Save all packing materials in the carton. For Bose contact information, refer to the address sheet included in case you need to be sure your LIFESTYLE® system and select the CD/DVD source. 2. Turn on your system includes the parts shown on this...
Lifestyle® VS-2 video enhancer - Owner's guide
Page 6
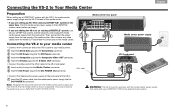
...cables from the rear panel of the VS-2 cable to your LIFESTYLE® system remote control. Then, disconnect the power supply from ... Center English Preparation When setting up a LIFESTYLE® system with your LIFESTYLE system, wait 30 seconds, and unplug ...the media center power supply from the media center power supply into the VS-2 instead of the media center. • If you are setting up the VS-2 and your LIFESTYLE...® system at the same time, find the media center power supply in the LIFESTYLE system carton before...
...cables from the rear panel of the VS-2 cable to your LIFESTYLE® system remote control. Then, disconnect the power supply from ... Center English Preparation When setting up a LIFESTYLE® system with your LIFESTYLE system, wait 30 seconds, and unplug ...the media center power supply from the media center power supply into the VS-2 instead of the media center. • If you are setting up the VS-2 and your LIFESTYLE...® system at the same time, find the media center power supply in the LIFESTYLE system carton before...
Lifestyle® VS-2 video enhancer - Owner's guide
Page 19
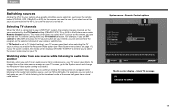
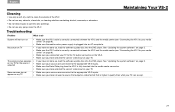
Selecting TV channels When the VS-2 is connected to your LIFESTYLE® system, the remote changes channels on your TV. System menu - blank TV message TV CHOOSE TV INPUT 19 This means that you have connected ... jacks. If your cable or satellite box. English Switching sources Adding the VS-2 to your TV screen goes blank. Just press the remote button (CD/DVD, VCR, CBL•SAT, or AUX) for the source you to select the correct video input on the source selected by the TV Control setting...
Selecting TV channels When the VS-2 is connected to your LIFESTYLE® system, the remote changes channels on your TV. System menu - blank TV message TV CHOOSE TV INPUT 19 This means that you have connected ... jacks. If your cable or satellite box. English Switching sources Adding the VS-2 to your TV screen goes blank. Just press the remote button (CD/DVD, VCR, CBL•SAT, or AUX) for the source you to select the correct video input on the source selected by the TV Control setting...
Lifestyle® VS-2 video enhancer - Owner's guide
Page 21
... VS-2. • Do not use any solvents, chemicals, or cleaning solutions containing alcohol, ammonia, or abrasives. • Do not allow liquids to spill into the DVD player. See "Updating the system software" on my TV for the source I • Make sure your sources are connected to the appropriate VS-2 inputs. •...on your sources are connected to do not appear on TV • If you have not done so, load the software update disc into the DVD player. Troubleshooting Problem What to the appropriate VS-2 inputs. No picture on my TV • Make sure your TV. on page 5.
... VS-2. • Do not use any solvents, chemicals, or cleaning solutions containing alcohol, ammonia, or abrasives. • Do not allow liquids to spill into the DVD player. See "Updating the system software" on my TV for the source I • Make sure your sources are connected to the appropriate VS-2 inputs. •...on your sources are connected to do not appear on TV • If you have not done so, load the software update disc into the DVD player. Troubleshooting Problem What to the appropriate VS-2 inputs. No picture on my TV • Make sure your TV. on page 5.
Operating guide
Page 2
...Safety Instructions sheet enclosed in music recognition technology and related content delivery. It will help you set up and operate your LIFESTYLE® DVD home entertainment system media center and ON the rear panel of the Acoustimass® module: Español Français...user to EN 60825-1:1994 + A11. The CLASS 1 LASER PRODUCT label is the industry standard in the shipping carton. ©2004 Bose Corporation. Batteries Additional safety information See the additional instructions on the bottom of Dolby Laboratories. Confidential Unpublished Works. ©1992-1997 Dolby ...
...Safety Instructions sheet enclosed in music recognition technology and related content delivery. It will help you set up and operate your LIFESTYLE® DVD home entertainment system media center and ON the rear panel of the Acoustimass® module: Español Français...user to EN 60825-1:1994 + A11. The CLASS 1 LASER PRODUCT label is the industry standard in the shipping carton. ©2004 Bose Corporation. Batteries Additional safety information See the additional instructions on the bottom of Dolby Laboratories. Confidential Unpublished Works. ©1992-1997 Dolby ...
Operating guide
Page 3
...Legal notice: "AEC One Stop Group, Inc. ("AEC") hold harmless AEC and its affiliates, and Bose and its affiliates, against any use of The Guides, (ii) your selection 16 System Performance 17 ... that is intended for play 5 Regarding copy protection Check for region number compatibility 5 Glossary of this LIFESTYLE® system uniquely yours 7 How you can tell the system to "Do as I do 7... and is protected by Cirrus Logic, Inc. as well as you in this model 525p DVD player, please contact our customer service center." and subject to the copyright protection of this directive...
...Legal notice: "AEC One Stop Group, Inc. ("AEC") hold harmless AEC and its affiliates, and Bose and its affiliates, against any use of The Guides, (ii) your selection 16 System Performance 17 ... that is intended for play 5 Regarding copy protection Check for region number compatibility 5 Glossary of this LIFESTYLE® system uniquely yours 7 How you can tell the system to "Do as I do 7... and is protected by Cirrus Logic, Inc. as well as you in this model 525p DVD player, please contact our customer service center." and subject to the copyright protection of this directive...
Operating guide
Page 4
... How to change the settings 35 Tuner setting options (FM or AM radio 36 CD setting options 36 Stored CDs setting options 37 DVD setting options 38 TV setting options (for VCR, CBL-SAT, and AUX 39 Using System Menus 40 Making system adjustments 40 How to see the ...; link remote in another room 52 Setting up a second room with sound 52 Bose® link compatible products simplify your decisions 53 Bose® link remote switch settings 53 Taking care of your LIFESTYLE® system 54 Troubleshooting 55 Contacting customer service 57 Limited warranty 57 Technical information 57 END...
... How to change the settings 35 Tuner setting options (FM or AM radio 36 CD setting options 36 Stored CDs setting options 37 DVD setting options 38 TV setting options (for VCR, CBL-SAT, and AUX 39 Using System Menus 40 Making system adjustments 40 How to see the ...; link remote in another room 52 Setting up a second room with sound 52 Bose® link compatible products simplify your decisions 53 Bose® link remote switch settings 53 Taking care of your LIFESTYLE® system 54 Troubleshooting 55 Contacting customer service 57 Limited warranty 57 Technical information 57 END...
Operating guide
Page 5
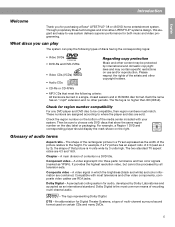
Through proprietary Bose technologies and innovative LIFESTYLE® systems design, this elegant and easy-to-use system delivers superior performance for Digital Theater Systems, a type of contents in ISO9660 ...logo representing Dolby Digital. Glossary of that meet the following types of encoding multi-channel audio. - Composite video - Check for purchasing a Bose® LIFESTYLE® 38 or 48 DVD home entertainment system. Compatible with your system. Dolby Digital is 4 units wide by Dolby Laboratories and accepted as an international standard. Dolby ...
Through proprietary Bose technologies and innovative LIFESTYLE® systems design, this elegant and easy-to-use system delivers superior performance for Digital Theater Systems, a type of contents in ISO9660 ...logo representing Dolby Digital. Glossary of that meet the following types of encoding multi-channel audio. - Composite video - Check for purchasing a Bose® LIFESTYLE® 38 or 48 DVD home entertainment system. Compatible with your system. Dolby Digital is 4 units wide by Dolby Laboratories and accepted as an international standard. Dolby ...


