
The Bose® Lifestyle® amplifier - Owner's guide
Page 4
...electrodes, and requirements for a Class B digital device, pursuant to an antenna discharge unit, size of grounding conductors, location of cable entry as per National Electrical Code, ANSI/NFPA 70. Antenna lead-in wire Information about products that interference will provide some protection ... interference to the antenna grounding illustration on this page. Ground All Outdoor Antennas - If an external antenna or cable system is practical. ©2001 Bose Corporation, The Mountain, Framingham, MA 01701-9168 USA 255805 AM Rev.00 JN10494 2b January 10, 2002 AM262840_00_V...
...electrodes, and requirements for a Class B digital device, pursuant to an antenna discharge unit, size of grounding conductors, location of cable entry as per National Electrical Code, ANSI/NFPA 70. Antenna lead-in wire Information about products that interference will provide some protection ... interference to the antenna grounding illustration on this page. Ground All Outdoor Antennas - If an external antenna or cable system is practical. ©2001 Bose Corporation, The Mountain, Framingham, MA 01701-9168 USA 255805 AM Rev.00 JN10494 2b January 10, 2002 AM262840_00_V...

The Bose® Lifestyle® amplifier - Owner's guide
Page 6
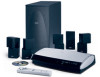
... way to use it. If any way. Figure 1 Contents of the shipping carton 30-ft audio input cable PN197406 Lifestyle® stereo amplifier Owner's guide Power cord* USA/Canada (120V) * The Lifestyle® stereo amplifier includes a 120V AC (mains) power cord for use in the USA and...bottom panel of the amplifier, and write it into an AC (mains) outlet until you can enjoy Bose quality sound and Lifestyle® system convenience in your product. Contact your Lifestyle® stereo amplifier includes the parts identified in Figure 1. Refer to see if you ...
... way to use it. If any way. Figure 1 Contents of the shipping carton 30-ft audio input cable PN197406 Lifestyle® stereo amplifier Owner's guide Power cord* USA/Canada (120V) * The Lifestyle® stereo amplifier includes a 120V AC (mains) power cord for use in the USA and...bottom panel of the amplifier, and write it into an AC (mains) outlet until you can enjoy Bose quality sound and Lifestyle® system convenience in your product. Contact your Lifestyle® stereo amplifier includes the parts identified in Figure 1. Refer to see if you ...

The Bose® Lifestyle® amplifier - Owner's guide
Page 7
...following guidelines when selecting a location for recommended mounting hardware. Setting Up Your Lifestyle® Stereo Amplifier Selecting a location for your Lifestyle® stereo amplifier Select a location for your Lifestyle® system or the accessory speakers, consider the following guidelines. The ampli... • Make sure that have hazards concealed behind them, such as the finished surface of the supplied 30-foot audio input cable. • Place the amplifier in an area where the maximum ambient temperature is neither designed nor tested for air fl...
...following guidelines when selecting a location for recommended mounting hardware. Setting Up Your Lifestyle® Stereo Amplifier Selecting a location for your Lifestyle® stereo amplifier Select a location for your Lifestyle® system or the accessory speakers, consider the following guidelines. The ampli... • Make sure that have hazards concealed behind them, such as the finished surface of the supplied 30-foot audio input cable. • Place the amplifier in an area where the maximum ambient temperature is neither designed nor tested for air fl...

The Bose® Lifestyle® amplifier - Owner's guide
Page 9
... the amplifier. 3. Insert the white RCA piggyback connector of the supplied cable into the R (right) INPUT jack of the multi-room interface (Figure 6). 2. Figure 6 Cable connections between a multi-room interface and the Lifestyle® stereo amplifier Lifestyle® stereo amplifier rear panel Multi-room interface rear panel 4 Ω...
... the amplifier. 3. Insert the white RCA piggyback connector of the supplied cable into the R (right) INPUT jack of the multi-room interface (Figure 6). 2. Figure 6 Cable connections between a multi-room interface and the Lifestyle® stereo amplifier Lifestyle® stereo amplifier rear panel Multi-room interface rear panel 4 Ω...

The Bose® Lifestyle® amplifier - Owner's guide
Page 11
... the R (right) INPUT jack of the media center (Figure 8). 2. Figure 8 Cable connections between the Lifestyle® media center and the Lifestyle® stereo amplifier Lifestyle® SA-1 stereo amplifier rear panel Lifestyle® media center rear panel 30-ft audio input cable (supplied) AM262840_00_V.pdf January 4, 2002 9 DO NOT plug the amplifier...
... the R (right) INPUT jack of the media center (Figure 8). 2. Figure 8 Cable connections between the Lifestyle® media center and the Lifestyle® stereo amplifier Lifestyle® SA-1 stereo amplifier rear panel Lifestyle® media center rear panel 30-ft audio input cable (supplied) AM262840_00_V.pdf January 4, 2002 9 DO NOT plug the amplifier...

The Bose® Lifestyle® amplifier - Owner's guide
Page 13
...panel of the amplifier. Setting Up Your Lifestyle® Stereo Amplifier Connecting the Lifestyle® stereo amplifier to a Model 20 music center ® Figure 10 Cable connections between the Model 20 music center and the Lifestyle® stereo amplifier CAUTION: Before making ...connections, turn the Lifestyle® system off and disconnect the music center from the AC (mains) ...
...panel of the amplifier. Setting Up Your Lifestyle® Stereo Amplifier Connecting the Lifestyle® stereo amplifier to a Model 20 music center ® Figure 10 Cable connections between the Model 20 music center and the Lifestyle® stereo amplifier CAUTION: Before making ...connections, turn the Lifestyle® system off and disconnect the music center from the AC (mains) ...

The Bose® Lifestyle® amplifier - Owner's guide
Page 15
...; system off and disconnect the music center from both FIXED OUTPUT jacks. 4. CAUTION: DO NOT connect the audio input cable for the Lifestyle® stereo amplifier to work properly with the fixed output level available from the FIXED OUTPUT jacks. 1. SPSEPAEKAEKREROOUUTPTUPUTSTS INPUT 3.5 ... you need to the FIXED OUTPUT jacks on the rear panel of the audio input cable, insert the 3.5 mm mini-plug into the white piggyback jack. Setting Up Your Lifestyle® Stereo Amplifier Connecting the Lifestyle® stereo amplifier to a Model 5 music center In systems using ...
...; system off and disconnect the music center from both FIXED OUTPUT jacks. 4. CAUTION: DO NOT connect the audio input cable for the Lifestyle® stereo amplifier to work properly with the fixed output level available from the FIXED OUTPUT jacks. 1. SPSEPAEKAEKREROOUUTPTUPUTSTS INPUT 3.5 ... you need to the FIXED OUTPUT jacks on the rear panel of the audio input cable, insert the 3.5 mm mini-plug into the white piggyback jack. Setting Up Your Lifestyle® Stereo Amplifier Connecting the Lifestyle® stereo amplifier to a Model 5 music center In systems using ...

The Bose® Lifestyle® amplifier - Owner's guide
Page 16
... to the SPEAKER OUTPUT R terminals (Figure 14). Be sure that it ) attaches to the cable connected to the positive (+ or red) terminal. One wire is connected to operate your Lifestyle® stereo amplifier. 1. The plain wire should be connected to the SPEAKER OUTPUT ... terminals in your first remote. 3. Remove the remote control battery cover and locate the miniature switches (Figure 13). 2. Setting Up Your Lifestyle® Stereo Amplifier ® Figure 13 RC-5 remote switch settings Setting up the RC-5 remote control If your system uses a Model 5 music...
... to the SPEAKER OUTPUT R terminals (Figure 14). Be sure that it ) attaches to the cable connected to the positive (+ or red) terminal. One wire is connected to operate your Lifestyle® stereo amplifier. 1. The plain wire should be connected to the SPEAKER OUTPUT ... terminals in your first remote. 3. Remove the remote control battery cover and locate the miniature switches (Figure 13). 2. Setting Up Your Lifestyle® Stereo Amplifier ® Figure 13 RC-5 remote switch settings Setting up the RC-5 remote control If your system uses a Model 5 music...

The Bose® Lifestyle® amplifier - Owner's guide
Page 18
...• See "Connecting speakers to your Bose dealer to the elements. If the problem still exists, contact your Lifestyle® stereo amplifier" on . • If using a Model 20 music center, make sure the amplifier audio input cable is plugged into any headphones. •...to be affected by exposure to arrange for home theater (Lifestyle® 12 or Lifestyle® 8 systems), make sure the audio input cable is inserted into SPEAKER ZONE 2. • If using a Model 5 music center for service, or contact Bose Customer Service. To clean the amplifier, use caulking...
...• See "Connecting speakers to your Bose dealer to the elements. If the problem still exists, contact your Lifestyle® stereo amplifier" on . • If using a Model 20 music center, make sure the amplifier audio input cable is plugged into any headphones. •...to be affected by exposure to arrange for home theater (Lifestyle® 12 or Lifestyle® 8 systems), make sure the audio input cable is inserted into SPEAKER ZONE 2. • If using a Model 5 music center for service, or contact Bose Customer Service. To clean the amplifier, use caulking...

The Bose® Lifestyle® amplifier - Owner's guide
Page 19
...an intentional action of the coverage are connected at the other cable from its speaker, and connect that end of the amplifier. Warranty period The Lifestyle® stereo amplifier is in solving problems, contact Bose® Customer Service. Please fill out the information... section of the problem. • Disconnect the same cable from that speaker and the amplifier. ...
...an intentional action of the coverage are connected at the other cable from its speaker, and connect that end of the amplifier. Warranty period The Lifestyle® stereo amplifier is in solving problems, contact Bose® Customer Service. Please fill out the information... section of the problem. • Disconnect the same cable from that speaker and the amplifier. ...
Owner's guide
Page 4
...Ground clamps Power service grounding electrode system (NEC ART 250, Part H) Note to CATV system installer This reminder is practical. ©2001 Bose Corporation, The Mountain, Framingham, MA 01701-9168 USA 255805 AM Rev.00 JN10494 2b Avoid Power Lines - Section 810 of the National ... electrodes, and requirements for proper grounding. Antenna grounding Example of the building, as contact with them may be sure the antenna or cable system is connected to the point of antenna-discharge unit, connection to the antenna grounding illustration on the product. 19. Ground All Outdoor...
...Ground clamps Power service grounding electrode system (NEC ART 250, Part H) Note to CATV system installer This reminder is practical. ©2001 Bose Corporation, The Mountain, Framingham, MA 01701-9168 USA 255805 AM Rev.00 JN10494 2b Avoid Power Lines - Section 810 of the National ... electrodes, and requirements for proper grounding. Antenna grounding Example of the building, as contact with them may be sure the antenna or cable system is connected to the point of antenna-discharge unit, connection to the antenna grounding illustration on the product. 19. Ground All Outdoor...

Owner's guide
Page 5
... Controlling external sources 18 Programming your LIFESTYLE® remote to control your TV 18 Programming your LIFESTYLE® remote to control your VCR 18 Programming your LIFESTYLE® remote to find ... Contents Where to control your cable/satellite box 19 Turning the system...cable/satellite box 20 Using the VCR sound source 20 Using a tape deck 20 Changing System Settings 21 Using the settings menus 21 Changing DVD play options 23 Changing CD settings 24 Changing FM settings 25 Changing AM settings 26 Changing TV/VCR/AUX/TAPE settings 27 Making audio adjustments 28...
... Controlling external sources 18 Programming your LIFESTYLE® remote to control your TV 18 Programming your LIFESTYLE® remote to control your VCR 18 Programming your LIFESTYLE® remote to find ... Contents Where to control your cable/satellite box 19 Turning the system...cable/satellite box 20 Using the VCR sound source 20 Using a tape deck 20 Changing System Settings 21 Using the settings menus 21 Changing DVD play options 23 Changing CD settings 24 Changing FM settings 25 Changing AM settings 26 Changing TV/VCR/AUX/TAPE settings 27 Making audio adjustments 28...

Owner's guide
Page 9
... (1) your TV's remote control must have two external inputs, one of buildings create "dead spots" where the remote will allow you connect to your cable box and the other to control your TV (if properly connected) as the sound source. The top of this button turns your AUX device on... On Off Turns the system on and selects the AUX input (such as cable box or satellite receiver) as the sound source. FM/AM Selects the built-in the current zone. Switches between these two inputs. Note: Your LIFESTYLE® remote can also move the media center a few feet to control ...
... (1) your TV's remote control must have two external inputs, one of buildings create "dead spots" where the remote will allow you connect to your cable box and the other to control your TV (if properly connected) as the sound source. The top of this button turns your AUX device on... On Off Turns the system on and selects the AUX input (such as cable box or satellite receiver) as the sound source. FM/AM Selects the built-in the current zone. Switches between these two inputs. Note: Your LIFESTYLE® remote can also move the media center a few feet to control ...

Owner's guide
Page 14
...you play a DVD video, all ZONE 1 speakers are muted. buttons on page 21. lowers it on with yellow connectors) or an S-video cable, you select FM, the front right and left speakers are turned on. See "Using the settings menus" on your remote. To change your...However, if you turn it . Using the sleep timer Your system includes a sleep timer which can be changed using a standard composite video cable (single cable with either On/Off button, the source that source is automatically determined. Making sound adjustments Volume System volume can be accessed through the settings menu...
...you play a DVD video, all ZONE 1 speakers are muted. buttons on page 21. lowers it on with yellow connectors) or an S-video cable, you select FM, the front right and left speakers are turned on. See "Using the settings menus" on your remote. To change your...However, if you turn it . Using the sleep timer Your system includes a sleep timer which can be changed using a standard composite video cable (single cable with either On/Off button, the source that source is automatically determined. Making sound adjustments Volume System volume can be accessed through the settings menu...

Owner's guide
Page 20
... the "Remote control setup submenu" on page 33. 1. Programming your LIFESTYLE® remote to control your TV If you can program it to operate your new LIFESTYLE® remote to control most brands of TVs, VCRs, and cable/satellite control boxes. TV Brand is shown. An infrared (IR) emitter... is included behind the media center display to communicate with your LIFESTYLE® remote control, you want to...
... the "Remote control setup submenu" on page 33. 1. Programming your LIFESTYLE® remote to control your TV If you can program it to operate your new LIFESTYLE® remote to control most brands of TVs, VCRs, and cable/satellite control boxes. TV Brand is shown. An infrared (IR) emitter... is included behind the media center display to communicate with your LIFESTYLE® remote control, you want to...

Owner's guide
Page 21
... Power Power lite box turns off your VCR off and on and selects the component connected to select cable or satellite. 7. Scroll down once more and select AUX Brand. on the LIFESTYLE® remote control to see if the VCR turns 9. If the system is shown. Press the Settings... button. 4. The first 4-digit device code is shown. 8. on the LIFESTYLE® remote control to see if the cable/satel- 10. Test each device code until you cannot turn off . If you find one that turns your system on...
... Power Power lite box turns off your VCR off and on and selects the component connected to select cable or satellite. 7. Scroll down once more and select AUX Brand. on the LIFESTYLE® remote control to see if the VCR turns 9. If the system is shown. Press the Settings... button. 4. The first 4-digit device code is shown. 8. on the LIFESTYLE® remote control to see if the cable/satel- 10. Test each device code until you cannot turn off . If you find one that turns your system on...

Owner's guide
Page 22
... record. 3. Play the source. Using the VCR sound source Press VCR on the remote or Source on the media center until VCR appears on the LIFESTYLE® remote control. 3. Set the tape deck to VCR or AUX. 8. Select System Setup and press Enter. 5. Press the Settings button again. 9. This turns your... system settings menu: 1. Select TV Tuner. 7. Choose the source (FM/AM, DVD/CD, or AUX) you will need to change TV channels using a VCR or a cable/satellite box instead of using a VCR or cable/satellite box You may want to record. 2.
... record. 3. Play the source. Using the VCR sound source Press VCR on the remote or Source on the media center until VCR appears on the LIFESTYLE® remote control. 3. Set the tape deck to VCR or AUX. 8. Select System Setup and press Enter. 5. Press the Settings button again. 9. This turns your... system settings menu: 1. Select TV Tuner. 7. Choose the source (FM/AM, DVD/CD, or AUX) you will need to change TV channels using a VCR or a cable/satellite box instead of using a VCR or cable/satellite box You may want to record. 2.

Owner's guide
Page 35
... / Code2 / etc. Press AUX Power to test. Press TV Power to the AUX input. VCR Brand: Brand1/Brand2/ etc. AUX Device: Cable / Satellite Chooses the type of the AUX component uses. Chooses the AUX component brand. AM259776_01_V.pdf October 30, 2001 33 Chooses the TV brand.... etc. Chooses the VCR brand. Changing System Settings Remote control setup submenu This menu allows you to program your LIFESTYLE® remote to operate your TV, VCR and cable/satellite box. TV Brand: Brand1/Brand2/ etc. Chooses the IR code that the remote control of device connected to...
... / Code2 / etc. Press AUX Power to test. Press TV Power to the AUX input. VCR Brand: Brand1/Brand2/ etc. AUX Device: Cable / Satellite Chooses the type of the AUX component uses. Chooses the AUX component brand. AM259776_01_V.pdf October 30, 2001 33 Chooses the TV brand.... etc. Chooses the VCR brand. Changing System Settings Remote control setup submenu This menu allows you to program your LIFESTYLE® remote to operate your TV, VCR and cable/satellite box. TV Brand: Brand1/Brand2/ etc. Chooses the IR code that the remote control of device connected to...
Owner's guide
Page 37
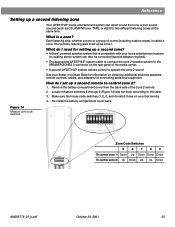
... system can also be connected (special adapter required). • The appropriate LIFESTYLE® system cable to connect the zone 2 speaker system to the SPEAKER ZONES 2 connector on obtaining additional powered speakers, remote controls, cables, and adapters for setting up a second zone? • A Bose® powered speaker system that is a zone? Make sure the house...
... system can also be connected (special adapter required). • The appropriate LIFESTYLE® system cable to connect the zone 2 speaker system to the SPEAKER ZONES 2 connector on obtaining additional powered speakers, remote controls, cables, and adapters for setting up a second zone? • A Bose® powered speaker system that is a zone? Make sure the house...

Owner's guide
Page 39
... on the remote and snap it is, press the Mute button on the remote control to unmute the sound. • Make sure the audio input cable is firmly seated in the media center SPEAKER ZONE 1 jack and the multi-pin connector on the other end is firmly seated in...
... on the remote and snap it is, press the Mute button on the remote control to unmute the sound. • Make sure the audio input cable is firmly seated in the media center SPEAKER ZONE 1 jack and the multi-pin connector on the other end is firmly seated in...


