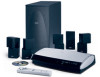
The Bose® Lifestyle® amplifier - Owner's guide
Page 2
... : POUR RÉDUIRE LE RISQUE DE DÉCHARGE ÉLECTRIQUE, NE PAS RETIRER LE COUVERCLE (OU L'ARRIÈRE). Bose, Acoustimass, Lifestyle, Personal and Wave are located on the system, is intended to alert the user to the presence of uninsulated dangerous voltage within an... a risk of important operating and maintenance instructions in this owner's guide carefully. It will help you set up and operate your owner's guide for future reference. ©2001 Bose Corporation. REFER SERVICING TO QUALIFIED PERSONNEL. S'ADRESSER À UN RÉPARATEUR COMPÉTENT These ...
... : POUR RÉDUIRE LE RISQUE DE DÉCHARGE ÉLECTRIQUE, NE PAS RETIRER LE COUVERCLE (OU L'ARRIÈRE). Bose, Acoustimass, Lifestyle, Personal and Wave are located on the system, is intended to alert the user to the presence of uninsulated dangerous voltage within an... a risk of important operating and maintenance instructions in this owner's guide carefully. It will help you set up and operate your owner's guide for future reference. ©2001 Bose Corporation. REFER SERVICING TO QUALIFIED PERSONNEL. S'ADRESSER À UN RÉPARATEUR COMPÉTENT These ...

The Bose® Lifestyle® amplifier - Owner's guide
Page 5
...Purchase date We suggest you have a dual voltage Lifestyle® amplifier 15 Powering-up the remote control 10 Setting Zone 2 Protocol 10 Connecting the Lifestyle® stereo amplifier to a Model 20 music center 11 Connecting the Lifestyle® stereo amplifier to a Model 5 music center... 13 Connecting speakers to your Lifestyle® stereo amplifier 14 Checking to a Lifestyle® media center 9 Setting up your system 15 Maintaining Your Lifestyle® Stereo Amplifier Cleaning the ...
...Purchase date We suggest you have a dual voltage Lifestyle® amplifier 15 Powering-up the remote control 10 Setting Zone 2 Protocol 10 Connecting the Lifestyle® stereo amplifier to a Model 20 music center 11 Connecting the Lifestyle® stereo amplifier to a Model 5 music center... 13 Connecting speakers to your Lifestyle® stereo amplifier 14 Checking to a Lifestyle® media center 9 Setting up your system 15 Maintaining Your Lifestyle® Stereo Amplifier Cleaning the ...

The Bose® Lifestyle® amplifier - Owner's guide
Page 6
We recommend saving all packing materials. Using the wrong voltage setting may need them later. Contact Bose Customer Service for your Lifestyle® stereo amplifier includes the parts identified in the appropriate blank on the rear... 120V power cord and a 230V plug adapter. Setting up your Lifestyle® Stereo Amplifier Before you begin Thank you for international use. The Lifestyle® stereo amplifier provides you with your Lifestyle® stereo amplifier. Bose proprietary Integrated Signal Processing technology, featured in any ...
We recommend saving all packing materials. Using the wrong voltage setting may need them later. Contact Bose Customer Service for your Lifestyle® stereo amplifier includes the parts identified in the appropriate blank on the rear... 120V power cord and a 230V plug adapter. Setting up your Lifestyle® Stereo Amplifier Before you begin Thank you for international use. The Lifestyle® stereo amplifier provides you with your Lifestyle® stereo amplifier. Bose proprietary Integrated Signal Processing technology, featured in any ...

The Bose® Lifestyle® amplifier - Owner's guide
Page 7
...or inside an entertainment center, maintain 2.0 inches (5.0 cm) minimum clearance (Figure 2) on all electrical equipment, it according to either your Lifestyle® system or the accessory speakers, consider the following guidelines. CAUTION: DO NOT mount the amplifier on surfaces that are not... Although the amplifier does not need to be placed indoors. Setting Up Your Lifestyle® Stereo Amplifier Selecting a location for your Lifestyle® stereo amplifier Select a location for your Lifestyle® stereo amplifier and mount it generates some heat. &#...
...or inside an entertainment center, maintain 2.0 inches (5.0 cm) minimum clearance (Figure 2) on all electrical equipment, it according to either your Lifestyle® system or the accessory speakers, consider the following guidelines. CAUTION: DO NOT mount the amplifier on surfaces that are not... Although the amplifier does not need to be placed indoors. Setting Up Your Lifestyle® Stereo Amplifier Selecting a location for your Lifestyle® stereo amplifier Select a location for your Lifestyle® stereo amplifier and mount it generates some heat. &#...
The Bose® Lifestyle® amplifier - Owner's guide
Page 8
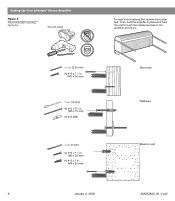
Then, hold the amplifier in place and mark the wall through the clearance holes in the amplifier enclosure. /3 32 in. (2.25 mm) (4) #10 x 11/2 in. (M5 x 36 mm) 1/2 in. (12 mm) (4) #10 x 21/2 in. (M5 x 75 mm) (4) #10 (M5) 1/4 in. (6 mm) (4) #10 x 11/2 in. (M5 x 36 mm) (4) #10 x 1 in. (M5 x 25 mm) Wood wall Wallboard Masonry wall 6 January 4, 2002 AM262840_00_V.pdf Setting Up Your Lifestyle® Stereo Amplifier Figure 5 Recommended mounting hardware You will need: To mark hole locations, first remove the rubber feet.
Then, hold the amplifier in place and mark the wall through the clearance holes in the amplifier enclosure. /3 32 in. (2.25 mm) (4) #10 x 11/2 in. (M5 x 36 mm) 1/2 in. (12 mm) (4) #10 x 21/2 in. (M5 x 75 mm) (4) #10 (M5) 1/4 in. (6 mm) (4) #10 x 11/2 in. (M5 x 36 mm) (4) #10 x 1 in. (M5 x 25 mm) Wood wall Wallboard Masonry wall 6 January 4, 2002 AM262840_00_V.pdf Setting Up Your Lifestyle® Stereo Amplifier Figure 5 Recommended mounting hardware You will need: To mark hole locations, first remove the rubber feet.

The Bose® Lifestyle® amplifier - Owner's guide
Page 9
... interface (Figure 6). 2. At the other connections. 1. Figure 6 Cable connections between a multi-room interface and the Lifestyle® stereo amplifier Lifestyle® stereo amplifier rear panel Multi-room interface rear panel 4 Ω MINIMUM LL R L SYSTEM RR... jack. SPSEPAEKAEKREROOUUTPTUPUTSTS INPUT 30-ft audio input cable (supplied) AM262840_00_V.pdf January 4, 2002 7 Setting Up Your Lifestyle® Stereo Amplifier Connecting the Lifestyle® stereo amplifier to a multi-room interface CAUTION: Before making any connections, turn the...
... interface (Figure 6). 2. At the other connections. 1. Figure 6 Cable connections between a multi-room interface and the Lifestyle® stereo amplifier Lifestyle® stereo amplifier rear panel Multi-room interface rear panel 4 Ω MINIMUM LL R L SYSTEM RR... jack. SPSEPAEKAEKREROOUUTPTUPUTSTS INPUT 30-ft audio input cable (supplied) AM262840_00_V.pdf January 4, 2002 7 Setting Up Your Lifestyle® Stereo Amplifier Connecting the Lifestyle® stereo amplifier to a multi-room interface CAUTION: Before making any connections, turn the...

The Bose® Lifestyle® amplifier - Owner's guide
Page 10
... are controlled by the ROOM or HOUSE button 8 January 4, 2002 AM262840_00_V.pdf Setting Up Your Lifestyle® Stereo Amplifier Figure 7 Sample display for more information on operating your system in more than one room of Bose® powered speakers placed in other rooms with room A being the primary room... (the one used for a one The room indicators tell you what was selected by the Personal music center which requires no internal switch settings before it allows you ...
... are controlled by the ROOM or HOUSE button 8 January 4, 2002 AM262840_00_V.pdf Setting Up Your Lifestyle® Stereo Amplifier Figure 7 Sample display for more information on operating your system in more than one room of Bose® powered speakers placed in other rooms with room A being the primary room... (the one used for a one The room indicators tell you what was selected by the Personal music center which requires no internal switch settings before it allows you ...

The Bose® Lifestyle® amplifier - Owner's guide
Page 11
... on the rear panel of the audio input cable into the L (left) INPUT jack. Setting Up Your Lifestyle® Stereo Amplifier Connecting the Lifestyle® stereo amplifier to a Lifestyle® media center CAUTION: Before making connections, turn the Lifestyle® system off and disconnect the media center from the AC (mains) power outlet...
... on the rear panel of the audio input cable into the L (left) INPUT jack. Setting Up Your Lifestyle® Stereo Amplifier Connecting the Lifestyle® stereo amplifier to a Lifestyle® media center CAUTION: Before making connections, turn the Lifestyle® system off and disconnect the media center from the AC (mains) power outlet...

The Bose® Lifestyle® amplifier - Owner's guide
Page 12
Setting Up Your Lifestyle® Stereo Amplifier Figure 9 Setting up a Zone 2 remote control Setting up the remote control You need to set up , and switches 6 and 9 are down through (2 or 3) to (3 of 3) is reset to Legacy mode. Make sure that the Zone 2 Protocol is Zone 2 Protocol. 4.... down -arrow button and select System Setup using Zone 2, shut off the system and turn it on operating your system in your Lifestyle® DVD system is on, press the Settings button on -screen display. 2. While your first remote. 3. Use the right-arrow button to change the protocol from Normal...
Setting Up Your Lifestyle® Stereo Amplifier Figure 9 Setting up a Zone 2 remote control Setting up the remote control You need to set up , and switches 6 and 9 are down through (2 or 3) to (3 of 3) is reset to Legacy mode. Make sure that the Zone 2 Protocol is Zone 2 Protocol. 4.... down -arrow button and select System Setup using Zone 2, shut off the system and turn it on operating your system in your Lifestyle® DVD system is on, press the Settings button on -screen display. 2. While your first remote. 3. Use the right-arrow button to change the protocol from Normal...

The Bose® Lifestyle® amplifier - Owner's guide
Page 13
...of the amplifier. SPEAKER OUTPUTS INPUT Model 20 music center rear panel 30-ft audio input cable (supplied) AM262840_00_V.pdf January 4, 2002 11 Lifestyle® stereo amplifier rear panel 4 Ω MINIMUM LL R L SYSTEM RR CONTROL L R +- At the other connections. 1. DO NOT...the rear panel of the audio input cable, insert the 3.5 mm mini-plug into the L (left) INPUT jack. Setting Up Your Lifestyle® Stereo Amplifier Connecting the Lifestyle® stereo amplifier to a Model 20 music center ® Figure 10 Cable connections between the Model 20 ...
...of the amplifier. SPEAKER OUTPUTS INPUT Model 20 music center rear panel 30-ft audio input cable (supplied) AM262840_00_V.pdf January 4, 2002 11 Lifestyle® stereo amplifier rear panel 4 Ω MINIMUM LL R L SYSTEM RR CONTROL L R +- At the other connections. 1. DO NOT...the rear panel of the audio input cable, insert the 3.5 mm mini-plug into the L (left) INPUT jack. Setting Up Your Lifestyle® Stereo Amplifier Connecting the Lifestyle® stereo amplifier to a Model 20 music center ® Figure 10 Cable connections between the Model 20 ...

The Bose® Lifestyle® amplifier - Owner's guide
Page 14
... control battery cover and locate the miniature switches (Figure 11). 2. Note: Refer to your Lifestyle® system owner's guide for Zone 2 If your first remote. 3. Setting Up Your Lifestyle® Stereo Amplifier Figure 11 Setting up a Zone 2 remote control Setting up the RC-20 remote control for more than one room. Slide switch 5 down...
... control battery cover and locate the miniature switches (Figure 11). 2. Note: Refer to your Lifestyle® system owner's guide for Zone 2 If your first remote. 3. Setting Up Your Lifestyle® Stereo Amplifier Figure 11 Setting up a Zone 2 remote control Setting up the RC-20 remote control for more than one room. Slide switch 5 down...

The Bose® Lifestyle® amplifier - Owner's guide
Page 15
...speakers from the FIXED OUTPUT jacks. 1. Insert the red RCA piggyback connector of the supplied cable into the white piggyback jack. When adding the Lifestyle® amplifier, you have completed all other end of the audio input cable, insert the 3.5 mm mini-plug into the SYSTEM... the white RCA piggyback connector into the multi-pin INPUT jack on the rear of the amplifier (Figure 12). 2. Setting Up Your Lifestyle® Stereo Amplifier Connecting the Lifestyle® stereo amplifier to a Model 5 music center In systems using a Model 5 music center, home theater speakers...
...speakers from the FIXED OUTPUT jacks. 1. Insert the red RCA piggyback connector of the supplied cable into the white piggyback jack. When adding the Lifestyle® amplifier, you have completed all other end of the audio input cable, insert the 3.5 mm mini-plug into the SYSTEM... the white RCA piggyback connector into the multi-pin INPUT jack on the rear of the amplifier (Figure 12). 2. Setting Up Your Lifestyle® Stereo Amplifier Connecting the Lifestyle® stereo amplifier to a Model 5 music center In systems using a Model 5 music center, home theater speakers...

The Bose® Lifestyle® amplifier - Owner's guide
Page 16
... cable connections on the left in the listening area (as you need to set up (on operating your system in more than one room. Setting Up Your Lifestyle® Stereo Amplifier ® Figure 13 RC-5 remote switch settings Setting up the RC-5 remote control If your system uses a Model 5 music ...connected to the negative (- Make sure that it ) attaches to the cable connected to the L output. Doing so may cause damage to your Lifestyle® system owner's guide for more information on ). Remove the remote control battery cover and locate the miniature switches (Figure 13). 2. ON...
... cable connections on the left in the listening area (as you need to set up (on operating your system in more than one room. Setting Up Your Lifestyle® Stereo Amplifier ® Figure 13 RC-5 remote switch settings Setting up the RC-5 remote control If your system uses a Model 5 music ...connected to the negative (- Make sure that it ) attaches to the cable connected to the L output. Doing so may cause damage to your Lifestyle® system owner's guide for more information on ). Remove the remote control battery cover and locate the miniature switches (Figure 13). 2. ON...

The Bose® Lifestyle® amplifier - Owner's guide
Page 17
...small connector on one end of the amplifier (Figure 16). 2. Figure 15 Setting the voltage selection switch to 115V Powering-up your unit has this switch to the 115V position. If you have a dual voltage Lifestyle® amplifier • Dual voltage units have a voltage selection switch on ...er to 115V (North America), slide this switch. • This switch is a power switch on the rear panel of the amplifier. 115 V Setting Up Your Lifestyle® Stereo Amplifier Checking to see if your system CAUTION: DO NOT plug the AC power cord into the AC power jack on the...
...small connector on one end of the amplifier (Figure 16). 2. Figure 15 Setting the voltage selection switch to 115V Powering-up your unit has this switch to the 115V position. If you have a dual voltage Lifestyle® amplifier • Dual voltage units have a voltage selection switch on ...er to 115V (North America), slide this switch. • This switch is a power switch on the rear panel of the amplifier. 115 V Setting Up Your Lifestyle® Stereo Amplifier Checking to see if your system CAUTION: DO NOT plug the AC power cord into the AC power jack on the...

The Bose® Lifestyle® amplifier - Owner's guide
Page 18
...; 12 or Lifestyle® 8 systems), make sure the audio input cable is inserted into any headphones. • Make sure the remote control switch settings are in working order. • Be sure a music source is commonly available at both ends. • See "Connecting speakers to spill... stereo amplifier, follow the guidelines below. If the problem still exists, contact your Lifestyle® stereo amplifier" on . • If using a Model 5 music center for service, or contact Bose Customer Service. To clean the amplifier, use a silicone caulking material, such as ...
...; 12 or Lifestyle® 8 systems), make sure the audio input cable is inserted into any headphones. • Make sure the remote control switch settings are in working order. • Be sure a music source is commonly available at both ends. • See "Connecting speakers to spill... stereo amplifier, follow the guidelines below. If the problem still exists, contact your Lifestyle® stereo amplifier" on . • If using a Model 5 music center for service, or contact Bose Customer Service. To clean the amplifier, use a silicone caulking material, such as ...

The Bose® Lifestyle® amplifier - Owner's guide
Page 19
If the speaker does not play , the problem is in the speaker. Bass or treble is covered by the Bose limited one-year transferable warranty. to -. • See "Connecting speakers to your Lifestyle® DVD system's owners guide. Check to be sure the cable connected to the SPEAKER OUTPUTS R at the amplifi... was connected to that end of the card and mail it to the other end to the speaker on the right in the system settings menu is set too high and is firmly inserted in that speaker and the amplifier. For more informa- Refer to the address list enclosed...
If the speaker does not play , the problem is in the speaker. Bass or treble is covered by the Bose limited one-year transferable warranty. to -. • See "Connecting speakers to your Lifestyle® DVD system's owners guide. Check to be sure the cable connected to the SPEAKER OUTPUTS R at the amplifi... was connected to that end of the card and mail it to the other end to the speaker on the right in the system settings menu is set too high and is firmly inserted in that speaker and the amplifier. For more informa- Refer to the address list enclosed...
Owner's guide
Page 2
... that is a trademark of the Canadian Interference-Causing Equipment Regulations. It will help you set up and operate your owner's guide for home and other intellectual property rights owned by ...guide carefully. "Dolby" and the double-D symbol are located on the enclosure of your LIFESTYLE® media center and on the system, is intended to alert the user to the ... The exclamation point within an equilateral triangle, is intended for future reference. ©2001 Bose Corporation. The CLASS 1 LASER PRODUCT label is located on the Important Safety Information sheet ...
... that is a trademark of the Canadian Interference-Causing Equipment Regulations. It will help you set up and operate your owner's guide for home and other intellectual property rights owned by ...guide carefully. "Dolby" and the double-D symbol are located on the enclosure of your LIFESTYLE® media center and on the system, is intended to alert the user to the ... The exclamation point within an equilateral triangle, is intended for future reference. ©2001 Bose Corporation. The CLASS 1 LASER PRODUCT label is located on the Important Safety Information sheet ...

Owner's guide
Page 5
... Using a tape deck 20 Changing System Settings 21 Using the settings menus 21 Changing DVD play options 23 Changing CD settings 24 Changing FM settings 25 Changing AM settings 26 Changing TV/VCR/AUX/TAPE settings 27 Making audio adjustments 28 Changing the system setup 30 AM259776_01_V.pdf ... radio on 16 Tuning 16 Setting a station preset 16 Erasing a station preset 17 Selecting a preset station 17 Playing External Sources 18 Controlling external sources 18 Programming your LIFESTYLE® remote to control your TV 18 Programming your LIFESTYLE® remote to control your...
... Using a tape deck 20 Changing System Settings 21 Using the settings menus 21 Changing DVD play options 23 Changing CD settings 24 Changing FM settings 25 Changing AM settings 26 Changing TV/VCR/AUX/TAPE settings 27 Making audio adjustments 28 Changing the system setup 30 AM259776_01_V.pdf ... radio on 16 Tuning 16 Setting a station preset 16 Erasing a station preset 17 Selecting a preset station 17 Playing External Sources 18 Controlling external sources 18 Programming your LIFESTYLE® remote to control your TV 18 Programming your LIFESTYLE® remote to control your...
Owner's guide
Page 6
Contents Reference 34 Changing the house code settings 34 Setting up a second listening zone 35 Taking care of your LIFESTYLE® system 36 Replacing the remote control batteries 37 Troubleshooting 37 Technical information 40 Accessories 41 Warranty period 41 Contacting customer service 41 4 October 30, 2001 AM259776_01_V.pdf
Contents Reference 34 Changing the house code settings 34 Setting up a second listening zone 35 Taking care of your LIFESTYLE® system 36 Replacing the remote control batteries 37 Troubleshooting 37 Technical information 40 Accessories 41 Warranty period 41 Contacting customer service 41 4 October 30, 2001 AM259776_01_V.pdf

Owner's guide
Page 7
... DISPLAY items are allocated to DVD players according to -use system. It is 4 units wide by that will be used in a TV set. Our standard TV picture, in terminology used by 3 units high, or 4:3 (read through this guide Operating instructions include names of buttons on... in this manual and familiarize yourself with the features of the media center. AM259776_01_V.pdf October 30, 2001 5 Through proprietary Bose technologies and innovative LIFESTYLE® systems design, it delivers superior performance for the region number marked on the carton or on the media center display....
... DISPLAY items are allocated to DVD players according to -use system. It is 4 units wide by that will be used in a TV set. Our standard TV picture, in terminology used by 3 units high, or 4:3 (read through this guide Operating instructions include names of buttons on... in this manual and familiarize yourself with the features of the media center. AM259776_01_V.pdf October 30, 2001 5 Through proprietary Bose technologies and innovative LIFESTYLE® systems design, it delivers superior performance for the region number marked on the carton or on the media center display....


