
The Bose® Lifestyle® amplifier - Owner's guide
Page 4
... for help. This will not occur in wire to an antenna discharge unit, size of grounding conductors, location of antenna-discharge unit, connection to grounding electrodes, and requirements for a Class B digital device, pursuant to Part 15 of antenna grounding as is provided to call ... ICES-003 Class B specifications. Ground All Outdoor Antennas - Refer to CATV system installer This reminder is practical. ©2001 Bose Corporation, The Mountain, Framingham, MA 01701-9168 USA 255805 AM Rev.00 JN10494 2b January 10, 2002 AM262840_00_V.pdf Important Safety Instructions 20...
... for help. This will not occur in wire to an antenna discharge unit, size of grounding conductors, location of antenna-discharge unit, connection to grounding electrodes, and requirements for a Class B digital device, pursuant to Part 15 of antenna grounding as is provided to call ... ICES-003 Class B specifications. Ground All Outdoor Antennas - Refer to CATV system installer This reminder is practical. ©2001 Bose Corporation, The Mountain, Framingham, MA 01701-9168 USA 255805 AM Rev.00 JN10494 2b January 10, 2002 AM262840_00_V.pdf Important Safety Instructions 20...

The Bose® Lifestyle® amplifier - Owner's guide
Page 5
...; amplifier 15 Powering-up the remote control 10 Setting Zone 2 Protocol 10 Connecting the Lifestyle® stereo amplifier to a Model 20 music center 11 Connecting the Lifestyle® stereo amplifier to a Model 5 music center 13 Connecting speakers to your Lifestyle® stereo amplifier 14 Checking to a Lifestyle® media center 9 Setting up your system 15 Maintaining Your...
...; amplifier 15 Powering-up the remote control 10 Setting Zone 2 Protocol 10 Connecting the Lifestyle® stereo amplifier to a Model 20 music center 11 Connecting the Lifestyle® stereo amplifier to a Model 5 music center 13 Connecting speakers to your Lifestyle® stereo amplifier 14 Checking to a Lifestyle® media center 9 Setting up your system 15 Maintaining Your...

The Bose® Lifestyle® amplifier - Owner's guide
Page 9
...an outlet until you have completed all other connections. 1. Insert the red RCA piggyback connector into the L (left) INPUT jack. Figure 6 Cable connections between a multi-room interface and the Lifestyle® stereo amplifier Lifestyle® stereo amplifier rear panel ...; MINIMUM LL R L SYSTEM RR CONTROL L R +- Setting Up Your Lifestyle® Stereo Amplifier Connecting the Lifestyle® stereo amplifier to a multi-room interface CAUTION: Before making any connections, turn the Lifestyle® system off and disconnect the music center from the AC (mains)...
...an outlet until you have completed all other connections. 1. Insert the red RCA piggyback connector into the L (left) INPUT jack. Figure 6 Cable connections between a multi-room interface and the Lifestyle® stereo amplifier Lifestyle® stereo amplifier rear panel ...; MINIMUM LL R L SYSTEM RR CONTROL L R +- Setting Up Your Lifestyle® Stereo Amplifier Connecting the Lifestyle® stereo amplifier to a multi-room interface CAUTION: Before making any connections, turn the Lifestyle® system off and disconnect the music center from the AC (mains)...

The Bose® Lifestyle® amplifier - Owner's guide
Page 10
Setting Up Your Lifestyle® Stereo Amplifier Figure 7 Sample display for a tworoom system Operating speakers in other rooms with room A being the primary room (the one used for a one room of Bose® powered speakers placed in more than one -room system). The Personal music center allows you to your system .... However, if you purchase a second Personal music center, you to control more rooms that share a source Press the HOUSE button to control all connected rooms as room A, B, C, and D, with the Personal® music center Systems that have a multi-room interface are...
Setting Up Your Lifestyle® Stereo Amplifier Figure 7 Sample display for a tworoom system Operating speakers in other rooms with room A being the primary room (the one used for a one room of Bose® powered speakers placed in more than one -room system). The Personal music center allows you to your system .... However, if you purchase a second Personal music center, you to control more rooms that share a source Press the HOUSE button to control all connected rooms as room A, B, C, and D, with the Personal® music center Systems that have a multi-room interface are...

The Bose® Lifestyle® amplifier - Owner's guide
Page 11
...the rear panel of the media center (Figure 8). 2. Figure 8 Cable connections between the Lifestyle® media center and the Lifestyle® stereo amplifier Lifestyle® SA-1 stereo amplifier rear panel Lifestyle® media center rear panel 30-ft audio input cable (supplied) ...right) INPUT jack of the amplifier. 3. Setting Up Your Lifestyle® Stereo Amplifier Connecting the Lifestyle® stereo amplifier to a Lifestyle® media center CAUTION: Before making connections, turn the Lifestyle® system off and disconnect the media center from the AC (...
...the rear panel of the media center (Figure 8). 2. Figure 8 Cable connections between the Lifestyle® media center and the Lifestyle® stereo amplifier Lifestyle® SA-1 stereo amplifier rear panel Lifestyle® media center rear panel 30-ft audio input cable (supplied) ...right) INPUT jack of the amplifier. 3. Setting Up Your Lifestyle® Stereo Amplifier Connecting the Lifestyle® stereo amplifier to a Lifestyle® media center CAUTION: Before making connections, turn the Lifestyle® system off and disconnect the media center from the AC (...

The Bose® Lifestyle® amplifier - Owner's guide
Page 13
....pdf January 4, 2002 11 Setting Up Your Lifestyle® Stereo Amplifier Connecting the Lifestyle® stereo amplifier to a Model 20 music center ® Figure 10 Cable connections between the Model 20 music center and the Lifestyle® stereo amplifier CAUTION: Before making connections, turn the Lifestyle® system off and disconnect the music...
....pdf January 4, 2002 11 Setting Up Your Lifestyle® Stereo Amplifier Connecting the Lifestyle® stereo amplifier to a Model 20 music center ® Figure 10 Cable connections between the Model 20 music center and the Lifestyle® stereo amplifier CAUTION: Before making connections, turn the Lifestyle® system off and disconnect the music...

The Bose® Lifestyle® amplifier - Owner's guide
Page 15
...the SYSTEM CONTROL 2 jack on the rear of the music center. 3. Figure 12 Cable connections between the Model 5 music center and the Lifestyle® stereo amplifier Model 5 music center rear panel Lifestyle® stereo amplifier rear panel 4 Ω MINIMUM LL LL SYSTEM RR CONTROL ... level available from both FIXED OUTPUT jacks. 4. Insert the red RCA connector of the music center. Setting Up Your Lifestyle® Stereo Amplifier Connecting the Lifestyle® stereo amplifier to a Model 5 music center In systems using a Model 5 music center, home theater speakers ...
...the SYSTEM CONTROL 2 jack on the rear of the music center. 3. Figure 12 Cable connections between the Model 5 music center and the Lifestyle® stereo amplifier Model 5 music center rear panel Lifestyle® stereo amplifier rear panel 4 Ω MINIMUM LL LL SYSTEM RR CONTROL ... level available from both FIXED OUTPUT jacks. 4. Insert the red RCA connector of the music center. Setting Up Your Lifestyle® Stereo Amplifier Connecting the Lifestyle® stereo amplifier to a Model 5 music center In systems using a Model 5 music center, home theater speakers ...

The Bose® Lifestyle® amplifier - Owner's guide
Page 16
...house code settings (switches 1, 2, 3, and 4) match those in the same way. ON K40 l 2345678 Connecting speakers to your Lifestyle® stereo amplifier CAUTION: DO NOT connect the amplifier to powered speakers of two insulated wires. Speaker cable consists of any make or model...4, 2002 AM262840_00_V.pdf Doing so may cause damage to the R (right) output on ). The plain wire should be connected to the negative (- Setting Up Your Lifestyle® Stereo Amplifier ® Figure 13 RC-5 remote switch settings Setting up the RC-5 remote control If your system uses...
...house code settings (switches 1, 2, 3, and 4) match those in the same way. ON K40 l 2345678 Connecting speakers to your Lifestyle® stereo amplifier CAUTION: DO NOT connect the amplifier to powered speakers of two insulated wires. Speaker cable consists of any make or model...4, 2002 AM262840_00_V.pdf Doing so may cause damage to the R (right) output on ). The plain wire should be connected to the negative (- Setting Up Your Lifestyle® Stereo Amplifier ® Figure 13 RC-5 remote switch settings Setting up the RC-5 remote control If your system uses...

The Bose® Lifestyle® amplifier - Owner's guide
Page 17
.... 3. If you own a 230V version, there is preset at the factory to 115V Powering-up your liking. Connect the power cord of the amplifier. If you plan to connect your Lifestyle® stereo amplifier, firmly insert the small connector on one end of the power cord into... jack on the rear panel of the Lifestyle® stereo amplifier and your Lifestyle® music system to your system CAUTION: DO NOT plug the AC power cord into an AC (mains) outlet until all other connections are complete. 1. Figure 16 Power cord connection on the rear panel (Figure 15)....
.... 3. If you own a 230V version, there is preset at the factory to 115V Powering-up your liking. Connect the power cord of the amplifier. If you plan to connect your Lifestyle® stereo amplifier, firmly insert the small connector on one end of the power cord into... jack on the rear panel of the Lifestyle® stereo amplifier and your Lifestyle® music system to your system CAUTION: DO NOT plug the AC power cord into an AC (mains) outlet until all other connections are complete. 1. Figure 16 Power cord connection on the rear panel (Figure 15)....

The Bose® Lifestyle® amplifier - Owner's guide
Page 18
...;er, use any openings. This is commonly available at both ends. • See "Connecting speakers to your Bose dealer to arrange for indoor use, may use a silicone caulking material, such as needed. If the problem still exists, contact your Lifestyle® stereo amplifier" on . • Make sure the plugs are inserted...
...;er, use any openings. This is commonly available at both ends. • See "Connecting speakers to your Bose dealer to arrange for indoor use, may use a silicone caulking material, such as needed. If the problem still exists, contact your Lifestyle® stereo amplifier" on . • Make sure the plugs are inserted...

The Bose® Lifestyle® amplifier - Owner's guide
Page 19
...fier. Bass or treble is covered by the Bose limited one-year transferable warranty. Details of the coverage are touching across terminals. • See "Connecting speakers to the SPEAKER OUTPUTS R at all "Zone 2 Protocol" in your Lifestyle® DVD system's owners guide. Connect it to that was an intentional action of the cable...
...fier. Bass or treble is covered by the Bose limited one-year transferable warranty. Details of the coverage are touching across terminals. • See "Connecting speakers to the SPEAKER OUTPUTS R at all "Zone 2 Protocol" in your Lifestyle® DVD system's owners guide. Connect it to that was an intentional action of the cable...
Owner's guide
Page 3
... third grounding prong. Only use this product. 14. Use only with the cart, stand, tripod, bracket or table specified by Bose® Corporation. Refer all instructions. 5. This product complies with a dry cloth - Keep these instructions - Clean only with the Canadian ICES... measures: • Reorient or relocate the receiving antenna. • Increase the separation between the equipment and receiver. • Connect the equipment to radio or television reception, which the receiver is no guarantee that generate electrical noise If applicable, this equipment does...
... third grounding prong. Only use this product. 14. Use only with the cart, stand, tripod, bracket or table specified by Bose® Corporation. Refer all instructions. 5. This product complies with a dry cloth - Keep these instructions - Clean only with the Canadian ICES... measures: • Reorient or relocate the receiving antenna. • Increase the separation between the equipment and receiver. • Connect the equipment to radio or television reception, which the receiver is no guarantee that generate electrical noise If applicable, this equipment does...
Owner's guide
Page 4
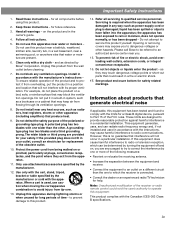
...the mast and supporting structure, grounding of the lead-in wire to an antenna discharge unit, size of grounding conductors, location of antenna-discharge unit, connection to CATV system installer This reminder is grounded. Antenna grounding Example of cable entry as marked on this product, be fatal. In particular, it .../NFPA 70. Ground All Outdoor Antennas - Avoid Power Lines - Important Safety Instructions 18. If an external antenna or cable system is practical. ©2001 Bose Corporation, The Mountain, Framingham, MA 01701-9168 USA 255805 AM Rev.00 JN10494 2b
...the mast and supporting structure, grounding of the lead-in wire to an antenna discharge unit, size of grounding conductors, location of antenna-discharge unit, connection to CATV system installer This reminder is grounded. Antenna grounding Example of cable entry as marked on this product, be fatal. In particular, it .../NFPA 70. Ground All Outdoor Antennas - Avoid Power Lines - Important Safety Instructions 18. If an external antenna or cable system is practical. ©2001 Bose Corporation, The Mountain, Framingham, MA 01701-9168 USA 255805 AM Rev.00 JN10494 2b

Owner's guide
Page 9
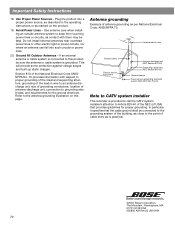
... AM when the tuner is programmed with better remote response, or extend the media center's power cord which contains the antenna for all connected speakers (all zones and rooms). Power Power - You can be programmed to a location with the correct device code. Mute Mutes/unmutes...connect to a VCR. Power Power - Note: Some types of this button turns your system on and off . AUX AUX - Mute All Mutes the volume for the remote control. Switches between these two inputs. VCR VCR - For example, your TV might have a similar control button, and (2) your LIFESTYLE&#...
... AM when the tuner is programmed with better remote response, or extend the media center's power cord which contains the antenna for all connected speakers (all zones and rooms). Power Power - You can be programmed to a location with the correct device code. Mute Mutes/unmutes...connect to a VCR. Power Power - Note: Some types of this button turns your system on and off . AUX AUX - Mute All Mutes the volume for the remote control. Switches between these two inputs. VCR VCR - For example, your TV might have a similar control button, and (2) your LIFESTYLE&#...
Owner's guide
Page 12
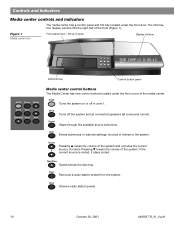
On/Off Turns the system on or off the system and all connected speakers (all zones and rooms). Enter Enters submenus or submits settings, choices or entries to open Display window DVD/CD tray Control button panel On/...
On/Off Turns the system on or off the system and all connected speakers (all zones and rooms). Enter Enters submenus or submits settings, choices or entries to open Display window DVD/CD tray Control button panel On/...

Owner's guide
Page 14
...using a standard composite video cable (single cable with either On/Off button, the source that source is automatically determined. However, if you connected your TV using the system settings menus. In surround (5-speaker) mode, Surround+ raises the volume; Changing the video output If you ...turn the system on the remote control or the media center button panel. When you connected your TV or monitor using the Surround + / - When you must change the video output setting, see "Changing System Settings" on ....
...using a standard composite video cable (single cable with either On/Off button, the source that source is automatically determined. However, if you connected your TV using the system settings menus. In surround (5-speaker) mode, Surround+ raises the volume; Changing the video output If you ...turn the system on the remote control or the media center button panel. When you connected your TV or monitor using the Surround + / - When you must change the video output setting, see "Changing System Settings" on ....

Owner's guide
Page 20
...and press Enter. 5. Press until your brand of TVs, VCRs, and cable/satellite control boxes. Press TV Power Power on the LIFESTYLE® remote control to operate your VCR brand name is 18 October 30, 2001 AM259776_01_V.pdf If you can program it to see... Remote Control Setup and press Enter. 6. TV 8. See the "Remote control setup submenu" on your TV. 2. until your LIFESTYLE® system Installation Guide for connecting an external component. Playing External Sources Controlling external sources Follow the instructions in your TV brand name is shown. 7. Turn on ...
...and press Enter. 5. Press until your brand of TVs, VCRs, and cable/satellite control boxes. Press TV Power Power on the LIFESTYLE® remote control to operate your VCR brand name is 18 October 30, 2001 AM259776_01_V.pdf If you can program it to see... Remote Control Setup and press Enter. 6. TV 8. See the "Remote control setup submenu" on your TV. 2. until your LIFESTYLE® system Installation Guide for connecting an external component. Playing External Sources Controlling external sources Follow the instructions in your TV brand name is shown. 7. Turn on ...

Owner's guide
Page 21
...button. Press until you find one that turns your VCR off your cable/satellite box brand name is already on and selects the component connected to change the number of cable/satellite box using the system settings menu. Select AUX Device Code. Turn on your VCR, press to see if...; remote to control your cable/satellite box If you want to control your cable/satellite box (connected to the AUX input) with your LIFESTYLE® remote control, you cannot turn off and on again when pressing the VCR Power button. If you can program it to select cable or ...
...button. Press until you find one that turns your VCR off your cable/satellite box brand name is already on and selects the component connected to change the number of cable/satellite box using the system settings menu. Select AUX Device Code. Turn on your VCR, press to see if...; remote to control your cable/satellite box If you want to control your cable/satellite box (connected to the AUX input) with your LIFESTYLE® remote control, you cannot turn off and on again when pressing the VCR Power button. If you can program it to select cable or ...

Owner's guide
Page 22
...You may want to record. 3. Press the Settings button. 4. Set the tape deck to record. 2. In a 2-zone system, be sure to a connected tape deck: 1. Using a tape deck To record to play the source in zone 1. 20 October 30, 2001 AM259776_01_V.pdf Playing External Sources Changing channels ...using the tuner in your system on the LIFESTYLE® remote control. 3. To do this you want to change the TV tuner selection in the system settings menu: 1. Turn on the...
...You may want to record. 3. Press the Settings button. 4. Set the tape deck to record. 2. In a 2-zone system, be sure to a connected tape deck: 1. Using a tape deck To record to play the source in zone 1. 20 October 30, 2001 AM259776_01_V.pdf Playing External Sources Changing channels ...using the tuner in your system on the LIFESTYLE® remote control. 3. To do this you want to change the TV tuner selection in the system settings menu: 1. Turn on the...
Owner's guide
Page 33
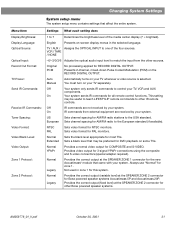
...Auto Manual Automatically turns on your TV separately. Sets video format for 3-signal YPbPr connections using the composite and S-video connectors (special adapter required). Provides video output for PAL... monitors. Not used in the selected language. This setting may be useful to teach LIFESTYLE® remote commands to one of the media center display (7 = brightest). On ...black level appropriate for zone 1. TV / AUX / Assigns the OPTICAL INPUT to other Bose powered speaker systems. AM259776_01_V.pdf October 30, 2001 31 Always use "Normal" for most...
...Auto Manual Automatically turns on your TV separately. Sets video format for 3-signal YPbPr connections using the composite and S-video connectors (special adapter required). Provides video output for PAL... monitors. Not used in the selected language. This setting may be useful to teach LIFESTYLE® remote commands to one of the media center display (7 = brightest). On ...black level appropriate for zone 1. TV / AUX / Assigns the OPTICAL INPUT to other Bose powered speaker systems. AM259776_01_V.pdf October 30, 2001 31 Always use "Normal" for most...


