
The Bose® Lifestyle® amplifier - Owner's guide
Page 4
.... If an external antenna or cable system is connected to this product, be determined by one or more of the receiver or radio remote control could void the user's authority to operate this is no guarantee that the cable ground shall be connected to the grounding system of the building, as close to radio or television reception, which the receiver is practical. ©2001 Bose Corporation, The...
.... If an external antenna or cable system is connected to this product, be determined by one or more of the receiver or radio remote control could void the user's authority to operate this is no guarantee that the cable ground shall be connected to the grounding system of the building, as close to radio or television reception, which the receiver is practical. ©2001 Bose Corporation, The...

The Bose® Lifestyle® amplifier - Owner's guide
Page 6
... NOT plug it in your yard, patio, swimming deck, garage, or utility room. Using the wrong voltage setting may need them later. See "Checking to your product. Contact your Lifestyle® system. Refer to see if you check the position of the voltage selection switch on the rear panel of the shipping carton 30-ft audio input cable PN197406 Lifestyle® stereo amplifier Owner's guide Power cord...
... NOT plug it in your yard, patio, swimming deck, garage, or utility room. Using the wrong voltage setting may need them later. See "Checking to your product. Contact your Lifestyle® system. Refer to see if you check the position of the voltage selection switch on the rear panel of the shipping carton 30-ft audio input cable PN197406 Lifestyle® stereo amplifier Owner's guide Power cord...

The Bose® Lifestyle® amplifier - Owner's guide
Page 12
... System Setup using Zone 2, shut off the system and turn it on -screen display. 2. While your remote control. Use the right-arrow button to change the protocol from Normal to Legacy. 5. Scroll down with a Lifestyle® media center, you will now see a menu entitled System Setup (1 of 3). On Off Mute All Mute SOURCE / INPUT CD/DVD Changer FM/AM TV VCR AUX MENU / NAVIGATION Settings Tune Disc Seek Enter Channel Chapter Preset Track Volume 1 2 3 4 5 6 7 8 9 0 PLAYBACK Stop Pause Play Shuffle Repeat Settings Settings ( ) System Setup Enter System Setup...
... System Setup using Zone 2, shut off the system and turn it on -screen display. 2. While your remote control. Use the right-arrow button to change the protocol from Normal to Legacy. 5. Scroll down with a Lifestyle® media center, you will now see a menu entitled System Setup (1 of 3). On Off Mute All Mute SOURCE / INPUT CD/DVD Changer FM/AM TV VCR AUX MENU / NAVIGATION Settings Tune Disc Seek Enter Channel Chapter Preset Track Volume 1 2 3 4 5 6 7 8 9 0 PLAYBACK Stop Pause Play Shuffle Repeat Settings Settings ( ) System Setup Enter System Setup...

The Bose® Lifestyle® amplifier - Owner's guide
Page 13
Setting Up Your Lifestyle® Stereo Amplifier Connecting the Lifestyle® stereo amplifier to a Model 20 music center ® Figure 10 Cable connections between the Model 20 music center and the Lifestyle® stereo amplifier CAUTION: Before making connections, turn the Lifestyle® system off and disconnect the music center from the AC (mains) power outlet. Insert the single multi-pin connector at one end of the audio input cable into the SPEAKER ZONES 2 output jack on the rear panel of the...
Setting Up Your Lifestyle® Stereo Amplifier Connecting the Lifestyle® stereo amplifier to a Model 20 music center ® Figure 10 Cable connections between the Model 20 music center and the Lifestyle® stereo amplifier CAUTION: Before making connections, turn the Lifestyle® system off and disconnect the music center from the AC (mains) power outlet. Insert the single multi-pin connector at one end of the audio input cable into the SPEAKER ZONES 2 output jack on the rear panel of the...

The Bose® Lifestyle® amplifier - Owner's guide
Page 15
... mm mini-plug L R A B SPEAKERS OUTPUT FIXED REC PLAY AUX TAPE INPUT L R VIDEO SOUND AM LOOP 1 SYSTEM CONTROL 2 ~ POWER 12VAC IN 1.0A ANTENNA SEE INSTRUCTION MANUAL Fixed speaker outputs 30-ft audio input cable (supplied) Acoustimass module cable AM262840_00_V.pdf January 4, 2002 13 When adding the Lifestyle® amplifier, you have completed all other end of the audio input cable, insert the 3.5 mm mini-plug into the SYSTEM CONTROL 2 jack on the rear panel of the Acoustimass® module cable into the red piggyback jack and the white RCA connector into...
... mm mini-plug L R A B SPEAKERS OUTPUT FIXED REC PLAY AUX TAPE INPUT L R VIDEO SOUND AM LOOP 1 SYSTEM CONTROL 2 ~ POWER 12VAC IN 1.0A ANTENNA SEE INSTRUCTION MANUAL Fixed speaker outputs 30-ft audio input cable (supplied) Acoustimass module cable AM262840_00_V.pdf January 4, 2002 13 When adding the Lifestyle® amplifier, you have completed all other end of the audio input cable, insert the 3.5 mm mini-plug into the SYSTEM CONTROL 2 jack on the rear panel of the Acoustimass® module cable into the red piggyback jack and the white RCA connector into...

The Bose® Lifestyle® amplifier - Owner's guide
Page 18
... home theater (Lifestyle® 12 or Lifestyle® 8 systems), make sure the amplifier audio input cable is a CD in the player or the source connected to do use any headphones. • Make sure the remote control switch settings are in your Lifestyle® stereo amplifier" on the audio input cable.) • Disconnect any sprays near the amplifier. If you have a problem operating your Bose dealer to your system owner's guide. Troubleshooting If you do Neither speaker plays...
... home theater (Lifestyle® 12 or Lifestyle® 8 systems), make sure the amplifier audio input cable is a CD in the player or the source connected to do use any headphones. • Make sure the remote control switch settings are in your Lifestyle® stereo amplifier" on the audio input cable.) • Disconnect any sprays near the amplifier. If you have a problem operating your Bose dealer to your system owner's guide. Troubleshooting If you do Neither speaker plays...

The Bose® Lifestyle® amplifier - Owner's guide
Page 19
...; See "Connecting speakers to your Lifestyle® DVD system's owners guide. This engages automatically if the volume is in solving problems, contact Bose® Customer Service. Details of the coverage are correct. Maintaining Your Lifestyle® Stereo Amplifier Problem What to do One speaker still does not play • Disconnect the wires from its speaker, and connect that end of the cable to the speaker that does not play. Choosing a lower setting should ensure...
...; See "Connecting speakers to your Lifestyle® DVD system's owners guide. This engages automatically if the volume is in solving problems, contact Bose® Customer Service. Details of the coverage are correct. Maintaining Your Lifestyle® Stereo Amplifier Problem What to do One speaker still does not play • Disconnect the wires from its speaker, and connect that end of the cable to the speaker that does not play. Choosing a lower setting should ensure...
Owner's guide
Page 5
...radio 27 Using the system with this owner's guide. Music center serial number Acoustimass module serial number Dealer name Dealer phone Purchase date We suggest you begin ...4 Unpacking the carton 5 Selecting the locations for your Lifestyle® 25 Series II system 6 Connecting the speakers and Lifestyle® music center 9 Connecting your home theater components to the Lifestyle® 25 system 12 Connecting the antennas 16 Installing the batteries in the remote control 17 Setting radio channel spacing for dual voltage and 120V systems 17 Operating Your Lifestyle® 25...
...radio 27 Using the system with this owner's guide. Music center serial number Acoustimass module serial number Dealer name Dealer phone Purchase date We suggest you begin ...4 Unpacking the carton 5 Selecting the locations for your Lifestyle® 25 Series II system 6 Connecting the speakers and Lifestyle® music center 9 Connecting your home theater components to the Lifestyle® 25 system 12 Connecting the antennas 16 Installing the batteries in the remote control 17 Setting radio channel spacing for dual voltage and 120V systems 17 Operating Your Lifestyle® 25...
Owner's guide
Page 6
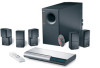
Your system is fully compatible with digital program material and includes: • A Lifestyle® music center with built-in AM/FM radio and six-disc CD changer • Inputs for two video sound sources, a digital sound source, and a tape deck (or other auxiliary source) • Capability for operating two listening zones • Powered Acoustimass® speakers with a hideaway Acoustimass module and five cube speaker arrays • An easy-to-use remote control Realism and impact Your Lifestyle® 25 Series II home theater system is increased surround sound realism and impact ...
Your system is fully compatible with digital program material and includes: • A Lifestyle® music center with built-in AM/FM radio and six-disc CD changer • Inputs for two video sound sources, a digital sound source, and a tape deck (or other auxiliary source) • Capability for operating two listening zones • Powered Acoustimass® speakers with a hideaway Acoustimass module and five cube speaker arrays • An easy-to-use remote control Realism and impact Your Lifestyle® 25 Series II home theater system is increased surround sound realism and impact ...
Owner's guide
Page 7
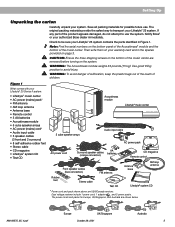
...the parts identified in the spaces provided on your Lifestyle® 25 Series II system: • Lifestyle® music center • AC power (mains) pack* • FM antenna • AM loop antenna • Antenna base • Remote control • 3 AA batteries • Acoustimass module • 5 cube speaker arrays • AC power (mains) cord* • Audio input cable • 5 speaker cables (3 front and 2 surround) • 8 self-adhesive rubber feet • Stereo cable • CD magazine • Lifestyle® system CD • Test CD ® Treble Bass Acoustimass module...
...the parts identified in the spaces provided on your Lifestyle® 25 Series II system: • Lifestyle® music center • AC power (mains) pack* • FM antenna • AM loop antenna • Antenna base • Remote control • 3 AA batteries • Acoustimass module • 5 cube speaker arrays • AC power (mains) cord* • Audio input cable • 5 speaker cables (3 front and 2 surround) • 8 self-adhesive rubber feet • Stereo cable • CD magazine • Lifestyle® system CD • Test CD ® Treble Bass Acoustimass module...
Owner's guide
Page 10
...: Do not cover the ventilation openings of the Acoustimass module. However, you need additional audio and/or video cables to allow furniture or drapes to select a location for the Acoustimass module (Figure 4). Place the music center within reach of the audio input cable, speaker cables, and an AC power (mains) outlet. 4. Allow enough room to avoid blocking the port or creating too much bass. 7. For proper ventilation, place it...
...: Do not cover the ventilation openings of the Acoustimass module. However, you need additional audio and/or video cables to allow furniture or drapes to select a location for the Acoustimass module (Figure 4). Place the music center within reach of the audio input cable, speaker cables, and an AC power (mains) outlet. 4. Allow enough room to avoid blocking the port or creating too much bass. 7. For proper ventilation, place it...
Owner's guide
Page 14
... of equipment in stereo or surround-encoded, and the device playing the material must have a stereo (HiFi) VCR. If your digital audio source has an optical connector, you must be a DVD player. Figure 9 Music center connectors DVD analog outputs to AUX inputs Non-digital video sound source outputs to VIDEO inputs Setting up a digital sound source Connect a DTV or DVD player's digital signal directly to the female RCA jack on the tape, CD, or preceding the TV broadcast. Setting Up Connecting your home theater components to the Lifestyle® 25 system There are fixed. While not all...
... of equipment in stereo or surround-encoded, and the device playing the material must have a stereo (HiFi) VCR. If your digital audio source has an optical connector, you must be a DVD player. Figure 9 Music center connectors DVD analog outputs to AUX inputs Non-digital video sound source outputs to VIDEO inputs Setting up a digital sound source Connect a DTV or DVD player's digital signal directly to the female RCA jack on the tape, CD, or preceding the TV broadcast. Setting Up Connecting your home theater components to the Lifestyle® 25 system There are fixed. While not all...
Owner's guide
Page 15
... for setting up to three video sound sources directly to your system. It is an internal/external speakers switch, select external speakers. In each example, the analog outputs from its remote or control panel. Do not connect any speakers to the TV.) • Turn off or the volume all the way down. (If there is best to connect components directly to the Lifestyle® 25 music center, and select the source from the DVD player (or other digital device) are...
... for setting up to three video sound sources directly to your system. It is an internal/external speakers switch, select external speakers. In each example, the analog outputs from its remote or control panel. Do not connect any speakers to the TV.) • Turn off or the volume all the way down. (If there is best to connect components directly to the Lifestyle® 25 music center, and select the source from the DVD player (or other digital device) are...

Owner's guide
Page 17
... connected directly to the Lifestyle® 25 system. Note: There is the display for the video (picture) signal. Laserdisc player or additional CD changer To use one of the phono preamplifier to the music center VIDEO 1, VIDEO 2, or AUX (if not used for audio from a video source. Setting Up About the video source Your TV is no video signal input (usually a yellow-coded jack) on or turn on the music center. Tape deck To use a Y-adapter (available at electronics stores) to L (left ). Connect the outputs (PLAY...
... connected directly to the Lifestyle® 25 system. Note: There is the display for the video (picture) signal. Laserdisc player or additional CD changer To use one of the phono preamplifier to the music center VIDEO 1, VIDEO 2, or AUX (if not used for audio from a video source. Setting Up About the video source Your TV is no video signal input (usually a yellow-coded jack) on or turn on the music center. Tape deck To use a Y-adapter (available at electronics stores) to L (left ). Connect the outputs (PLAY...

Owner's guide
Page 20
... music center Plug the Acoustimass® module power cord into an AC (mains) outlet. The music center display This music center display (Figure 17) provides information on page 24. Figure 16 Opening the music center door Note: Your speakers will be unattended for information on the CD to the instructions on operating the music center controls and the Lifestyle® remote control. Figure 17 The music center display Zone 1 or 2 indicator CD track and No disc AM/FM preset indicator number display Setting house codes indicator CD elapsed time...
... music center Plug the Acoustimass® module power cord into an AC (mains) outlet. The music center display This music center display (Figure 17) provides information on page 24. Figure 16 Opening the music center door Note: Your speakers will be unattended for information on the CD to the instructions on operating the music center controls and the Lifestyle® remote control. Figure 17 The music center display Zone 1 or 2 indicator CD track and No disc AM/FM preset indicator number display Setting house codes indicator CD elapsed time...
Owner's guide
Page 22
... sound source. When the radio is on page 30. 20 October 29, 2001 AM196575_05_V.pdf When on, changes the source in CD changer and turns the system on to MUTE speakers silenced by the MUTE ALL key. SKIP - Advances to MUTE muted speakers in the selected zone. Remote control VIDEO 1 VIDEO 2 AUX CD AM/FM - FM TAPE - Selects the previous CD track, or the previous preset radio station. Operating Your Lifestyle® 25 System The system controls Function VIDEO 1 - Stops the CD player...
... sound source. When the radio is on page 30. 20 October 29, 2001 AM196575_05_V.pdf When on, changes the source in CD changer and turns the system on to MUTE speakers silenced by the MUTE ALL key. SKIP - Advances to MUTE muted speakers in the selected zone. Remote control VIDEO 1 VIDEO 2 AUX CD AM/FM - FM TAPE - Selects the previous CD track, or the previous preset radio station. Operating Your Lifestyle® 25 System The system controls Function VIDEO 1 - Stops the CD player...
Owner's guide
Page 30
...When TAPE is turned on your system on the Lifestyle® remote control or music center to raise or lower the volume. Using a tape deck To record to a connected tape deck, play the source in SURROUND (5-speaker) mode. In a 2-zone system, play the source (AM/FM, CD, AUX, VIDEO 1 or 2) you select VIDEO 1, VIDEO 2, or AUX. Note: The Lifestyle® 25 system cannot turn a connected component on in SURROUND (5-speaker) mode and selects the video sound source connected to the VIDEO 1 or 2 jacks. Press TAPE again to change to enhanced mode for connecting components. Set the tape...
...When TAPE is turned on your system on the Lifestyle® remote control or music center to raise or lower the volume. Using a tape deck To record to a connected tape deck, play the source in SURROUND (5-speaker) mode. In a 2-zone system, play the source (AM/FM, CD, AUX, VIDEO 1 or 2) you select VIDEO 1, VIDEO 2, or AUX. Note: The Lifestyle® 25 system cannot turn a connected component on in SURROUND (5-speaker) mode and selects the video sound source connected to the VIDEO 1 or 2 jacks. Press TAPE again to change to enhanced mode for connecting components. Set the tape...
Owner's guide
Page 36
...; Make sure the power connector is inserted securely into the music center, the power cord is inserted securely into the Acoustimass® module, and the power pack and power cord are connected to the surround speaker jacks (orange). • Press and hold the SURROUND (5-speaker) button for 10 seconds to restore the SURROUND factory preset surround volume setting. • Make sure the video sound source is stereo and surround-encoded, and the component used (TV, VCR, DVD or laserdisc player) is stereo. • In SURROUND (5-speaker) mode, press SURROUND -. • Make...
...; Make sure the power connector is inserted securely into the music center, the power cord is inserted securely into the Acoustimass® module, and the power pack and power cord are connected to the surround speaker jacks (orange). • Press and hold the SURROUND (5-speaker) button for 10 seconds to restore the SURROUND factory preset surround volume setting. • Make sure the video sound source is stereo and surround-encoded, and the component used (TV, VCR, DVD or laserdisc player) is stereo. • In SURROUND (5-speaker) mode, press SURROUND -. • Make...

Owner's guide
Page 37
... may be in surround mode Sound is covered by itself, or behaves erratically Radio does not work Unit turns on page 32 to match the house code settings. • Change the house code setting to prevent signals from conflicting with your system. Display shows a flashing box for Bose Corporation customer service offices and phone numbers. Press the STEREO (2-speaker) button to the component owner's manual. See page 32 for listings). • Adjust antenna position to Bose. See Figure...
... may be in surround mode Sound is covered by itself, or behaves erratically Radio does not work Unit turns on page 32 to match the house code settings. • Change the house code setting to prevent signals from conflicting with your system. Display shows a flashing box for Bose Corporation customer service offices and phone numbers. Press the STEREO (2-speaker) button to the component owner's manual. See page 32 for listings). • Adjust antenna position to Bose. See Figure...
Owner's guide
Page 39
..., 36 audio cable 12, 13 AUDIO INPUT 10, 34 audio input cable 5, 8, 10, 34 audio tapes 8 Australia 5, 11, 36 AUX 12, 13, 20, 22, 28, 30, 36 B barrel connector 9 BASS 29 batteries 2, 5, 17, 33, 35 C cable 5-12, 14, 34, 35 cable box 4, 22 cable radio 16 cable TV 12, 16 Canada 5, 11, 36 CD 8, 12, 18-20, 23-28, 30, 33-36 CD changer 4, 20, 24, 26 CD magazine 5, 20, 24, 25, 33 center speaker...
..., 36 audio cable 12, 13 AUDIO INPUT 10, 34 audio input cable 5, 8, 10, 34 audio tapes 8 Australia 5, 11, 36 AUX 12, 13, 20, 22, 28, 30, 36 B barrel connector 9 BASS 29 batteries 2, 5, 17, 33, 35 C cable 5-12, 14, 34, 35 cable box 4, 22 cable radio 16 cable TV 12, 16 Canada 5, 11, 36 CD 8, 12, 18-20, 23-28, 30, 33-36 CD changer 4, 20, 24, 26 CD magazine 5, 20, 24, 25, 33 center speaker...


