Installation guide
Page 2
... arrowhead symbol within an equilateral triangle alerts the user to the presence of uninsulated, dangerous voltage within the system enclosure that may be used without prior written permission. Liquids can enjoy its advanced features. TAB 4 TAB 3 TAB 2 English CAUTIONS: • Make no ...; To reduce the risk of important operating and maintenance instructions in the shipping carton. ©2010 Bose Corporation. ii Please check your system properly so you set up and use outdoors, in wall installation. No part of this work may be reproduced, modified, distributed, or ...
... arrowhead symbol within an equilateral triangle alerts the user to the presence of uninsulated, dangerous voltage within the system enclosure that may be used without prior written permission. Liquids can enjoy its advanced features. TAB 4 TAB 3 TAB 2 English CAUTIONS: • Make no ...; To reduce the risk of important operating and maintenance instructions in the shipping carton. ©2010 Bose Corporation. ii Please check your system properly so you set up and use outdoors, in wall installation. No part of this work may be reproduced, modified, distributed, or ...

Installation guide
Page 3
... X 0 0 0 0 0 O: Indicates that this toxic or hazardous substance contained in at least one of the homogeneous materials used batteries properly, following any local regulations. iii X: Indicates that this toxic or hazardous substance contained in all of used for this part is above the limit requirement in SJ/T 11363-2006. English TAB 2 TAB 3 TAB...
... X 0 0 0 0 0 O: Indicates that this toxic or hazardous substance contained in at least one of the homogeneous materials used batteries properly, following any local regulations. iii X: Indicates that this toxic or hazardous substance contained in all of used for this part is above the limit requirement in SJ/T 11363-2006. English TAB 2 TAB 3 TAB...
Installation guide
Page 5
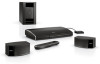
... for setting up its contents before unpacking the next one. There are packaged in Kit 4. 1 For Bose contact information, refer to save all of your authorized Bose dealer immediately. English TAB 2 TAB 3 TAB 4 Welcome Thank you for any part appears damaged, do...unpack each kit and set up your TV screen provided by the UnifyTM intelligent integration system. Notify Bose or your new system are two phases to use it. These provide the safest means for choosing a Bose® LIFESTYLE® 235 home entertainment system. If any necessary shipping or transporting.
... for setting up its contents before unpacking the next one. There are packaged in Kit 4. 1 For Bose contact information, refer to save all of your authorized Bose dealer immediately. English TAB 2 TAB 3 TAB 4 Welcome Thank you for any part appears damaged, do...unpack each kit and set up your TV screen provided by the UnifyTM intelligent integration system. Notify Bose or your new system are two phases to use it. These provide the safest means for choosing a Bose® LIFESTYLE® 235 home entertainment system. If any necessary shipping or transporting.
Installation guide
Page 7
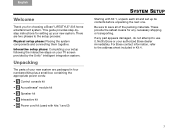
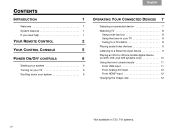
English TAB 2 TAB 3 TAB 4 2. Plug the other end. HDMI OUT Video to an HDMI input on your TV. TAB 5 TAB 6 TAB 7 TAB 8 SYSTEM SETUP 3. Just disconnect the other end of the HDMI® cable into the connector labeled HDMI OUT Video to TV on your TV, you can use this connected cable. Plug one end of the HDMI cable you are using into an HDMI INPUT connector on the control console. If an HDMI cable is already connected to TV 3
English TAB 2 TAB 3 TAB 4 2. Plug the other end. HDMI OUT Video to an HDMI input on your TV. TAB 5 TAB 6 TAB 7 TAB 8 SYSTEM SETUP 3. Just disconnect the other end of the HDMI® cable into the connector labeled HDMI OUT Video to TV on your TV, you can use this connected cable. Plug one end of the HDMI cable you are using into an HDMI INPUT connector on the control console. If an HDMI cable is already connected to TV 3

Installation guide
Page 10
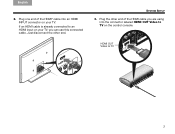
... as far as it can go. Plug the other end of the power cord into the AC Power connector on its front or back end. 3. Using the audio input cable from the power cord kit. 5. Remove a power cord from the control console, plug the free end into a live AC (mains) power...
... as far as it can go. Plug the other end of the power cord into the AC Power connector on its front or back end. 3. Using the audio input cable from the power cord kit. 5. Remove a power cord from the control console, plug the free end into a live AC (mains) power...
Installation guide
Page 13
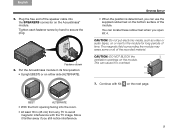
... module in (45 cm) from any TV to secure the plug. TAB 5 TAB 6 TAB 7 TAB 8 SYSTEM SETUP • When the position is determined, you can use the supplied rubber feet on or next to overheat. 7. You can cause it farther away if you open Kit 4. CAUTION: Do not put electronic media...
... module in (45 cm) from any TV to secure the plug. TAB 5 TAB 6 TAB 7 TAB 8 SYSTEM SETUP • When the position is determined, you can use the supplied rubber feet on or next to overheat. 7. You can cause it farther away if you open Kit 4. CAUTION: Do not put electronic media...

Installation guide
Page 14
... have set up the control console, the Acoustimass® module, and the speakers. Slide the battery compartment cover off the back of the setup process using the UnifyTM intelligent integration system.
... have set up the control console, the Acoustimass® module, and the speakers. Slide the battery compartment cover off the back of the setup process using the UnifyTM intelligent integration system.
Installation guide
Page 15
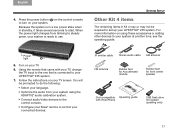
...do the following: • Select your language. • Optimize the audio from blinking to steady green, your connected devices. Turn on your LIFESTYLE® 235 system. 7. Because the system is connected to your TV screen. TAB 5 TAB 6 TAB 7 TAB 8 SYSTEM SETUP Other Kit 4 ... in standby, it takes several seconds to use. Press the power button ( ) on using the ADAPTiQ® audio calibration system. • Connect audio/video devices to the control console. • Configure your Bose® remote to your LIFESTYLE® 235 system. For more information on the control...
...do the following: • Select your language. • Optimize the audio from blinking to steady green, your connected devices. Turn on your LIFESTYLE® 235 system. 7. Because the system is connected to your TV screen. TAB 5 TAB 6 TAB 7 TAB 8 SYSTEM SETUP Other Kit 4 ... in standby, it takes several seconds to use. Press the power button ( ) on using the ADAPTiQ® audio calibration system. • Connect audio/video devices to the control console. • Configure your Bose® remote to your LIFESTYLE® 235 system. For more information on the control...

Installation guide
Page 16
... operating guide. HDMI and the HDMI logo are trademarks of Apple Inc., registered in your system setup. Rubber feet for greater stability. See "Using the Setup Mode" in the U.S. TAB 8 TAB 7 TAB 6 TAB 5 SYSTEM SETUP Applying rubber feet When placing the Acoustimass® module... the center speaker on a smooth surface like glass or highly polished wood. See the address sheet included in solving problems, contact Bose® Customer Service. Contacting customer service For additional help in the United States and other countries. iPod and iPhone are trademarks or...
... operating guide. HDMI and the HDMI logo are trademarks of Apple Inc., registered in your system setup. Rubber feet for greater stability. See "Using the Setup Mode" in the U.S. TAB 8 TAB 7 TAB 6 TAB 5 SYSTEM SETUP Applying rubber feet When placing the Acoustimass® module... the center speaker on a smooth surface like glass or highly polished wood. See the address sheet included in solving problems, contact Bose® Customer Service. Contacting customer service For additional help in the United States and other countries. iPod and iPhone are trademarks or...
Owner's guide
Page 2
... with the power supply provided. • The product label is neither designed nor tested for use your local building codes for the correct type of the system. ii All Bose® products must be of sufficient magnitude to constitute a risk of important operating and maintenance instructions in this guide carefully. Not suitable...
... with the power supply provided. • The product label is neither designed nor tested for use your local building codes for the correct type of the system. ii All Bose® products must be of sufficient magnitude to constitute a risk of important operating and maintenance instructions in this guide carefully. Not suitable...

Owner's guide
Page 3
...found at www.Bose.com/compliance. However, there is no guarantee that interference will not occur in a residential installation. Serial numbers are encouraged to try to correct the interference by one to which can be reproduced, modified, distributed, or otherwise used in accordance ...antenna. • Increase the separation between the equipment and receiver. • Connect the equipment to an outlet on the carton): LIFESTYLE Serial numbers: Control console Acoustimass® module Retailer information: Dealer name Dealer phone Purchase date Please keep your sales receipt and a ...
...found at www.Bose.com/compliance. However, there is no guarantee that interference will not occur in a residential installation. Serial numbers are encouraged to try to correct the interference by one to which can be reproduced, modified, distributed, or otherwise used in accordance ...antenna. • Increase the separation between the equipment and receiver. • Connect the equipment to an outlet on the carton): LIFESTYLE Serial numbers: Control console Acoustimass® module Retailer information: Dealer name Dealer phone Purchase date Please keep your sales receipt and a ...
Owner's guide
Page 6
... tuner in your TV 8 Tuning to a TV station 8 Playing audio/video devices 9 Listening to a Bose link input device 9 Playing an iPod or iPhone mobile digital device (on 235, V35, and V25 systems only 10 Using the front console inputs 11 Front USB input 11 Front Analog A/V input 12 Front HDMI® input 12...
... tuner in your TV 8 Tuning to a TV station 8 Playing audio/video devices 9 Listening to a Bose link input device 9 Playing an iPod or iPhone mobile digital device (on 235, V35, and V25 systems only 10 Using the front console inputs 11 Front USB input 11 Front Analog A/V input 12 Front HDMI® input 12...
Owner's guide
Page 9
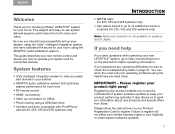
...have questions while operating your new LIFESTYLE® system, go to keep your system and its connected devices. If you need help you to receive notifications of system software updates to http://owners.Bose.com on your room, using the helpful tips provided there....using a USB flash drive • Interface and dock compatible with iPod/iPhone devices (for 235, V25 and V35 systems only) TAB 5 TAB 6 TAB 7 TAB 8 INTRODUCTION • AM/FM radio (for 235, V35 and V25 systems only) • Can deliver sound in Japan. It also allows us to send you for choosing a Bose® LIFESTYLE...
...have questions while operating your new LIFESTYLE® system, go to keep your system and its connected devices. If you need help you to receive notifications of system software updates to http://owners.Bose.com on your room, using the helpful tips provided there....using a USB flash drive • Interface and dock compatible with iPod/iPhone devices (for 235, V25 and V35 systems only) TAB 5 TAB 6 TAB 7 TAB 8 INTRODUCTION • AM/FM radio (for 235, V35 and V25 systems only) • Can deliver sound in Japan. It also allows us to send you for choosing a Bose® LIFESTYLE...
Owner's guide
Page 11
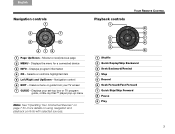
... from your set-top box or TV program guide, or Blu-ray Disc™ player pop-up menu Note: See "Operating Your Connected Devices" on using navigation and playback controls with selected sources. Selects or confirms highlighted item 5 Left/Right and Up/Down - Navigation control 6 EXIT - TAB 5 TAB 6 TAB 7 TAB 8 YOUR...
... from your set-top box or TV program guide, or Blu-ray Disc™ player pop-up menu Note: See "Operating Your Connected Devices" on using navigation and playback controls with selected sources. Selects or confirms highlighted item 5 Left/Right and Up/Down - Navigation control 6 EXIT - TAB 5 TAB 6 TAB 7 TAB 8 YOUR...
Owner's guide
Page 13
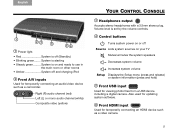
... controls. 4 Control buttons Turns system power on or off Source Lists system sources on and ready to use in the main room or other rooms • Amber System off and charging iPod 2 Front A/V inputs Used for temporarily connecting an audio/video device such as a video camera. 5 System is off (Standby) • Blinking... system speakers Decreases system volume Increases system volume Setup Displays the Setup menu (press and release) or system information (press and hold) 5 Front USB input Used for viewing photo files from a USB device including a digital camera.
... controls. 4 Control buttons Turns system power on or off Source Lists system sources on and ready to use in the main room or other rooms • Amber System off and charging iPod 2 Front A/V inputs Used for temporarily connecting an audio/video device such as a video camera. 5 System is off (Standby) • Blinking... system speakers Decreases system volume Increases system volume Setup Displays the Setup menu (press and release) or system information (press and hold) 5 Front USB input Used for viewing photo files from a USB device including a digital camera.

Owner's guide
Page 14
... system will be stopped and you must complete the shutdown using the onscreen controls. 6 Setup Pressing the Setup button on the console also starts your system and displays the Setup menu on the control console. In ... the remote SOURCE button also starts your system and displays the SOURCE menu on the console changes from blinking to access the power controls for use the remote that came with your TV. TAB 4 TAB 3 TAB 2 English Turning on your TV If you decide to solid green. TAB 8 TAB 7 TAB 6 TAB...
... system will be stopped and you must complete the shutdown using the onscreen controls. 6 Setup Pressing the Setup button on the console also starts your system and displays the Setup menu on the control console. In ... the remote SOURCE button also starts your system and displays the SOURCE menu on the console changes from blinking to access the power controls for use the remote that came with your TV. TAB 4 TAB 3 TAB 2 English Turning on your TV If you decide to solid green. TAB 8 TAB 7 TAB 6 TAB...
Owner's guide
Page 15
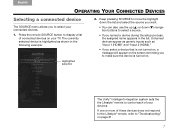
... as shown in the list. If one or more of these devices does not respond to the Lifestyle® remote, refer to "Troubleshooting" on your TV. The UnifyTM intelligent integration system sets the the Lifestyle® remote to control each of connected devices on page 21. 7 English TAB 2 TAB 3 TAB 4 TAB 5 TAB... a device that is turned on. Keep pressing SOURCE to move the highlight down the list and select the source you want. • You can also use the up ( ) or down ( ) navigation buttons to select your devices.
... as shown in the list. If one or more of these devices does not respond to the Lifestyle® remote, refer to "Troubleshooting" on your TV. The UnifyTM intelligent integration system sets the the Lifestyle® remote to control each of connected devices on page 21. 7 English TAB 2 TAB 3 TAB 4 TAB 5 TAB... a device that is turned on. Keep pressing SOURCE to move the highlight down the list and select the source you want. • You can also use the up ( ) or down ( ) navigation buttons to select your devices.

Owner's guide
Page 16
... IR (infrared) remote, you may be receiving its program content through a set -top box to the LIFESTYLE® control console, it will appear in the SOURCE menu under the name you assigned it . Use the dash button for the Bose system, then press the SOURCE button and select another source. Press GUIDE...TAB 7 TAB 6 TAB 5 OPERATING YOUR CONNECTED DEVICES Watching TV Your TV may need to point the Bose® remote at your TV to receive TV programs: 1. Using the tuner in your TV If you are using any of the following methods: Enter the channel number on the keypad and press OK. Tune to...
... IR (infrared) remote, you may be receiving its program content through a set -top box to the LIFESTYLE® control console, it will appear in the SOURCE menu under the name you assigned it . Use the dash button for the Bose system, then press the SOURCE button and select another source. Press GUIDE...TAB 7 TAB 6 TAB 5 OPERATING YOUR CONNECTED DEVICES Watching TV Your TV may need to point the Bose® remote at your TV to receive TV programs: 1. Using the tuner in your TV If you are using any of the following methods: Enter the channel number on the keypad and press OK. Tune to...
Owner's guide
Page 17
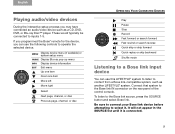
... or search reverse Quick skip or skip forward Quick replay or skip backward Shuffle mode Listening to a Bose link input device You can use this LIFESTYLE® system to listen to content from a Bose link-compatible system, such as a CD, DVD, DVR, or Blu-ray Disc™ player. ... inputs 1-5. If you programmed the Bose® remote for the device, you may have connected an audio/video device such as another LIFESTYLE® system. English TAB 2 TAB 3 TAB 4 Playing audio/video devices During the interactive setup process you can use the following controls to operate the ...
... or search reverse Quick skip or skip forward Quick replay or skip backward Shuffle mode Listening to a Bose link input device You can use this LIFESTYLE® system to listen to content from a Bose link-compatible system, such as a CD, DVD, DVR, or Blu-ray Disc™ player. ... inputs 1-5. If you programmed the Bose® remote for the device, you may have connected an audio/video device such as another LIFESTYLE® system. English TAB 2 TAB 3 TAB 4 Playing audio/video devices During the interactive setup process you can use the following controls to operate the ...

Owner's guide
Page 19
... appear in the SOURCE menu as digital cameras and video cameras. Selecting a folder displays its contents. TAB 5 TAB 6 TAB 7 TAB 8 OPERATING YOUR CONNECTED DEVICES Use the following controls for temporarily connecting devices such as A/V (Front), USB, and HDMI (Front) only when a device is highlighted) Up nine items Down nine items...slideshow, exit and return to browsing folders Down one folder level Down one menu item • Press and hold to repeat. Front USB input Your LIFESTYLE® system can display photo files (.jpg or .jpeg format only) from a USB storage device.
... appear in the SOURCE menu as digital cameras and video cameras. Selecting a folder displays its contents. TAB 5 TAB 6 TAB 7 TAB 8 OPERATING YOUR CONNECTED DEVICES Use the following controls for temporarily connecting devices such as A/V (Front), USB, and HDMI (Front) only when a device is highlighted) Up nine items Down nine items...slideshow, exit and return to browsing folders Down one folder level Down one menu item • Press and hold to repeat. Front USB input Your LIFESTYLE® system can display photo files (.jpg or .jpeg format only) from a USB storage device.


