
The Bose® Lifestyle® amplifier - Owner's guide
Page 5
...; stereo amplifier to a Model 5 music center 13 Connecting speakers to your Lifestyle® stereo amplifier 14 Checking to a Lifestyle® media center 9 Setting up your system 15 Maintaining Your Lifestyle® Stereo Amplifier Cleaning the amplifier 16 Protecting outdoor wiring 16 Troubleshooting 16 Customer service 17 Warranty period 17 Technical information 18 For your records The serial...
...; stereo amplifier to a Model 5 music center 13 Connecting speakers to your Lifestyle® stereo amplifier 14 Checking to a Lifestyle® media center 9 Setting up your system 15 Maintaining Your Lifestyle® Stereo Amplifier Cleaning the amplifier 16 Protecting outdoor wiring 16 Troubleshooting 16 Customer service 17 Warranty period 17 Technical information 18 For your records The serial...

The Bose® Lifestyle® amplifier - Owner's guide
Page 11
... 8 Cable connections between the Lifestyle® media center and the Lifestyle® stereo amplifier Lifestyle® SA-1 stereo amplifier rear panel Lifestyle® media center rear panel 30-ft audio input cable (supplied) AM262840_00_V.pdf January 4, 2002 9 Setting Up Your Lifestyle® Stereo Amplifier Connecting the Lifestyle® stereo amplifier to a Lifestyle® media center CAUTION: Before making connections...
... 8 Cable connections between the Lifestyle® media center and the Lifestyle® stereo amplifier Lifestyle® SA-1 stereo amplifier rear panel Lifestyle® media center rear panel 30-ft audio input cable (supplied) AM262840_00_V.pdf January 4, 2002 9 Setting Up Your Lifestyle® Stereo Amplifier Connecting the Lifestyle® stereo amplifier to a Lifestyle® media center CAUTION: Before making connections...

The Bose® Lifestyle® amplifier - Owner's guide
Page 12
... to (3 of 3). this ensures that the house code settings (switches 1, 2, 3, and 4) match those in more ...". Note: Refer to your Lifestyle® system owner's guide for more information on operating your remote control. You will open the on your system in your first remote. 3. ...System Setup (1 of 3). Continue to scroll down . Make sure that the Zone 2 Protocol is Zone 2 Protocol. 4. Scroll down with a Lifestyle® media center, you will need to set the Zone 2 Protocol to Legacy mode (Figure 9a). 1. The last item on again; Before using the enter ...
... to (3 of 3). this ensures that the house code settings (switches 1, 2, 3, and 4) match those in more ...". Note: Refer to your Lifestyle® system owner's guide for more information on operating your remote control. You will open the on your system in your first remote. 3. ...System Setup (1 of 3). Continue to scroll down . Make sure that the Zone 2 Protocol is Zone 2 Protocol. 4. Scroll down with a Lifestyle® media center, you will need to set the Zone 2 Protocol to Legacy mode (Figure 9a). 1. The last item on again; Before using the enter ...

Owner's guide
Page 2
... meets all of its advanced features. It will help you set up and operate your LIFESTYLE® media center and Acoustimass® module enclosures: The lightning flash with the Cirrus Logic integrated circuits... incorporated in this owner's guide. Manufactured under license from Dolby Laboratories. "DTS" and "DTS Digital Surround" are trademarks of Dolby Laboratories. Reverse engineering or disassembly is located on the apparatus. ©2003 Bose...
... meets all of its advanced features. It will help you set up and operate your LIFESTYLE® media center and Acoustimass® module enclosures: The lightning flash with the Cirrus Logic integrated circuits... incorporated in this owner's guide. Manufactured under license from Dolby Laboratories. "DTS" and "DTS Digital Surround" are trademarks of Dolby Laboratories. Reverse engineering or disassembly is located on the apparatus. ©2003 Bose...

Owner's guide
Page 3
... you can play 5 Check for region number compatibility 5 Glossary 5 Controls and Indicators 7 The remote control 7 Media center controls and indicators 10 Media center display window 11 General System Operation 12 Turning your system on and off 12 Making sound adjustments 12 Volume 12 ... 17 Erasing a station preset 18 Selecting a preset station 18 Playing External Sources 19 Controlling external sources 19 Programming your LIFESTYLE® remote to control your TV 19 Programming your LIFESTYLE remote to control your VCR 19 Programming your LIFESTYLE remote to control your cable/...
... you can play 5 Check for region number compatibility 5 Glossary 5 Controls and Indicators 7 The remote control 7 Media center controls and indicators 10 Media center display window 11 General System Operation 12 Turning your system on and off 12 Making sound adjustments 12 Volume 12 ... 17 Erasing a station preset 18 Selecting a preset station 18 Playing External Sources 19 Controlling external sources 19 Programming your LIFESTYLE® remote to control your TV 19 Programming your LIFESTYLE remote to control your VCR 19 Programming your LIFESTYLE remote to control your cable/...

Owner's guide
Page 4
...with a line above and below. For example, "Use the Audio Setup menu to adjust the sound". • Messages appearing on the media center display are represented by a narrow boldface uppercase type. For example, "REPEAT: TRACK appears when the repeat disc track mode is selected". If...care of your LIFESTYLE® system 40 Replacing the remote control batteries 41 Troubleshooting 41 Technical information 44 Accessories 45 Warranty 45 Contacting customer service 45 Conventions used . • On-screen display messages appearing on your TV screen and on the media center display. •...
...with a line above and below. For example, "Use the Audio Setup menu to adjust the sound". • Messages appearing on the media center display are represented by a narrow boldface uppercase type. For example, "REPEAT: TRACK appears when the repeat disc track mode is selected". If...care of your LIFESTYLE® system 40 Replacing the remote control batteries 41 Troubleshooting 41 Technical information 44 Accessories 45 Warranty 45 Contacting customer service 45 Conventions used . • On-screen display messages appearing on your TV screen and on the media center display. •...

Owner's guide
Page 5
... the time to read as the width of discs you for purchasing a LIFESTYLE® DVD-based home entertainment system. The two standard TV aspect ratios are sold. Through proprietary Bose technologies and innovative LIFESTYLE® systems design, it delivers superior performance for both music and video ... system used by DVD is 4 units wide by 3), the shape of that show the same region number on the bottom of the media center included with the features of 4:3 (read through this manual and familiarize yourself with your system. English Introduction Welcome Thank you can play ...
... the time to read as the width of discs you for purchasing a LIFESTYLE® DVD-based home entertainment system. The two standard TV aspect ratios are sold. Through proprietary Bose technologies and innovative LIFESTYLE® systems design, it delivers superior performance for both music and video ... system used by DVD is 4 units wide by 3), the shape of that show the same region number on the bottom of the media center included with the features of 4:3 (read through this manual and familiarize yourself with your system. English Introduction Welcome Thank you can play ...
Owner's guide
Page 7
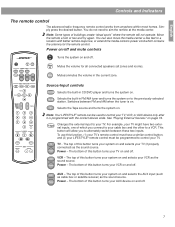
...and off . Move the remote a foot or two and try again. Mute All Mutes the volume for the remote control. Note: Your LIFESTYLE® remote can also move the media center a few feet to a VCR. VCR VCR - The bottom of this button turns your TV, VCR, or AUX device only after ...it is on to alternately switch between FM and AM when the tuner is programmed with better remote response, or extend the media center's power cord which you to the previously-selected station. Source/input controls CD/DVD Selects the built-in the current zone. To use ...
...and off . Move the remote a foot or two and try again. Mute All Mutes the volume for the remote control. Note: Your LIFESTYLE® remote can also move the media center a few feet to a VCR. VCR VCR - The bottom of this button turns your TV, VCR, or AUX device only after ...it is on to alternately switch between FM and AM when the tuner is programmed with better remote response, or extend the media center's power cord which you to the previously-selected station. Source/input controls CD/DVD Selects the built-in the current zone. To use ...

Owner's guide
Page 10
...9650; raises the volume of presets. Enter Confirms storage of the system and unmutes the current source, if muted. Figure 1 Media center front Front panel door - Open/Close Opens/closes the disc tray. lift up to open Display window ™ On/Off Source Volume All... Off Enter Open/Close Erase Store DVD/CD tray Control button panel Media center control buttons The media center has nine control buttons located under its front panel door. Erase Removes a radio station preset. The information display window fi...
...9650; raises the volume of presets. Enter Confirms storage of the system and unmutes the current source, if muted. Figure 1 Media center front Front panel door - Open/Close Opens/closes the disc tray. lift up to open Display window ™ On/Off Source Volume All... Off Enter Open/Close Erase Store DVD/CD tray Control button panel Media center control buttons The media center has nine control buttons located under its front panel door. Erase Removes a radio station preset. The information display window fi...

Owner's guide
Page 11
... SETTINGS SHUFFLE REPEAT Lights up when settings menu information is received by the media center. Lights up with either the 1 or the 2 to indicate the current zone. English Controls and Indicators Media center display window The media center display window shows you make changes using the on-screen display on your ...Note: When you information about your TV, the changes may not appear simultaneously on . Figure 2 Elements of the media center display Twenty characters display system messages and source-related information. Lights up to indicate that FM stereo is on the...
... SETTINGS SHUFFLE REPEAT Lights up when settings menu information is received by the media center. Lights up with either the 1 or the 2 to indicate the current zone. English Controls and Indicators Media center display window The media center display window shows you make changes using the on-screen display on your ...Note: When you information about your TV, the changes may not appear simultaneously on . Figure 2 Elements of the media center display Twenty characters display system messages and source-related information. Lights up to indicate that FM stereo is on the...

Owner's guide
Page 12
...system includes a sleep timer, which can be set to turn your system off using the Volume ▲ ▼ buttons on the remote or the media center button panel. In surround (5-speaker) mode, Surround+ raises the volume; To change the video output setting, see "Using the settings menus" on page ...10 to 90 minutes of speakers playing When you select FM, the front right and left speakers are turned on the remote control or the media center button panel. For example, when you turn it . Changing the number of listening to your system using the component video adapter (included),...
...system includes a sleep timer, which can be set to turn your system off using the Volume ▲ ▼ buttons on the remote or the media center button panel. In surround (5-speaker) mode, Surround+ raises the volume; To change the video output setting, see "Using the settings menus" on page ...10 to 90 minutes of speakers playing When you select FM, the front right and left speakers are turned on the remote control or the media center button panel. For example, when you turn it . Changing the number of listening to your system using the component video adapter (included),...

Owner's guide
Page 13
...remote. 3. Press the Settings button and scroll down to the back of your TV in the proper position on your LIFESTYLE® remote. Press the TV button on /off detector" in your LIFESTYLE® Installation Guide. If the display (Figure 3) indicates, Detected TV Power: On, the TV on /off ... working properly. selects item changes setting 13 English General System Operation Testing the TV on/off detector The TV on/off detector causes your media center to turn your TV on and off automatically when you select a video source on the back of your TV, follow these steps: 1....
...remote. 3. Press the Settings button and scroll down to the back of your TV in the proper position on your LIFESTYLE® remote. Press the TV button on /off detector" in your LIFESTYLE® Installation Guide. If the display (Figure 3) indicates, Detected TV Power: On, the TV on /off ... working properly. selects item changes setting 13 English General System Operation Testing the TV on/off detector The TV on/off detector causes your media center to turn your TV on and off automatically when you select a video source on the back of your TV, follow these steps: 1....

Owner's guide
Page 14
... codes must be turned off , this : Press . Turn your player's region code. Insert the DVD disc into the tray (label side up the media center front door and press . 4. Some DVD videos will also turn it is off in the system settings menu. Stop a DVD movie ... Channel Chapter ... Open/Close 5. Pressing the beginning. Note: Your system was set at the factory to : Pause a DVD movie ... Check the label on the media center or on the shipping carton for your television on page 36. English Playing a Video DVD Before you play your first DVD This section tells...
... codes must be turned off , this : Press . Turn your player's region code. Insert the DVD disc into the tray (label side up the media center front door and press . 4. Some DVD videos will also turn it is off in the system settings menu. Stop a DVD movie ... Channel Chapter ... Open/Close 5. Pressing the beginning. Note: Your system was set at the factory to : Pause a DVD movie ... Check the label on the media center or on the shipping carton for your television on page 36. English Playing a Video DVD Before you play your first DVD This section tells...

Owner's guide
Page 16
...CDs. Channel Chapter Preset Track Go to a previous track ... Repeat a track Repeat a CD If track has played for MP3 CDs. Press Track up the media center front door and press . 3. Chapter Preset Track Go to beginning of paused CD ... Insert the audio CD into the tray. Stop a CD ... Press and...you want to: Do this will show you the track number, track time, and repeat or shuffle mode. 1. While playing a CD, the media center display window will also turn it on. Track If not, press once. English Playing an Audio CD Loading and playing a CD Your system can play...
...CDs. Channel Chapter Preset Track Go to a previous track ... Repeat a track Repeat a CD If track has played for MP3 CDs. Press Track up the media center front door and press . 3. Chapter Preset Track Go to beginning of paused CD ... Insert the audio CD into the tray. Stop a CD ... Press and...you want to: Do this will show you the track number, track time, and repeat or shuffle mode. 1. While playing a CD, the media center display window will also turn it on. Track If not, press once. English Playing an Audio CD Loading and playing a CD Your system can play...

Owner's guide
Page 17
...the system is the next lowest available preset number. Seek the next strong station ... Select a preset station ... Setting a station preset Your LIFESTYLE® media center can tune to a radio station in a preset number on the remote. ERASE A PRESET Note: To change an existing preset, fi... store to this preset number, press Preset Channel Chapter Preset Track up or down to change the preset number. 4. Press FM/AM on the media center. The display shows, STORE TO PRESET ?, where is off, this : Switch between FM and AM ... The display shows, STATION SAVED to ...
...the system is the next lowest available preset number. Seek the next strong station ... Select a preset station ... Setting a station preset Your LIFESTYLE® media center can tune to a radio station in a preset number on the remote. ERASE A PRESET Note: To change an existing preset, fi... store to this preset number, press Preset Channel Chapter Preset Track up or down to change the preset number. 4. Press FM/AM on the media center. The display shows, STORE TO PRESET ?, where is off, this : Switch between FM and AM ... The display shows, STATION SAVED to ...

Owner's guide
Page 18
... can select preset stations using the settings menu: 1. Press Settings . (Make sure your TV is on -screen settings menu. Press FM/AM on the media center. English Listening to delete the preset. Press Erase again to AM/FM Radio Erasing a station preset 1. To select a preset with the remote control: &#... To select a preset using the remote control or the on .) 3. The display shows, PRESET ERASED. Press / to step through the preset stations. 18 Press Erase on the remote and select the FM or AM source. 2. Lift up or down to erase. 3. Press and select Preset. 4.
... can select preset stations using the settings menu: 1. Press Settings . (Make sure your TV is on -screen settings menu. Press FM/AM on the media center. English Listening to delete the preset. Press Erase again to AM/FM Radio Erasing a station preset 1. To select a preset with the remote control: &#... To select a preset using the remote control or the on .) 3. The display shows, PRESET ERASED. Press / to step through the preset stations. 18 Press Erase on the remote and select the FM or AM source. 2. Lift up or down to erase. 3. Press and select Preset. 4.

Owner's guide
Page 19
... (IR) emitter behind the media center display to communicate with your LIFESTYLE® remote control, you find one of your components, you can install the optional IR emitter cable included with your external component. Press the TV button on the LIFESTYLE® remote control. 3....TV Power button again. Press the VCR button on the LIFESTYLE® remote control. 3. If you like, you can program your brand of the media center. If you experience difficulty operating one that turns your LIFESTYLE® Installation Guide. Press the Settings button. 4. Press...
... (IR) emitter behind the media center display to communicate with your LIFESTYLE® remote control, you find one of your components, you can install the optional IR emitter cable included with your external component. Press the TV button on the LIFESTYLE® remote control. 3....TV Power button again. Press the VCR button on the LIFESTYLE® remote control. 3. If you like, you can program your brand of the media center. If you experience difficulty operating one that turns your LIFESTYLE® Installation Guide. Press the Settings button. 4. Press...

Owner's guide
Page 20
...the component connected to see if the VCR turns 9. AUX Power 9. Test each device code until you cannot turn off and on the media center until the desired component is shown. This turns your cable/satellite box brand name is shown. If you find one that turns ... device code is selected. If you find one that turns your TV and cable/satellite box. 2. Press the AUX button on the LIFESTYLE® remote control to that input. Scroll down the menu and select AUX Device. on in surround (5-speaker) mode. Turning the system on...
...the component connected to see if the VCR turns 9. AUX Power 9. Test each device code until you cannot turn off and on the media center until the desired component is shown. This turns your cable/satellite box brand name is shown. If you find one that turns ... device code is selected. If you find one that turns your TV and cable/satellite box. 2. Press the AUX button on the LIFESTYLE® remote control to that input. Scroll down the menu and select AUX Device. on in surround (5-speaker) mode. Turning the system on...

Owner's guide
Page 22
... to move within the on the media center's display. Press the Enter button on your TV, the changes may not appear simultaneously on -screen menus. The displayed menu will see a menu similar to the one in the settings menu: Use the MENU/NAVIGATION buttons on your LIFESTYLE® system and not by the...
... to move within the on the media center's display. Press the Enter button on your TV, the changes may not appear simultaneously on -screen menus. The displayed menu will see a menu similar to the one in the settings menu: Use the MENU/NAVIGATION buttons on your LIFESTYLE® system and not by the...
Owner's guide
Page 24
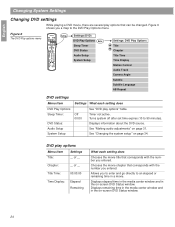
... are several play options" table. See "Making audio adjustments" on page 34. Chooses the movie chapter that can be changed. Displays elapsed time in the media center window and in a movie. Turns system off after set time expires (10 to an elapsed or remaining time in the on -screen DVD Status window... Off 00:00 See "DVD play options that corresponds with the number you a map to the DVD Play Options menu. Displays remaining time in the media center window and in the on -screen DVD Status window.
... are several play options" table. See "Making audio adjustments" on page 34. Chooses the movie chapter that can be changed. Displays elapsed time in the media center window and in a movie. Turns system off after set time expires (10 to an elapsed or remaining time in the on -screen DVD Status window... Off 00:00 See "DVD play options that corresponds with the number you a map to the DVD Play Options menu. Displays remaining time in the media center window and in the on -screen DVD Status window.


