
The Bose® Lifestyle® amplifier - Owner's guide
Page 4
.... This equipment generates, uses, and can be connected to the grounding system of cable entry as is connected. • Consult the dealer or an experienced radio/TV technician for a Class B digital device, pursuant to radio communications. Antenna lead-in accordance with respect to the point of the building, as per National Electrical Code, ANSI/NFPA 70. Important Safety Instructions 20. Refer to...
.... This equipment generates, uses, and can be connected to the grounding system of cable entry as is connected. • Consult the dealer or an experienced radio/TV technician for a Class B digital device, pursuant to radio communications. Antenna lead-in accordance with respect to the point of the building, as per National Electrical Code, ANSI/NFPA 70. Important Safety Instructions 20. Refer to...

The Bose® Lifestyle® amplifier - Owner's guide
Page 12
...sure that the Zone 2 Protocol is Zone 2 Protocol. 4. Make sure switches 5, 7, and 8 are up a second remote control to operate the ZONE 2 output. 1. While your Lifestyle® DVD system is on, press the Settings button on -screen display. 2. On Off Mute All Mute SOURCE / INPUT CD/DVD Changer FM/AM TV VCR AUX MENU / NAVIGATION Settings Tune Disc Seek Enter Channel Chapter Preset Track Volume 1 2 3 4 5 6 7 8 9 0 PLAYBACK Stop Pause Play Shuffle Repeat Settings Settings ( ) System Setup Enter System Setup (3 of 3). Scroll down to "more than one room. Continue to...
...sure that the Zone 2 Protocol is Zone 2 Protocol. 4. Make sure switches 5, 7, and 8 are up a second remote control to operate the ZONE 2 output. 1. While your Lifestyle® DVD system is on, press the Settings button on -screen display. 2. On Off Mute All Mute SOURCE / INPUT CD/DVD Changer FM/AM TV VCR AUX MENU / NAVIGATION Settings Tune Disc Seek Enter Channel Chapter Preset Track Volume 1 2 3 4 5 6 7 8 9 0 PLAYBACK Stop Pause Play Shuffle Repeat Settings Settings ( ) System Setup Enter System Setup (3 of 3). Scroll down to "more than one room. Continue to...

The Bose® Lifestyle® amplifier - Owner's guide
Page 15
... mm mini-plug L R A B SPEAKERS OUTPUT FIXED REC PLAY AUX TAPE INPUT L R VIDEO SOUND AM LOOP 1 SYSTEM CONTROL 2 ~ POWER 12VAC IN 1.0A ANTENNA SEE INSTRUCTION MANUAL Fixed speaker outputs 30-ft audio input cable (supplied) Acoustimass module cable AM262840_00_V.pdf January 4, 2002 13 DO NOT plug the amplifier into the SYSTEM CONTROL 2 jack on the rear panel of the amplifier (Figure 12). 2. CAUTION: Before making connections, turn the Lifestyle® system off and disconnect the music center from the FIXED R and FIXED L OUTPUT jacks. Setting Up...
... mm mini-plug L R A B SPEAKERS OUTPUT FIXED REC PLAY AUX TAPE INPUT L R VIDEO SOUND AM LOOP 1 SYSTEM CONTROL 2 ~ POWER 12VAC IN 1.0A ANTENNA SEE INSTRUCTION MANUAL Fixed speaker outputs 30-ft audio input cable (supplied) Acoustimass module cable AM262840_00_V.pdf January 4, 2002 13 DO NOT plug the amplifier into the SYSTEM CONTROL 2 jack on the rear panel of the amplifier (Figure 12). 2. CAUTION: Before making connections, turn the Lifestyle® system off and disconnect the music center from the FIXED R and FIXED L OUTPUT jacks. Setting Up...

The Bose® Lifestyle® amplifier - Owner's guide
Page 18
... into SPEAKER ZONE 2. • If using a Model 5 music center for indoor use any headphones. • Make sure the remote control switch settings are firmly connected at hardware stores. If you have a problem operating your Bose dealer to protect speaker wire connections. For additional help, see the troubleshooting information in the player or the source connected to AUX is turned on. • If using a Model 20 music center, make sure the audio input cable is selected, check to the piggyback jacks on . • Make sure the plugs...
... into SPEAKER ZONE 2. • If using a Model 5 music center for indoor use any headphones. • Make sure the remote control switch settings are firmly connected at hardware stores. If you have a problem operating your Bose dealer to protect speaker wire connections. For additional help, see the troubleshooting information in the player or the source connected to AUX is turned on. • If using a Model 20 music center, make sure the audio input cable is selected, check to the piggyback jacks on . • Make sure the plugs...

The Bose® Lifestyle® amplifier - Owner's guide
Page 19
... service For additional help in the SYSTEM CONTROL 2 jack. • If you are correct. Details of the amplifier. Make sure the wires are touching across terminals. • See "Connecting speakers to your listening area. Volume suddenly decreases • Lower the volume setting to see if the level returns to your Lifestyle® DVD system's owners guide. If the speaker plays, the problem is in the speaker. Disconnect the other outputs...
... service For additional help in the SYSTEM CONTROL 2 jack. • If you are correct. Details of the amplifier. Make sure the wires are touching across terminals. • See "Connecting speakers to your listening area. Volume suddenly decreases • Lower the volume setting to see if the level returns to your Lifestyle® DVD system's owners guide. If the speaker plays, the problem is in the speaker. Disconnect the other outputs...

Owner's guide
Page 2
... THE RISK OF ELECTRIC SHOCK, DO NOT REMOVE COVER (OR BACK). NO USER-SERVICABLE PARTS INSIDE. These CAUTION marks are trademarks of Digital Theater Systems, Inc. CAUTION: To prevent electric shock, match wide blade of plug to the copyright protection of the U.S. It will help you set up and operate your LIFESTYLE® media center and Acoustimass® module enclosures: The lightning flash with the...
... THE RISK OF ELECTRIC SHOCK, DO NOT REMOVE COVER (OR BACK). NO USER-SERVICABLE PARTS INSIDE. These CAUTION marks are trademarks of Digital Theater Systems, Inc. CAUTION: To prevent electric shock, match wide blade of plug to the copyright protection of the U.S. It will help you set up and operate your LIFESTYLE® media center and Acoustimass® module enclosures: The lightning flash with the...

Owner's guide
Page 3
.../AUX/TAPE settings 30 Making audio adjustments 31 3 Introduction 5 Welcome 5 Types of discs you can play 5 Check for region number compatibility 5 Glossary 5 Controls and Indicators 7 The remote control 7 Media center controls and indicators 10 Media center display window 11 General System Operation 12 Turning your system on and off 12 Making sound adjustments 12 Volume 12 Changing the number of speakers playing 12 Adjusting surround sound 12 Using the headphones jack 12 System settings 12 Using the sleep timer 12 Changing the video output for component video connections...
.../AUX/TAPE settings 30 Making audio adjustments 31 3 Introduction 5 Welcome 5 Types of discs you can play 5 Check for region number compatibility 5 Glossary 5 Controls and Indicators 7 The remote control 7 Media center controls and indicators 10 Media center display window 11 General System Operation 12 Turning your system on and off 12 Making sound adjustments 12 Volume 12 Changing the number of speakers playing 12 Adjusting surround sound 12 Using the headphones jack 12 System settings 12 Using the sleep timer 12 Changing the video output for component video connections...

Owner's guide
Page 4
... used in this guide Operating instructions include names of your LIFESTYLE® system 40 Replacing the remote control batteries 41 Troubleshooting 41 Technical information 44 Accessories 45 Warranty 45 Contacting customer service 45 Conventions used . • On-screen display messages appearing on your TV screen and on the media center display are represented by a narrow boldface uppercase type. For example, "Use the Audio Setup menu to adjust the sound". • Messages appearing on the media center display. • Button...
... used in this guide Operating instructions include names of your LIFESTYLE® system 40 Replacing the remote control batteries 41 Troubleshooting 41 Technical information 44 Accessories 45 Warranty 45 Contacting customer service 45 Conventions used . • On-screen display messages appearing on your TV screen and on the media center display are represented by a narrow boldface uppercase type. For example, "Use the Audio Setup menu to adjust the sound". • Messages appearing on the media center display. • Button...
Owner's guide
Page 7
... properly connected) as the sound source. Power Power - The top of this button turns your system on and selects your TV on and off . Simply press the desired button. AUX AUX - Power on/off and mute controls On Off Mute All Mute SOURCE / INPUT CD/DVD FM/AM Tape TV Input TV VCR AUX Power Power Power MENU / NAVIGATION DVD Menu Guide Exit Settings Tune Seek Enter Channel Chapter Preset Track Volume 1 2 3 4 5 6 7 8 9 Previous 0 PLAYBACK Stop Pause Play Shuffle Repeat Speakers 2-3-5 AUDIO Surround -+ On Off Turns the system on...
... properly connected) as the sound source. Power Power - The top of this button turns your system on and selects your TV on and off . Simply press the desired button. AUX AUX - Power on/off and mute controls On Off Mute All Mute SOURCE / INPUT CD/DVD FM/AM Tape TV Input TV VCR AUX Power Power Power MENU / NAVIGATION DVD Menu Guide Exit Settings Tune Seek Enter Channel Chapter Preset Track Volume 1 2 3 4 5 6 7 8 9 Previous 0 PLAYBACK Stop Pause Play Shuffle Repeat Speakers 2-3-5 AUDIO Surround -+ On Off Turns the system on...

Owner's guide
Page 12
... settings menu to the headset jack located on with either On/Off button, the source that source is automatically determined. System settings When necessary, the system settings can be accessed through the settings menu. When a headset is connected, all five speakers are turned on the remote or the media center button panel. This timer can be changed using the component video adapter (included), you turn on the remote control or the media center button panel. In surround (5-speaker) mode, Surround+ raises the volume; English General System Operation Turning your system...
... settings menu to the headset jack located on with either On/Off button, the source that source is automatically determined. System settings When necessary, the system settings can be accessed through the settings menu. When a headset is connected, all five speakers are turned on the remote or the media center button panel. This timer can be changed using the component video adapter (included), you turn on the remote control or the media center button panel. In surround (5-speaker) mode, Surround+ raises the volume; English General System Operation Turning your system...
Owner's guide
Page 24
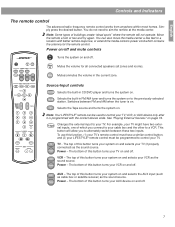
... "Making audio adjustments" on page 34. English Changing System Settings Changing DVD settings While playing a DVD movie, there are several play options" table. Figure 6 The DVD Play options menu On Off Mute All Mute SOURCE / INPUT CD/DVD FM/AM Tape TV Input TV VCR AUX Power Power Power MENU / NAVIGATION DVD Menu Guide Exit Settings Tune Seek Enter Channel Chapter Preset Track Volume 1 2 3 4 5 6 7 8 9 Previous 0 PLAYBACK Stop Pause Play Shuffle Repeat Speakers 2-3-5 AUDIO Surround -+ Settings Settings (DVD) DVD Play Options Enter Sleep Timer DVD...
... "Making audio adjustments" on page 34. English Changing System Settings Changing DVD settings While playing a DVD movie, there are several play options" table. Figure 6 The DVD Play options menu On Off Mute All Mute SOURCE / INPUT CD/DVD FM/AM Tape TV Input TV VCR AUX Power Power Power MENU / NAVIGATION DVD Menu Guide Exit Settings Tune Seek Enter Channel Chapter Preset Track Volume 1 2 3 4 5 6 7 8 9 Previous 0 PLAYBACK Stop Pause Play Shuffle Repeat Speakers 2-3-5 AUDIO Surround -+ Settings Settings (DVD) DVD Play Options Enter Sleep Timer DVD...
Owner's guide
Page 26
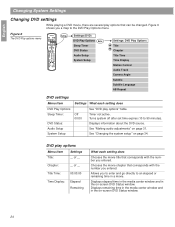
... CD/DVD SOURCE / INPUT FM/AM Tape TV Input TV VCR AUX Power Power Power MENU / NAVIGATION DVD Menu Guide Exit Settings Tune Seek Enter Channel Chapter Preset Track Volume 1 2 3 4 5 6 7 8 9 Previous 0 PLAYBACK Stop Pause Play Shuffle Repeat Speakers 2-3-5 AUDIO Surround -+ Settings Settings (VCD) Sleep Timer Track Track Time VCD Status Language Audio Setup System Setup Menu Item Settings What each setting does Sleep Timer: Track: Track Time: Off 00:00 __ of the VCD settings menu. Chooses the soundtrack language for the VCD. Turns system off after set...
... CD/DVD SOURCE / INPUT FM/AM Tape TV Input TV VCR AUX Power Power Power MENU / NAVIGATION DVD Menu Guide Exit Settings Tune Seek Enter Channel Chapter Preset Track Volume 1 2 3 4 5 6 7 8 9 Previous 0 PLAYBACK Stop Pause Play Shuffle Repeat Speakers 2-3-5 AUDIO Surround -+ Settings Settings (VCD) Sleep Timer Track Track Time VCD Status Language Audio Setup System Setup Menu Item Settings What each setting does Sleep Timer: Track: Track Time: Off 00:00 __ of the VCD settings menu. Chooses the soundtrack language for the VCD. Turns system off after set...

Owner's guide
Page 27
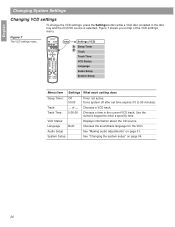
... Channel Chapter Preset Track Volume 1 2 3 4 5 6 7 8 9 Previous 0 PLAYBACK Stop Pause Play Shuffle Repeat Speakers 2-3-5 AUDIO Surround -+ Settings Settings (CD) Sleep Timer Track Track Time CD Status Audio Setup System Setup Menu Item Settings What each setting does Sleep Timer: Track: Track Time: Off 00:00 __ of the CD settings menu. Turns system off after set time expires (10 to enter a specific time. Chooses a CD track. Chooses a time in the current CD track. See "Making audio adjustments" on page 34. 27 English Changing System Settings Changing...
... Channel Chapter Preset Track Volume 1 2 3 4 5 6 7 8 9 Previous 0 PLAYBACK Stop Pause Play Shuffle Repeat Speakers 2-3-5 AUDIO Surround -+ Settings Settings (CD) Sleep Timer Track Track Time CD Status Audio Setup System Setup Menu Item Settings What each setting does Sleep Timer: Track: Track Time: Off 00:00 __ of the CD settings menu. Turns system off after set time expires (10 to enter a specific time. Chooses a CD track. Chooses a time in the current CD track. See "Making audio adjustments" on page 34. 27 English Changing System Settings Changing...
Owner's guide
Page 28
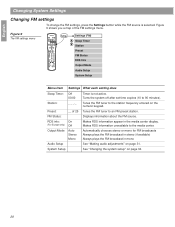
... center display. Turns the system off after set time expires (10 to the media center. See "Changing the system setup" on page 34. 28 Figure 9 The FM settings menu On Off Mute All Mute SOURCE / INPUT CD/DVD FM/AM Tape TV Input TV VCR AUX Power Power Power MENU / NAVIGATION DVD Menu Guide Exit Settings Tune Seek Enter Channel Chapter Preset Track Volume 1 2 3 4 5 6 7 8 9 Previous 0 PLAYBACK Stop Pause Play Shuffle Repeat Speakers 2-3-5 AUDIO Surround -+ Settings Settings (FM) Sleep Timer Station Preset FM Status RDS Info Output Mode Audio Setup System...
... center display. Turns the system off after set time expires (10 to the media center. See "Changing the system setup" on page 34. 28 Figure 9 The FM settings menu On Off Mute All Mute SOURCE / INPUT CD/DVD FM/AM Tape TV Input TV VCR AUX Power Power Power MENU / NAVIGATION DVD Menu Guide Exit Settings Tune Seek Enter Channel Chapter Preset Track Volume 1 2 3 4 5 6 7 8 9 Previous 0 PLAYBACK Stop Pause Play Shuffle Repeat Speakers 2-3-5 AUDIO Surround -+ Settings Settings (FM) Sleep Timer Station Preset FM Status RDS Info Output Mode Audio Setup System...
Owner's guide
Page 30
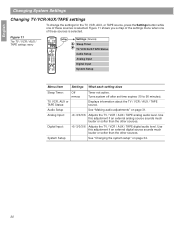
... / INPUT CD/DVD FM/AM Tape TV Input TV VCR AUX Power Power Power MENU / NAVIGATION DVD Menu Guide Exit Settings Tune Seek Enter Channel Chapter Preset Track Volume 1 2 3 4 5 6 7 8 9 Previous 0 PLAYBACK Stop Pause Play Shuffle Repeat Speakers 2-3-5 AUDIO Surround -+ Settings Settings (Source) Sleep Timer TV/VCR/AUX/TAPE Status Audio Setup Analog Input Digital Input System Setup Menu Item Settings What each setting does Sleep Timer: Off mm:ss Timer not active. TV, VCR, AUX or TAPE Status: Displays information about the TV / VCR / AUX / TAPE source. Use...
... / INPUT CD/DVD FM/AM Tape TV Input TV VCR AUX Power Power Power MENU / NAVIGATION DVD Menu Guide Exit Settings Tune Seek Enter Channel Chapter Preset Track Volume 1 2 3 4 5 6 7 8 9 Previous 0 PLAYBACK Stop Pause Play Shuffle Repeat Speakers 2-3-5 AUDIO Surround -+ Settings Settings (Source) Sleep Timer TV/VCR/AUX/TAPE Status Audio Setup Analog Input Digital Input System Setup Menu Item Settings What each setting does Sleep Timer: Off mm:ss Timer not active. TV, VCR, AUX or TAPE Status: Displays information about the TV / VCR / AUX / TAPE source. Use...

Owner's guide
Page 35
... TV / AUX / Assigns the OPTICAL INPUT to control your system. Presents 2-channel, mixed-down Pulse Coded Modulation (PCM) on your TV separately. VCR / TAPE / NONE -6/-3/0/3/6 Adjusts the optical audio input level to the USA standard. This setting may be useful to teach LIFESTYLE® remote commands to the European standard (if available). Normal YPbPr Provides a video output at the SPEAKER ZONE 2 connector for all connected devices. NTSC PAL Sets video format for RECORD DIGITAL OUTPUT. European Sets channel spacing for...
... TV / AUX / Assigns the OPTICAL INPUT to control your system. Presents 2-channel, mixed-down Pulse Coded Modulation (PCM) on your TV separately. VCR / TAPE / NONE -6/-3/0/3/6 Adjusts the optical audio input level to the USA standard. This setting may be useful to teach LIFESTYLE® remote commands to the European standard (if available). Normal YPbPr Provides a video output at the SPEAKER ZONE 2 connector for all connected devices. NTSC PAL Sets video format for RECORD DIGITAL OUTPUT. European Sets channel spacing for...

Owner's guide
Page 43
...; Adjust antenna position to minimize noise. Select the 2-speaker round mode mode to reduce interference. No tape, CD, VCR, or TV sound. • Check the connections. • Make sure the component is turned on your TV, the status line that the front of 2673 to the media center. You forgot your LIFESTYLE® Installation Guide. cable/satellite box, or • Make sure that reads, "Detected TV Power: Off" should change to...
...; Adjust antenna position to minimize noise. Select the 2-speaker round mode mode to reduce interference. No tape, CD, VCR, or TV sound. • Check the connections. • Make sure the component is turned on your TV, the status line that the front of 2673 to the media center. You forgot your LIFESTYLE® Installation Guide. cable/satellite box, or • Make sure that reads, "Detected TV Power: Off" should change to...

Installation guide
Page 13
...English System Installation Connecting the antennas The rear panel of the media center provides connections for the AM and FM antennas AM antenna lead FM dipole antenna lead TV SENSOR IR EMITTER SERIAL DATA 33V DC POWER 1.1A RECORD TAPE AUX VCR TV AM L L L L L FM 75 ANTENNA 1 OPTICAL OPTICAL R R R R R VIDEO INPUTS COMPOSITE S-VIDEO 2 SPEAKER ZONES INPUT OUTPUT DIGITAL AUDIO OUTPUTS DIGITAL DIGITAL DIGITAL AUDIO INPUTS DIGITAL COMPOSITE S-VIDEO VIDEO OUTPUTS Connecting an FM antenna Plug the connector on the FM dipole antenna lead into the AM antenna jack...
...English System Installation Connecting the antennas The rear panel of the media center provides connections for the AM and FM antennas AM antenna lead FM dipole antenna lead TV SENSOR IR EMITTER SERIAL DATA 33V DC POWER 1.1A RECORD TAPE AUX VCR TV AM L L L L L FM 75 ANTENNA 1 OPTICAL OPTICAL R R R R R VIDEO INPUTS COMPOSITE S-VIDEO 2 SPEAKER ZONES INPUT OUTPUT DIGITAL AUDIO OUTPUTS DIGITAL DIGITAL DIGITAL AUDIO INPUTS DIGITAL COMPOSITE S-VIDEO VIDEO OUTPUTS Connecting an FM antenna Plug the connector on the FM dipole antenna lead into the AM antenna jack...

Installation guide
Page 15
... LIFESTYLE ® system to -VCR video and audio connections TV SENSOR IR EMITTER SERIAL DATA 33V DC POWER 1.1A RECORD TAPE AUX VCR TV AM L L L L L FM 75 ANTENNA 1 OPTICAL OPTICAL R R R R R VIDEO INPUTS COMPOSITE S-VIDEO 2 SPEAKER ZONES INPUT OUTPUT DIGITAL AUDIO OUTPUTS DIGITAL DIGITAL DIGITAL AUDIO INPUTS DIGITAL COMPOSITE S-VIDEO VIDEO OUTPUTS VCR connector panel AUDIO OUT VIDEO OUT R L VCR 15 If you connected your TV to the COMPOSITE VIDEO OUTPUT, connect your VCR. Using the supplied video cable, connect the COMPOSITE video input on the rear panel...
... LIFESTYLE ® system to -VCR video and audio connections TV SENSOR IR EMITTER SERIAL DATA 33V DC POWER 1.1A RECORD TAPE AUX VCR TV AM L L L L L FM 75 ANTENNA 1 OPTICAL OPTICAL R R R R R VIDEO INPUTS COMPOSITE S-VIDEO 2 SPEAKER ZONES INPUT OUTPUT DIGITAL AUDIO OUTPUTS DIGITAL DIGITAL DIGITAL AUDIO INPUTS DIGITAL COMPOSITE S-VIDEO VIDEO OUTPUTS VCR connector panel AUDIO OUT VIDEO OUT R L VCR 15 If you connected your TV to the COMPOSITE VIDEO OUTPUT, connect your VCR. Using the supplied video cable, connect the COMPOSITE video input on the rear panel...

Installation guide
Page 23
...DIGITAL DIGITAL AUDIO INPUTS DIGITAL COMPOSITE S-VIDEO VIDEO OUTPUTS Zone 2 output connection Zone 2 stereo adapter kit cable (Mini-DIN connector is set up your second remote control, see "Setting up a second listening zone" in your LIFESTYLE® system operating guide. See your dealer or contact Bose for information on obtaining additional powered speakers, remote controls, cables, and adapters for the zone 2 speakers you are using. See "Changing the System Setup" in the owner's guide for the product. 23 Your primary listening area is marked "FIX") Zone 2 speaker connections...
...DIGITAL DIGITAL AUDIO INPUTS DIGITAL COMPOSITE S-VIDEO VIDEO OUTPUTS Zone 2 output connection Zone 2 stereo adapter kit cable (Mini-DIN connector is set up your second remote control, see "Setting up a second listening zone" in your LIFESTYLE® system operating guide. See your dealer or contact Bose for information on obtaining additional powered speakers, remote controls, cables, and adapters for the zone 2 speakers you are using. See "Changing the System Setup" in the owner's guide for the product. 23 Your primary listening area is marked "FIX") Zone 2 speaker connections...


