
Owner's guide
Page 2
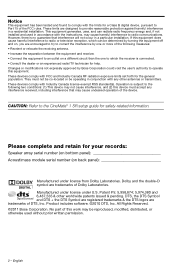
...work may cause undesired operation of the FCC rules. CAUTION: Refer to radio communications. Please complete and retain for your records: Speaker array serial number (on bottom panel Acoustimass module serial number (on a different circuit than the one to which can radiate ...Inc. However, there is no guarantee that may be determined by Bose Corporation could void the user's authority to the following two conditions: (1) This device may cause harmful interference to the CineMate® 1 SR setup guide for safety-related information. These limits are trademarks of Dolby...
...work may cause undesired operation of the FCC rules. CAUTION: Refer to radio communications. Please complete and retain for your records: Speaker array serial number (on bottom panel Acoustimass module serial number (on a different circuit than the one to which can radiate ...Inc. However, there is no guarantee that may be determined by Bose Corporation could void the user's authority to the following two conditions: (1) This device may cause harmful interference to the CineMate® 1 SR setup guide for safety-related information. These limits are trademarks of Dolby...
Owner's guide
Page 4
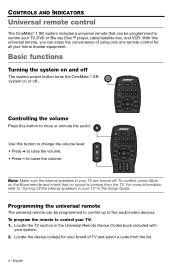
To confirm, press Mute on or off the internal speakers in your TV" in the Setup Guide. Locate the device code(s) for all your home theater equipment. To program the remote to five audio/video devices. Programming the universal remote The universal remote can be programmed to ...player, cable/satellite box, and VCR. Note: Make sure the internal speakers in the Universal Remote Device Codes book included with your TV are turned off The system power button turns the CineMate 1 SR system on the Bose remote and check that can be programmed to control up to control your...
To confirm, press Mute on or off the internal speakers in your TV" in the Setup Guide. Locate the device code(s) for all your home theater equipment. To program the remote to five audio/video devices. Programming the universal remote The universal remote can be programmed to ...player, cable/satellite box, and VCR. Note: Make sure the internal speakers in the Universal Remote Device Codes book included with your TV are turned off The system power button turns the CineMate 1 SR system on the Bose remote and check that can be programmed to control up to control your...
Owner's guide
Page 12
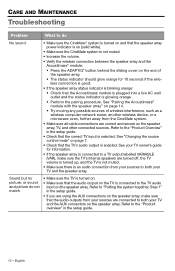
...your TV and the AUX connectors on the speaker array, make sure the TV's internal speakers are connected to "Putting the system together, Step 1" in the setup guide. 12 - Sound but no picture, or sound and picture do No sound • Make sure the CineMate® system is turned on and that... the Acoustimass module is plugged into a live AC wall outlet and the status indicator is enabled. Refer to the "Product overview" in the setup guide. • If you are using the AUX connections on the speaker array. Refer to both...
...your TV and the AUX connectors on the speaker array, make sure the TV's internal speakers are connected to "Putting the system together, Step 1" in the setup guide. 12 - Sound but no picture, or sound and picture do No sound • Make sure the CineMate® system is turned on and that... the Acoustimass module is plugged into a live AC wall outlet and the status indicator is enabled. Refer to the "Product overview" in the setup guide. • If you are using the AUX connections on the speaker array. Refer to both...
Setup guide
Page 5
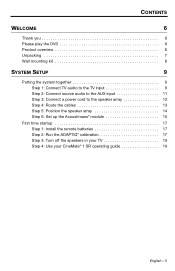
... 6 Product overview 6 Unpacking 7 Wall mounting kit 8 SYSTEM SETUP 9 Putting the system together 9 Step 1: Connect TV audio to the TV input 9 Step 2: Connect source audio to the AUX input 11 Step 3: Connect a power cord to the speaker array 12 Step 4: Route the cables 13 Step 5: Position ...the speaker array 14 Step 6: Set up the Acoustimass® module 15 First time startup 17 Step 1: Install the remote batteries 17 Step 2: Run the ADAPTiQ® calibration 17 Step 3: Turn off the speakers in your TV 19 Step 4: Use your CineMate® 1 SR operating guide 19 ...
... 6 Product overview 6 Unpacking 7 Wall mounting kit 8 SYSTEM SETUP 9 Putting the system together 9 Step 1: Connect TV audio to the TV input 9 Step 2: Connect source audio to the AUX input 11 Step 3: Connect a power cord to the speaker array 12 Step 4: Route the cables 13 Step 5: Position ...the speaker array 14 Step 6: Set up the Acoustimass® module 15 First time startup 17 Step 1: Install the remote batteries 17 Step 2: Run the ADAPTiQ® calibration 17 Step 3: Turn off the speakers in your TV 19 Step 4: Use your CineMate® 1 SR operating guide 19 ...
Setup guide
Page 6
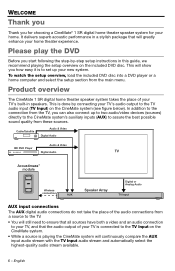
... to assure the best possible sound quality from these sources. To watch the setup overview, load the included DVD disc into a DVD player or a home computer and select the setup section from the TV, you can also connect up your TV's audio output... choosing a CineMate® 1 SR digital home theater speaker system for your TV's built-in speakers. This will continuously compare the AUX input audio stream with the TV Input audio stream and automatically select the highest-quality audio stream available. 6 - Product overview The CineMate 1 SR digital home theater speaker system takes ...
... to assure the best possible sound quality from these sources. To watch the setup overview, load the included DVD disc into a DVD player or a home computer and select the setup section from the TV, you can also connect up your TV's audio output... choosing a CineMate® 1 SR digital home theater speaker system for your TV's built-in speakers. This will continuously compare the AUX input audio stream with the TV Input audio stream and automatically select the highest-quality audio stream available. 6 - Product overview The CineMate 1 SR digital home theater speaker system takes ...
Setup guide
Page 7
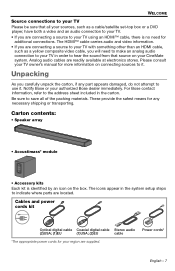
...EU cable *The appropriate power cords for additional connections. For Bose contact information, refer to the address sheet included in the system setup steps to indicate where parts are connecting a source to your... TV using an HDMI™ cable, there is identified by an icon on the box. Carton contents: • Speaker array... English - 7 WELCOME Source connections to your TV Please be sure that source on your CineMate system. The HDMI™ cable carries audio and video information. • If you are ...
...EU cable *The appropriate power cords for additional connections. For Bose contact information, refer to the address sheet included in the system setup steps to indicate where parts are connecting a source to your... TV using an HDMI™ cable, there is identified by an icon on the box. Carton contents: • Speaker array... English - 7 WELCOME Source connections to your TV Please be sure that source on your CineMate system. The HDMI™ cable carries audio and video information. • If you are ...
Setup guide
Page 9
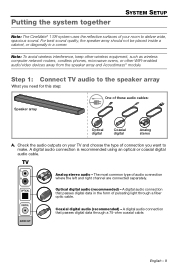
...wireless equipment, such as wireless computer network routers, cordless phones, microwave ovens, or other WIFI-enabled audio/video devices away from the speaker array and Acoustimass® module. A digital audio connection that passes digital data in a corner. A digital audio connection is recommended ... coaxial digital audio cable. Coaxial digital audio (recommended) - Optical digital audio (recommended) - Putting the system together SYSTEM SETUP Note: The CineMate® 1 SR system uses the reflective surfaces of your TV and choose the type of connection you need for this step: One of...
...wireless equipment, such as wireless computer network routers, cordless phones, microwave ovens, or other WIFI-enabled audio/video devices away from the speaker array and Acoustimass® module. A digital audio connection that passes digital data in a corner. A digital audio connection is recommended ... coaxial digital audio cable. Coaxial digital audio (recommended) - Optical digital audio (recommended) - Putting the system together SYSTEM SETUP Note: The CineMate® 1 SR system uses the reflective surfaces of your TV and choose the type of connection you need for this step: One of...

Setup guide
Page 10
... in all protective films from the TV into the corresponding audio output connector on the speaker array. 10 - Note: To protect the surface of the selected audio cable coming from the speaker array before you may sense a slight resistance before operating the system. The foam bag... audio R - Note: Be sure to remove the protective cover from the speaker array could be sure to remove all the way. C. English SYSTEM SETUP B. You may want to temporarily put a protective cloth under the speaker array. Note: If you are using an optical cable, be used for ...
... in all protective films from the TV into the corresponding audio output connector on the speaker array. 10 - Note: To protect the surface of the selected audio cable coming from the speaker array before you may sense a slight resistance before operating the system. The foam bag... audio R - Note: Be sure to remove the protective cover from the speaker array could be sure to remove all the way. C. English SYSTEM SETUP B. You may want to temporarily put a protective cloth under the speaker array. Note: If you are using an optical cable, be used for ...
Setup guide
Page 11
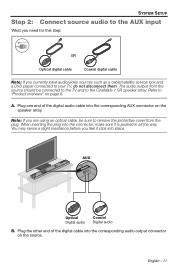
...are using an optical cable, be connected to the TV and to remove the protective cover from the source should be sure to the CineMate 1 SR speaker array. Refer to your TV, do not disconnect them. When inserting the plug into the connector, make sure it click into the ...corresponding audio output connector on the speaker array. English - 11 AUX Optical Digital audio Coaxial Digital audio B. SYSTEM SETUP Step 2: Connect source audio to the AUX input What you need for this step: OR Optical digital ...
...are using an optical cable, be connected to the TV and to remove the protective cover from the source should be sure to the CineMate 1 SR speaker array. Refer to your TV, do not disconnect them. When inserting the plug into the connector, make sure it click into the ...corresponding audio output connector on the speaker array. English - 11 AUX Optical Digital audio Coaxial Digital audio B. SYSTEM SETUP Step 2: Connect source audio to the AUX input What you need for this step: OR Optical digital ...

Setup guide
Page 12
SYSTEM SETUP Step 3: Connect a power cord to do this later in the setup process. English Note: Do not plug the power cord into an AC power outlet at this step: Power cord Plug the small end of the power cord into the connector labeled Power. Power cord 12 - You will be instructed to the speaker array What you need for this time.
SYSTEM SETUP Step 3: Connect a power cord to do this later in the setup process. English Note: Do not plug the power cord into an AC power outlet at this step: Power cord Plug the small end of the power cord into the connector labeled Power. Power cord 12 - You will be instructed to the speaker array What you need for this time.

Setup guide
Page 13
SYSTEM SETUP B. Step 4: Route the cables A. Channel Cable clip English - 13 OPTIONAL: Secure cables under the clips in the channel running along the length of the speaker array. Arrange the cables as needed for your setup location.
SYSTEM SETUP B. Step 4: Route the cables A. Channel Cable clip English - 13 OPTIONAL: Secure cables under the clips in the channel running along the length of the speaker array. Arrange the cables as needed for your setup location.
Setup guide
Page 14
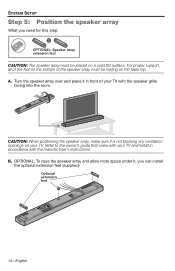
...speaker array, make sure it , you need for this step: OPTIONAL: Speaker array extension feet CAUTION: The speaker array must be placed on a solid flat surface. Optional extension feet 14 - A. B. English Turn the speaker array over and place it in accordance with the speaker... grille facing into the room. OPTIONAL: To raise the speaker array and allow more... bottom of your TV and install in front of the speaker array must be resting on the table top. Refer to the owner...
...speaker array, make sure it , you need for this step: OPTIONAL: Speaker array extension feet CAUTION: The speaker array must be placed on a solid flat surface. Optional extension feet 14 - A. B. English Turn the speaker array over and place it in accordance with the speaker... grille facing into the room. OPTIONAL: To raise the speaker array and allow more... bottom of your TV and install in front of the speaker array must be resting on the table top. Refer to the owner...
Setup guide
Page 15
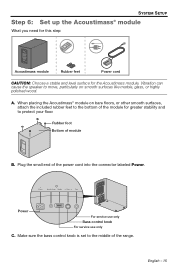
SYSTEM SETUP Step 6: Set up the Acoustimass® module What you need for this step: Acoustimass module Rubber feet Power cord CAUTION: Choose a stable and level surface for greater stability and to protect your floor. Vibration can cause the speaker to the middle of module B. When placing the Acoustimass® module on smooth...
SYSTEM SETUP Step 6: Set up the Acoustimass® module What you need for this step: Acoustimass module Rubber feet Power cord CAUTION: Choose a stable and level surface for greater stability and to protect your floor. Vibration can cause the speaker to the middle of module B. When placing the Acoustimass® module on smooth...

Setup guide
Page 16
... the same wall as your TV, or along any other wall in place. Place the Acoustimass module according to remove all protective films from the speaker array and the Acoustimass module into an AC (mains) power outlet. 16 - E. CAUTION: Do not operate the Acoustimass module on its front end, back end...
... the same wall as your TV, or along any other wall in place. Place the Acoustimass module according to remove all protective films from the speaker array and the Acoustimass module into an AC (mains) power outlet. 16 - E. CAUTION: Do not operate the Acoustimass module on its front end, back end...
Setup guide
Page 18
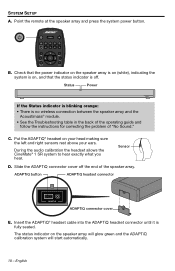
During the audio calibration the headset allows the CineMate® 1 SR system to hear exactly what you hear. B. Put the ADAPTiQ® headset on the speaker array will glow green and the ADAPTiQ calibration system will start automatically. 18 - Slide the ADAPTiQ connector cover ...8226; See the Troubleshooting table in the back of the operating guide and follow the instructions for correcting the problem of the speaker array. SYSTEM SETUP A. C. English Insert the ADAPTiQ® headset cable into the ADAPTiQ headset connector until it is fully seated. ADAPTiQ button ADAPTiQ...
During the audio calibration the headset allows the CineMate® 1 SR system to hear exactly what you hear. B. Put the ADAPTiQ® headset on the speaker array will glow green and the ADAPTiQ calibration system will start automatically. 18 - Slide the ADAPTiQ connector cover ...8226; See the Troubleshooting table in the back of the operating guide and follow the instructions for correcting the problem of the speaker array. SYSTEM SETUP A. C. English Insert the ADAPTiQ® headset cable into the ADAPTiQ headset connector until it is fully seated. ADAPTiQ button ADAPTiQ...
Setup guide
Page 19
... by pressing the ADAPTiQ button. Step 3: Turn off the speakers in a different location or orientation. • If you have a menu setting for turning off switch on the Bose remote and check that came with your TV has a speaker on basic functions, programming the remote, and troubleshooting. If your...TV with a setup menu, use the remote that no sound is done, unplug the ADAPTiQ headset from the TV. Note: To confirm your TV speakers are off position and adjust the TV volume to about 80% of hearing TV audio through the CineMate® 1 SR system, the internal speakers in your ...
... by pressing the ADAPTiQ button. Step 3: Turn off the speakers in a different location or orientation. • If you have a menu setting for turning off switch on the Bose remote and check that came with your TV has a speaker on basic functions, programming the remote, and troubleshooting. If your...TV with a setup menu, use the remote that no sound is done, unplug the ADAPTiQ headset from the TV. Note: To confirm your TV speakers are off position and adjust the TV volume to about 80% of hearing TV audio through the CineMate® 1 SR system, the internal speakers in your ...


