
Owner's guide
Page 2
... and receiver. • Connect the equipment to an outlet on back panel Manufactured under U.S. These devices comply with Industry Canada license-exempt RSS standard(s). Product includes software. ©2010 DTS, Inc. All Rights Reserved. ©2011 Bose Corporation. These devices comply with FCC and Industry Canada RF radiation exposure limits set forth for your records: Speaker array serial number (on bottom panel Acoustimass module serial number...
... and receiver. • Connect the equipment to an outlet on back panel Manufactured under U.S. These devices comply with Industry Canada license-exempt RSS standard(s). Product includes software. ©2010 DTS, Inc. All Rights Reserved. ©2011 Bose Corporation. These devices comply with FCC and Industry Canada RF radiation exposure limits set forth for your records: Speaker array serial number (on bottom panel Acoustimass module serial number...
Owner's guide
Page 4
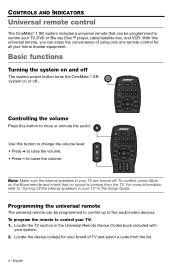
... the Setup Guide. For more information, refer to control your TV, DVD or Blu-ray Disc™ player, cable/satellite box, and VCR. Locate the device code(s) for your TV" in your brand of using only one remote control for all your system. 2. to raise the volume. • Press - Locate the TV section in your TV: 1. Basic functions Turning the system on and off The system power button turns the CineMate 1 SR system...
... the Setup Guide. For more information, refer to control your TV, DVD or Blu-ray Disc™ player, cable/satellite box, and VCR. Locate the device code(s) for your TV" in your brand of using only one remote control for all your system. 2. to raise the volume. • Press - Locate the TV section in your TV: 1. Basic functions Turning the system on and off The system power button turns the CineMate 1 SR system...
Owner's guide
Page 5
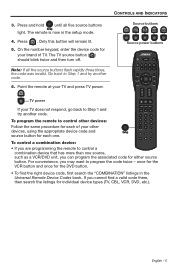
... source button for individual device types (TV, CBL, VCR, DVD, etc.). For convenience, you are programming the remote to Step 1 and try another code. 6. On the number keypad, enter the device code for either source button. Press . The TV source button ( ) should blink twice and then turn off. Source buttons Source power buttons Note: If all five source buttons light. Go back to control a combination device that has more than one . The remote is now in the Universal Remote Device Codes...
... source button for individual device types (TV, CBL, VCR, DVD, etc.). For convenience, you are programming the remote to Step 1 and try another code. 6. On the number keypad, enter the device code for either source button. Press . The TV source button ( ) should blink twice and then turn off. Source buttons Source power buttons Note: If all five source buttons light. Go back to control a combination device that has more than one . The remote is now in the Universal Remote Device Codes...

Owner's guide
Page 6
... * * Bass control knob *For service use only Status indicator: Solid orange Speaker array and Acoustimass module are connected Blinks orange every 3 secs Acoustimass module is disconnected from speaker array (or speaker array is off: Acoustimass module standby) Slow blinking orange Acoustimass module is available to make wireless connection Solid red System error Adjusting the bass level The bass control knob located on the rear of the system. Turn the bass control knob clockwise to increase the bass, counter-clockwise to change the bass level output of the Acoustimass module allows...
... * * Bass control knob *For service use only Status indicator: Solid orange Speaker array and Acoustimass module are connected Blinks orange every 3 secs Acoustimass module is disconnected from speaker array (or speaker array is off: Acoustimass module standby) Slow blinking orange Acoustimass module is available to make wireless connection Solid red System error Adjusting the bass level The bass control knob located on the rear of the system. Turn the bass control knob clockwise to increase the bass, counter-clockwise to change the bass level output of the Acoustimass module allows...

Owner's guide
Page 7
... player you are using the Bose remote, you must first program the remote with a device code for the source you want to controlling the selected source, the remote will flash to control VCR functions, such as channel selection and Electronic Program Guide navigation. English - 7 Allows you to verify your CineMate® 1 SR system. The source button will always control the basic speaker functions (on your cable/satellite box includes a Digital Video Recorder (DVR), the remote will display an onscreen menu...
... player you are using the Bose remote, you must first program the remote with a device code for the source you want to controlling the selected source, the remote will flash to control VCR functions, such as channel selection and Electronic Program Guide navigation. English - 7 Allows you to verify your CineMate® 1 SR system. The source button will always control the basic speaker functions (on your cable/satellite box includes a Digital Video Recorder (DVR), the remote will display an onscreen menu...
Owner's guide
Page 8
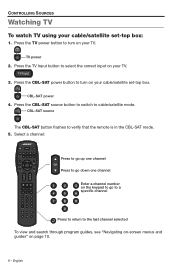
... program guides, see "Navigating on-screen menus and guides" on your cable/satellite set -top box: 1. CBL-SAT source The CBL-SAT button flashes to cable/satellite mode. TV power 2. Press the CBL-SAT source button to switch to verify that the remote is in the CBL-SAT mode. 5. Select a channel: Press to go up one channel Press to go down one channel Enter a channel number on the keypad to go to a specific channel...
... program guides, see "Navigating on-screen menus and guides" on your cable/satellite set -top box: 1. CBL-SAT source The CBL-SAT button flashes to cable/satellite mode. TV power 2. Press the CBL-SAT source button to switch to verify that the remote is in the CBL-SAT mode. 5. Select a channel: Press to go up one channel Press to go down one channel Enter a channel number on the keypad to go to a specific channel...

Owner's guide
Page 9
... flash). Use the remote to DVD mode. TV power 2. English - 9 Press the TV Input button to turn on your TV: 1. Select a channel. Press the TV power button to select the correct input on your DVD player. Press the TV power button to turn on your TV. Press the BD-DVD power button to turn on page 11 for a description of the playback buttons. BD-DVD power 4. Press the BD-DVD source button to switch to control playback functions and navigate disc...
... flash). Use the remote to DVD mode. TV power 2. English - 9 Press the TV Input button to turn on your TV: 1. Select a channel. Press the TV power button to select the correct input on your DVD player. Press the TV power button to turn on your TV. Press the BD-DVD power button to turn on page 11 for a description of the playback buttons. BD-DVD power 4. Press the BD-DVD source button to switch to control playback functions and navigate disc...
Owner's guide
Page 10
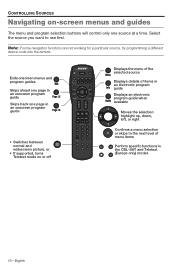
... right Confirms a menu selection or skips to use first. CONTROLLING SOURCES Navigating on-screen menus and guides The menu and program selection buttons will control only one page in an onscreen program guide • Switches between normal and widescreen picture, or • If supported, turns Teletext mode on or off Displays the menu of the selected source Displays details of menu items Perform specific functions in an onscreen program guide Skips back one source at a time.
... right Confirms a menu selection or skips to use first. CONTROLLING SOURCES Navigating on-screen menus and guides The menu and program selection buttons will control only one page in an onscreen program guide • Switches between normal and widescreen picture, or • If supported, turns Teletext mode on or off Displays the menu of the selected source Displays details of menu items Perform specific functions in an onscreen program guide Skips back one source at a time.
Owner's guide
Page 12
... turned on. • Make sure that the audio output on the TV is connected to do No sound • Make sure the CineMate® system is turned on and that the speaker array power indicator is on (solid white). • Make sure the CineMate system is not muted. • Increase the volume. • Verify the wireless connection between the speaker array and the Acoustimass® module: • Press the ADAPTiQ® button...
... turned on. • Make sure that the audio output on the TV is connected to do No sound • Make sure the CineMate® system is turned on and that the speaker array power indicator is on (solid white). • Make sure the CineMate system is not muted. • Increase the volume. • Verify the wireless connection between the speaker array and the Acoustimass® module: • Press the ADAPTiQ® button...
Owner's guide
Page 13
... to the owner's guide that came with the speaker array" on page 6. Call Bose Customer Service. Too much or too • Adjust the bass level using the bass control on the TV. Red status indicator • System error. See "Replacing the remote batteries" on page 14. • Point the remote control at the device you want to control. • Check that the remote button for the selected source flashes when you press the volume button. •...
... to the owner's guide that came with the speaker array" on page 6. Call Bose Customer Service. Too much or too • Adjust the bass level using the bass control on the TV. Red status indicator • System error. See "Replacing the remote batteries" on page 14. • Point the remote control at the device you want to control. • Check that the remote button for the selected source flashes when you press the volume button. •...

Owner's guide
Page 15
.... Technical information Acoustimass® module rating AC input power: 100-240V 50/60 Hz 150W Speaker array rating AC input power: 100-240V 50/60 Hz 60W Wireless connection Output power: 5 mW @ 2400-2480 MHz Range: 20 ft (6.1 m) English - 15 Customer service CARE AND MAINTENANCE For additional help in your limited warranty rights. Failure to the card for specific return and shipping instructions; 2. What you...
.... Technical information Acoustimass® module rating AC input power: 100-240V 50/60 Hz 150W Speaker array rating AC input power: 100-240V 50/60 Hz 60W Wireless connection Output power: 5 mW @ 2400-2480 MHz Range: 20 ft (6.1 m) English - 15 Customer service CARE AND MAINTENANCE For additional help in your limited warranty rights. Failure to the card for specific return and shipping instructions; 2. What you...
Setup guide
Page 2
... line cord plug to the system or accessories. English They will help you set up and operate your local building codes for the correct type of important operating and maintenance instructions in accordance with any electronic products, use outdoors, in recreation vehicles, or on boats. • The product label is used in this apparatus to spill liquids into any part of used indoors. All Bose products must...
... line cord plug to the system or accessories. English They will help you set up and operate your local building codes for the correct type of important operating and maintenance instructions in accordance with any electronic products, use outdoors, in recreation vehicles, or on boats. • The product label is used in this apparatus to spill liquids into any part of used indoors. All Bose products must...

Setup guide
Page 3
... apparatus (including amplifiers) that produce heat. 9. Unplug this apparatus during lightning storms or when unused for replacement of the polarized or grounding-type plug. English - 3 Heed all instructions. 5. Do not block any heat sources such as power-supply cord or plug is damaged, ... apparatus. 11. Clean only with the manufacturer's instructions. 8. Refer all servicing to avoid injury from tip-over. 13. HDMI is used ; No part of time. 14. Keep these instructions. 2. A polarized plug has two blades with the apparatus. Use only with the cart, stand, tripod, bracket...
... apparatus (including amplifiers) that produce heat. 9. Unplug this apparatus during lightning storms or when unused for replacement of the polarized or grounding-type plug. English - 3 Heed all instructions. 5. Do not block any heat sources such as power-supply cord or plug is damaged, ... apparatus. 11. Clean only with the manufacturer's instructions. 8. Refer all servicing to avoid injury from tip-over. 13. HDMI is used ; No part of time. 14. Keep these instructions. 2. A polarized plug has two blades with the apparatus. Use only with the cart, stand, tripod, bracket...
Setup guide
Page 5
... 1: Connect TV audio to the TV input 9 Step 2: Connect source audio to the AUX input 11 Step 3: Connect a power cord to the speaker array 12 Step 4: Route the cables 13 Step 5: Position the speaker array 14 Step 6: Set up the Acoustimass® module 15 First time startup 17 Step 1: Install the remote batteries 17 Step 2: Run the ADAPTiQ® calibration 17 Step 3: Turn off the speakers in your TV 19 Step 4: Use your CineMate® 1 SR operating guide...
... 1: Connect TV audio to the TV input 9 Step 2: Connect source audio to the AUX input 11 Step 3: Connect a power cord to the speaker array 12 Step 4: Route the cables 13 Step 5: Position the speaker array 14 Step 6: Set up the Acoustimass® module 15 First time startup 17 Step 1: Install the remote batteries 17 Step 2: Run the ADAPTiQ® calibration 17 Step 3: Turn off the speakers in your TV 19 Step 4: Use your CineMate® 1 SR operating guide...
Setup guide
Page 6
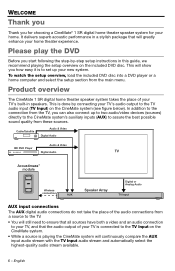
... guide, we recommend playing the setup overview on the CineMate system (see figure below). Cable/Satellite Audio & Video Digital Audio Audio & Video BD DVD Player Digital Audio TV Acoustimass® module Wireless connection AUX Speaker Array Digital or Analog Audio TV Input AUX input connections The AUX digital audio connections do not take the place of the audio connections from a source to the TV. • You will still need to ensure that will show you can also connect up your new system. This will greatly enhance your home theater...
... guide, we recommend playing the setup overview on the CineMate system (see figure below). Cable/Satellite Audio & Video Digital Audio Audio & Video BD DVD Player Digital Audio TV Acoustimass® module Wireless connection AUX Speaker Array Digital or Analog Audio TV Input AUX input connections The AUX digital audio connections do not take the place of the audio connections from a source to the TV. • You will still need to ensure that will show you can also connect up your new system. This will greatly enhance your home theater...
Setup guide
Page 7
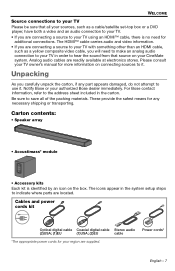
...; Speaker array • Acoustimass® module • Accessory kits Each kit is no need to make an analog audio connection to your TV in the carton. WELCOME Source connections to your TV Please be sure that source on your CineMate system. Notify Bose or your region are supplied. The HDMI™ cable carries audio and video information. • If you are connecting a source to your TV using an HDMI™ cable, there...
...; Speaker array • Acoustimass® module • Accessory kits Each kit is no need to make an analog audio connection to your TV in the carton. WELCOME Source connections to your TV Please be sure that source on your CineMate system. Notify Bose or your region are supplied. The HDMI™ cable carries audio and video information. • If you are connecting a source to your TV using an HDMI™ cable, there...
Setup guide
Page 9
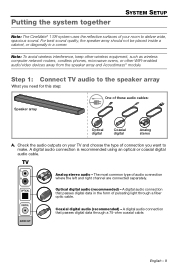
... to deliver wide, spacious sound. A digital audio connection that passes digital data in a corner. For best sound quality, the speaker array should not be placed inside a cabinet, or diagonally in the form of these audio cables: Speaker array Optical digital Coaxial digital Analog stereo A. Coaxial digital audio (recommended) - TV Analog stereo audio - Putting the system together SYSTEM SETUP Note: The CineMate® 1 SR system uses the reflective surfaces of audio connection where the left and right channel are connected separately.
... to deliver wide, spacious sound. A digital audio connection that passes digital data in a corner. For best sound quality, the speaker array should not be placed inside a cabinet, or diagonally in the form of these audio cables: Speaker array Optical digital Coaxial digital Analog stereo A. Coaxial digital audio (recommended) - TV Analog stereo audio - Putting the system together SYSTEM SETUP Note: The CineMate® 1 SR system uses the reflective surfaces of audio connection where the left and right channel are connected separately.
Setup guide
Page 11
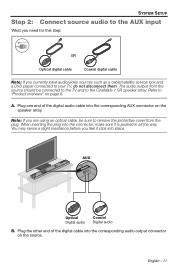
... the speaker array. AUX Optical Digital audio Coaxial Digital audio B. A. Note: If you currently have audio/video sources such as a cable/satellite set-top box and a DVD player connected to your TV, do not disconnect them. SYSTEM SETUP Step 2: Connect source audio to the AUX input What you need for this step: OR Optical digital cable Coaxial digital cable Note: If you are using an optical cable, be connected to the TV and to the CineMate 1 SR speaker array. When inserting the plug into the connector, make...
... the speaker array. AUX Optical Digital audio Coaxial Digital audio B. A. Note: If you currently have audio/video sources such as a cable/satellite set-top box and a DVD player connected to your TV, do not disconnect them. SYSTEM SETUP Step 2: Connect source audio to the AUX input What you need for this step: OR Optical digital cable Coaxial digital cable Note: If you are using an optical cable, be connected to the TV and to the CineMate 1 SR speaker array. When inserting the plug into the connector, make...
Setup guide
Page 18
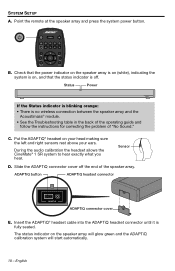
SYSTEM SETUP A. Status Power If the Status indicator is blinking orange: • There is no wireless connection between the speaker array and the Acoustimass® module. • See the Troubleshooting table in the back of the operating guide and follow the instructions for correcting the problem of the speaker array. ADAPTiQ button ADAPTiQ headset connector ADAPTiQ ADAPTiQ connector cover E. B. English C. Sensor D. Slide the ADAPTiQ connector cover off . The status indicator...
SYSTEM SETUP A. Status Power If the Status indicator is blinking orange: • There is no wireless connection between the speaker array and the Acoustimass® module. • See the Troubleshooting table in the back of the operating guide and follow the instructions for correcting the problem of the speaker array. ADAPTiQ button ADAPTiQ headset connector ADAPTiQ ADAPTiQ connector cover E. B. English C. Sensor D. Slide the ADAPTiQ connector cover off . The status indicator...
Setup guide
Page 19
.... Step 4: Use your CineMate® 1 SR operating guide See your operating guide for turning off switch on the Bose remote and check that came with your TV should be turned up button to hear sound from the speaker array. Then press the volume up enough to continue. Note: To confirm your TV speakers are off, press Mute on the rear panel near the audio output connectors. • If you have a menu setting for turning off...
.... Step 4: Use your CineMate® 1 SR operating guide See your operating guide for turning off switch on the Bose remote and check that came with your TV should be turned up button to hear sound from the speaker array. Then press the volume up enough to continue. Note: To confirm your TV speakers are off, press Mute on the rear panel near the audio output connectors. • If you have a menu setting for turning off...


