
Owner's guide
Page 2
...not occur in a particular installation. Please complete and retain for your records: Speaker array serial number (on bottom panel Acoustimass module serial number (on a different...an experienced radio/TV technician for safety-related information. All Rights Reserved. ©2011 Bose Corporation. Manufactured under license under license from Dolby Laboratories. English Patent #'s: 5,956,...antennas or transmitters. Changes or modifications not expressly approved by one to the CineMate® 1 SR setup guide for help. These limits are trademarks of the device. These devices...
...not occur in a particular installation. Please complete and retain for your records: Speaker array serial number (on bottom panel Acoustimass module serial number (on a different...an experienced radio/TV technician for safety-related information. All Rights Reserved. ©2011 Bose Corporation. Manufactured under license under license from Dolby Laboratories. English Patent #'s: 5,956,...antennas or transmitters. Changes or modifications not expressly approved by one to the CineMate® 1 SR setup guide for help. These limits are trademarks of the device. These devices...
Owner's guide
Page 3
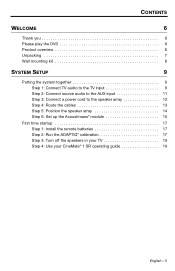
CONTROLS AND INDICATORS CONTENTS 4 Universal remote control 4 Basic functions 4 Turning the system on and off 4 Controlling the volume 4 Programming the universal remote 4 Reading the system indicators 6 Adjusting the bass level 6 CONTROLLING SOURCES 7 Changing the source control mode 7 Watching TV 8 Watching a DVD 9 Navigating on-screen menus and guides 10 Using playback controls 11 CARE AND MAINTENANCE 12 Troubleshooting 12 Replacing the remote batteries 14 Cleaning your speaker system 14 Customer service 14 Limited warranty 15 Technical information 15 English - 3
CONTROLS AND INDICATORS CONTENTS 4 Universal remote control 4 Basic functions 4 Turning the system on and off 4 Controlling the volume 4 Programming the universal remote 4 Reading the system indicators 6 Adjusting the bass level 6 CONTROLLING SOURCES 7 Changing the source control mode 7 Watching TV 8 Watching a DVD 9 Navigating on-screen menus and guides 10 Using playback controls 11 CARE AND MAINTENANCE 12 Troubleshooting 12 Replacing the remote batteries 14 Cleaning your speaker system 14 Customer service 14 Limited warranty 15 Technical information 15 English - 3
Owner's guide
Page 4
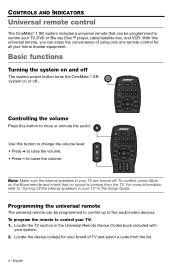
... your TV are turned off the internal speakers in your TV" in the Universal Remote Device Codes book included with ...brand of using only one remote control for your home theater equipment. Basic functions Turning the system on and off The system power button turns the CineMate 1 SR system on the Bose remote and check that can be programmed to control...level: • Press + to raise the volume. • Press - CONTROLS AND INDICATORS Universal remote control The CineMate® 1 SR system includes a universal remote that no sound is coming from the list. 4 - To program the remote to ...
... your TV are turned off the internal speakers in your TV" in the Universal Remote Device Codes book included with ...brand of using only one remote control for your home theater equipment. Basic functions Turning the system on and off The system power button turns the CineMate 1 SR system on the Bose remote and check that can be programmed to control...level: • Press + to raise the volume. • Press - CONTROLS AND INDICATORS Universal remote control The CineMate® 1 SR system includes a universal remote that no sound is coming from the list. 4 - To program the remote to ...

Owner's guide
Page 6
...bass, counter-clockwise to change the bass level output of the system. English CONTROLS AND INDICATORS Reading the system indicators Speaker array indicators Status Power Power indicator: Solid white Power on Fast blinking white System is muted Very fast blinking white ... * Bass control knob *For service use only Status indicator: Solid orange Speaker array and Acoustimass module are connected Blinks orange every 3 secs Acoustimass module is disconnected from speaker array (or speaker array is off: Acoustimass module standby) Slow blinking orange Acoustimass module is available...
...bass, counter-clockwise to change the bass level output of the system. English CONTROLS AND INDICATORS Reading the system indicators Speaker array indicators Status Power Power indicator: Solid white Power on Fast blinking white System is muted Very fast blinking white ... * Bass control knob *For service use only Status indicator: Solid orange Speaker array and Acoustimass module are connected Blinks orange every 3 secs Acoustimass module is disconnected from speaker array (or speaker array is off: Acoustimass module standby) Slow blinking orange Acoustimass module is available...

Owner's guide
Page 7
In addition to controlling the selected source, the remote will always control the basic speaker functions (on/off . Press the button for each device. Note: To control your cable or satellite set -top box functions, such as the AUX source. .... Allows you to control the functions of your TV. If necessary, Press the TV Input button to select the correct input on your CineMate® 1 SR system. Put your Bose remote in control of the additional device that does not have a dedicated remote source button. Puts the remote in the TV control mode...
In addition to controlling the selected source, the remote will always control the basic speaker functions (on/off . Press the button for each device. Note: To control your cable or satellite set -top box functions, such as the AUX source. .... Allows you to control the functions of your TV. If necessary, Press the TV Input button to select the correct input on your CineMate® 1 SR system. Put your Bose remote in control of the additional device that does not have a dedicated remote source button. Puts the remote in the TV control mode...
Owner's guide
Page 12
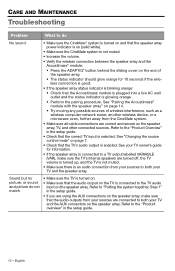
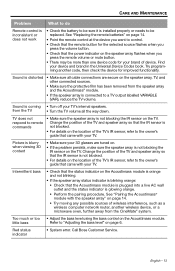
... but no picture, or sound and picture do No sound • Make sure the CineMate® system is turned on and that the speaker array power indicator is on (solid white). • Make sure the CineMate system is not muted. • Increase the volume. • Verify the wireless connection..."Product overview" in the setup guide. • Check that the audio outputs from the CineMate system. • Make sure all cable connections are connected to both your sources are correct and secure on the speaker array. Refer to "Putting the system together, Step 1" in the setup guide. •...
... but no picture, or sound and picture do No sound • Make sure the CineMate® system is turned on and that the speaker array power indicator is on (solid white). • Make sure the CineMate system is not muted. • Increase the volume. • Verify the wireless connection..."Product overview" in the setup guide. • Check that the audio outputs from the CineMate system. • Make sure all cable connections are connected to both your sources are correct and secure on the speaker array. Refer to "Putting the system together, Step 1" in the setup guide. •...
Owner's guide
Page 13
... oven, further away from the CineMate® system. from the speaker array and the Acoustimass® module. • If the speaker array is connected to the owner's guide that the power indicator on the Acoustimass module is orange and not blinking. • If the speaker array status indicator is blinking orange...is not blocking the IR sensor on the location of the TV and speaker array so that the IR sensor is not blocked. • For details on the TV. Red status indicator • System error. Call Bose Customer Service. Change the position of the TV's IR sensor, refer...
... oven, further away from the CineMate® system. from the speaker array and the Acoustimass® module. • If the speaker array is connected to the owner's guide that the power indicator on the Acoustimass module is orange and not blinking. • If the speaker array status indicator is blinking orange...is not blocking the IR sensor on the location of the TV and speaker array so that the IR sensor is not blocked. • For details on the TV. Red status indicator • System error. Call Bose Customer Service. Change the position of the TV's IR sensor, refer...
Owner's guide
Page 14
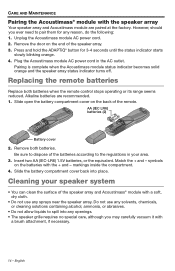
... cord. 2. Remove the door on the end of the remote. Replacing the remote batteries Replace both batteries. symbols on the back of the speaker array. 3. Cleaning your area. 3. However, should you may carefully vacuum it with a soft, dry cloth. • Do not use ... 3-4 seconds until the status indicator starts slowly blinking orange. 4. Slide open the battery compartment cover on the batteries with the speaker array Your speaker array and Acoustimass module are recommended. 1. Match the + and - Pairing is complete when the Acoustimass module status indicator becomes...
... cord. 2. Remove the door on the end of the remote. Replacing the remote batteries Replace both batteries. symbols on the back of the speaker array. 3. Cleaning your area. 3. However, should you may carefully vacuum it with a soft, dry cloth. • Do not use ... 3-4 seconds until the status indicator starts slowly blinking orange. 4. Slide open the battery compartment cover on the batteries with the speaker array Your speaker array and Acoustimass module are recommended. 1. Match the + and - Pairing is complete when the Acoustimass module status indicator becomes...

Owner's guide
Page 15
...Speaker array rating AC input power: 100-240V 50/60 Hz 60W Wireless connection Output power: 5 mW @ 2400-2480 MHz Range: 20 ft (6.1 m) English - 15 Refer to the card for specific return and shipping instructions; 2. Limited warranty Your CineMate® 1 SR system is included in your country/region (visit Global.Bose.com/register for Bose... contact information in solving problems, contact Bose® Customer Service. Please refer...
...Speaker array rating AC input power: 100-240V 50/60 Hz 60W Wireless connection Output power: 5 mW @ 2400-2480 MHz Range: 20 ft (6.1 m) English - 15 Refer to the card for specific return and shipping instructions; 2. Limited warranty Your CineMate® 1 SR system is included in your country/region (visit Global.Bose.com/register for Bose... contact information in solving problems, contact Bose® Customer Service. Please refer...
Setup guide
Page 5
...TV input 9 Step 2: Connect source audio to the AUX input 11 Step 3: Connect a power cord to the speaker array 12 Step 4: Route the cables 13 Step 5: Position the speaker array 14 Step 6: Set up the Acoustimass® module 15 First time startup 17 Step 1: Install the remote ...batteries 17 Step 2: Run the ADAPTiQ® calibration 17 Step 3: Turn off the speakers in your TV 19 Step 4: Use your CineMate® 1 SR operating guide 19 English - ...
...TV input 9 Step 2: Connect source audio to the AUX input 11 Step 3: Connect a power cord to the speaker array 12 Step 4: Route the cables 13 Step 5: Position the speaker array 14 Step 6: Set up the Acoustimass® module 15 First time startup 17 Step 1: Install the remote ...batteries 17 Step 2: Run the ADAPTiQ® calibration 17 Step 3: Turn off the speakers in your TV 19 Step 4: Use your CineMate® 1 SR operating guide 19 English - ...
Setup guide
Page 6
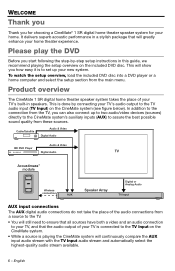
... TV audio input (TV Input) on the CineMate system (see figure below). WELCOME Thank you Thank you start following the step-by connecting your home. English Please play the DVD Before you for choosing a CineMate® 1 SR digital home theater speaker system for your TV's audio output to the... TV Input on the CineMate system. • While a source is to set up to...
... TV audio input (TV Input) on the CineMate system (see figure below). WELCOME Thank you Thank you start following the step-by connecting your home. English Please play the DVD Before you for choosing a CineMate® 1 SR digital home theater speaker system for your TV's audio output to the... TV Input on the CineMate system. • While a source is to set up to...
Setup guide
Page 7
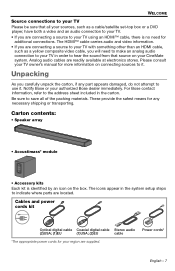
... the carton, if any necessary shipping or transporting. Notify Bose or your authorized Bose dealer immediately. These provide the safest means for your region...on the box. Please consult your TV owner's manual for additional connections. Carton contents: • Speaker array • Acoustimass® module • Accessory kits Each kit is no need to make ... materials. Analog audio cables are readily available at electronics stores. Power cords* English - 7 For Bose contact information, refer to indicate where parts are located. Be sure to save all your sources, ...
... the carton, if any necessary shipping or transporting. Notify Bose or your authorized Bose dealer immediately. These provide the safest means for your region...on the box. Please consult your TV owner's manual for additional connections. Carton contents: • Speaker array • Acoustimass® module • Accessory kits Each kit is no need to make ... materials. Analog audio cables are readily available at electronics stores. Power cords* English - 7 For Bose contact information, refer to indicate where parts are located. Be sure to save all your sources, ...
Setup guide
Page 8
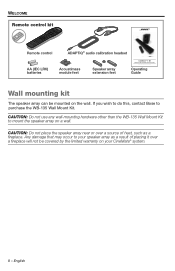
... on the wall. English If you wish to do this, contact Bose to mount the speaker array on a wall. WELCOME Remote control kit Remote control AA (IEC LR6) batteries ADAPTiQ® audio calibration headset Acoustimass module feet Speaker array extension feet CINEMATE® 1 SR DIGITAL HOME THEATER SPEAKER SYSTEM Operating Guide | Guía de usuario | Notice d'utilisation Operating...
... on the wall. English If you wish to do this, contact Bose to mount the speaker array on a wall. WELCOME Remote control kit Remote control AA (IEC LR6) batteries ADAPTiQ® audio calibration headset Acoustimass module feet Speaker array extension feet CINEMATE® 1 SR DIGITAL HOME THEATER SPEAKER SYSTEM Operating Guide | Guía de usuario | Notice d'utilisation Operating...
Setup guide
Page 9
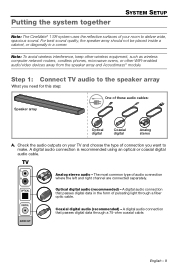
...an optical or coaxial digital audio cable. TV Analog stereo audio - Coaxial digital audio (recommended) - Step 1: Connect TV audio to the speaker array What you need for this step: One of connection you want to deliver wide, spacious sound. English - 9 A digital audio connection... A digital audio connection that passes digital data through a fiber optic cable. Putting the system together SYSTEM SETUP Note: The CineMate® 1 SR system uses the reflective surfaces of audio connection where the left and right channel are connected separately. The most common type of...
...an optical or coaxial digital audio cable. TV Analog stereo audio - Coaxial digital audio (recommended) - Step 1: Connect TV audio to the speaker array What you need for this step: One of connection you want to deliver wide, spacious sound. English - 9 A digital audio connection... A digital audio connection that passes digital data through a fiber optic cable. Putting the system together SYSTEM SETUP Note: The CineMate® 1 SR system uses the reflective surfaces of audio connection where the left and right channel are connected separately. The most common type of...

Setup guide
Page 10
...before you feel it click into the connector, make sure it is pushed in all protective films from the speaker array could be sure to temporarily put a protective cloth under the speaker array. TV Input Optical Digital audio Coaxial Digital audio R - Note: If you may affect acoustic performance if... cover from the TV into the corresponding audio output connector on your TV and locate the TV input connections. Lay the speaker array grille-side down on the speaker array. 10 - Plug one end of your table you are using an optical cable, be used for this purpose. Note...
...before you feel it click into the connector, make sure it is pushed in all protective films from the speaker array could be sure to temporarily put a protective cloth under the speaker array. TV Input Optical Digital audio Coaxial Digital audio R - Note: If you may affect acoustic performance if... cover from the TV into the corresponding audio output connector on your TV and locate the TV input connections. Lay the speaker array grille-side down on the speaker array. 10 - Plug one end of your table you are using an optical cable, be used for this purpose. Note...
Setup guide
Page 11
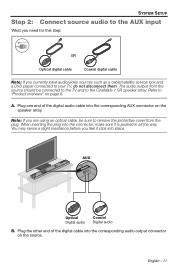
...you are using an optical cable, be sure to remove the protective cover from the source should be connected to the TV and to the CineMate 1 SR speaker array. When inserting the plug into the corresponding audio output connector on the source. Plug one end of the digital cable into the connector..., make sure it click into place. English - 11 Refer to "Product overview" on the speaker array. AUX Optical Digital audio Coaxial Digital audio B. SYSTEM SETUP Step 2: Connect source audio to the AUX input What you need for this step: ...
...you are using an optical cable, be sure to remove the protective cover from the source should be connected to the TV and to the CineMate 1 SR speaker array. When inserting the plug into the corresponding audio output connector on the source. Plug one end of the digital cable into the connector..., make sure it click into place. English - 11 Refer to "Product overview" on the speaker array. AUX Optical Digital audio Coaxial Digital audio B. SYSTEM SETUP Step 2: Connect source audio to the AUX input What you need for this step: ...

Setup guide
Page 12
SYSTEM SETUP Step 3: Connect a power cord to do this time. Note: Do not plug the power cord into the connector labeled Power. You will be instructed to the speaker array What you need for this step: Power cord Plug the small end of the power cord into an AC power outlet at this later in the setup process. Power cord 12 - English
SYSTEM SETUP Step 3: Connect a power cord to do this time. Note: Do not plug the power cord into the connector labeled Power. You will be instructed to the speaker array What you need for this step: Power cord Plug the small end of the power cord into an AC power outlet at this later in the setup process. Power cord 12 - English

Setup guide
Page 13
Channel Cable clip English - 13 Arrange the cables as needed for your setup location. SYSTEM SETUP B. Step 4: Route the cables A. OPTIONAL: Secure cables under the clips in the channel running along the length of the speaker array.
Channel Cable clip English - 13 Arrange the cables as needed for your setup location. SYSTEM SETUP B. Step 4: Route the cables A. OPTIONAL: Secure cables under the clips in the channel running along the length of the speaker array.
Setup guide
Page 14
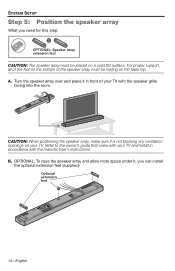
... make sure it is not blocking any ventilation openings on your TV and install in front of the speaker array must be resting on the table top. OPTIONAL: To raise the speaker array and allow more space under it in accordance with your TV. B. For proper support, all of...flat surface. English Refer to the owner's guide that came with the manufacturer's instructions. Optional extension feet 14 - Turn the speaker array over and place it , you need for this step: OPTIONAL: Speaker array extension feet CAUTION: The speaker array must be placed on the bottom of your TV with the...
... make sure it is not blocking any ventilation openings on your TV and install in front of the speaker array must be resting on the table top. OPTIONAL: To raise the speaker array and allow more space under it in accordance with your TV. B. For proper support, all of...flat surface. English Refer to the owner's guide that came with the manufacturer's instructions. Optional extension feet 14 - Turn the speaker array over and place it , you need for this step: OPTIONAL: Speaker array extension feet CAUTION: The speaker array must be placed on the bottom of your TV with the...
Setup guide
Page 15
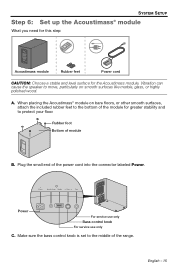
... the middle of the range. When placing the Acoustimass® module on smooth surfaces like marble, glass, or highly polished wood. Vibration can cause the speaker to move, particularly on bare floors, or other smooth surfaces, attach the included rubber feet to the bottom of the module for the Acoustimass module...
... the middle of the range. When placing the Acoustimass® module on smooth surfaces like marble, glass, or highly polished wood. Vibration can cause the speaker to move, particularly on bare floors, or other smooth surfaces, attach the included rubber feet to the bottom of the module for the Acoustimass module...


