Owner's guide
Page 3
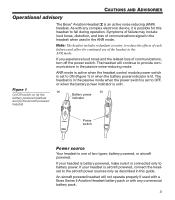
... it is aircraft powered, connect the headset to battery power. The headset will not operate properly if used in the ANR mode. If your headset is possible for continued use of communications signal in the headset when used with a Bose Series II Aviation Headset battery pack or with any commercial battery pack. 3 Note: The headset includes redundant circuitry to reduce the...
... it is aircraft powered, connect the headset to battery power. The headset will not operate properly if used in the ANR mode. If your headset is possible for continued use of communications signal in the headset when used with a Bose Series II Aviation Headset battery pack or with any commercial battery pack. 3 Note: The headset includes redundant circuitry to reduce the...
Owner's guide
Page 4
...headset use with ANR turned off . We strongly advise you to make sure you may not sound familiar. Other cautions TriPort® headset earcup requirements Proper headset operation requires that do not interfere with ANR off. As pilot in -flight entertainment or a home audio source through a Bose Aviation Headset... the communications signal coming into the headset, whether ANR is on . Using entertainment audio sources When listening to in command, you can hear and recognize these sounds when using the Bose® Aviation Headset while operating any aircraft. Avoid setting...
...headset use with ANR turned off . We strongly advise you to make sure you may not sound familiar. Other cautions TriPort® headset earcup requirements Proper headset operation requires that do not interfere with ANR off. As pilot in -flight entertainment or a home audio source through a Bose Aviation Headset... the communications signal coming into the headset, whether ANR is on . Using entertainment audio sources When listening to in command, you can hear and recognize these sounds when using the Bose® Aviation Headset while operating any aircraft. Avoid setting...
Owner's guide
Page 6
... an attached boom microphone cable 11 Attaching the boom microphone cable 11 Clothing clip 12 Preparing to use battery power 13 Changing the optional operation switches 13 Inserting batteries 14 Preparing the aircraft powered headset for use 14 Attaching and removing the cable 14 Mounting the connector 15 Details on making the connections...
... an attached boom microphone cable 11 Attaching the boom microphone cable 11 Clothing clip 12 Preparing to use battery power 13 Changing the optional operation switches 13 Inserting batteries 14 Preparing the aircraft powered headset for use 14 Attaching and removing the cable 14 Mounting the connector 15 Details on making the connections...
Owner's guide
Page 7
...individual earcup controls 24 Controlling the volume of a single aircraft powered headset 24 Volume control using multiple headsets 24 Headset Care and Maintenance 25 Instructions for continued airworthiness 25 Cleaning the headset 25 General cleaning 25 Earcup TriPort® headset openings 25 Ear cushions 26 Microphone windscreen 26 Earcup inner screen ...Technical Information 32 FAA Technical Standards Order 33 Service & Warranty Information 34 Warranty period 34 Service 34 To return your headset to Bose for repair 34 Contact information 34 Ordering parts and accessories 35 7
...individual earcup controls 24 Controlling the volume of a single aircraft powered headset 24 Volume control using multiple headsets 24 Headset Care and Maintenance 25 Instructions for continued airworthiness 25 Cleaning the headset 25 General cleaning 25 Earcup TriPort® headset openings 25 Ear cushions 26 Microphone windscreen 26 Earcup inner screen ...Technical Information 32 FAA Technical Standards Order 33 Service & Warranty Information 34 Warranty period 34 Service 34 To return your headset to Bose for repair 34 Contact information 34 Ordering parts and accessories 35 7
Owner's guide
Page 8
... variations The Bose Aviation Headset is the finest aviation headset you have purchased. Features common to electronically reduce unwanted aircraft noise, and Bose TriPort® headset technology for general aviation and helicopter use. This headset combines Bose Acoustic Noise Cancelling® headset technology to most variations: • Acoustic Noise Cancelling headset technology • TriPort headset technology • Communications cable with integrated control module •...
... variations The Bose Aviation Headset is the finest aviation headset you have purchased. Features common to electronically reduce unwanted aircraft noise, and Bose TriPort® headset technology for general aviation and helicopter use. This headset combines Bose Acoustic Noise Cancelling® headset technology to most variations: • Acoustic Noise Cancelling headset technology • TriPort headset technology • Communications cable with integrated control module •...
Owner's guide
Page 10
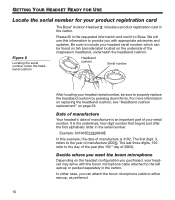
..., four-digit number that begins just after the first alphabetic letter in the carton. We will use this example, the date of your serial number. GETTING YOUR HEADSET READY FOR USE Locate the serial number for your product registration card The Bose® Aviation Headset includes a product registration card in the serial number. It is 3192.
..., four-digit number that begins just after the first alphabetic letter in the carton. We will use this example, the date of your serial number. GETTING YOUR HEADSET READY FOR USE Locate the serial number for your product registration card The Bose® Aviation Headset includes a product registration card in the serial number. It is 3192.
Owner's guide
Page 11
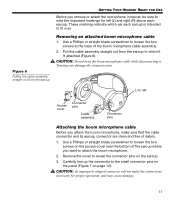
...attached (Figure 6). CAUTION: Do not twist the boom microphone cable while disconnecting it is intended to loosen the two screws on page 12). Use a Phillips or straight blade screwdriver to reveal the connector pins on the earcup. 3. Carefully line up the connector to the small connector pins... or straight blade screwdriver to fit over. Pull the cable assembly straight out from the earcup GETTING YOUR HEADSET READY FOR USE Before you attach the boom microphone, make the connections necessary for left Access cover Connector pins Cable assembly Connector pins Attaching ...
...attached (Figure 6). CAUTION: Do not twist the boom microphone cable while disconnecting it is intended to loosen the two screws on page 12). Use a Phillips or straight blade screwdriver to reveal the connector pins on the earcup. 3. Carefully line up the connector to the small connector pins... or straight blade screwdriver to fit over. Pull the cable assembly straight out from the earcup GETTING YOUR HEADSET READY FOR USE Before you attach the boom microphone, make the connections necessary for left Access cover Connector pins Cable assembly Connector pins Attaching ...
Owner's guide
Page 12
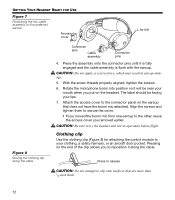
...when you put on the earcup that are more than 1/4-inch thick. 12 With the screw threads properly aligned, tighten the screws. 6. Clothing clip Use the clothing clip (Figure 8) for left Figure 8 Moving the clothing clip along the cable. Press to release CAUTION: Do not attempt to clip ...that does not have the boom mic attached. CAUTION: Do not apply excessive force, which may result in earcup damage. 5. GETTING YOUR HEADSET READY FOR USE Figure 7 Positioning the mic cable assembly on the end of the clip allows you to reposition it along the cable Connector pins Cable assembly...
...when you put on the earcup that are more than 1/4-inch thick. 12 With the screw threads properly aligned, tighten the screws. 6. Clothing clip Use the clothing clip (Figure 8) for left Figure 8 Moving the clothing clip along the cable. Press to release CAUTION: Do not attempt to clip ...that does not have the boom mic attached. CAUTION: Do not apply excessive force, which may result in earcup damage. 5. GETTING YOUR HEADSET READY FOR USE Figure 7 Positioning the mic cable assembly on the end of the clip allows you to reposition it along the cable Connector pins Cable assembly...
Owner's guide
Page 13
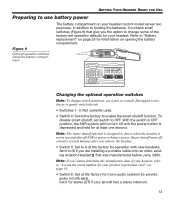
...the tab. • Switches 1- 3: Not currently used. • Switch 4: Set at the factory for information on page 28 for operation with new headsets. Refer to B if you are installing a portable cable onto an older, existing Aviation Headset that give you cannot determine the manufacture date of ...the factory-set switch to use a pen or a small, flat-tipped screwdriver to...
...the tab. • Switches 1- 3: Not currently used. • Switch 4: Set at the factory for information on page 28 for operation with new headsets. Refer to B if you are installing a portable cable onto an older, existing Aviation Headset that give you cannot determine the manufacture date of ...the factory-set switch to use a pen or a small, flat-tipped screwdriver to...
Owner's guide
Page 14
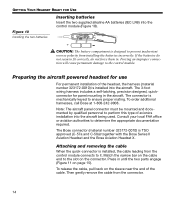
... number 323172-0010) is installed into the aircraft being used. The Bose connector (material number 323172-0010) is TSO approved (C-57a and C-58a) together with the Bose Series II Aviation Headset and the Bose Aviation Headset X. To release the cable, pull back on the connector. Preparing the aircraft powered headset for panel mounting in until the two parts engage...
... number 323172-0010) is installed into the aircraft being used. The Bose connector (material number 323172-0010) is TSO approved (C-57a and C-58a) together with the Bose Series II Aviation Headset and the Bose Aviation Headset X. To release the cable, pull back on the connector. Preparing the aircraft powered headset for panel mounting in until the two parts engage...
Owner's guide
Page 15
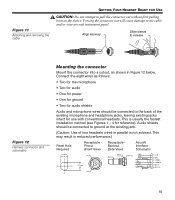
...back on the sleeve. This is not advised. Audio shields should be connected to the back of two headsets wired in parallel is usually the fastest installation method (see Figures 1 - 4 for use with conventional headsets. This may result in Figure 12 below. Align keyway Slide sleeve to release Figure 12 Harness connector ...• 1 V+IN • 2 GND • 3 COMM L • 4 COMM R • 5 MIC HI • 6 MIC LO 15 Figure 11 Attaching and removing the cable GETTING YOUR HEADSET READY FOR USE CAUTION: Do not attempt to the cable and/or your aircraft instrument panel.
...back on the sleeve. This is not advised. Audio shields should be connected to the back of two headsets wired in parallel is usually the fastest installation method (see Figures 1 - 4 for use with conventional headsets. This may result in Figure 12 below. Align keyway Slide sleeve to release Figure 12 Harness connector ...• 1 V+IN • 2 GND • 3 COMM L • 4 COMM R • 5 MIC HI • 6 MIC LO 15 Figure 11 Attaching and removing the cable GETTING YOUR HEADSET READY FOR USE CAUTION: Do not attempt to the cable and/or your aircraft instrument panel.
Owner's guide
Page 16
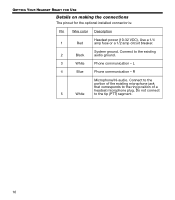
L 4 Blue Phone communication - R Microphone/Hi-audio. GETTING YOUR HEADSET READY FOR USE Details on making the connections The pinout for the optional installed connector is: Pin Wire color Description Headset power (10-32 VDC). Connect to the tip (PTT) segment. 16 Do not connect 5 White to the existing 2 Black audio ground. 3 White Phone communication - Connect to the portion of the existing microphone jack that corresponds to the ring position of a headset microphone plug. Use a 1/4 1 Red amp fuse or a 1/2 amp circuit breaker. System ground.
L 4 Blue Phone communication - R Microphone/Hi-audio. GETTING YOUR HEADSET READY FOR USE Details on making the connections The pinout for the optional installed connector is: Pin Wire color Description Headset power (10-32 VDC). Connect to the tip (PTT) segment. 16 Do not connect 5 White to the existing 2 Black audio ground. 3 White Phone communication - Connect to the portion of the existing microphone jack that corresponds to the ring position of a headset microphone plug. Use a 1/4 1 Red amp fuse or a 1/2 amp circuit breaker. System ground.
Owner's guide
Page 17
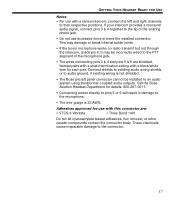
...segment of the existing phone jack. • Do not use excessive force or bend the installed connector. Connect shields to existing audio wiring shields or to audio ground, if existing wiring is 22 AWG. Call the Bose Aviation Headset Department for details: 800-287-0611. • Connecting ...power directly to pins 5 or 6 will result in damage to an audio system using transformer-coupled audio outputs. This may be installed to the microphone. ...
...segment of the existing phone jack. • Do not use excessive force or bend the installed connector. Connect shields to existing audio wiring shields or to audio ground, if existing wiring is 22 AWG. Call the Bose Aviation Headset Department for details: 800-287-0611. • Connecting ...power directly to pins 5 or 6 will result in damage to an audio system using transformer-coupled audio outputs. This may be installed to the microphone. ...
Owner's guide
Page 18
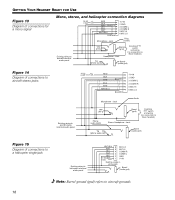
... FOR USE Figure 13 Diagram of connections to aircraft stereo jacks 10-32 V DC 1/2A RED BLK WHT BLU WHT WHT/BLU BLK/WH BLK/WH Microphone - Jack Exisiting PTT switch and wiring (no connection to Bose headset) Tip (phone audio left) Barrel (audio gnd) Figure 15 Diagram of ... 3 COMM L BLK 10-32 RED V DC 1/2A 2 1 GND V+IN Existing single 4prong jack Barrel (audio gnd) Note: Barrel ground (gnd) refers to Bose headset) Tip (phone audio) Barrel (audio gnd) Figure 14 Diagram of connections for a mono signal Mono, stereo, and helicopter connection diagrams 10-32 V DC 1/2A RED...
... FOR USE Figure 13 Diagram of connections to aircraft stereo jacks 10-32 V DC 1/2A RED BLK WHT BLU WHT WHT/BLU BLK/WH BLK/WH Microphone - Jack Exisiting PTT switch and wiring (no connection to Bose headset) Tip (phone audio left) Barrel (audio gnd) Figure 15 Diagram of ... 3 COMM L BLK 10-32 RED V DC 1/2A 2 1 GND V+IN Existing single 4prong jack Barrel (audio gnd) Note: Barrel ground (gnd) refers to Bose headset) Tip (phone audio) Barrel (audio gnd) Figure 14 Diagram of connections for a mono signal Mono, stereo, and helicopter connection diagrams 10-32 V DC 1/2A RED...
Owner's guide
Page 19
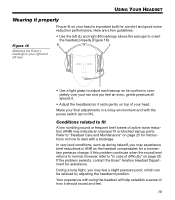
...the headband position. During a long flight, you feel . 19 Make your head. Refer to "Headset Care and Maintenance" on page 25 for a momentary pressure change. R L • Use a light grasp to adjust each earcup so its cushion is important both for assistance. Conditions related ... the headband so it rests gently on page 30. If the problem persists, contact the Bose® Aviation Headset Department for comfort and good noise reduction performance. Your experience with using the headset will help establish a sense of active noise reduction (ANR) may indicate an improper fit ...
...the headband position. During a long flight, you feel . 19 Make your head. Refer to "Headset Care and Maintenance" on page 25 for a momentary pressure change. R L • Use a light grasp to adjust each earcup so its cushion is important both for assistance. Conditions related ... the headband so it rests gently on page 30. If the problem persists, contact the Bose® Aviation Headset Department for comfort and good noise reduction performance. Your experience with using the headset will help establish a sense of active noise reduction (ANR) may indicate an improper fit ...

Owner's guide
Page 20
...center, the microphone should be 1/2 inch from the opening of the microphone is adjustable for longer life from the two batteries. USING YOUR HEADSET Figure 17 Properly placing the microphone, (a) wide side nearly touching your mouth, not (b) farther away or (c) tilted Microphone placement... down so it will be slightly off the circuitry several minutes after you remove the headset. The battery powered headset uses AdaptiSense™ headset technology to "Operating the aircraft powered headset" on your lips. Pull the microphone in . This maximizes available energy for day/night...
...center, the microphone should be 1/2 inch from the opening of the microphone is adjustable for longer life from the two batteries. USING YOUR HEADSET Figure 17 Properly placing the microphone, (a) wide side nearly touching your mouth, not (b) farther away or (c) tilted Microphone placement... down so it will be slightly off the circuitry several minutes after you remove the headset. The battery powered headset uses AdaptiSense™ headset technology to "Operating the aircraft powered headset" on your lips. Pull the microphone in . This maximizes available energy for day/night...

Owner's guide
Page 21
...the aircraft intercom or radio and at its lowest setting, neither knob on the control module can completely turn off the volume. Even at the headset control module. Exposure to toggle between the daytime (brighter) and nighttime (dimmer) LED settings. Figure 18 The LED, volume control knobs, ...and power switch on the control module of a battery powered headset USING YOUR HEADSET Power button Use the power button to turn the headset on or off, or to change the LED brightness (Figure 18). • Press the power button once to turn ...
...the aircraft intercom or radio and at its lowest setting, neither knob on the control module can completely turn off the volume. Even at the headset control module. Exposure to toggle between the daytime (brighter) and nighttime (dimmer) LED settings. Figure 18 The LED, volume control knobs, ...and power switch on the control module of a battery powered headset USING YOUR HEADSET Power button Use the power button to turn the headset on or off, or to change the LED brightness (Figure 18). • Press the power button once to turn ...
Owner's guide
Page 22
... to balance the volume between the left earcup. • Use the right knob to a safe operating level. 2. Adjust the volume knobs on the headset control module up to increase the volume of his/her Bose® Aviation Headset as follows: 1. Battery life varies with the ambient noise ...level of the aircraft, temperature, ear cushion condition, and age of their headsets. Turn each volume knob on page 24...
... to balance the volume between the left earcup. • Use the right knob to a safe operating level. 2. Adjust the volume knobs on the headset control module up to increase the volume of his/her Bose® Aviation Headset as follows: 1. Battery life varies with the ambient noise ...level of the aircraft, temperature, ear cushion condition, and age of their headsets. Turn each volume knob on page 24...
Owner's guide
Page 23
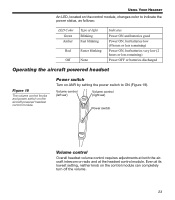
USING YOUR HEADSET An LED, located on the control module, changes color to ON (Figure 19). Even at the headset control module. Volume control (left ear) Volume control (right ear) Power switch Volume control Overall headset volume control requires adjustments at both the aircraft intercom or radio and...very low (2 hours or less remaining) Power OFF or batteries discharged Operating the aircraft powered headset Figure 19 The volume control knobs and power switch on the aircraft powered headset control module Power switch Turn on the control module can completely turn off the volume. 23...
USING YOUR HEADSET An LED, located on the control module, changes color to ON (Figure 19). Even at the headset control module. Volume control (left ear) Volume control (right ear) Power switch Volume control Overall headset volume control requires adjustments at both the aircraft intercom or radio and...very low (2 hours or less remaining) Power OFF or batteries discharged Operating the aircraft powered headset Figure 19 The volume control knobs and power switch on the aircraft powered headset control module Power switch Turn on the control module can completely turn off the volume. 23...

Owner's guide
Page 24
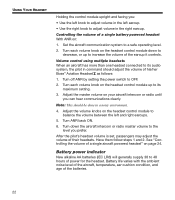
... the power switch to a safe operating level. Have them follow steps 1 and 2 under "Controlling the volume of his/her Bose Aviation Headset as follows: 1. Notice the individual earcup controls Separate knobs on the control module control the volume for the first time, turn ...it controls. Note: This should adjust the volume of a single aircraft powered headset" above. Volume control using multiple headsets When an aircraft has more than one headset connected to high volume levels. 2. USING YOUR HEADSET 24 CAUTION: Avoid setting the volume levels too high. Turn each separate ...
... the power switch to a safe operating level. Have them follow steps 1 and 2 under "Controlling the volume of his/her Bose Aviation Headset as follows: 1. Notice the individual earcup controls Separate knobs on the control module control the volume for the first time, turn ...it controls. Note: This should adjust the volume of a single aircraft powered headset" above. Volume control using multiple headsets When an aircraft has more than one headset connected to high volume levels. 2. USING YOUR HEADSET 24 CAUTION: Avoid setting the volume levels too high. Turn each separate ...


