Owner's guide
Page 4
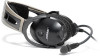
... audio source through a Bose Aviation Headset , be sure you can understand critical communications even with ANR off. We strongly advise you to make sure you can hear and recognize these sounds when using the Bose® Aviation Headset while operating any aircraft. The TriPort headset openings (Figure 2 on page 5) are located on the earcup are comprised of two...
... audio source through a Bose Aviation Headset , be sure you can understand critical communications even with ANR off. We strongly advise you to make sure you can hear and recognize these sounds when using the Bose® Aviation Headset while operating any aircraft. The TriPort headset openings (Figure 2 on page 5) are located on the earcup are comprised of two...
Owner's guide
Page 5
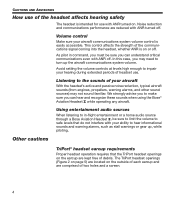
... adjacent to reduce noise (Figure 3). Figure 2 TriPort® headset openings CAUTIONS AND ADVISORIES Figure 3 Protective inner screen inside the earcup TriPort headset openings Earcup inner screen The protective inner screen is battery powered, remove the batteries before storing the headset for screen replacement, contact the Bose® Aviation Headset Department. If the screen gets wet or any foreign...
... adjacent to reduce noise (Figure 3). Figure 2 TriPort® headset openings CAUTIONS AND ADVISORIES Figure 3 Protective inner screen inside the earcup TriPort headset openings Earcup inner screen The protective inner screen is battery powered, remove the batteries before storing the headset for screen replacement, contact the Bose® Aviation Headset Department. If the screen gets wet or any foreign...
Owner's guide
Page 6
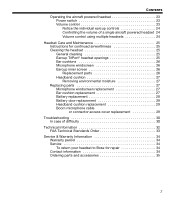
... 4 Volume control 4 Listening to the sounds of your aircraft 4 Using entertainment audio sources 4 Other cautions 4 TriPort® headset earcup requirements 4 Earcup inner screen 5 Storage 5 Contents 6 Introduction 8 We appreciate your choice 8 Headset and cable variations 8 Getting Your Headset Ready for Use 10 Locate the serial number for your product registration card 10 Date of manufacture 10...
... 4 Volume control 4 Listening to the sounds of your aircraft 4 Using entertainment audio sources 4 Other cautions 4 TriPort® headset earcup requirements 4 Earcup inner screen 5 Storage 5 Contents 6 Introduction 8 We appreciate your choice 8 Headset and cable variations 8 Getting Your Headset Ready for Use 10 Locate the serial number for your product registration card 10 Date of manufacture 10...
Owner's guide
Page 7
... the volume of a single aircraft powered headset 24 Volume control using multiple headsets 24 Headset Care and Maintenance 25 Instructions for continued airworthiness 25 Cleaning the headset 25 General cleaning 25 Earcup TriPort® headset openings 25 Ear cushions 26 Microphone windscreen 26 Earcup inner screen 26 Replacement parts 26 Headband ...Technical Information 32 FAA Technical Standards Order 33 Service & Warranty Information 34 Warranty period 34 Service 34 To return your headset to Bose for repair 34 Contact information 34 Ordering parts and accessories 35 7
... the volume of a single aircraft powered headset 24 Volume control using multiple headsets 24 Headset Care and Maintenance 25 Instructions for continued airworthiness 25 Cleaning the headset 25 General cleaning 25 Earcup TriPort® headset openings 25 Ear cushions 26 Microphone windscreen 26 Earcup inner screen 26 Replacement parts 26 Headband ...Technical Information 32 FAA Technical Standards Order 33 Service & Warranty Information 34 Warranty period 34 Service 34 To return your headset to Bose for repair 34 Contact information 34 Ordering parts and accessories 35 7
Owner's guide
Page 10
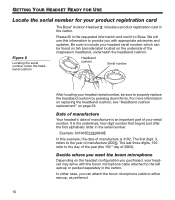
We will use this example, the date of your serial number. It is an important part of manufacture is 3192. In either earcup, as preferred. 10 The first digit, 3, refers to the day of the year (the 192nd day of the magnesium headband, underneath...Depending on the headset configuration you can be sure to Bose. Headband cushion Serial number After locating your headset serial number, be found on teh barcode label located on page 29. GETTING YOUR HEADSET READY FOR USE Locate the serial number for your product registration card The Bose® Aviation Headset includes a ...
We will use this example, the date of your serial number. It is an important part of manufacture is 3192. In either earcup, as preferred. 10 The first digit, 3, refers to the day of the year (the 192nd day of the magnesium headband, underneath...Depending on the headset configuration you can be sure to Bose. Headband cushion Serial number After locating your headset serial number, be found on teh barcode label located on page 29. GETTING YOUR HEADSET READY FOR USE Locate the serial number for your product registration card The Bose® Aviation Headset includes a ...
Owner's guide
Page 11
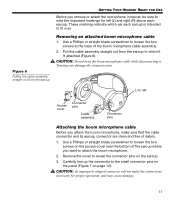
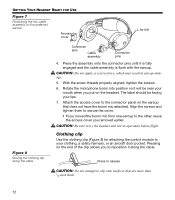
... line up the connector to the small connector pins on the panel (Figure 7 on the earcup. 3. These markings indicate which it . Pull the cable assembly straight out from the earcup GETTING YOUR HEADSET READY FOR USE Before you remove or attach the microphone, however, be sure to note the... for proper operation, and may cause damage. 11 CAUTION: An improperly aligned connector will not make sure that the cable connector and its earcup connector are clean and free of the earcup where you attach the boom microphone, make the connections necessary for left (L) and right (R) above each...
... line up the connector to the small connector pins on the panel (Figure 7 on the earcup. 3. These markings indicate which it . Pull the cable assembly straight out from the earcup GETTING YOUR HEADSET READY FOR USE Before you remove or attach the microphone, however, be sure to note the... for proper operation, and may cause damage. 11 CAUTION: An improperly aligned connector will not make sure that the cable connector and its earcup connector are clean and free of the earcup where you attach the boom microphone, make the connections necessary for left (L) and right (R) above each...
Owner's guide
Page 12
.... 5. Align the screws and tighten them to secure the cover. • If you moved the boom mic from one earcup to try the headset and test its operation before flight. Rotate the microphone boom into position so it will be facing your clothing, a safety harness, or an aircraft door...the boom mic attached. Press the assembly onto the connector pins until it is fully engaged and the cable assembly is flush with the earcup. GETTING YOUR HEADSET READY FOR USE Figure 7 Positioning the mic cable assembly on the end of the clip allows you to reposition it along the cable Connector...
.... 5. Align the screws and tighten them to secure the cover. • If you moved the boom mic from one earcup to try the headset and test its operation before flight. Rotate the microphone boom into position so it will be facing your clothing, a safety harness, or an aircraft door...the boom mic attached. Press the assembly onto the connector pins until it is fully engaged and the cable assembly is flush with the earcup. GETTING YOUR HEADSET READY FOR USE Figure 7 Positioning the mic cable assembly on the end of the clip allows you to reposition it along the cable Connector...
Owner's guide
Page 19
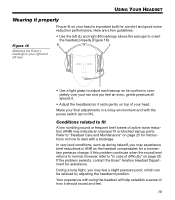
..." on page 30. Make your final adjustments in ANR as during takeoff, you may indicate an improper fit or blocked earcup ports. Conditions related to orient the headset properly (Figure 16). Here are a few guidelines: Figure 16 Matching the R and L markings to your right and ...such as the headset compensates for instructions on how to ON. If the problem persists, contact the Bose® Aviation Headset Department for comfort and good noise reduction performance. If this problem continues when the sound level returns to normal, however, refer to adjust each earcup so its cushion...
..." on page 30. Make your final adjustments in ANR as during takeoff, you may indicate an improper fit or blocked earcup ports. Conditions related to orient the headset properly (Figure 16). Here are a few guidelines: Figure 16 Matching the R and L markings to your right and ...such as the headset compensates for instructions on how to ON. If the problem persists, contact the Bose® Aviation Headset Department for comfort and good noise reduction performance. If this problem continues when the sound level returns to normal, however, refer to adjust each earcup so its cushion...

Owner's guide
Page 21
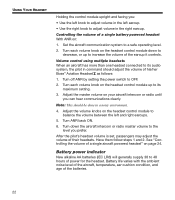
... and hold the power button to loud sounds may cause hearing damage. 21 CAUTION: Avoid setting the volume levels too high. Overall headset volume control requires adjustments at both the aircraft intercom or radio and at its lowest setting, neither knob on page page 13). Exposure...power indicator Volume control (left ear) Volume control (right ear) LED brightness control symbol On/Off control symbol Power button for each separate earcup (Figure 18). Note: For details on how to disable smart shutoff, see "Changing the optional operation switches" on the control module control...
... and hold the power button to loud sounds may cause hearing damage. 21 CAUTION: Avoid setting the volume levels too high. Overall headset volume control requires adjustments at both the aircraft intercom or radio and at its lowest setting, neither knob on page page 13). Exposure...power indicator Volume control (left ear) Volume control (right ear) LED brightness control symbol On/Off control symbol Power button for each separate earcup (Figure 18). Note: For details on how to disable smart shutoff, see "Changing the optional operation switches" on the control module control...
Owner's guide
Page 22
... adjust volume in the right earcup. Set the aircraft communication system to OFF. 2. Turn off ANR by setting the power switch to a safe operating level. 2. Turn each volume knob on the headset control module up to increase the volume of his/her Bose® Aviation Headset as follows: 1. Turn ANR... back ON. 6. After the pilot's headset volume is set, passengers may adjust the volume of power for the...
... adjust volume in the right earcup. Set the aircraft communication system to OFF. 2. Turn off ANR by setting the power switch to a safe operating level. 2. Turn each volume knob on the headset control module up to increase the volume of his/her Bose® Aviation Headset as follows: 1. Turn ANR... back ON. 6. After the pilot's headset volume is set, passengers may adjust the volume of power for the...

Owner's guide
Page 24
...Adjust the master volume on your aircraft for each volume knob on the headset control module to OFF. 2. Adjust the knobs on the headset control module to its maximum. 3. Notice the individual earcup controls Separate knobs on the aircraft intercom or radio to loud sounds may...• Use the left knob to adjust volume in the left and right earcups. 5. Set the aircraft communication system to adjust the volume in a noisy environment. 4. Controlling the volume of his/her Bose Aviation Headset as follows: 1. Holding the control module upright and facing you can hear communications...
...Adjust the master volume on your aircraft for each volume knob on the headset control module to OFF. 2. Adjust the knobs on the headset control module to its maximum. 3. Notice the individual earcup controls Separate knobs on the aircraft intercom or radio to loud sounds may...• Use the left knob to adjust volume in the left and right earcups. 5. Set the aircraft communication system to adjust the volume in a noisy environment. 4. Controlling the volume of his/her Bose Aviation Headset as follows: 1. Holding the control module upright and facing you can hear communications...

Owner's guide
Page 25
...warranty period, must remain clean and free of the earcups, as windscreens and ear cushions may be sure that may require periodic replacement. HEADSET CARE AND MAINTENANCE Instructions for continued airworthiness Bose recommends following pages. Do not blow air into ...the openings. Other maintenance is needed, follow the recommendations on one earcup Earcup TriPort® headset openings The TriPort headset openings, shown ...
...warranty period, must remain clean and free of the earcups, as windscreens and ear cushions may be sure that may require periodic replacement. HEADSET CARE AND MAINTENANCE Instructions for continued airworthiness Bose recommends following pages. Do not blow air into ...the openings. Other maintenance is needed, follow the recommendations on one earcup Earcup TriPort® headset openings The TriPort headset openings, shown ...
Owner's guide
Page 26
... replace, repair, or clean this component. Located inside the earcup, the inner screen is critical to cause operating problems, contact the Bose® Aviation Headset Department. Do not immerse ear cushions in mild soapy water. HEADSET CARE AND MAINTENANCE Ear cushions As a general rule, ear ...cushions should be ordered directly from the earcups, as described in "General cleaning" on...
... replace, repair, or clean this component. Located inside the earcup, the inner screen is critical to cause operating problems, contact the Bose® Aviation Headset Department. Do not immerse ear cushions in mild soapy water. HEADSET CARE AND MAINTENANCE Ear cushions As a general rule, ear ...cushions should be ordered directly from the earcups, as described in "General cleaning" on...
Owner's guide
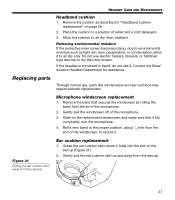
Page 27
...replacement windscreen and make sure that secures the windscreen by rolling the band from the earcup. 27 Microphone windscreen replacement 1. Allow the cushion to air dry only. If the headset is immersed in "Headband cushion replacement" on page 29. 2. Replacing parts Through..., about 1/4 inch from the earcup Ear cushion replacement 1. Removing environmental moisture If the protective inner screen becomes damp, due to environmental moisture such as described in liquid, do not use it. Contact the Bose® Aviation Headset Department for assistance. Grasp the ear...
...replacement windscreen and make sure that secures the windscreen by rolling the band from the earcup. 27 Microphone windscreen replacement 1. Allow the cushion to air dry only. If the headset is immersed in "Headband cushion replacement" on page 29. 2. Replacing parts Through..., about 1/4 inch from the earcup Ear cushion replacement 1. Removing environmental moisture If the protective inner screen becomes damp, due to environmental moisture such as described in liquid, do not use it. Contact the Bose® Aviation Headset Department for assistance. Grasp the ear...
Owner's guide
Page 28
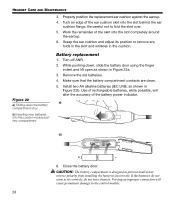
...Turn off ANR. 2. Forcing an improper connection will alter the accuracy of the ear cushion skirt into the slot completely around the earcup. 6. Work the remainder of the skirt into the slot behind the ear cushion flange. Tuck an edge of the battery power ...6. If the batteries do not seem to fit correctly, do not force them in Figure 22a. 3. HEADSET CARE AND MAINTENANCE 3. Properly position the replacement ear cushion against the earcup. 4. Use of rechargeable batteries, while possible, will cause permanent damage to prevent inadvertent reverse polarity from installing...
...Turn off ANR. 2. Forcing an improper connection will alter the accuracy of the ear cushion skirt into the slot completely around the earcup. 6. Work the remainder of the skirt into the slot behind the ear cushion flange. Tuck an edge of the battery power ...6. If the batteries do not seem to fit correctly, do not force them in Figure 22a. 3. HEADSET CARE AND MAINTENANCE 3. Properly position the replacement ear cushion against the earcup. 4. Use of rechargeable batteries, while possible, will cause permanent damage to prevent inadvertent reverse polarity from installing...
Owner's guide
Page 30
...distortion in a loud environment • Check the TriPort® headset openings on the outside of each earcup to do Communication, but no active noise reduction in either ear • Make sure the headset ANR is present, carefully remove the debris using the contact information...aircraft powered version) for instructions on volume adjustment. • Check stereo/mono configuration switch. If the problem persists, contact the Bose® Aviation Headset Department, using tweezers. Refer to do " in the right column. Refer to page 22 for description of LED indicator. ...
...distortion in a loud environment • Check the TriPort® headset openings on the outside of each earcup to do Communication, but no active noise reduction in either ear • Make sure the headset ANR is present, carefully remove the debris using the contact information...aircraft powered version) for instructions on volume adjustment. • Check stereo/mono configuration switch. If the problem persists, contact the Bose® Aviation Headset Department, using tweezers. Refer to do " in the right column. Refer to page 22 for description of LED indicator. ...
Owner's guide
Page 31
...that have surface tears, torn stitching joints, large wrinkles, or have become dried and stiff. Refer to headset turned on in a quiet environment • Adjust the earcup fit to stereo, and the headset is plugged into the slot on your head. Low rumbling sound with no communication • Check boom ...• If your aircraft has a mono audio system, verify that the stereo/ mono configuration switch is set to create a better seal on the earcup with headset turned on page 19. Do not blow out or vacuum debris. • Inspect the seal between the ear cushion skirt and the...
...that have surface tears, torn stitching joints, large wrinkles, or have become dried and stiff. Refer to headset turned on in a quiet environment • Adjust the earcup fit to stereo, and the headset is plugged into the slot on your head. Low rumbling sound with no communication • Check boom ...• If your aircraft has a mono audio system, verify that the stereo/ mono configuration switch is set to create a better seal on the earcup with headset turned on page 19. Do not blow out or vacuum debris. • Inspect the seal between the ear cushion skirt and the...