Owner's guide
Page 3
English DEsepuatsñcohl FItralniaçnaois Nederlands Svenska CONTENTS INTRODUCTION 2 Before you begin 2 For your records 3 Unpacking 4 SETUP 6 1 Placing the system components 6 2 Connecting the speakers to the module 8 3 Connecting the module to the media center . . . . 10 4 Connecting the system video to your TV 12 5 Connecting a cable box or other component . . . ... 41 Checking for disc compatibility 42 For DVDs: Setting Parental Control 42 Choosing a password 42 Setting a restriction level 43 Ratings supplied by the MPAA 43 iii
English DEsepuatsñcohl FItralniaçnaois Nederlands Svenska CONTENTS INTRODUCTION 2 Before you begin 2 For your records 3 Unpacking 4 SETUP 6 1 Placing the system components 6 2 Connecting the speakers to the module 8 3 Connecting the module to the media center . . . . 10 4 Connecting the system video to your TV 12 5 Connecting a cable box or other component . . . ... 41 Checking for disc compatibility 42 For DVDs: Setting Parental Control 42 Choosing a password 42 Setting a restriction level 43 Ratings supplied by the MPAA 43 iii
Owner's guide
Page 4
... to the Settings menu 53 Settings options 54 REFERENCE 59 Replacing remote batteries 59 Protecting the system 59 Cleaning the media center 59 Cleaning the speakers 59 Troubleshooting 60 For customer service 63 Limited warranty 63 Technical information 64 COPYRIGHT AND LICENSE PROTECTIONS 69 DEVICE CODES A-1 iv
... to the Settings menu 53 Settings options 54 REFERENCE 59 Replacing remote batteries 59 Protecting the system 59 Cleaning the media center 59 Cleaning the speakers 59 Troubleshooting 60 For customer service 63 Limited warranty 63 Technical information 64 COPYRIGHT AND LICENSE PROTECTIONS 69 DEVICE CODES A-1 iv
Owner's guide
Page 6
...DEsepuatsñcohl English INTRODUCTION Before you begin Thank you for text displays 2 System features include: • Small, easy-to-place shelf speakers • Easy-to-hide Acoustimass® module • Integrated DVD/CD player and AM/FM tuner • Remote and media center... for three components • Your choice of language for purchasing the 3•2•1® DVD home entertainment system. Using Bose® proprietary signal processing technology, the 3•2•1 system provides improved spaciousness from stereo recordings and bold movie effects for surround-sound...
...DEsepuatsñcohl English INTRODUCTION Before you begin Thank you for text displays 2 System features include: • Small, easy-to-place shelf speakers • Easy-to-hide Acoustimass® module • Integrated DVD/CD player and AM/FM tuner • Remote and media center... for three components • Your choice of language for purchasing the 3•2•1® DVD home entertainment system. Using Bose® proprietary signal processing technology, the 3•2•1 system provides improved spaciousness from stereo recordings and bold movie effects for surround-sound...
Owner's guide
Page 8
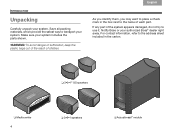
... bags out of the reach of the system appears damaged, do not try to transport your system. Notify Bose or your system includes the parts shown. Make sure your authorized Bose® dealer right away. As you identify them, you may want to place a check mark in the... box next to the address sheet included in the carton. ❏ 3•2•1® GS speakers ❏ Media center 4 ❏ 3•2•1 speakers ❏ Acoustimass® ...
... bags out of the reach of the system appears damaged, do not try to transport your system. Notify Bose or your system includes the parts shown. Make sure your authorized Bose® dealer right away. As you identify them, you may want to place a check mark in the... box next to the address sheet included in the carton. ❏ 3•2•1® GS speakers ❏ Media center 4 ❏ 3•2•1 speakers ❏ Acoustimass® ...
Owner's guide
Page 10
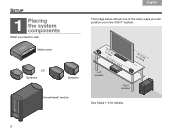
SETUP 1 Placing the system components What you need to use: Svenska Nederlands FItralniaçnaois DEsepuatsñcohl English The image below shows one of the many ways you can position your new 3•2•1® system. Media center OR Speakers Speakers Acoustimass® module o3r'le(1ssm) 3' (1 m) or more Left speaker or3'm(1orme ) Right speaker See Steps 1-6 for details. 6
SETUP 1 Placing the system components What you need to use: Svenska Nederlands FItralniaçnaois DEsepuatsñcohl English The image below shows one of the many ways you can position your new 3•2•1® system. Media center OR Speakers Speakers Acoustimass® module o3r'le(1ssm) 3' (1 m) or more Left speaker or3'm(1orme ) Right speaker See Steps 1-6 for details. 6

Owner's guide
Page 11
... not lying on a side, the front, or the back • with 2 on a surface that can block the ventilation openings. Place the left and right speakers: • at least 3 feet (1 meter) from the TV to prevent interference with the screen • several feet (.8 meters) from audio or video tapes to... the front port aimed out from or along a wall for balanced performance • hidden under a table, behind a sofa or chair, or behind drapes as the speakers and your TV • at least 3 feet (1 meter) apart • within 3 feet (1 meter) of the room as preferred • NOT in an enclosure,...
... not lying on a side, the front, or the back • with 2 on a surface that can block the ventilation openings. Place the left and right speakers: • at least 3 feet (1 meter) from the TV to prevent interference with the screen • several feet (.8 meters) from audio or video tapes to... the front port aimed out from or along a wall for balanced performance • hidden under a table, behind a sofa or chair, or behind drapes as the speakers and your TV • at least 3 feet (1 meter) apart • within 3 feet (1 meter) of the room as preferred • NOT in an enclosure,...
Owner's guide
Page 12
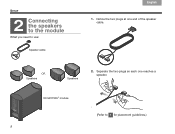
Speaker cable OR Speakers Speakers 2. Acoustimass® module (Refer to use: 1. Notice the two plugs at one reaches a speaker. Svenska Nederlands FItralniaçnaois DEsepuatsñcohl English SETUP 2 Connecting the speakers to the module What you need to 1 for placement guidelines.) 8 Separate the two plugs so each one end of the speaker cable.
Speaker cable OR Speakers Speakers 2. Acoustimass® module (Refer to use: 1. Notice the two plugs at one reaches a speaker. Svenska Nederlands FItralniaçnaois DEsepuatsñcohl English SETUP 2 Connecting the speakers to the module What you need to 1 for placement guidelines.) 8 Separate the two plugs so each one end of the speaker cable.

Owner's guide
Page 13
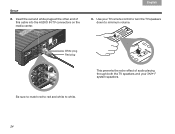
Tighten each plug into an AC power (mains) outlet until all other components are connected. 6. Continue with 3 on the proper speaker. CAUTION: Do not plug the Acoustimass module into the connector on the next page. 9 Fastener screws 5. Insert the remaining single plug into the speaker placed to secure the plug. English DEsepuatsñcohl FItralniaçnaois Nederlands Svenska SETUP 3. The plug marked RIGHT goes into the connector labeled SPEAKERS on the back of your TV. 4. Insert each fastener screw by hand to the right of the Acoustimass® module.
Tighten each plug into an AC power (mains) outlet until all other components are connected. 6. Continue with 3 on the proper speaker. CAUTION: Do not plug the Acoustimass module into the connector on the next page. 9 Fastener screws 5. Insert the remaining single plug into the speaker placed to secure the plug. English DEsepuatsñcohl FItralniaçnaois Nederlands Svenska SETUP 3. The plug marked RIGHT goes into the connector labeled SPEAKERS on the back of your TV. 4. Insert each fastener screw by hand to the right of the Acoustimass® module.
Owner's guide
Page 21
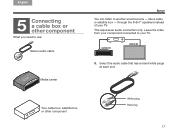
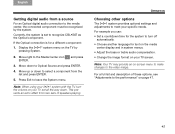
Select the audio cable that has red and white plugs at each end. through the 3•2•1® speakers instead of your TV. This requires an audio connection only. Stereo audio cable Media center 5. English DEsepuatsñcohl FItralniaçnaois Nederlands Svenska SETUP 5 Connecting a cable box or other component White plug Red plug 17 like a cable or satellite box - Leave the video from your component connected to another sound source - Your cable box, satellite box, or other component What you need to use: You can listen to your TV.
Select the audio cable that has red and white plugs at each end. through the 3•2•1® speakers instead of your TV. This requires an audio connection only. Stereo audio cable Media center 5. English DEsepuatsñcohl FItralniaçnaois Nederlands Svenska SETUP 5 Connecting a cable box or other component White plug Red plug 17 like a cable or satellite box - Leave the video from your component connected to another sound source - Your cable box, satellite box, or other component What you need to use: You can listen to your TV.
Owner's guide
Page 26
... connectors. • You watch TV programs without using a cable or satellite box. • You connect a video camera or game console to your 3•2•1® speakers, you need another cable for this connection.
... connectors. • You watch TV programs without using a cable or satellite box. • You connect a video camera or game console to your 3•2•1® speakers, you need another cable for this connection.
Owner's guide
Page 27
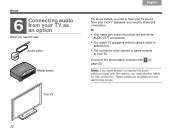
White plug Red plug Note: If your TV speakers for TV program audio. Continue to use your TV does not provide AUDIO OUT connectors, you can make a digital AUDIO OUT connection from the TV ... to the media center. Be sure to match red to red and white to the 3•2•1 media center will play through the 3•2•1 speakers. English DEsepuatsñcohl FItralniaçnaois Nederlands Svenska SETUP 1.
White plug Red plug Note: If your TV speakers for TV program audio. Continue to use your TV does not provide AUDIO OUT connectors, you can make a digital AUDIO OUT connection from the TV ... to the media center. Be sure to match red to red and white to the 3•2•1 media center will play through the 3•2•1 speakers. English DEsepuatsñcohl FItralniaçnaois Nederlands Svenska SETUP 1.
Owner's guide
Page 28
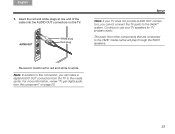
This prevents the echo effect of this cable into the AUDIO IN TV connectors on the media center. 3. Use your 3•2•1® system speakers. 24 White plug Red plug Be sure to match red to red and white to minimum volume. Insert the red and white plugs at the other end of audio playing through both the TV speakers and your TV remote control to turn the TV speakers down to white. Svenska Nederlands FItralniaçnaois DEsepuatsñcohl English SETUP 2.
This prevents the echo effect of this cable into the AUDIO IN TV connectors on the media center. 3. Use your 3•2•1® system speakers. 24 White plug Red plug Be sure to match red to red and white to minimum volume. Insert the red and white plugs at the other end of audio playing through both the TV speakers and your TV remote control to turn the TV speakers down to white. Svenska Nederlands FItralniaçnaois DEsepuatsñcohl English SETUP 2.
Owner's guide
Page 49
... down. Choosing other options The 3•2•1 system provides optional settings and adjustments to the Media Center icon ENTER. For a full list and description of speakers playing. For example you can: • Set a countdown time for the system to turn the volume on your 3•2•1 system with the TV, turn...
... down. Choosing other options The 3•2•1 system provides optional settings and adjustments to the Media Center icon ENTER. For a full list and description of speakers playing. For example you can: • Set a countdown time for the system to turn the volume on your 3•2•1 system with the TV, turn...
Owner's guide
Page 53
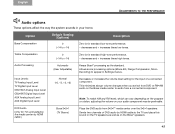
.... This minimizes abrupt volume changes when you switch from DVD or FM•AM audio on the TV speakers as well as the standard. Audio Processing Automatic (User Adjustable) Keeps Bose® processing as on your home. Note: To match AM and FM levels, which can vary depending... on the program or station, adjusting the volume on the Bose® speakers. 49 Treble Compensation 0 (-14 to audio from 3•2•1® media center over the 3•2•1 speakers. Input Levels: TV Analog Input Level TV Digital Input Level CBL•SAT Analog...
.... This minimizes abrupt volume changes when you switch from DVD or FM•AM audio on the TV speakers as well as the standard. Audio Processing Automatic (User Adjustable) Keeps Bose® processing as on your home. Note: To match AM and FM levels, which can vary depending... on the program or station, adjusting the volume on the Bose® speakers. 49 Treble Compensation 0 (-14 to audio from 3•2•1® media center over the 3•2•1 speakers. Input Levels: TV Analog Input Level TV Digital Input Level CBL•SAT Analog...

Owner's guide
Page 59
... provides the best picture. Important note: When you change resolution, your TV screen takes several seconds to hear the audio on mono channel 2, or both speakers. (On) Processes the signal from a VCD or single-channel digital broadcast. Changing this setting allows you to both mono channels at the same time. HDTVs...
... provides the best picture. Important note: When you change resolution, your TV screen takes several seconds to hear the audio on mono channel 2, or both speakers. (On) Processes the signal from a VCD or single-channel digital broadcast. Changing this setting allows you to both mono channels at the same time. HDTVs...
Owner's guide
Page 63
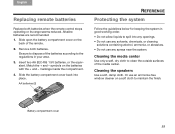
... cleaning solutions containing alcohol, ammonia, or abrasives. • Do not use an ammonia-free window cleaner on the back of the media center. Cleaning the speakers Use a soft, damp cloth. Slide open the battery compartment cover on a soft cloth to clean the outside surfaces of the remote. 2. Match the + and - Cleaning...
... cleaning solutions containing alcohol, ammonia, or abrasives. • Do not use an ammonia-free window cleaner on the back of the media center. Cleaning the speakers Use a soft, damp cloth. Slide open the battery compartment cover on a soft cloth to clean the outside surfaces of the remote. 2. Match the + and - Cleaning...
Owner's guide
Page 64
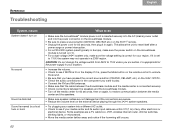
... remote. • Unplug the power cord for 60 seconds, then on again, to restore communication between the media center and the speakers. • Make sure speaker cables are not damaged and the connections are secure. • Reduce the volume level on the external device playing through the 3•2&#.... • Make sure that the cable between the Acoustimass module and the media center is connected securely. • Check connections between the speakers and the Acoustimass module. • Turn off the media center for 60 seconds, then plug it is appropriate for your region. This allows...
... remote. • Unplug the power cord for 60 seconds, then on again, to restore communication between the media center and the speakers. • Make sure speaker cables are not damaged and the connections are secure. • Reduce the volume level on the external device playing through the 3•2&#.... • Make sure that the cable between the Acoustimass module and the media center is connected securely. • Check connections between the speakers and the Acoustimass module. • Turn off the media center for 60 seconds, then plug it is appropriate for your region. This allows...
Owner's guide
Page 65
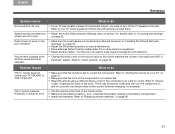
... to "Device codes" located at the front of the radio and DVD in "Installing the FM and AM radio antennas" on and off the TV speakers internally. Refer to "Replacing remote batteries" on page 49. Refer to your TV, CBL•SAT, or AUX component 3•2•1 remote behaves...of Fixed audio output, you want to control. For details, refer to "Choosing new settings" screen are connected and positioned as shown in the Bose® system. There may be several codes that the remote is set to control the component. Volume level changes when another station. You may ...
... to "Device codes" located at the front of the radio and DVD in "Installing the FM and AM radio antennas" on and off the TV speakers internally. Refer to "Replacing remote batteries" on page 49. Refer to your TV, CBL•SAT, or AUX component 3•2•1 remote behaves...of Fixed audio output, you want to control. For details, refer to "Choosing new settings" screen are connected and positioned as shown in the Bose® system. There may be several codes that the remote is set to control the component. Volume level changes when another station. You may ...


