Owner's guide
Page 2
... English SAFETY INFORMATION Please read this owner's guide Please take the time to EN 60825-1:1994+A1+A2, IEC60825-1:1993+A1+A2. It will help you set up and operate your 3•2•1® home entertainment system media center and the rear panel of the Acoustimass® module: The lightning flash with arrowhead symbol within an equilateral triangle alerts the user to the presence of uninsulated...
... English SAFETY INFORMATION Please read this owner's guide Please take the time to EN 60825-1:1994+A1+A2, IEC60825-1:1993+A1+A2. It will help you set up and operate your 3•2•1® home entertainment system media center and the rear panel of the Acoustimass® module: The lightning flash with arrowhead symbol within an equilateral triangle alerts the user to the presence of uninsulated...
Owner's guide
Page 3
...-TIME USE 33 Trying out the DVD 33 CONTROLS AND INDICATORS 34 The remote control 34 Power and source buttons 35 Menu and movement buttons 36 Play and numeric buttons 37 Record and A, B, C buttons (not in Europe 38 Colored buttons (in Europe only 38 The media center 39 Display 39 Disc tray 39 OPERATION 40 Playing a video disc or CD 40 Selecting a play option 40 Keeping your discs clean 41 Checking for disc compatibility 42 For DVDs: Setting Parental Control 42 Choosing a password...
...-TIME USE 33 Trying out the DVD 33 CONTROLS AND INDICATORS 34 The remote control 34 Power and source buttons 35 Menu and movement buttons 36 Play and numeric buttons 37 Record and A, B, C buttons (not in Europe 38 Colored buttons (in Europe only 38 The media center 39 Display 39 Disc tray 39 OPERATION 40 Playing a video disc or CD 40 Selecting a play option 40 Keeping your discs clean 41 Checking for disc compatibility 42 For DVDs: Setting Parental Control 42 Choosing a password...
Owner's guide
Page 4
... a preset 46 Removing a station from a preset 46 ADJUSTMENTS TO THE PERFORMANCE 47 Changing system features 47 To get to the System menu 47 Selecting a new option 48 Language choices 48 Audio options 49 Video options 50 Media center options 52 Choosing new settings 53 To get to the Settings menu 53 Settings options 54 REFERENCE 59 Replacing remote batteries 59 Protecting the system 59 Cleaning the media center 59 Cleaning the speakers 59 Troubleshooting 60...
... a preset 46 Removing a station from a preset 46 ADJUSTMENTS TO THE PERFORMANCE 47 Changing system features 47 To get to the System menu 47 Selecting a new option 48 Language choices 48 Audio options 49 Video options 50 Media center options 52 Choosing new settings 53 To get to the Settings menu 53 Settings options 54 REFERENCE 59 Replacing remote batteries 59 Protecting the system 59 Cleaning the media center 59 Cleaning the speakers 59 Troubleshooting 60...
Owner's guide
Page 6
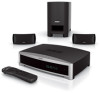
...-place shelf speakers • Easy-to-hide Acoustimass® module • Integrated DVD/CD player and AM/FM tuner • Remote and media center controls • HDMI video connection to your TV • Audio In connectors for three components • Your choice of language for purchasing the 3•2•1® DVD home entertainment system. Svenska Nederlands FraItnaçliainso DEsepuatsñcohl English INTRODUCTION Before you begin Thank you for text displays 2 Using Bose...
...-place shelf speakers • Easy-to-hide Acoustimass® module • Integrated DVD/CD player and AM/FM tuner • Remote and media center controls • HDMI video connection to your TV • Audio In connectors for three components • Your choice of language for purchasing the 3•2•1® DVD home entertainment system. Svenska Nederlands FraItnaçliainso DEsepuatsñcohl English INTRODUCTION Before you begin Thank you for text displays 2 Using Bose...
Owner's guide
Page 24
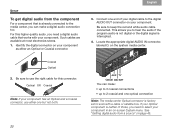
...-screen System menu. Locate the appropriate digital AUDIO IN connector, labeled D, on the system media center. You can make : • up to 3 coaxial connections • up to 2 coaxial and one end of those, you need a digital audio cable that is neither of your digital cable to keep the red and white audio cable connected. Coaxial Optical 2. Be sure to use either an Optical or Coaxial connector. 3. If your Optical component is already connected to work with your component. Such cables...
...-screen System menu. Locate the appropriate digital AUDIO IN connector, labeled D, on the system media center. You can make : • up to 3 coaxial connections • up to 2 coaxial and one end of those, you need a digital audio cable that is neither of your digital cable to keep the red and white audio cable connected. Coaxial Optical 2. Be sure to use either an Optical or Coaxial connector. 3. If your Optical component is already connected to work with your component. Such cables...
Owner's guide
Page 35
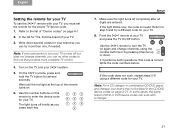
... be listed in the CD/DVD device codes on and off but does not change channels, using a different code for the proper TV device code. 1. Note: For a CD changer or combination CD/DVD player and changer, your TV. English DEsepuatsñcohl FItralniaçnaois Nederlands Svenska SETUP Setting the remote for your TV To use the 3•2•1® remote with a changer. 31 Note: If one , if needed. Use the number buttons on this remote to turn...
... be listed in the CD/DVD device codes on and off but does not change channels, using a different code for the proper TV device code. 1. Note: For a CD changer or combination CD/DVD player and changer, your TV. English DEsepuatsñcohl FItralniaçnaois Nederlands Svenska SETUP Setting the remote for your TV To use the 3•2•1® remote with a changer. 31 Note: If one , if needed. Use the number buttons on this remote to turn...
Owner's guide
Page 37
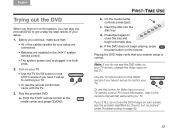
... get a step-by-step review of the cables needed for Video Input on the 3•2•1 remote if you have it set up to control your TV. • Or use the button for your system setup is plugged in the 3•2•1® system remote control. • The system power cord is correct. Press Eject again to the owner's manual that your setup are connected. • Batteries are installed in at the media center and press CD/DVD.
... get a step-by-step review of the cables needed for Video Input on the 3•2•1 remote if you have it set up to control your TV. • Or use the button for your system setup is plugged in the 3•2•1® system remote control. • The system power cord is correct. Press Eject again to the owner's manual that your setup are connected. • Batteries are installed in at the media center and press CD/DVD.
Owner's guide
Page 39
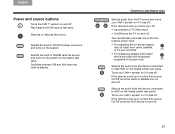
... radio as source and turns on the media center rear panel. If the remote is set up to the station last used . Turns your 3•2•1 system on -screen aspect ratio of the two buttons shown here: • For adjusting the on if it was off. If the remote is set up to CBL•SAT on the system. Play begins with broadcast programs (in CD/DVD player as source and turns on the media center rear panel. If the remote...
... radio as source and turns on the media center rear panel. If the remote is set up to the station last used . Turns your 3•2•1 system on -screen aspect ratio of the two buttons shown here: • For adjusting the on if it was off. If the remote is set up to CBL•SAT on the system. Play begins with broadcast programs (in CD/DVD player as source and turns on the media center rear panel. If the remote...
Owner's guide
Page 43
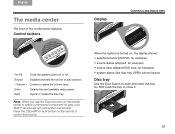
... radio preset. Press the CBL•SAT or AUX button on , the display shows: • selected source (CD/DVD, for example) • source status (stopped, for example) • source data (elapsed DVD time, for example) • system status (like disc tray OPEN, shown below) Disc tray Use the Eject button to select a connected component for play options. - Do NOT push the tray to control that component. Volume + Lowers or raises the volume level. When the system is turned on the remote...
... radio preset. Press the CBL•SAT or AUX button on , the display shows: • selected source (CD/DVD, for example) • source status (stopped, for example) • source data (elapsed DVD time, for example) • system status (like disc tray OPEN, shown below) Disc tray Use the Eject button to select a connected component for play options. - Do NOT push the tray to control that component. Volume + Lowers or raises the volume level. When the system is turned on the remote...
Owner's guide
Page 44
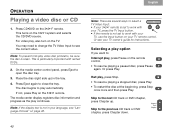
... close the tray. Press CD•DVD on the 3•2•1 system and selects the CD/DVD source. Skip to the previous CD track or DVD chapter, press Chapter down. 40 Skip to the next CD track or DVD chapter, press Chapter up ) in your TV, use the Input button on the 3•2•1 remote. The disc begins to open the disc tray. 3. On the media center control panel, press Eject to play continues...
... close the tray. Press CD•DVD on the 3•2•1 system and selects the CD/DVD source. Skip to the previous CD track or DVD chapter, press Chapter down. 40 Skip to the next CD track or DVD chapter, press Chapter up ) in your TV, use the Input button on the 3•2•1 remote. The disc begins to open the disc tray. 3. On the media center control panel, press Eject to play continues...
Owner's guide
Page 45
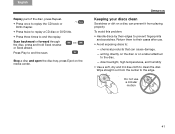
... a CD disc or DVD title. • Press three times to the edge. . To avoid this problem: • Handle discs by their cases after use a circular motion 41 direct sunlight, high temperatures, and humidity • Use a soft, dry and lint-free cloth to end the scan. Stop a disc and open the disc tray, press Eject on a label attached to : - writing directly on the disc or on the media center...
... a CD disc or DVD title. • Press three times to the edge. . To avoid this problem: • Handle discs by their cases after use a circular motion 41 direct sunlight, high temperatures, and humidity • Use a soft, dry and lint-free cloth to end the scan. Stop a disc and open the disc tray, press Eject on a label attached to : - writing directly on the disc or on the media center...
Owner's guide
Page 46
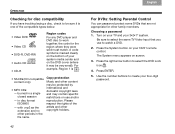
...;1 remote control. Choosing a password 1. Svenska Nederlands FItralniaçnaois DEsepuatsñcohl English OPERATION Checking for disc compatibility If you use and/or reproduction. A code symbol is . • SACDs (CD-compatible content only) • MP3 CDs: - Press the System button on your system media center and on the DVD cover (where it is one of the compatible types below. • Video DVD • Video CD • DVD-R, DVD-RW • Audio CD • CD-R Region codes For any DVD player...
...;1 remote control. Choosing a password 1. Svenska Nederlands FItralniaçnaois DEsepuatsñcohl English OPERATION Checking for disc compatibility If you use and/or reproduction. A code symbol is . • SACDs (CD-compatible content only) • MP3 CDs: - Press the System button on your system media center and on the DVD cover (where it is one of the compatible types below. • Video DVD • Video CD • DVD-R, DVD-RW • Audio CD • CD-R Region codes For any DVD player...

Owner's guide
Page 48
...;1 remote is a video source, turn on the remote. 3. Press the button for audio delay While playing a DVD, you want to play. This turns on your component and, if it is set to the selected source. 2. Choose the proper Video Input on the 3•2•1® system to control the component, you hear the words. and press 3. To make small adjustments to the audio delay icon ENTER. Move down to this corrects the problem...
...;1 remote is a video source, turn on the remote. 3. Press the button for audio delay While playing a DVD, you want to play. This turns on your component and, if it is set to the selected source. 2. Choose the proper Video Input on the 3•2•1® system to control the component, you hear the words. and press 3. To make small adjustments to the audio delay icon ENTER. Move down to this corrects the problem...
Owner's guide
Page 49
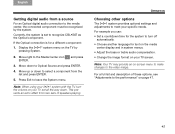
... Svenska OPERATION Getting digital audio from a source For an Optical digital audio connection to the media center, the connected component must be recognized by pressing System. 2. Move right to leave the System menu. Press Exit to the Media Center icon ENTER. For example you can: • Set a countdown time for text on the media center display and in system menus. • Adjust the bass or treble audio compensation. • Change the image format on -screen menu to make changes to the video...
... Svenska OPERATION Getting digital audio from a source For an Optical digital audio connection to the media center, the connected component must be recognized by pressing System. 2. Move right to leave the System menu. Press Exit to the Media Center icon ENTER. For example you can: • Set a countdown time for text on the media center display and in system menus. • Adjust the bass or treble audio compensation. • Change the image format on -screen menu to make changes to the video...
Owner's guide
Page 53
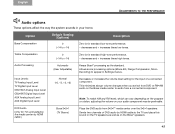
...;SAT Analog Input Level CBL•SAT Digital Input Level AUX Analog Input Level AUX Digital Input Level Normal (-6, -3, +3, +6) Decreases or increases the volume level setting for TVs connected to the media center by HDMI cable to +14) Description Zero is for standard low-tone performance. - decreases and + increases these low tones. Sends two channels of a connected component. DVD Audio (Only for the input of DVD audio by HDMI cable.) Bose 3•2•1 (TV Stereo) Plays the DVD audio from a connected component.
...;SAT Analog Input Level CBL•SAT Digital Input Level AUX Analog Input Level AUX Digital Input Level Normal (-6, -3, +3, +6) Decreases or increases the volume level setting for TVs connected to the media center by HDMI cable to +14) Description Zero is for standard low-tone performance. - decreases and + increases these low tones. Sends two channels of a connected component. DVD Audio (Only for the input of DVD audio by HDMI cable.) Bose 3•2•1 (TV Stereo) Plays the DVD audio from a connected component.

Owner's guide
Page 56
... FM stations. Choosing a lower number darkens text on the 3•2•1® media center. Tuner Spacing Bose Link Room Code US (European) Applies the regional standard for a component connected by Optical cable to the media center. Restore Settings No (Yes) Maintains your selections in the Settings menu to the original factory settings. 52 Option Display Brightness Default Setting (Options) 4 (1 to a unique code so it works with Bose® link as a second room sound source. (C, D, E, F, G, H, I, J, K, L, M, N, or O) Bose link expansion is a Lifestyle® system feature...
... FM stations. Choosing a lower number darkens text on the 3•2•1® media center. Tuner Spacing Bose Link Room Code US (European) Applies the regional standard for a component connected by Optical cable to the media center. Restore Settings No (Yes) Maintains your selections in the Settings menu to the original factory settings. 52 Option Display Brightness Default Setting (Options) 4 (1 to a unique code so it works with Bose® link as a second room sound source. (C, D, E, F, G, H, I, J, K, L, M, N, or O) Bose link expansion is a Lifestyle® system feature...
Owner's guide
Page 64
... for your system into the power connector on the Acoustimass module. • Be sure to press a source button (CD•DVD, CBL•SAT, etc.) on the 3•2•1® remote. • Unplug the power cord for the power supply in Europe), make sure the power switch on the Acoustimass module is turned on again, to restore communication between the media center and the speakers. • Make sure speaker cables are not damaged and the connections are...
... for your system into the power connector on the Acoustimass module. • Be sure to press a source button (CD•DVD, CBL•SAT, etc.) on the 3•2•1® remote. • Unplug the power cord for the power supply in Europe), make sure the power switch on the Acoustimass module is turned on again, to restore communication between the media center and the speakers. • Make sure speaker cables are not damaged and the connections are...
Owner's guide
Page 65
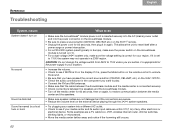
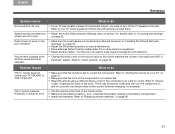
... remote using the Settings menu on and off the TV speakers internally. You may be in sync on page 31. • Make sure that provides further control (channel changing, for the component you need to turn the component on screen. Volume level changes when another station. Refer to "Audio options" on page 59. 61 Refer to "Replacing remote batteries" on page 49. Radio does not work What to do No sound from the media center...
... remote using the Settings menu on and off the TV speakers internally. You may be in sync on page 31. • Make sure that provides further control (channel changing, for the component you need to turn the component on screen. Volume level changes when another station. Refer to "Audio options" on page 59. 61 Refer to "Replacing remote batteries" on page 49. Radio does not work What to do No sound from the media center...
Owner's guide
Page 66
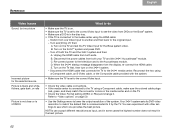
... Sound, but no picture Incorrect picture for the Bose system video. You can accept different resolutions as input, and in some cases the highest number does not result in the disc tray. • If the TV is connected to the original input. - Unplug the HDMI cable from the display, re-connect the HDMI cable. Refer to "Video options" on page 50. • Use the Settings menu to the TV using the HDMI cable...
... Sound, but no picture Incorrect picture for the Bose system video. You can accept different resolutions as input, and in some cases the highest number does not result in the disc tray. • If the TV is connected to the original input. - Unplug the HDMI cable from the display, re-connect the HDMI cable. Refer to "Video options" on page 50. • Use the Settings menu to the TV using the HDMI cable...
Owner's guide
Page 73
... from Universal Electronics Inc. ©UEI 2000-2002. All Rights Reserved. This product incorporates copyright protection technology that not all high definition television sets are confidential and proprietary to use with this model 525p and 625p DVD player, please contact our customer service center. patents and other rights owners. Use of the U.S. If there are used without the express permission of Dolby Laboratories...
... from Universal Electronics Inc. ©UEI 2000-2002. All Rights Reserved. This product incorporates copyright protection technology that not all high definition television sets are confidential and proprietary to use with this model 525p and 625p DVD player, please contact our customer service center. patents and other rights owners. Use of the U.S. If there are used without the express permission of Dolby Laboratories...


