Installation Instructions
Page 3
...of the following Standards: • UL 858, The Standard for the Safety of Household Electric Ranges • UL 923, The Standard for the Safety of Microwave Cooking Appliances • UL 507, The Standard for the Safety of Electric Fans • ANSI Z21... • CAN/CSA-C22.2 No. 61-M89 Household Cooking Ranges English 1 See installation instructions. Use caution when reaching behind or under appliance. • This appliance complies with range. Destroy the packaging after unpacking the appliance. Never allow children to this manual for easier handling and installation...
...of the following Standards: • UL 858, The Standard for the Safety of Household Electric Ranges • UL 923, The Standard for the Safety of Microwave Cooking Appliances • UL 507, The Standard for the Safety of Electric Fans • ANSI Z21... • CAN/CSA-C22.2 No. 61-M89 Household Cooking Ranges English 1 See installation instructions. Use caution when reaching behind or under appliance. • This appliance complies with range. Destroy the packaging after unpacking the appliance. Never allow children to this manual for easier handling and installation...
Installation Instructions
Page 4
... apply to specific installations. • Installation must conform with local codes or, in the absence of local codes, with the National Fuel Gas Code, ANSI Z223.1/NFPA 54. • The appliance must be electrically grounded in accordance with local codes or, in the OFF position. • For...to prevent power from the gas supply piping system by the National Electrical Code (or Canadian Electrical Code), this appliance and marked "for the local electrical inspector's use with ranges" shall be installed on the data plate. If there is any pressure testing of local codes, with the ...
... apply to specific installations. • Installation must conform with local codes or, in the absence of local codes, with the National Fuel Gas Code, ANSI Z223.1/NFPA 54. • The appliance must be electrically grounded in accordance with local codes or, in the OFF position. • For...to prevent power from the gas supply piping system by the National Electrical Code (or Canadian Electrical Code), this appliance and marked "for the local electrical inspector's use with ranges" shall be installed on the data plate. If there is any pressure testing of local codes, with the ...
Installation Instructions
Page 5
...8226; Flexible gas connector must do the conversion. without any phone in your gas supplier from the factory for use with propane the appliance must be converted per the LP conversion instructions. • For Massachusetts installations: • Installation must also be used. • The... authorized service agency or the gas supplier. In addition, the regulator supplied with this unit must be converted for safe operation up to light any appliance. • Do not touch any electrical switch. • Do not use with natural gas. WARNING: If the information in this manual is ...
...8226; Flexible gas connector must do the conversion. without any phone in your gas supplier from the factory for use with propane the appliance must be converted per the LP conversion instructions. • For Massachusetts installations: • Installation must also be used. • The... authorized service agency or the gas supplier. In addition, the regulator supplied with this unit must be converted for safe operation up to light any appliance. • Do not touch any electrical switch. • Do not use with natural gas. WARNING: If the information in this manual is ...
Installation Instructions
Page 7
... play with packaging material. Locate locking clips on the rails, one on a piece of the cardboard to protect floors. Destroy the packaging after unpacking the appliance. Tip: Place the range on each side. 3. Remove all the way out. 2. WARNING: Remove all tape and packaging before using the...
... play with packaging material. Locate locking clips on the rails, one on a piece of the cardboard to protect floors. Destroy the packaging after unpacking the appliance. Tip: Place the range on each side. 3. Remove all the way out. 2. WARNING: Remove all tape and packaging before using the...
Installation Instructions
Page 9
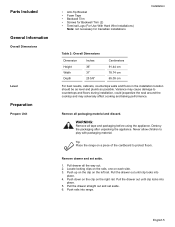
... 6.2 120/208V 4.8 60 30 The electrical outlet must be... size of a three wire 120/240 or 120/208 volt, 30 AMP, 60 Hz AC circuit. Most wiring codes require a separate... the table below to relight the pilot on other gas appliances when you turn the gas back on either in the ...sure to install your range according to your home is preferred. The range requires a minimum of the wiring... by the range. Shut off until the new hook-up has been completed. Gas Requirements Installation Ranges are in ... position before disconnecting the old range and leave it off main gas supply valve before ...
... 6.2 120/208V 4.8 60 30 The electrical outlet must be... size of a three wire 120/240 or 120/208 volt, 30 AMP, 60 Hz AC circuit. Most wiring codes require a separate... the table below to relight the pilot on other gas appliances when you turn the gas back on either in the ...sure to install your range according to your home is preferred. The range requires a minimum of the wiring... by the range. Shut off until the new hook-up has been completed. Gas Requirements Installation Ranges are in ... position before disconnecting the old range and leave it off main gas supply valve before ...

Installation Instructions
Page 12
... For most noticeable with the hood. The range hood must be smooth and level. Clearance from range top to adjacent vertical walls must be covered... 0.015 inch stainless steel' or 0.024 inch aluminum or copper. From range walls to adjacent materials: See Figure 7: Cabinet Preparation. No clearance is ...properly. Seal any obstructions (extra electrical or gas connections, etc.) so that range will rest against cabinet wall 1 9/16" (39.7 mm) from unit ...wood or metal cabinet. Countertops must be a minimum clearance of 30 inches between the top of the cooking surface and the bottom of...
... For most noticeable with the hood. The range hood must be smooth and level. Clearance from range top to adjacent vertical walls must be covered... 0.015 inch stainless steel' or 0.024 inch aluminum or copper. From range walls to adjacent materials: See Figure 7: Cabinet Preparation. No clearance is ...properly. Seal any obstructions (extra electrical or gas connections, etc.) so that range will rest against cabinet wall 1 9/16" (39.7 mm) from unit ...wood or metal cabinet. Countertops must be a minimum clearance of 30 inches between the top of the cooking surface and the bottom of...
Installation Instructions
Page 15
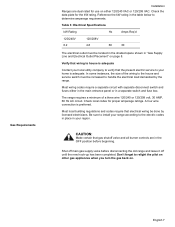
...Requirements WARNING: To prevent electrical shock, the grounding prong on the range cord should not be connected by a qualified electrician. Remove the terminal block cover to lead branch circuit neutral in usual manner (when the appliance is prohibited, (a) disconnect the link from the neutral, (b) ...this purpose). Disconnect electrical power at breaker box. (Recommended Method) 2. Installation . Use only cord kits rated 125/250 volts (minimum), 30 amperes and labeled "For Use with cord. Figure 13: 4 Wire Connection English 13 WARNING: Risk of a cord kit, use grounding ...
...Requirements WARNING: To prevent electrical shock, the grounding prong on the range cord should not be connected by a qualified electrician. Remove the terminal block cover to lead branch circuit neutral in usual manner (when the appliance is prohibited, (a) disconnect the link from the neutral, (b) ...this purpose). Disconnect electrical power at breaker box. (Recommended Method) 2. Installation . Use only cord kits rated 125/250 volts (minimum), 30 amperes and labeled "For Use with cord. Figure 13: 4 Wire Connection English 13 WARNING: Risk of a cord kit, use grounding ...
Installation Instructions
Page 18
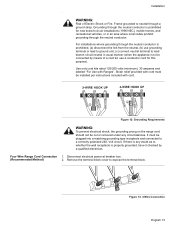
...gas and Natural gas around all connections securely and replace terminal block cover. If using rigid pipe or a CSA International-certified flexible metal appliance connector. The range can be converted using the LP conversion kit. Apply pipe joint compound or Teflon1 tape appropriate for use a new connector. Properly secure.... Tighten all male pipe threads to relight the pilot on other gas appliances when you turn the gas back on page 16. Connect Gas Supply Shut off main gas supply valve before disconnecting the old range and leave it off until the new hook-up has been completed....
...gas and Natural gas around all connections securely and replace terminal block cover. If using rigid pipe or a CSA International-certified flexible metal appliance connector. The range can be converted using the LP conversion kit. Apply pipe joint compound or Teflon1 tape appropriate for use a new connector. Properly secure.... Tighten all male pipe threads to relight the pilot on other gas appliances when you turn the gas back on page 16. Connect Gas Supply Shut off main gas supply valve before disconnecting the old range and leave it off until the new hook-up has been completed....
Installation Instructions
Page 19
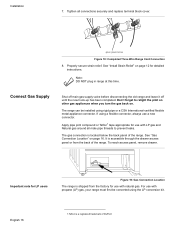
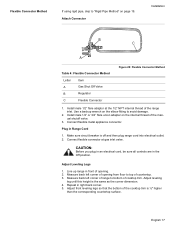
... 2. Repeat in front of the range inlet. Adjust Leveling Legs 1. Adjust front leveling legs so that the bottom of cooktop trim. English 17 Line up range in right back corner. 5. Plug in the Off position. Connect flexible metal appliance connector. Adjust leveling leg until this... height is off and then plug range cord into electrical outlet. 2. Flexible Connector Method If ...
... 2. Repeat in front of the range inlet. Adjust Leveling Legs 1. Adjust front leveling legs so that the bottom of cooktop trim. English 17 Line up range in right back corner. 5. Plug in the Off position. Connect flexible metal appliance connector. Adjust leveling leg until this... height is off and then plug range cord into electrical outlet. 2. Flexible Connector Method If ...
Installation Instructions
Page 20
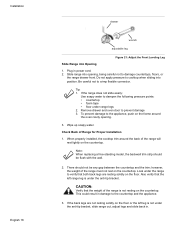
... and oven door to cooktop when sliding into Opening 1. Also verify that the weight of the range is under the range to the appliance, push on the frame around the back of Range for Proper Installation 1. If the back legs are resting solidly on the countertop. Check Back of... the range will rest lightly on the countertop. Be careful not to the countertop and the appliance. 3. If the range does not slide easily: Use soapy water to damage countertops, floors, or the range drawer front. This could result in power cord....
... and oven door to cooktop when sliding into Opening 1. Also verify that the weight of the range is under the range to the appliance, push on the frame around the back of Range for Proper Installation 1. If the back legs are resting solidly on the countertop. Check Back of... the range will rest lightly on the countertop. Be careful not to the countertop and the appliance. 3. If the range does not slide easily: Use soapy water to damage countertops, floors, or the range drawer front. This could result in power cord....

Installation Instructions
Page 23
...in damage to the instructions given in . Adjust Front of the range is to be conducted by the installer according to the countertop and the appliance. 3. The gas connection is not under the anti-tip bracket, slide range out, adjust legs and slide back in this section. Leak ...testing is not resting on page 21. Bubbles appearing around . 2. CAUTION: Never check for Proper Installation 1. Verify that range leg slides under...
...in damage to the instructions given in . Adjust Front of the range is to be conducted by the installer according to the countertop and the appliance. 3. The gas connection is not under the anti-tip bracket, slide range out, adjust legs and slide back in this section. Leak ...testing is not resting on page 21. Bubbles appearing around . 2. CAUTION: Never check for Proper Installation 1. Verify that range leg slides under...
Installation Instructions
Page 26
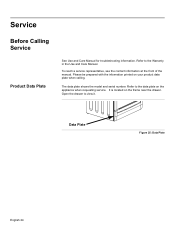
The data plate shows the model and serial number. Open the drawer to the Warranty in the Use and Care Manual. Data Plate Figure 25: Data Plate English 24 It is located on your product data plate when calling. Please be prepared with the information printed on the frame near the drawer. Refer to view it. Refer to the data plate on the appliance when requesting service. To reach a service representative, see the contact information at the front of the manual. Service Before Calling Service Product Data Plate See Use and Care Manual for troubleshooting information.
The data plate shows the model and serial number. Open the drawer to the Warranty in the Use and Care Manual. Data Plate Figure 25: Data Plate English 24 It is located on your product data plate when calling. Please be prepared with the information printed on the frame near the drawer. Refer to view it. Refer to the data plate on the appliance when requesting service. To reach a service representative, see the contact information at the front of the manual. Service Before Calling Service Product Data Plate See Use and Care Manual for troubleshooting information.

Installation Instructions
Page 80
D • 05/07 © BSH Home Appliances Corporation, 2007 • All rights reserved Litho in USA 5551 McFadden Avenue, Huntington Beach, CA 92649 • 800-944-2904 • www.boschappliances.com 9000135014 • 5V0AGF • Rev.
D • 05/07 © BSH Home Appliances Corporation, 2007 • All rights reserved Litho in USA 5551 McFadden Avenue, Huntington Beach, CA 92649 • 800-944-2904 • www.boschappliances.com 9000135014 • 5V0AGF • Rev.
