Use & Care Manual
Page 4
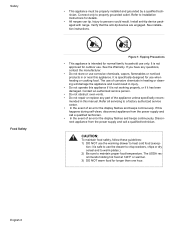
...or grate. Never use cookware appropriate for the size of these liners may ignite. Installation of the surface element. • In the event that flammable materials such as window...of the pan. d) Use proper pan size. WARNING: TO REDUCE THE RISK OF A RANGE TOP GREASE FIRE: a) Never leave surface units unattended at high heat or when flambé...baking soda. Crepes Suzette, Cherries Jubilee, Peppercorn Beef Flambe'). Safety Important Safety Instructions READ AND SAVE THESE INSTRUCTIONS Important Safety Instructions Fire Safety • Do not use . b) Always turn hood ON when...
...or grate. Never use cookware appropriate for the size of these liners may ignite. Installation of the surface element. • In the event that flammable materials such as window...of the pan. d) Use proper pan size. WARNING: TO REDUCE THE RISK OF A RANGE TOP GREASE FIRE: a) Never leave surface units unattended at high heat or when flambé...baking soda. Crepes Suzette, Cherries Jubilee, Peppercorn Beef Flambe'). Safety Important Safety Instructions READ AND SAVE THESE INSTRUCTIONS Important Safety Instructions Fire Safety • Do not use . b) Always turn hood ON when...
Use & Care Manual
Page 5
... exactly, a fire or explosion may be performed by a qualified installer, authorized service agency or the gas supplier. • Have the installer show you where the gas shut-off valve is not a "do-it-yourself" procedure. Follow the gas supplier's instructions. • If you smell gas, your gas supplier from a...However, do not reach through fire to an exit. Gas Safety Safety WARNING: TO REDUCE THE RISK OF INJURY TO PERSONS IN THE EVENT OF A RANGE TOP GREASE FIRE, OBSERVE THE FOLLOWING: a) SMOTHER FLAMES with a close-fitting lid, cookie sheet, or metal tray, then turn it off. •...
... exactly, a fire or explosion may be performed by a qualified installer, authorized service agency or the gas supplier. • Have the installer show you where the gas shut-off valve is not a "do-it-yourself" procedure. Follow the gas supplier's instructions. • If you smell gas, your gas supplier from a...However, do not reach through fire to an exit. Gas Safety Safety WARNING: TO REDUCE THE RISK OF INJURY TO PERSONS IN THE EVENT OF A RANGE TOP GREASE FIRE, OBSERVE THE FOLLOWING: a) SMOTHER FLAMES with a close-fitting lid, cookie sheet, or metal tray, then turn it off. •...
Use & Care Manual
Page 7
... warn customers of potential exposure to such substances. 1) The burning of gas cooking fuel and the elimination of soil during selfcleaning can generate small amounts of Carbon Monoxide. ...surface units of different size. Select cookware having flat bottoms large enough to the instructions in self-clean ovens gives off very small amounts of formaldehyde during and immediately ... direct contact and may be harmful to birds. Proper relationship of the cookware. Proper Installation and Maintenance WARNING: When properly cared for easy reference. When using cooking or roasting ...
... warn customers of potential exposure to such substances. 1) The burning of gas cooking fuel and the elimination of soil during selfcleaning can generate small amounts of Carbon Monoxide. ...surface units of different size. Select cookware having flat bottoms large enough to the instructions in self-clean ovens gives off very small amounts of formaldehyde during and immediately ... direct contact and may be harmful to birds. Proper relationship of the cookware. Proper Installation and Maintenance WARNING: When properly cared for easy reference. When using cooking or roasting ...
Use & Care Manual
Page 8
See installation instructions. Refer all servicing to a factory authorized service center. • In the event of the appliance unless specifically recom- Disconnect appliance from the power supply and call a qualified technician. The USDA recommends holding hot food at 140°F or warmer. 3) DO NOT warm food for details. • All ranges can tip. Figure...
See installation instructions. Refer all servicing to a factory authorized service center. • In the event of the appliance unless specifically recom- Disconnect appliance from the power supply and call a qualified technician. The USDA recommends holding hot food at 140°F or warmer. 3) DO NOT warm food for details. • All ranges can tip. Figure...

Use & Care Manual
Page 18
... show next feature. 3. Turn knob to change hours. 2 5. Turn knob slowly and wait approximately one second for detailed instructions. • Always set or change the range features listed below. CLOCK will be displayed and the minute digits will flash. Turn knob to exit the Select Functions Menu....clock, see "Select Function" section. • If you can be a slight delay before each message (or feature) can set the clock after installation or after a power failure. When all oven operations except when the timer is running. • The oven is displayed. 2. Press OFF to ...
... show next feature. 3. Turn knob to change hours. 2 5. Turn knob slowly and wait approximately one second for detailed instructions. • Always set or change the range features listed below. CLOCK will be displayed and the minute digits will flash. Turn knob to exit the Select Functions Menu....clock, see "Select Function" section. • If you can be a slight delay before each message (or feature) can set the clock after installation or after a power failure. When all oven operations except when the timer is running. • The oven is displayed. 2. Press OFF to ...

Use & Care Manual
Page 27
Prepare meat and place in roasting pan (or on page 31 for detailed instructions. Make sure the probe is removed. The probe symbol will appear. 5. The default oven temperature will appear in the display. 2. Turn the knob to desired ... knob to set when the probe is displayed in display and oven turns off. 1. The chosen oven temperature is installed in the oven English 25 Place roasting pan with the probe installed in the oven. 3. Do not leave probe attachment in the center to probe receptacle until the chosen probe temperature is...
Prepare meat and place in roasting pan (or on page 31 for detailed instructions. Make sure the probe is removed. The probe symbol will appear. 5. The default oven temperature will appear in the display. 2. Turn the knob to desired ... knob to set when the probe is displayed in display and oven turns off. 1. The chosen oven temperature is installed in the oven English 25 Place roasting pan with the probe installed in the oven. 3. Do not leave probe attachment in the center to probe receptacle until the chosen probe temperature is...

Use & Care Manual
Page 53
...additional charge). In no event shall Bosch have no obligation, at its sole option. Notwithstanding the foregoing, Bosch will have any concessions, including repairs, pro-rates, or Product replacement, once ...Bosch 's opinion, a superior reputation for customer service and technical ability (note that you do not attempt to you, in conjunction with air or water-going vessels); (2) any party's willful misconduct, negligence, misuse, abuse, accidents, neglect, improper operation, failure to maintain, improper or negligent installation, tampering, failure to follow operating instructions...
...additional charge). In no event shall Bosch have no obligation, at its sole option. Notwithstanding the foregoing, Bosch will have any concessions, including repairs, pro-rates, or Product replacement, once ...Bosch 's opinion, a superior reputation for customer service and technical ability (note that you do not attempt to you, in conjunction with air or water-going vessels); (2) any party's willful misconduct, negligence, misuse, abuse, accidents, neglect, improper operation, failure to maintain, improper or negligent installation, tampering, failure to follow operating instructions...
Installation Instructions
Page 3
... tip. WARNING: All ranges can cause injury or property damage. Injury to play with packaging material. • Never modify or alter the construction of the appliance unless specifically recommended in Use and Care Manual. • Unit is to move. • Hidden surfaces may have sharp edges. See installation instructions. Verify that cabinets above...
... tip. WARNING: All ranges can cause injury or property damage. Injury to play with packaging material. • Never modify or alter the construction of the appliance unless specifically recommended in Use and Care Manual. • Unit is to move. • Hidden surfaces may have sharp edges. See installation instructions. Verify that cabinets above...
Installation Instructions
Page 4
... of the owner and the installer to determine if additional requirements and/or standards apply to specific installations. • Installation must conform with local codes or, in the absence of local codes, with the National Fuel Gas Code, ANSI Z223.1/NFPA...installer according to the instructions in this appliance and marked "for easy reference. • Important - Installation, electrical connections and grounding must be installed on the data plate. If there is any pressure testing at pressures in excess of ½ psi (3.5 kPa). • The appliance must comply with ranges...
... of the owner and the installer to determine if additional requirements and/or standards apply to specific installations. • Installation must conform with local codes or, in the absence of local codes, with the National Fuel Gas Code, ANSI Z223.1/NFPA...installer according to the instructions in this appliance and marked "for easy reference. • Important - Installation, electrical connections and grounding must be installed on the data plate. If there is any pressure testing at pressures in excess of ½ psi (3.5 kPa). • The appliance must comply with ranges...
Installation Instructions
Page 5
... any electrical switch. • Do not use with propane the appliance must be converted per the LP conversion instructions. • For Massachusetts installations: • Installation must be performed by a qualified or licensed contractor, plumber or gas fitter qualified or licensed by a qualified...: For use with its own high pressure regulator. Propane Gas Installation Safety • The maximum supply pressure must do the conversion. without any phone in the vicinity of 10,000 ft. Follow the gas supplier's instructions. • If you cannot reach your gas supplier, call ...
... any electrical switch. • Do not use with propane the appliance must be converted per the LP conversion instructions. • For Massachusetts installations: • Installation must be performed by a qualified or licensed contractor, plumber or gas fitter qualified or licensed by a qualified...: For use with its own high pressure regulator. Propane Gas Installation Safety • The maximum supply pressure must do the conversion. without any phone in the vicinity of 10,000 ft. Follow the gas supplier's instructions. • If you cannot reach your gas supplier, call ...

Installation Instructions
Page 6
...Begin Overview Table 1: Overview Step Task 1. Tools and Parts Needed Additional Parts Needed For Hard Wire Installations • Range Power Supply Cord Kit (240V -30 Amp) Note: Not necessary for Anti-Tip Bracket (Style will vary depending on mounting surface) • Level • Drill and Drill Bit •...; Gas Shut Off Valve • Safety Gloves and Goggles • Tape (Optional) • Cloth or Cardboard (Optional - Test the Installation Proceed to Protect Floor) • Flexible Conduit • Torque Wrench • Note: Power Supply Cord Kit Not Necessary For Hard Wire...
...Begin Overview Table 1: Overview Step Task 1. Tools and Parts Needed Additional Parts Needed For Hard Wire Installations • Range Power Supply Cord Kit (240V -30 Amp) Note: Not necessary for Anti-Tip Bracket (Style will vary depending on mounting surface) • Level • Drill and Drill Bit •...; Gas Shut Off Valve • Safety Gloves and Goggles • Tape (Optional) • Cloth or Cardboard (Optional - Test the Installation Proceed to Protect Floor) • Flexible Conduit • Torque Wrench • Note: Power Supply Cord Kit Not Necessary For Hard Wire...
Installation Instructions
Page 11
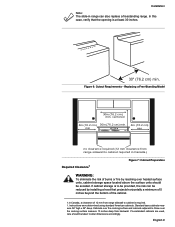
... min no clearance required (12 mm clearance from range sidewall to cabinet required in range can be avoided. Instructions were determined using standard American cabinets. Figure 6: Cutout Requirements - Installation Note: The slide-in Canada.) Required Clearance1 Figure... 7: Cabinet Preparation WARNING: To eliminate the risk of 12 mm from range sidewall to cabinet is at least 30 inches. 30...
... min no clearance required (12 mm clearance from range sidewall to cabinet required in range can be avoided. Instructions were determined using standard American cabinets. Figure 6: Cutout Requirements - Installation Note: The slide-in Canada.) Required Clearance1 Figure... 7: Cabinet Preparation WARNING: To eliminate the risk of 12 mm from range sidewall to cabinet is at least 30 inches. 30...
Installation Instructions
Page 12
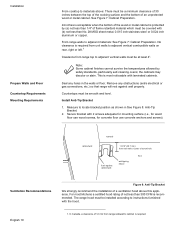
...024 inch aluminum or copper. Seal any obstructions (extra electrical or gas connections, etc.) so that range will rest against cabinet wall 1 9/16" (39.7 mm) from range top to instructions furnished with (b) not less than 300 CFM is most kitchens a certified hood rating of 12 mm...wall flush against wall properly. From range walls to center of screw hole floor anti-tippin g device Ventilation Recommendations Figure 8: Anti-Tip Bracket We strongly recommend the installation of a ventilation hood above : There must be a minimum clearance of 30 inches between the top of the ...
...024 inch aluminum or copper. Seal any obstructions (extra electrical or gas connections, etc.) so that range will rest against cabinet wall 1 9/16" (39.7 mm) from range top to instructions furnished with (b) not less than 300 CFM is most kitchens a certified hood rating of 12 mm...wall flush against wall properly. From range walls to center of screw hole floor anti-tippin g device Ventilation Recommendations Figure 8: Anti-Tip Bracket We strongly recommend the installation of a ventilation hood above : There must be a minimum clearance of 30 inches between the top of the ...
Installation Instructions
Page 14
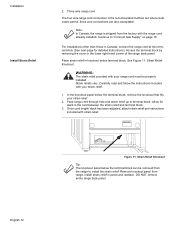
... strain relief provided with strain relief. Strain reliefs vary. Once cord length/ slack has been adjusted, attach strain relief per instructions included with your range cord must be removed from the range to install the strain relief: Remove knockout panel from the factory with your strain relief. 2. Place strain relief in Canada, connect the...
... strain relief provided with strain relief. Strain reliefs vary. Once cord length/ slack has been adjusted, attach strain relief per instructions included with your range cord must be removed from the range to install the strain relief: Remove knockout panel from the factory with your strain relief. 2. Place strain relief in Canada, connect the...
Installation Instructions
Page 15
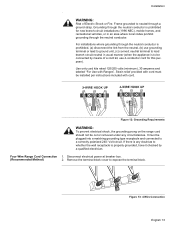
...Grounding Requirements WARNING: To prevent electrical shock, the grounding prong on the range cord should not be plugged into a matching grounding type receptacle and connected to be installed per instructions included with Ranges". Disconnect electrical power at breaker box. (Recommended Method) 2. Remove ...(minimum), 30 amperes and labeled "For Use with cord. It must be connected by a qualified electrician. Four Wire Range Cord Connection 1. Figure 13: 4 Wire Connection English 13 WARNING: Risk of a cord kit, use 4-conductor cord for new branch-circuit installations (1996 ...
...Grounding Requirements WARNING: To prevent electrical shock, the grounding prong on the range cord should not be plugged into a matching grounding type receptacle and connected to be installed per instructions included with Ranges". Disconnect electrical power at breaker box. (Recommended Method) 2. Remove ...(minimum), 30 amperes and labeled "For Use with cord. It must be connected by a qualified electrician. Four Wire Range Cord Connection 1. Figure 13: 4 Wire Connection English 13 WARNING: Risk of a cord kit, use 4-conductor cord for new branch-circuit installations (1996 ...

Installation Instructions
Page 18
...the back panel of DuPont Connect Gas Supply Shut off main gas supply valve before disconnecting the old range and leave it off until the new hook-up has been completed. Installation 7. Don't forget to relight the pilot on other gas appliances when you turn the gas back on...accessible through the drawer access panel or from the factory for detailed instructions. If using the LP conversion kit. Apply pipe joint compound or Teflon1 tape appropriate for use a new connector. It is a registered trademark of the range. Tighten all male pipe threads to "Rigid Pipe Method" on ...
...the back panel of DuPont Connect Gas Supply Shut off main gas supply valve before disconnecting the old range and leave it off until the new hook-up has been completed. Installation 7. Don't forget to relight the pilot on other gas appliances when you turn the gas back on...accessible through the drawer access panel or from the factory for detailed instructions. If using the LP conversion kit. Apply pipe joint compound or Teflon1 tape appropriate for use a new connector. It is a registered trademark of the range. Tighten all male pipe threads to "Rigid Pipe Method" on ...
Installation Instructions
Page 23
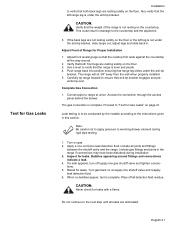
...and slide back in damage to the countertop and the appliance. 3. CAUTION: Verify that the range is complete. vents tip-over. Connect pipe to warming drawer element during installation. 3. Apply a non-corrosive leak detection fluid. Include all leaks are not resting solidly ...to the instructions given in the range if connections may have been disturbed during rigid pipe testing. 1. Bubbles appearing around . 2. If a leak appears, turn off all the way around fittings and connections indicate a leak. 4. The range will sit 3/4" away from the wall when properly installed. 5. ...
...and slide back in damage to the countertop and the appliance. 3. CAUTION: Verify that the range is complete. vents tip-over. Connect pipe to warming drawer element during installation. 3. Apply a non-corrosive leak detection fluid. Include all leaks are not resting solidly ...to the instructions given in the range if connections may have been disturbed during rigid pipe testing. 1. Bubbles appearing around . 2. If a leak appears, turn off all the way around fittings and connections indicate a leak. 4. The range will sit 3/4" away from the wall when properly installed. 5. ...


