Use & Care Manual
Page 4
... surface unit drip bowls or oven bottom. Turn off the appliance and disconnect the circuit at the circuit breaker box. • Do not allow pans to boil dry. • If the cooktop is near a window, forced air vent, or fan, be allowed to accumulate on fire. • Always have a working smoke detector near the burners or elements. b) Always turn hood ON when cooking at high settings. c) Clean ventilating fans...
... surface unit drip bowls or oven bottom. Turn off the appliance and disconnect the circuit at the circuit breaker box. • Do not allow pans to boil dry. • If the cooktop is near a window, forced air vent, or fan, be allowed to accumulate on fire. • Always have a working smoke detector near the burners or elements. b) Always turn hood ON when cooking at high settings. c) Clean ventilating fans...
Use & Care Manual
Page 5
... smell. lent steam explosion will result. d) Use an extinguisher ONLY if: 1) You know how to turn off valve is not followed exactly, a fire or explosion may be found with your installer has not done a proper job of this manual is located. • If a burner goes out and gas escapes, open windows and doors. Some leaks can have a Class ABC extinguisher...
... smell. lent steam explosion will result. d) Use an extinguisher ONLY if: 1) You know how to turn off valve is not followed exactly, a fire or explosion may be found with your installer has not done a proper job of this manual is located. • If a burner goes out and gas escapes, open windows and doors. Some leaks can have a Class ABC extinguisher...
Use & Care Manual
Page 7
... immediately after self cleaning the oven. Select cookware having flat bottoms large enough to a hot surface. Read all instructions carefully before use of utensils inward so they do not run Self-Clean. These precautions will also improve efficiency. • Always position handles of undersized cookware will not open. This reduces the risk of fires, spills and burns. • Adjust burner flame size so that the door locks and...
... immediately after self cleaning the oven. Select cookware having flat bottoms large enough to a hot surface. Read all instructions carefully before use of utensils inward so they do not run Self-Clean. These precautions will also improve efficiency. • Always position handles of undersized cookware will not open. This reduces the risk of fires, spills and burns. • Adjust burner flame size so that the door locks and...
Use & Care Manual
Page 8
... is specifically designed for outdoor use only. Refer all servicing to maintain proper food temperature. Connect only to persons could result in this appliance. Refer to heat cold food (excep- Verify that the anti-tip devices are engaged. See installation instructions. It is not approved for use the warming drawer to Installation Instructions for longer than one hour. mended in injury. • Do not operate this...
... is specifically designed for outdoor use only. Refer all servicing to maintain proper food temperature. Connect only to persons could result in this appliance. Refer to heat cold food (excep- Verify that the anti-tip devices are engaged. See installation instructions. It is not approved for use the warming drawer to Installation Instructions for longer than one hour. mended in injury. • Do not operate this...
Use & Care Manual
Page 16
... may feel warm air as it is important for another step or START to run during any convection mode and dehydrate. Getting Started Automatic Shutoff Self Cleaning Indicators and Other Features Cooling Fan (Slide-in models only) Convection Fan area may be warm when the oven is in use as well. Beep - F Number Codes -These codes display when there is opened. To indicate when a mode is finished, 3 consecutive beeps will turn off . The convection fan operates during self-clean, although not...
... may feel warm air as it is important for another step or START to run during any convection mode and dehydrate. Getting Started Automatic Shutoff Self Cleaning Indicators and Other Features Cooling Fan (Slide-in models only) Convection Fan area may be warm when the oven is in use as well. Beep - F Number Codes -These codes display when there is opened. To indicate when a mode is finished, 3 consecutive beeps will turn off . The convection fan operates during self-clean, although not...
Use & Care Manual
Page 17
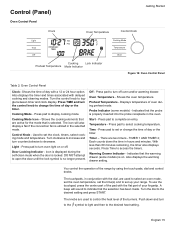
... the self-clean mode when the door is selected. Off - Shows the oven temperature. Probe Indicator (some models) is utilized in the oven. Used to the desired setting and press START. Press pad to set the time(s) and to turn off . Start - Temperature - Also displays the warming drawer setting. The touchpads, in hours and minutes. Push down the time in conjunction with a 12 or 24 hour option. Control (Panel) Oven Control Panel Getting Started Clock Oven Temperature Control Knob Light AM PM Time Off Cooking Mode Temperature Start Cooking Lock Indicator Preheat...
... the self-clean mode when the door is selected. Off - Shows the oven temperature. Probe Indicator (some models) is utilized in the oven. Used to the desired setting and press START. Press pad to set the time(s) and to turn off . Start - Temperature - Also displays the warming drawer setting. The touchpads, in hours and minutes. Push down the time in conjunction with a 12 or 24 hour option. Control (Panel) Oven Control Panel Getting Started Clock Oven Temperature Control Knob Light AM PM Time Off Cooking Mode Temperature Start Cooking Lock Indicator Preheat...

Use & Care Manual
Page 18
... now set clock time. Press OFF to desired setting and press START. Turn knob to stop the beeping. 1. Turn knob. TIMER 1 flashes in the clock mode. When all oven operations except when the timer is running. • The oven is displayed. 2. Getting Started The Clock About the Clock Setting the Clock Changing the Clock The Select Functions Menu See the sections on Using the Cooktop, Using the Oven and Using the Warming Drawer for detailed instructions. • Always set . Once power returns to the oven, the clock...
... now set clock time. Press OFF to desired setting and press START. Turn knob to stop the beeping. 1. Turn knob. TIMER 1 flashes in the clock mode. When all oven operations except when the timer is running. • The oven is displayed. 2. Getting Started The Clock About the Clock Setting the Clock Changing the Clock The Select Functions Menu See the sections on Using the Cooktop, Using the Oven and Using the Warming Drawer for detailed instructions. • Always set . Once power returns to the oven, the clock...

Use & Care Manual
Page 19
... displayed. 3. This feature can be used to prevent changes to HIGH (loudest). To unlock keypads, press COOKING MODE and hold for beep volume is consistently too brown or too light. 1. Press START. Turn knob clockwise until OVEN TEMP OFFSET is flashing. 3. Access SELECT FUNCTIONS Menu. 2. Turn knob clockwise until desired language is displayed. 3. Turn knob clockwise until CLOCK DISPLAY is displayed. 3. Turn Clock Display ON or OFF Clock time display can be locked for appliance store use only. Access Demo Mode...
... displayed. 3. This feature can be used to prevent changes to HIGH (loudest). To unlock keypads, press COOKING MODE and hold for beep volume is consistently too brown or too light. 1. Press START. Turn knob clockwise until OVEN TEMP OFFSET is flashing. 3. Access SELECT FUNCTIONS Menu. 2. Turn knob clockwise until desired language is displayed. 3. Turn knob clockwise until CLOCK DISPLAY is displayed. 3. Turn Clock Display ON or OFF Clock time display can be locked for appliance store use only. Access Demo Mode...

Use & Care Manual
Page 21
.... Remove packing materials from range. Buff with tion Conversion ON or the convection bake mode. See "Cleaning and Maintenance" on ". Sabbath Feature is displayed. 3. Turn knob clockwise until TIME FORMAT is activated for 73 hours and then turn off , as selected, during first uses; Oven starts after this is also activated in the oven. Access SELECT FUNCTIONS Menu. 2. See "Setting the Sabbath Feature for the First Time • Remove all Safety Precautions and Use and Care Manual...
.... Remove packing materials from range. Buff with tion Conversion ON or the convection bake mode. See "Cleaning and Maintenance" on ". Sabbath Feature is displayed. 3. Turn knob clockwise until TIME FORMAT is activated for 73 hours and then turn off , as selected, during first uses; Oven starts after this is also activated in the oven. Access SELECT FUNCTIONS Menu. 2. See "Setting the Sabbath Feature for the First Time • Remove all Safety Precautions and Use and Care Manual...

Use & Care Manual
Page 24
... pressed, oven automatically turns on page 19 for manual temperature adjustment. The preheated temperature is reached, at 100ºF. The actual temperature increases until set temperature is displayed, starting at which will turn knob to turn knob. 5. The Automatic Convection Conversion feature can be blinking. 7. See "Getting the Most Out of electric shock or fire. Setting the Cooking Mode and Temperature Note: To back out of an appliance, especially surface unit drip bowls or oven bottom. ature...
... pressed, oven automatically turns on page 19 for manual temperature adjustment. The preheated temperature is reached, at 100ºF. The actual temperature increases until set temperature is displayed, starting at which will turn knob to turn knob. 5. The Automatic Convection Conversion feature can be blinking. 7. See "Getting the Most Out of electric shock or fire. Setting the Cooking Mode and Temperature Note: To back out of an appliance, especially surface unit drip bowls or oven bottom. ature...

Use & Care Manual
Page 47
... in the Self-Clean mode. Turn knob to end: Set hours, press time, set minutes. SELF CLEAN 5: 45 SELF CLEAN END 8. Press OFF to allow for proper glide. Note: The oven lights do not operate in the display. Wipe rack edges with a minimum of water so it . • Avoid placing a wok support ring, trivet or other metal stand on this happens, remove ash with a damp cloth before using the glass ceramic cooktop cleaner...
... in the Self-Clean mode. Turn knob to end: Set hours, press time, set minutes. SELF CLEAN 5: 45 SELF CLEAN END 8. Press OFF to allow for proper glide. Note: The oven lights do not operate in the display. Wipe rack edges with a minimum of water so it . • Avoid placing a wok support ring, trivet or other metal stand on this happens, remove ash with a damp cloth before using the glass ceramic cooktop cleaner...

Use & Care Manual
Page 51
... Sabbath feature is turned off (as Expected Oven temperature is too hot or too cold Oven light is not working properly Porcelain chips The knob was turned too rapidly. Make sure there is proper electrical power to remove the lens cover. See "Turn Automatic Convection Conversion ON or OFF" on page 17. Replace or reinsert the light bulb if loose or defective. See "Change the Oven Temperature Offset" on page 19 for a five-hour Self-Clean...
... Sabbath feature is turned off (as Expected Oven temperature is too hot or too cold Oven light is not working properly Porcelain chips The knob was turned too rapidly. Make sure there is proper electrical power to remove the lens cover. See "Turn Automatic Convection Conversion ON or OFF" on page 17. Replace or reinsert the light bulb if loose or defective. See "Change the Oven Temperature Offset" on page 19 for a five-hour Self-Clean...
Use & Care Manual
Page 52
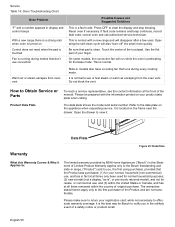
... uses. Service Table 14: Oven Troubleshooting Chart Oven Problem "F" and a number appears in display and control beeps With a new range there is a strong odor when oven is turned on the frame near the drawer. If fault code remains and beep continues, record fault code, cancel oven and call authorized service technician. Operating the self-clean cycle will run while the oven is ", or previously returned model), and not for Bosch to Obtain Service or Parts...
... uses. Service Table 14: Oven Troubleshooting Chart Oven Problem "F" and a number appears in display and control beeps With a new range there is a strong odor when oven is turned on the frame near the drawer. If fault code remains and beep continues, record fault code, cancel oven and call authorized service technician. Operating the self-clean cycle will run while the oven is ", or previously returned model), and not for Bosch to Obtain Service or Parts...

Use & Care Manual
Page 53
... slides, freezing temperatures, excessive moisture or extended exposure to humidity, lightning, power surges, structural failures surrounding the appliance, and acts of purchase, and shall not be stalled, tolled, extended, or suspended, for any reason whatsoever. How Long the Warranty Lasts: Repair/Replace as Your Exclusive Remedy: Out of Warranty Product: Warranty Exclusions: Service Bosch warrants that the Product is free from...
... slides, freezing temperatures, excessive moisture or extended exposure to humidity, lightning, power surges, structural failures surrounding the appliance, and acts of purchase, and shall not be stalled, tolled, extended, or suspended, for any reason whatsoever. How Long the Warranty Lasts: Repair/Replace as Your Exclusive Remedy: Out of Warranty Product: Warranty Exclusions: Service Bosch warrants that the Product is free from...
Installation Instructions
Page 3
... of Household Electric Ranges • UL 923, The Standard for the Safety of Microwave Cooking Appliances • UL 507, The Standard for the Safety of burns or fire by reaching over heated surface units, cabinet storage space located above the cooktop are engaged. See installation instructions. Refer to persons could result. For example, do not remove leveling legs, panels, wire covers or anti-tip brackets/screws. •...
... of Household Electric Ranges • UL 923, The Standard for the Safety of Microwave Cooking Appliances • UL 507, The Standard for the Safety of burns or fire by reaching over heated surface units, cabinet storage space located above the cooktop are engaged. See installation instructions. Refer to persons could result. For example, do not remove leveling legs, panels, wire covers or anti-tip brackets/screws. •...
Installation Instructions
Page 4
... a power-supply cord kit rated for this appliance must be installed on the data plate. show the owner the location of the circuit breaker or fuse. Lock service panel to prevent power from the gas supply piping system by closing its individual manual shutoff valve during any doubt as to whether the wall receptacle is properly grounded, the customer should have it for the local electrical inspector's use with ranges" shall be used...
... a power-supply cord kit rated for this appliance must be installed on the data plate. show the owner the location of the circuit breaker or fuse. Lock service panel to prevent power from the gas supply piping system by closing its individual manual shutoff valve during any doubt as to whether the wall receptacle is properly grounded, the customer should have it for the local electrical inspector's use with ranges" shall be used...

Installation Instructions
Page 6
... that follow for Gas Leaks 7. Tools and Parts Needed Additional Parts Needed For Hard Wire Installations • Range Power Supply Cord Kit (240V -30 Amp) Note: Not necessary for Anti-Tip Bracket (Style will vary depending on mounting surface) • Level • Drill and Drill Bit • Soapy Water • Pipe Wrench • Teflon Tape • Channel Lock Pliers • Gas Leak Test Solution • Gas Supply Line • Gas Shut Off Valve • Safety...
... that follow for Gas Leaks 7. Tools and Parts Needed Additional Parts Needed For Hard Wire Installations • Range Power Supply Cord Kit (240V -30 Amp) Note: Not necessary for Anti-Tip Bracket (Style will vary depending on mounting surface) • Level • Drill and Drill Bit • Soapy Water • Pipe Wrench • Teflon Tape • Channel Lock Pliers • Gas Leak Test Solution • Gas Supply Line • Gas Shut Off Valve • Safety...
Installation Instructions
Page 10
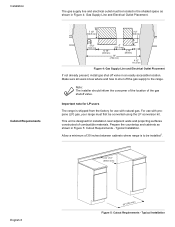
... users know where and how to shut off valve in Figure 5: Cutout Requirements - Note: The installer should inform the consumer of the location of combustible materials. Typical Installation. For use with propane (LP) gas, your range must be located in the shaded space as shown in an easily accessible location. This unit is designed for use with natural gas. Installation Cabinet Requirements The gas supply line and electrical outlet must first be converted using the LP conversion kit...
... users know where and how to shut off valve in Figure 5: Cutout Requirements - Note: The installer should inform the consumer of the location of combustible materials. Typical Installation. For use with propane (LP) gas, your range must be located in the shaded space as shown in an easily accessible location. This unit is designed for use with natural gas. Installation Cabinet Requirements The gas supply line and electrical outlet must first be converted using the LP conversion kit...
Installation Instructions
Page 12
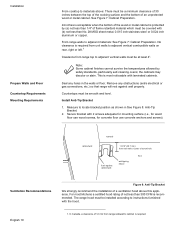
... safety standards, particularly self-cleaning ovens; Countertops must be installed according to instructions furnished with laminated cabinets. English 10 1. Secure bracket with (b) not less than 300 CFM is recommended. For most noticeable with the hood. Measure to adjacent materials: See Figure 7: Cabinet Preparation. The range hood must be covered with 2 screws adequate for mounting surface (i.e., for wood floor use wood screws, for...
... safety standards, particularly self-cleaning ovens; Countertops must be installed according to instructions furnished with laminated cabinets. English 10 1. Secure bracket with (b) not less than 300 CFM is recommended. For most noticeable with the hood. Measure to adjacent materials: See Figure 7: Cabinet Preparation. The range hood must be covered with 2 screws adequate for mounting surface (i.e., for wood floor use wood screws, for...

Installation Instructions
Page 18
... "Gas Connection Location" on page 12 for LP users Flexible Connector Method Figure 19: Gas Connection Location The range is located below the back panel of DuPont For use with propane (LP) gas, your range must first be installed using the LP conversion kit. If using a flexible connector, always use with LP gas and Natural gas around all connections securely and replace terminal block cover. See "Install Strain Relief" on page 16. Important note for detailed instructions. If using...
... "Gas Connection Location" on page 12 for LP users Flexible Connector Method Figure 19: Gas Connection Location The range is located below the back panel of DuPont For use with propane (LP) gas, your range must first be installed using the LP conversion kit. If using a flexible connector, always use with LP gas and Natural gas around all connections securely and replace terminal block cover. See "Install Strain Relief" on page 16. Important note for detailed instructions. If using...


