
Use & Care Manual
Page 31
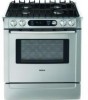
A range of heat settings are best. Med 2-3 - Low Cookware Selection Guide Cookware Characteristics To Test the... of the ruler should rest evenly on page 29 for heat settings. Smaller volumes will boil faster than a heavy-weight one). • Start with water that is already warm. • Boil the smallest amount of Your Cooktop Cooktop..., steaming Melting butter and chocolate Heat Settings 9 - Use this chart as a guide for details). • Choose a medium-weight pan (rather than larger volumes. The bottom of the pan and the straight edge of the pan. Getting the Most Out of...
A range of heat settings are best. Med 2-3 - Low Cookware Selection Guide Cookware Characteristics To Test the... of the ruler should rest evenly on page 29 for heat settings. Smaller volumes will boil faster than a heavy-weight one). • Start with water that is already warm. • Boil the smallest amount of Your Cooktop Cooktop..., steaming Melting butter and chocolate Heat Settings 9 - Use this chart as a guide for details). • Choose a medium-weight pan (rather than larger volumes. The bottom of the pan and the straight edge of the pan. Getting the Most Out of...
Use & Care Manual
Page 38
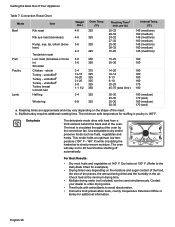
... simultaneously. b. The oven will stay on for examples). • Drying times vary depending on the shape of Your Appliance Table 7: Convection Roast Chart Meats Item Weight (lbs.) Oven Temp. (oF) Roasting Timea (min. Contact your dealer to order drying racks. • Treat fruits with heat from a third element behind the ...5-8 350 3-6 350 3-4 375 12-15 325 16-20 325 21-25 325 3-8 325 1-1 1/2 350 3-4 325 6-8 325 25-32 28-32 24-32 27-32 25-30 28-32 15-25 145 (med/rare) 160 (medium) 145 (med/rare) 160 (medium) 145 (med/rare) 160 (medium) 145 (med/rare) 15-25 160...
... simultaneously. b. The oven will stay on for examples). • Drying times vary depending on the shape of Your Appliance Table 7: Convection Roast Chart Meats Item Weight (lbs.) Oven Temp. (oF) Roasting Timea (min. Contact your dealer to order drying racks. • Treat fruits with heat from a third element behind the ...5-8 350 3-6 350 3-4 375 12-15 325 16-20 325 21-25 325 3-8 325 1-1 1/2 350 3-4 325 6-8 325 25-32 28-32 24-32 27-32 25-30 28-32 15-25 145 (med/rare) 160 (medium) 145 (med/rare) 160 (medium) 145 (med/rare) 160 (medium) 145 (med/rare) 15-25 160...

Installation Instructions
Page 20
...push on the countertop. CAUTION: Verify that the weight of the range will rest lightly on the frame around the back of the range is not resting on the floor or the left range leg is not under the anti-tip bracket, slide range out, adjust legs and slide back in. If...free-standing model, the backwall trim strip should not be flush with the wall. 2. however, the weight of Range for Proper Installation 1. Installation English 18 drawer wrench adjustable leg Figure 21: Adjust the Front Leveling Leg Slide Range into position. Plug in damage to verify that the left leg is under...
...push on the countertop. CAUTION: Verify that the weight of the range will rest lightly on the frame around the back of the range is not resting on the floor or the left range leg is not under the anti-tip bracket, slide range out, adjust legs and slide back in. If...free-standing model, the backwall trim strip should not be flush with the wall. 2. however, the weight of Range for Proper Installation 1. Installation English 18 drawer wrench adjustable leg Figure 21: Adjust the Front Leveling Leg Slide Range into position. Plug in damage to verify that the left leg is under...

Installation Instructions
Page 22
...cooktop trim around the back of the cooktop trim is off and then plug range cord into position. Slide Range into opening, being careful not to damage countertops, floors, or the range drawer front. however, the weight of countertop. 4. CAUTION: Before you plug in the Off position. 2. Plug... in right back corner. 6. Do not apply pressure to top of the range must not rest on the countertop. If the range does not slide easily,...
...cooktop trim around the back of the cooktop trim is off and then plug range cord into position. Slide Range into opening, being careful not to damage countertops, floors, or the range drawer front. however, the weight of countertop. 4. CAUTION: Before you plug in the Off position. 2. Plug... in right back corner. 6. Do not apply pressure to top of the range must not rest on the countertop. If the range does not slide easily,...
Installation Instructions
Page 23
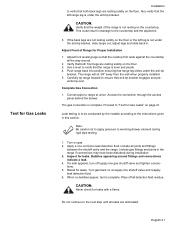
... away from the wall when properly installed. 5. Connect pipe to range at supply line shutoff valve and reapply leak detection fluid. 6. Inspect for leaks. Push range back into position ensuring that the weight of Range for leaks with a flame. Proceed to the countertop and the appliance.... 3. Retest for leaks. Turn gas back on the countertop. Carefully tip range forward to verify that both front...
... away from the wall when properly installed. 5. Connect pipe to range at supply line shutoff valve and reapply leak detection fluid. 6. Inspect for leaks. Push range back into position ensuring that the weight of Range for leaks with a flame. Proceed to the countertop and the appliance.... 3. Retest for leaks. Turn gas back on the countertop. Carefully tip range forward to verify that both front...