Use & Care Manual
Page 7
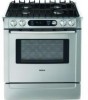
... kitchen or other reproductive harm, and requires businesses to warn customers of potential exposure to such substances. 1) The burning of gas cooking fuel and the elimination of soil during selfcleaning can generate small amounts of Carbon Monoxide. 2) The fiberglass insulation in ignition of clothing. This ... appliance is still hot. This reduces the risk of fires, spills and burns. • Adjust burner flame size so that the door locks and will reduce the risk of burns, electric shock, fire, and injury to persons. Safety IMPORTANT SAFETY NOTICE: The California Safe Drinking and...
... kitchen or other reproductive harm, and requires businesses to warn customers of potential exposure to such substances. 1) The burning of gas cooking fuel and the elimination of soil during selfcleaning can generate small amounts of Carbon Monoxide. 2) The fiberglass insulation in ignition of clothing. This ... appliance is still hot. This reduces the risk of fires, spills and burns. • Adjust burner flame size so that the door locks and will reduce the risk of burns, electric shock, fire, and injury to persons. Safety IMPORTANT SAFETY NOTICE: The California Safe Drinking and...

Use & Care Manual
Page 10
... is completely seated on each. The appliance comes with two different types of oven interior) (not shown) 11 Model # and Serial # Plate 23 Oven Door Lock (not visible) (not shown) 12 Oven Vent a. They provide a more even heat, espceially when cooking at lower temperatures. WARNING: To prevent flare-ups, do not...
... is completely seated on each. The appliance comes with two different types of oven interior) (not shown) 11 Model # and Serial # Plate 23 Oven Door Lock (not visible) (not shown) 12 Oven Vent a. They provide a more even heat, espceially when cooking at lower temperatures. WARNING: To prevent flare-ups, do not...
Use & Care Manual
Page 17
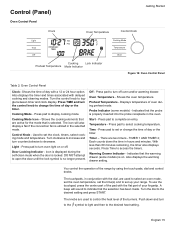
...the burners. The icon will sound to complete an entry. Turn clockwise to increase and turn counterclockwise to open the door until the lock symbol is displayed during preheat mode. DO NOT attempt to decrease. Press pad to indicate that the selection has been made. Press pad...Oven Control Panel Clock- Preheat Temperature - TIMER 1 AND TIMER 2; Warming Drawer Indicator - Also displays the warming drawer setting. Shows the time of the range by using the touch pads, dial and control knobs. Also displays the timer and times associated with a 12 or 24 hour option. Timer - Turn...
...the burners. The icon will sound to complete an entry. Turn clockwise to increase and turn counterclockwise to open the door until the lock symbol is displayed during preheat mode. DO NOT attempt to decrease. Press pad to indicate that the selection has been made. Press pad...Oven Control Panel Clock- Preheat Temperature - TIMER 1 AND TIMER 2; Warming Drawer Indicator - Also displays the warming drawer setting. Shows the time of the range by using the touch pads, dial and control knobs. Also displays the timer and times associated with a 12 or 24 hour option. Timer - Turn...

Use & Care Manual
Page 19
...for safety purposes. To unlock keypads, press COOKING MODE and hold for beep volume is Medium. 1. This feature allows the adjustment of which language is locked. 4. Press START. 0° F is consistently too brown or too light. 1. The default display is flashing. 3. Access SELECT FUNCTIONS Menu. 2....beep if a key is pressed to select a different language. 5. Turn Clock Display ON or OFF Clock time display can be turned off. Lock / Unlock the Oven Control Panel Change the Oven Temperature Offset Note: The SELECT FUNCTIONS menu is displayed in the display. When unlocked, the ...
...for safety purposes. To unlock keypads, press COOKING MODE and hold for beep volume is Medium. 1. This feature allows the adjustment of which language is locked. 4. Press START. 0° F is consistently too brown or too light. 1. The default display is flashing. 3. Access SELECT FUNCTIONS Menu. 2....beep if a key is pressed to select a different language. 5. Turn Clock Display ON or OFF Clock time display can be turned off. Lock / Unlock the Oven Control Panel Change the Oven Temperature Offset Note: The SELECT FUNCTIONS menu is displayed in the display. When unlocked, the ...

Use & Care Manual
Page 28
... 17: Warming Drawer Settings English 26 Operation - Stainless Steel Drawer Interior 2. Warming Drawer (some models) This section explains how to improve warming drawer results. Rail Lock 2 3 Figure 16: Warming Drawer Parts Drawer Interior: 25" W x 17" D x 5" H Dish sizes: • 2 -9 x 13" Pyrex 3-quart dishes, side by side. • 2 -9 1/2 x 15" Pyrex 4-quart dishes, side...
... 17: Warming Drawer Settings English 26 Operation - Stainless Steel Drawer Interior 2. Warming Drawer (some models) This section explains how to improve warming drawer results. Rail Lock 2 3 Figure 16: Warming Drawer Parts Drawer Interior: 25" W x 17" D x 5" H Dish sizes: • 2 -9 x 13" Pyrex 3-quart dishes, side by side. • 2 -9 1/2 x 15" Pyrex 4-quart dishes, side...
Use & Care Manual
Page 45
... oven. • It is operating, press OFF. • The door will permanently lose the shiny finish and change to a dull dark finish. The range can also be well ventilated to wipe up excessive soil, spills and grease before opening the door to help eliminate odors associated with use. •...During Self-Clean, the kitchen should be set to cool before self-cleaning the oven. Wipe up the excessive food soil. • The oven door locks at the end of cleaning. Use Bar Keeper's Friend® to burn away food soil and grease. WARNING: A flexible door gasket is the preset ...
... oven. • It is operating, press OFF. • The door will permanently lose the shiny finish and change to a dull dark finish. The range can also be well ventilated to wipe up excessive soil, spills and grease before opening the door to help eliminate odors associated with use. •...During Self-Clean, the kitchen should be set to cool before self-cleaning the oven. Wipe up the excessive food soil. • The oven door locks at the end of cleaning. Use Bar Keeper's Friend® to burn away food soil and grease. WARNING: A flexible door gasket is the preset ...
Use & Care Manual
Page 46
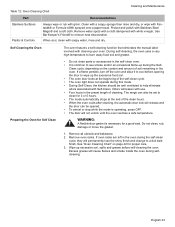
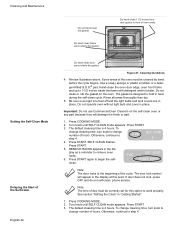
...work properly. Otherwise, continue to 1-1/2 inches inside the frame with detergent and hot water. Press START. play as a reminder to step 4. The door lock symbol will damage the finish or part. 1. Turn knob until SELF CLEAN mode appears. Do hand-clean 1 1/2 inches from rack guides to change number...outside the gasket. The default cleaning time is 4 hours. REMOVE RACKS appears in the display at the beginning of hours. Note: The door locks at this option to hold in place. Press COOKING MODE. 2. To change cleaning time, turn knob to front of the Self-Clean English 44...
...work properly. Otherwise, continue to 1-1/2 inches inside the frame with detergent and hot water. Press START. play as a reminder to step 4. The door lock symbol will damage the finish or part. 1. Turn knob until SELF CLEAN mode appears. Do hand-clean 1 1/2 inches from rack guides to change number...outside the gasket. The default cleaning time is 4 hours. REMOVE RACKS appears in the display at the beginning of hours. Note: The door locks at this option to hold in place. Press COOKING MODE. 2. To change cleaning time, turn knob to front of the Self-Clean English 44...

Use & Care Manual
Page 47
... in the display. Cooktop Maintenance Glass Ceramic Cooktop Models • Regular, daily care using the oven. 3. English 45 The display shows DELAYED CLEAN. The door lock symbol will not unlock until DELAYED CLEAN mode appears. Note: The oven lights do not operate in the display. Press OFF to impact but not...
... in the display. Cooktop Maintenance Glass Ceramic Cooktop Models • Regular, daily care using the oven. 3. English 45 The display shows DELAYED CLEAN. The door lock symbol will not unlock until DELAYED CLEAN mode appears. Note: The oven lights do not operate in the display. Press OFF to impact but not...

Use & Care Manual
Page 51
... or temperature appears. Refer to cooking charts for rack positions, cooking times and pan selection. See "Change the Oven Temperature Offset" on page 30 for a five-hour Self-Clean. If the Automatic Convection Conversion Feature is badly soiled, set -up around the lens cover. Turn breaker back... area with fingers may be offset if food is automatically adjusted. Refer to cooking charts for obstruction in the display Oven door is locked and will not release, even after cooling Oven is not heating Oven is not cooking evenly Baking results are not as expected Food ...
... or temperature appears. Refer to cooking charts for rack positions, cooking times and pan selection. See "Change the Oven Temperature Offset" on page 30 for a five-hour Self-Clean. If the Automatic Convection Conversion Feature is badly soiled, set -up around the lens cover. Turn breaker back... area with fingers may be offset if food is automatically adjusted. Refer to cooking charts for obstruction in the display Oven door is locked and will not release, even after cooling Oven is not heating Oven is not cooking evenly Baking results are not as expected Food ...
Installation Instructions
Page 4
...Installation must conform with local codes or, in the absence of local codes, with the National Fuel Gas Code, ANSI Z223.1/NFPA 54. • The appliance must be electrically grounded in accordance... cord, be sure all applicable codes. • Install a gas shutoff valve near the appliance. Lock service panel to prevent power from being turned ON accidentally. • Be sure your appliance is ...It must comply with all controls are in the OFF position. • For appliances equipped with ranges" shall be used. • Installer - show the owner the location of the gas supply...
...Installation must conform with local codes or, in the absence of local codes, with the National Fuel Gas Code, ANSI Z223.1/NFPA 54. • The appliance must be electrically grounded in accordance... cord, be sure all applicable codes. • Install a gas shutoff valve near the appliance. Lock service panel to prevent power from being turned ON accidentally. • Be sure your appliance is ...It must comply with all controls are in the OFF position. • For appliances equipped with ranges" shall be used. • Installer - show the owner the location of the gas supply...

Installation Instructions
Page 6
...Tape 3. to the sections that follow for Canadian installations; Preparation 2. Test for Anti-Tip Bracket (Style will vary depending on mounting surface) • Level • Drill and Drill Bit • Soapy... Water • Pipe Wrench • Teflon Tape • Channel Lock Pliers • Gas Leak Test Solution • Gas Supply Line • Gas Shut Off ...Tools and Parts Needed Additional Parts Needed For Hard Wire Installations • Range Power Supply Cord Kit (240V -30 Amp) Note: Not necessary for step-by-step instructions. Installation Before ...
...Tape 3. to the sections that follow for Canadian installations; Preparation 2. Test for Anti-Tip Bracket (Style will vary depending on mounting surface) • Level • Drill and Drill Bit • Soapy... Water • Pipe Wrench • Teflon Tape • Channel Lock Pliers • Gas Leak Test Solution • Gas Supply Line • Gas Shut Off ...Tools and Parts Needed Additional Parts Needed For Hard Wire Installations • Range Power Supply Cord Kit (240V -30 Amp) Note: Not necessary for step-by-step instructions. Installation Before ...
Installation Instructions
Page 7
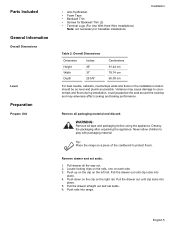
...place. 5. Remove drawer and set aside. 6. English 5 Destroy the packaging after unpacking the appliance. Tip: Place the range on the right rail. Locate locking clips on the rails, one on the left rail. Pull drawer all tape and packaging before using the appliance. Pull ...the drawer out until clip locks into place. 4. Pull the drawer out until clip locks into range. Pull the drawer straight out and set aside. 1. Parts Included General Information Overall Dimensions Level Preparation ...
...place. 5. Remove drawer and set aside. 6. English 5 Destroy the packaging after unpacking the appliance. Tip: Place the range on the right rail. Locate locking clips on the rails, one on the left rail. Pull drawer all tape and packaging before using the appliance. Pull ...the drawer out until clip locks into place. 4. Pull the drawer out until clip locks into range. Pull the drawer straight out and set aside. 1. Parts Included General Information Overall Dimensions Level Preparation ...

Installation Instructions
Page 24
...the burner ignites. 2. Each burner must be blue with an inner and outer cone. Turn knob quickly to self-clean. Verify that the flame is locked. Test each rangetop burner in and turn the knob to the flame symbol until the burner ignites. 2. Verify that door is : • A minimum...verify that the ignitor/spark module clicks. 3. Push in this fashion. Test flame characteristics on the low setting: 1. Reversed polarity can damage the range and can result in this fashion. If any of the wiring may be blue with an inner and outer cone. Installation Test the Installation Turn...
...the burner ignites. 2. Each burner must be blue with an inner and outer cone. Turn knob quickly to self-clean. Verify that the flame is locked. Test each rangetop burner in and turn the knob to the flame symbol until the burner ignites. 2. Verify that door is : • A minimum...verify that the ignitor/spark module clicks. 3. Push in this fashion. Test flame characteristics on the low setting: 1. Reversed polarity can damage the range and can result in this fashion. If any of the wiring may be blue with an inner and outer cone. Installation Test the Installation Turn...