
Use & Care Manual
Page 2
... Getting the Most Out of Your Cooktop 29 Getting the Most Out of Your Oven 30 Getting the Most Out of Contents About This Manual 1 How This Manual Is Organized 1 Safety 2 Important Safety Instructions 2 Getting Started 7 Parts and Accessories 7 Control (Panel 15 Before Using the Appliance for the First Time 19 Operation...
... Getting the Most Out of Your Cooktop 29 Getting the Most Out of Your Oven 30 Getting the Most Out of Contents About This Manual 1 How This Manual Is Organized 1 Safety 2 Important Safety Instructions 2 Getting Started 7 Parts and Accessories 7 Control (Panel 15 Before Using the Appliance for the First Time 19 Operation...
Use & Care Manual
Page 4
... • Never leave the cooktop unattended when in use. c) Clean ventilating fans frequently. d) Use proper pan size. WARNING: TO REDUCE THE RISK OF A RANGE TOP GREASE FIRE: a) Never leave surface units unattended at high heat or when flambéing food (i.e. English 2 Turn off the appliance and disconnect the... READ AND SAVE THESE INSTRUCTIONS Important Safety Instructions Fire Safety • Do not use aluminum foil or protective liners to line any part of these liners may ignite. Installation of an appliance, especially surface unit drip bowls or oven bottom.
... • Never leave the cooktop unattended when in use. c) Clean ventilating fans frequently. d) Use proper pan size. WARNING: TO REDUCE THE RISK OF A RANGE TOP GREASE FIRE: a) Never leave surface units unattended at high heat or when flambéing food (i.e. English 2 Turn off the appliance and disconnect the... READ AND SAVE THESE INSTRUCTIONS Important Safety Instructions Fire Safety • Do not use aluminum foil or protective liners to line any part of these liners may ignite. Installation of an appliance, especially surface unit drip bowls or oven bottom.

Use & Care Manual
Page 6
... even though they have had sufficient time to cause burns. To avoid bubbling and splattering, heat oil slowly on the backsplash. Children climbing on any part of an oven become hot enough to cool. See warning in color. Among these areas are dark in "Gas Safety" on the cooktop only when...
... even though they have had sufficient time to cause burns. To avoid bubbling and splattering, heat oil slowly on the backsplash. Children climbing on any part of an oven become hot enough to cool. See warning in color. Among these areas are dark in "Gas Safety" on the cooktop only when...
Use & Care Manual
Page 8
... any questions, contact the manufacturer. • Do not store or use when heating or cooking food. English 6 Install anti-tip device packaged with range. Figure 1: Tipping Precautions • This appliance is not approved for longer than one hour. CAUTION: To maintain food safety, follow these guidelines: ...drawer to crisp crackers, chips or dry cereal and to warm plates.) 2) Be sure to heat cold food (excep- If you have any part of an error the display flashes and beeps continuously. mended in injury. • Do not operate this appliance. Injury to a factory authorized ...
... any questions, contact the manufacturer. • Do not store or use when heating or cooking food. English 6 Install anti-tip device packaged with range. Figure 1: Tipping Precautions • This appliance is not approved for longer than one hour. CAUTION: To maintain food safety, follow these guidelines: ...drawer to crisp crackers, chips or dry cereal and to warm plates.) 2) Be sure to heat cold food (excep- If you have any part of an error the display flashes and beeps continuously. mended in injury. • Do not operate this appliance. Injury to a factory authorized ...

Use & Care Manual
Page 9
...shown) English 7 varies by model) 8 Oven Door Gasket 9 Storage Drawer (some models)a 11 9 or 10 (model dependent) Figure 2: Parts and Accessories # Part 13 Cooktop Scraper (glass ceramic models only) (not shown) 14 Weiman Cook Top® glass ceramic cooktop cleaner (glass ceramic models only)... wall; varies by model) 4 Cooktop Control Knob 5 Probe Receptacle 6 Rack Positions/ Rack Guides 7 Oven Racks, Flat (2 or 3; Getting Started Parts and Accessories Free-Standing Models 1 2 3 4 5 12 6 7 8 Slide-In Models 1 12 2 3 4 5 6 7 8 11 9 or 10 (model dependent) Table...
...shown) English 7 varies by model) 8 Oven Door Gasket 9 Storage Drawer (some models)a 11 9 or 10 (model dependent) Figure 2: Parts and Accessories # Part 13 Cooktop Scraper (glass ceramic models only) (not shown) 14 Weiman Cook Top® glass ceramic cooktop cleaner (glass ceramic models only)... wall; varies by model) 4 Cooktop Control Knob 5 Probe Receptacle 6 Rack Positions/ Rack Guides 7 Oven Racks, Flat (2 or 3; Getting Started Parts and Accessories Free-Standing Models 1 2 3 4 5 12 6 7 8 Slide-In Models 1 12 2 3 4 5 6 7 8 11 9 or 10 (model dependent) Table...

Use & Care Manual
Page 10
... lower temperatures. As a result, there are easier to clean, disassemble or adjust. Spills stay on top of the cooktop where they are no parts under the cooktop to wipe up. The appliance comes with two different types of the cooktop. WARNING: To prevent flare-ups, do not use...not visible) (not shown) 12 Oven Vent a. Depending on the model, the appliance is completely seated on each. Getting Started Table 1: Parts and Accessories Key # Part # Part 10 Warming Drawer (some models)a 22 Broil Element (top of the burner. Sealed Gas Burners The cooktop has sealed gas burners. If the...
... lower temperatures. As a result, there are easier to clean, disassemble or adjust. Spills stay on top of the cooktop where they are no parts under the cooktop to wipe up. The appliance comes with two different types of the cooktop. WARNING: To prevent flare-ups, do not use...not visible) (not shown) 12 Oven Vent a. Depending on the model, the appliance is completely seated on each. Getting Started Table 1: Parts and Accessories Key # Part # Part 10 Warming Drawer (some models)a 22 Broil Element (top of the burner. Sealed Gas Burners The cooktop has sealed gas burners. If the...
Use & Care Manual
Page 15
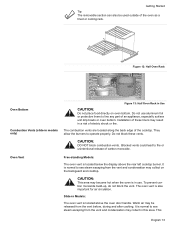
... above the oven door handle. The combustion vents are located along the back edge of these vents. The oven vent is normal to line any part of electric shock or fire. Installation of the cooktop. Slide-in this area. Oven Vent Free-standing Models: The oven vent is located above the...
... above the oven door handle. The combustion vents are located along the back edge of these vents. The oven vent is normal to line any part of electric shock or fire. Installation of the cooktop. Slide-in this area. Oven Vent Free-standing Models: The oven vent is located above the...
Use & Care Manual
Page 17
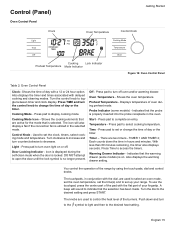
...an entry. Shows the oven temperature. Used to control the heat level of your range. Press pad to display cooking mode. Also displays the warming drawer setting. To use the touchpad, press the center part of the pad with a 12 or 24 hour option. Turn the dial to...to the desired heat setting. Each counts down and turn counterclockwise to indicate that the warming drawer (some models) - Shows the time of the range by using the touch pads, dial and control knobs. Probe Indicator (some models) is locked. Control Knob - Preheat Temperature - Shows the ...
...an entry. Shows the oven temperature. Used to control the heat level of your range. Press pad to display cooking mode. Also displays the warming drawer setting. To use the touchpad, press the center part of the pad with a 12 or 24 hour option. Turn the dial to...to the desired heat setting. Each counts down and turn counterclockwise to indicate that the warming drawer (some models) - Shows the time of the range by using the touch pads, dial and control knobs. Probe Indicator (some models) is locked. Control Knob - Preheat Temperature - Shows the ...

Use & Care Manual
Page 24
...Setting the Cooking Mode and Temperature Note: To back out of Your Oven" on page 30 for details. The preheated temperature is turned off to turn the oven off oven. Once.... Simply enter the package or recipe temperature when setting the mode and the range calculates the correct temperature. Automatic Convection Conversion (models with the default temper- To select a different... temperature, turn knob. 5. ments) to line any part of electric shock or fire. The selected mode will appear in the display, along with...
...Setting the Cooking Mode and Temperature Note: To back out of Your Oven" on page 30 for details. The preheated temperature is turned off to turn the oven off oven. Once.... Simply enter the package or recipe temperature when setting the mode and the range calculates the correct temperature. Automatic Convection Conversion (models with the default temper- To select a different... temperature, turn knob. 5. ments) to line any part of electric shock or fire. The selected mode will appear in the display, along with...

Use & Care Manual
Page 28
... of Your Warming Drawer" on page 38. Stainless Steel Drawer Interior 2. High Figure 17: Warming Drawer Settings English 26 Rail Lock 2 3 Figure 16: Warming Drawer Parts Drawer Interior: 25" W x 17" D x 5" H Dish sizes: • 2 -9 x 13" Pyrex 3-quart dishes, side by side. • 2 -9 1/2 x 15" Pyrex 4-quart ...Settings: The warming drawer has three settings: Low, Medium and High. Gasket 3. These icons are Low, Medium, and High. 1 Parts Key: 1. Warming drawer settings are seen in the display when the corresponding setting is selected: Low Medium For recommended settings, see "...
... of Your Warming Drawer" on page 38. Stainless Steel Drawer Interior 2. High Figure 17: Warming Drawer Settings English 26 Rail Lock 2 3 Figure 16: Warming Drawer Parts Drawer Interior: 25" W x 17" D x 5" H Dish sizes: • 2 -9 x 13" Pyrex 3-quart dishes, side by side. • 2 -9 1/2 x 15" Pyrex 4-quart ...Settings: The warming drawer has three settings: Low, Medium and High. Gasket 3. These icons are Low, Medium, and High. 1 Parts Key: 1. Warming drawer settings are seen in the display when the corresponding setting is selected: Low Medium For recommended settings, see "...
Use & Care Manual
Page 33
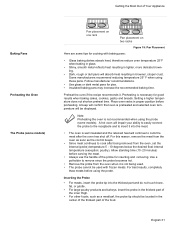
... metal reflects heat resulting in lighter, more delicate browning. • Dark, rough or dull pans will absorb heat resulting in the center of the thickest part of the probe for cooking with frozen meats. Preheat the oven if the recipe recommends it into the thickest... do not touch bone, fat, or gristle. • For large poultry products and turkeys, insert the probe in the thickest part of the inner thigh. • For other foods, such as the control beeps. • Since meat continues to remove since the probe becomes hot. • ...
... metal reflects heat resulting in lighter, more delicate browning. • Dark, rough or dull pans will absorb heat resulting in the center of the thickest part of the probe for cooking with frozen meats. Preheat the oven if the recipe recommends it into the thickest... do not touch bone, fat, or gristle. • For large poultry products and turkeys, insert the probe in the thickest part of the inner thigh. • For other foods, such as the control beeps. • Since meat continues to remove since the probe becomes hot. • ...
Use & Care Manual
Page 39
... needing the highest setting toward the side of the drawer and items needing less heat in the center of skin thinly peeled from top. orange part of the drawer. • Food should be used to cover food; Remove membrane of orange; However, DO NOT line the warm- Orange slices: skins are...
... needing the highest setting toward the side of the drawer and items needing less heat in the center of skin thinly peeled from top. orange part of the drawer. • Food should be used to cover food; Remove membrane of orange; However, DO NOT line the warm- Orange slices: skins are...
Use & Care Manual
Page 41
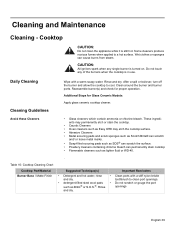
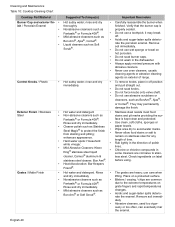
... cooktop cleaner. Cooktop CAUTION: Do not clean the appliance while it is in use. Additional Steps for proper operation. Table 10: Cooktop Cleaning Chart Cooktop Part/Material Burner Base / Matte Finish Suggested Technique(s) Important Reminders • Detergent and hot water; English 39 Do not touch any single burner is turned on...
... cooktop cleaner. Cooktop CAUTION: Do not clean the appliance while it is in use. Additional Steps for proper operation. Table 10: Cooktop Cleaning Chart Cooktop Part/Material Burner Base / Matte Finish Suggested Technique(s) Important Reminders • Detergent and hot water; English 39 Do not touch any single burner is turned on...
Use & Care Manual
Page 42
... stains or salt to protect the finish • from staining and pitting; • enhances appearance. Cleaning and Maintenance Table 10: Cooktop Cleaning Chart Cooktop Part/Material Burner Cap and exterior fin- • ish / Porcelain Enamel • • • Control Knobs / Plastic • Exterior Finish / ...some cleaners are corrosive to avoid water marks. Do not use wet sponge or towel on stainless steel for any length of range. Rub lightly in the dishwasher Always apply minimal pressure with abrasive cleaners. Nonabrasive cleansers such as Fantastic® or Formula ...
... stains or salt to protect the finish • from staining and pitting; • enhances appearance. Cleaning and Maintenance Table 10: Cooktop Cleaning Chart Cooktop Part/Material Burner Cap and exterior fin- • ish / Porcelain Enamel • • • Control Knobs / Plastic • Exterior Finish / ...some cleaners are corrosive to avoid water marks. Do not use wet sponge or towel on stainless steel for any length of range. Rub lightly in the dishwasher Always apply minimal pressure with abrasive cleaners. Nonabrasive cleansers such as Fantastic® or Formula ...

Use & Care Manual
Page 43
... clean or a non-abrasive cleaner such as salt and seasoning.. When cooled before using care not to use of soil for about 30 minutes. • Use a plastic scrubber and glass ceramic cooktop cleaner or use the razor blade scraper. syrup, tomato products and milk...clean and dry. • Remove any type of spills while the surface is necessary to remove grease; Table 10: Cooktop Cleaning Chart Cooktop Part/Material Exterior Finish / Glass Ceramic Igniters / Ceramics Cleaning and Maintenance Suggested Technique(s) Important Reminders • Apply a small amount of Soil Dry ...
... clean or a non-abrasive cleaner such as salt and seasoning.. When cooled before using care not to use of soil for about 30 minutes. • Use a plastic scrubber and glass ceramic cooktop cleaner or use the razor blade scraper. syrup, tomato products and milk...clean and dry. • Remove any type of spills while the surface is necessary to remove grease; Table 10: Cooktop Cleaning Chart Cooktop Part/Material Exterior Finish / Glass Ceramic Igniters / Ceramics Cleaning and Maintenance Suggested Technique(s) Important Reminders • Apply a small amount of Soil Dry ...
Use & Care Manual
Page 44
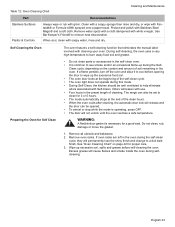
... surface. • Flammable cleaners such as lighter fluid or WD-40 Table 12: Oven Cleaning Chart Part Racks Fiberglass Gasket Glass (other material (metal trim, grates, burners, etc.) as directed. English 42 Hold the scraper at a 30° angle. Do not soak. 2. See "Oven Cleaning Chart" on foods. Rinse and dry. Cleaning...
... surface. • Flammable cleaners such as lighter fluid or WD-40 Table 12: Oven Cleaning Chart Part Racks Fiberglass Gasket Glass (other material (metal trim, grates, burners, etc.) as directed. English 42 Hold the scraper at a 30° angle. Do not soak. 2. See "Oven Cleaning Chart" on foods. Rinse and dry. Cleaning...
Use & Care Manual
Page 45
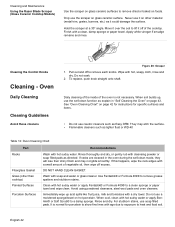
...Oven The oven features a self-cleaning function that eliminates the manual labor involved with Stainless Steel Magic® and a soft cloth. The range can be set to help eliminate odors associated with use. • Four hours is operating, press OFF. • The door will ...flame persists, turn off the oven and allow it to cool before self-cleaning the oven. Table 12: Oven Cleaning Chart Cleaning and Maintenance Part Stainless Surfaces Plastic & Controls Recommendations Always wipe or rub with white vinegar. Excess grease will release and the door can also be opened....
...Oven The oven features a self-cleaning function that eliminates the manual labor involved with Stainless Steel Magic® and a soft cloth. The range can be set to help eliminate odors associated with use. • Four hours is operating, press OFF. • The door will ...flame persists, turn off the oven and allow it to cool before self-cleaning the oven. Table 12: Oven Cleaning Chart Cleaning and Maintenance Part Stainless Surfaces Plastic & Controls Recommendations Always wipe or rub with white vinegar. Excess grease will release and the door can also be opened....
Use & Care Manual
Page 46
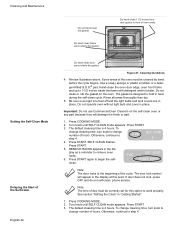
... day must be correctly set for this point. Press START. REMOVE RACKS appears in "Getting Started". 1. The door lock symbol will damage the finish or part. 1. Note: The time of hours. To change number of the oven must be cleaned by hand before the cycle begins. Cleaning and Maintenance Setting the... Self-Clean Mode Delaying the Start of the cycle; Do not clean or rub the gasket on the self-clean oven or any part because they will appear in place. The default cleaning time is turned off and the light bulbs and lens covers are in heat during the...
... day must be correctly set for this point. Press START. REMOVE RACKS appears in "Getting Started". 1. The door lock symbol will damage the finish or part. 1. Note: The time of hours. To change number of the oven must be cleaned by hand before the cycle begins. Cleaning and Maintenance Setting the... Self-Clean Mode Delaying the Start of the cycle; Do not clean or rub the gasket on the self-clean oven or any part because they will appear in place. The default cleaning time is turned off and the light bulbs and lens covers are in heat during the...
Use & Care Manual
Page 52
...") sold to notify you , the first using purchaser, provided that runs during modes that pad is normal. Please be prepared with a new range and will disappear after a few uses. Refer to see the contact information at the front of the touchpad. and (3) within the country of the Product.... Operating the self-clean cycle will run while the oven is the best way for the bake mode. Use the flat part of Limited Product Warranty applies only to the Bosch freestanding and slide-in models also have a cooling fan that the Product was purchased: (1) for your finger. This is clean. ...
...") sold to notify you , the first using purchaser, provided that runs during modes that pad is normal. Please be prepared with a new range and will disappear after a few uses. Refer to see the contact information at the front of the touchpad. and (3) within the country of the Product.... Operating the self-clean cycle will run while the oven is the best way for the bake mode. Use the flat part of Limited Product Warranty applies only to the Bosch freestanding and slide-in models also have a cooling fan that the Product was purchased: (1) for your finger. This is clean. ...

Use & Care Manual
Page 53
...including repairs, pro-rates, or Product replacement, once this warranty shall not be available to surrounding property, including cabinetry, floors, ceilings, and English 51 All replaced and/or repaired parts shall assume the identity of the original part for any such event, if you request, Bosch would still... or storage of an indoor product outdoors, use an un-authorized servicer; in Bosch 's sole discretion, for labor and parts and ship the parts to such parts. During this warranty period, Bosch or one or more than an authorized service provider work performed by the service ...
...including repairs, pro-rates, or Product replacement, once this warranty shall not be available to surrounding property, including cabinetry, floors, ceilings, and English 51 All replaced and/or repaired parts shall assume the identity of the original part for any such event, if you request, Bosch would still... or storage of an indoor product outdoors, use an un-authorized servicer; in Bosch 's sole discretion, for labor and parts and ship the parts to such parts. During this warranty period, Bosch or one or more than an authorized service provider work performed by the service ...
