
Installation Instructions
Page 2
... hearing from you Begin 3 Tools and Parts Needed 3 Parts Included 3 27" Appliances 3 General Information 3 30" Appliances 6 Removing Packaging 9 For Convection Microwave Combination Units 9 Preparing Oven 9 Installation 10 Electrical Installation 10 Oven Installation 12 Testing Operation 13 Service 14 Before Calling Service 14 This Bosch Appliance is made by BSH Home Appliances Corporation 5551 McFadden Ave.
... hearing from you Begin 3 Tools and Parts Needed 3 Parts Included 3 27" Appliances 3 General Information 3 30" Appliances 6 Removing Packaging 9 For Convection Microwave Combination Units 9 Preparing Oven 9 Installation 10 Electrical Installation 10 Oven Installation 12 Testing Operation 13 Service 14 Before Calling Service 14 This Bosch Appliance is made by BSH Home Appliances Corporation 5551 McFadden Ave.

Installation Instructions
Page 4
... Equipment Safety Transport Be sure your appliance is properly installed and grounded by a qualified technician. Never modify or alter the construction of the appliance. Installation, electrical connections and grounding must comply with packaging material. Remove all applicable codes. For example, do not remove leveling legs, panels, wire covers or anti-tip...
... Equipment Safety Transport Be sure your appliance is properly installed and grounded by a qualified technician. Never modify or alter the construction of the appliance. Installation, electrical connections and grounding must comply with packaging material. Remove all applicable codes. For example, do not remove leveling legs, panels, wire covers or anti-tip...

Installation Instructions
Page 5
...2x4 supports. Dimensions for 27" Wall-Mounted Units 24" (610mm) 251/2" (648mm) 263/4" (680mm) 2413/16" (630mm) 281/4" (718mm) 291/16" (738mm) 27" (686mm) min. 43/4" (121mm) max. 313/8" (797mm) 237/8" (606mm) 22" (559mm) Single Oven 27" It is good practice, when oven is installed at the end ...of a cabinet run, adjacent to a perpendicular wall or cabinet door, to back flush with the bottom and the side of the opening. Note: The...
...2x4 supports. Dimensions for 27" Wall-Mounted Units 24" (610mm) 251/2" (648mm) 263/4" (680mm) 2413/16" (630mm) 281/4" (718mm) 291/16" (738mm) 27" (686mm) min. 43/4" (121mm) max. 313/8" (797mm) 237/8" (606mm) 22" (559mm) Single Oven 27" It is good practice, when oven is installed at the end ...of a cabinet run, adjacent to a perpendicular wall or cabinet door, to back flush with the bottom and the side of the opening. Note: The...

Installation Instructions
Page 6
...front to allow at least 1/4" space between the side of the oven and the wall/door. Combo Oven with Microwave 27" It is good practice, when oven is installed at the end of a cabinet run , adjacent to a perpendicular wall or cabinet door, to back flush with the bottom and the ...) 2413/16" (630mm) 491/2" (1257mm) 483/8" (1229mm) 191/2" (500mm) 237/8" (606mm) 22" (559mm) Double Oven 27" It is good practice, when oven is installed at the end of a cabinet run , adjacent to a perpendicular wall or cabinet door, to the floor/cabinet and level. The supporting base must be well secured to...
...front to allow at least 1/4" space between the side of the oven and the wall/door. Combo Oven with Microwave 27" It is good practice, when oven is installed at the end of a cabinet run , adjacent to a perpendicular wall or cabinet door, to back flush with the bottom and the ...) 2413/16" (630mm) 491/2" (1257mm) 483/8" (1229mm) 191/2" (500mm) 237/8" (606mm) 22" (559mm) Double Oven 27" It is good practice, when oven is installed at the end of a cabinet run , adjacent to a perpendicular wall or cabinet door, to the floor/cabinet and level. The supporting base must be well secured to...

Installation Instructions
Page 7
...flat and capable of supporting a weight of at least 1/4" space between the side of the oven and the wall/door. The cabinet base must be well secured to the floor/cabinet and level. For oven support, install 2x4's extending front to back flush with Microwave and Warming Drawer 27" It ...is good practice, when oven is installed at the end of a cabinet run, adjacent to a perpendicular wall or cabinet door, to facilitate connecting and servicing. The supporting base must be located above the unit to allow...
...flat and capable of supporting a weight of at least 1/4" space between the side of the oven and the wall/door. The cabinet base must be well secured to the floor/cabinet and level. For oven support, install 2x4's extending front to back flush with Microwave and Warming Drawer 27" It ...is good practice, when oven is installed at the end of a cabinet run, adjacent to a perpendicular wall or cabinet door, to facilitate connecting and servicing. The supporting base must be located above the unit to allow...

Installation Instructions
Page 8
... above or below the unit, a 2" diameter hole or space is required between the side of the oven and the wall/door. Double Oven 30" It is good practice, when oven is installed at the end of a cabinet run , adjacent to a perpendicular wall or cabinet door, to allow at least 190 lbs (86 kg). For... oven support, install 2x4's extending front to back flush with the bottom and the side of the opening ....
... above or below the unit, a 2" diameter hole or space is required between the side of the oven and the wall/door. Double Oven 30" It is good practice, when oven is installed at the end of a cabinet run , adjacent to a perpendicular wall or cabinet door, to allow at least 190 lbs (86 kg). For... oven support, install 2x4's extending front to back flush with the bottom and the side of the opening ....

Installation Instructions
Page 9
...box must be located above the unit to facilitate connecting and servicing. Combo Oven with Microwave and Warming Drawer 30" It is good practice, when oven is installed at the end of a cabinet run , adjacent to a perpendicular wall or cabinet door, to allow at least 290 lbs (132 kg). .../4" (1543mm) 613/8" (1559mm) 595/8" (1514mm) 93/4" (248mm) 237/8" (606mm) 22" (559mm) Combo Oven with Microwave 30" It is good practice, when oven is installed at the end of a cabinet run , adjacent to a perpendicular wall or cabinet door, to allow at least 310 lbs (141 kg). Note: The conduit box must...
...box must be located above the unit to facilitate connecting and servicing. Combo Oven with Microwave and Warming Drawer 30" It is good practice, when oven is installed at the end of a cabinet run , adjacent to a perpendicular wall or cabinet door, to allow at least 290 lbs (132 kg). .../4" (1543mm) 613/8" (1559mm) 595/8" (1514mm) 93/4" (248mm) 237/8" (606mm) 22" (559mm) Combo Oven with Microwave 30" It is good practice, when oven is installed at the end of a cabinet run , adjacent to a perpendicular wall or cabinet door, to allow at least 310 lbs (141 kg). Note: The conduit box must...

Installation Instructions
Page 10
.... Note: The conduit box must be located above the unit to back flush with Warming Drawer 30" It is good practice, when oven is installed at the end of a cabinet run, adjacent to a perpendicular wall or cabinet door, to allow at least 1/4" space between the side of at least 290 lbs... (132 kg). 237/8" (606mm) 22" (559mm) 30" Under-the-counter-Units 24" (610mm) 161/2" (419mm) 281/4" (718mm) 293/4" ...
.... Note: The conduit box must be located above the unit to back flush with Warming Drawer 30" It is good practice, when oven is installed at the end of a cabinet run, adjacent to a perpendicular wall or cabinet door, to allow at least 1/4" space between the side of at least 290 lbs... (132 kg). 237/8" (606mm) 22" (559mm) 30" Under-the-counter-Units 24" (610mm) 161/2" (419mm) 281/4" (718mm) 293/4" ...
Installation Instructions
Page 11
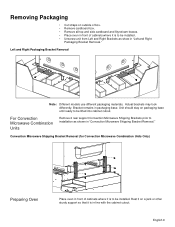
... stay on packaging base until ready to be installed. Convection Microwave Shipping Bracket Removal (for Convection Microwave Combination Units Only) Preparing Oven Place oven in front of cabinets where it is to installation as show in "Left and Right Packaging Bracket Removal." Removing Packaging •... straps on outside of box. • Remove cardboard box. • Remove all top and side cardboard and Styrofoam braces. • Place oven in front of cabinets where it is to be installed. • Unscrew unit from Left and Right Brackets as shown in "Convection Microwave Shipping...
... stay on packaging base until ready to be installed. Convection Microwave Shipping Bracket Removal (for Convection Microwave Combination Units Only) Preparing Oven Place oven in front of cabinets where it is to installation as show in "Left and Right Packaging Bracket Removal." Removing Packaging •... straps on outside of box. • Remove cardboard box. • Remove all top and side cardboard and Styrofoam braces. • Place oven in front of cabinets where it is to be installed. • Unscrew unit from Left and Right Brackets as shown in "Convection Microwave Shipping...

Installation Instructions
Page 12
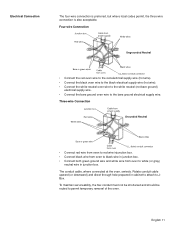
... and grounding must be a 4-wire single-phase AC. If local codes permit grounding through the electrical supply neutral, connect both the white neutral wire and the bare ground wire from the oven to either 208/240V AC, 60 Hz, 4 wire, single-phase power supply. Install a suitable conduit box (...not furnished). Refer to the junction box. Model Circuit Required 208V, 60 Hz 240V, 60 Hz HBN33, HBL33 25 AMP 30 AMP HBN34, HBL34, HBN54, HBL54 HBL85 30 AMP 30 AMP HBN35...
... and grounding must be a 4-wire single-phase AC. If local codes permit grounding through the electrical supply neutral, connect both the white neutral wire and the bare ground wire from the oven to either 208/240V AC, 60 Hz, 4 wire, single-phase power supply. Install a suitable conduit box (...not furnished). Refer to the junction box. Model Circuit Required 208V, 60 Hz 240V, 60 Hz HBN33, HBL33 25 AMP 30 AMP HBN34, HBL34, HBN54, HBL54 HBL85 30 AMP 30 AMP HBN35...
Installation Instructions
Page 13
...to attach to white (or gray) neutral wire in junction box. • Connect both green ground wire and white wire from oven to JBox. Electrical Connection The four-wire connection is preferred, but where local codes permit, the three wire connection is also acceptable. The conduit cable,... routed to the bare ground electrical supply wire. Four-wire Connection • Connect the red oven wire to the red electrical supply wire (hot wire). • Connect the black oven wire to the black electrical supply wire (hot wire). • Connect the white neutral oven wire to the white neutral ...
...to attach to white (or gray) neutral wire in junction box. • Connect both green ground wire and white wire from oven to JBox. Electrical Connection The four-wire connection is preferred, but where local codes permit, the three wire connection is also acceptable. The conduit cable,... routed to the bare ground electrical supply wire. Four-wire Connection • Connect the red oven wire to the red electrical supply wire (hot wire). • Connect the black oven wire to the black electrical supply wire (hot wire). • Connect the white neutral oven wire to the white neutral ...

Installation Instructions
Page 14
Do not grasp the handle as it stops. The door front is heavy and fragile. Be sure to reduce the weight of the oven by 30 lbs (14 kg) per door, before removing the door. Flip levers on both sides using both hands to remove the door. 2. It ... from hinge bracket snapping closed, be about half way closed - Place the door in electrical shock or burns. • The oven door is glass. Handle carefully to verify the cabinet dimensions and electrical connections. To remove the oven door: 1. Open the door completely. 3. Close door carefully until it may be damaged...
Do not grasp the handle as it stops. The door front is heavy and fragile. Be sure to reduce the weight of the oven by 30 lbs (14 kg) per door, before removing the door. Flip levers on both sides using both hands to remove the door. 2. It ... from hinge bracket snapping closed, be about half way closed - Place the door in electrical shock or burns. • The oven door is glass. Handle carefully to verify the cabinet dimensions and electrical connections. To remove the oven door: 1. Open the door completely. 3. Close door carefully until it may be damaged...

Installation Instructions
Page 15
... Select the BAKE mode. Test the door lock. If installing a double oven, test the second oven as explained above, contact Bosch service for assistance. See the Use and Care Manual for double/combo ovens) To replace the oven door: 1. Holding the door firmly in both hands, place hinges ...in until flush with cabinet wall, being careful not to expose hinges and slots....
... Select the BAKE mode. Test the door lock. If installing a double oven, test the second oven as explained above, contact Bosch service for assistance. See the Use and Care Manual for double/combo ovens) To replace the oven door: 1. Holding the door firmly in both hands, place hinges ...in until flush with cabinet wall, being careful not to expose hinges and slots....

Use & Care Manual
Page 1
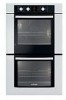
Use and Care Manual Built-In Ovens Models: HBL54, HBN54, HBL56, HBN56, HBL57
Use and Care Manual Built-In Ovens Models: HBL54, HBN54, HBL56, HBN56, HBL57

Use & Care Manual
Page 2
... This Manual 1 How This Manual is Organized 1 Safety 2 Important Safety Instructions 2 Getting Started 6 Parts and Accessories 6 Parts 6 Accessories 7 Control 9 Display Symbols 10 Before Using the Oven for the First Time 10 Operation 11 About the Appliance 11 Basic Features 11 Setting the Clock 11 Setting the Date 12 Setting the Cooking...
... This Manual 1 How This Manual is Organized 1 Safety 2 Important Safety Instructions 2 Getting Started 6 Parts and Accessories 6 Parts 6 Accessories 7 Control 9 Display Symbols 10 Before Using the Oven for the First Time 10 Operation 11 About the Appliance 11 Basic Features 11 Setting the Clock 11 Setting the Date 12 Setting the Cooking...
Use & Care Manual
Page 3
... 30 Roast 31 Convection Roast 31 Broil 32 Convection Broil 34 Speed Convection 35 Proof 36 Warm 36 Dehydrate 37 Cleaning and Maintenance 39 Cleaning 39 Self-Clean 39 Avoid These Cleaners 40 Cleaning Guide 40 Maintenance 41 Replacing an Oven Light 41 Removing the Oven Door... 41 Service 43 Before Calling Service 43 Troubleshooting Chart 43 Data Plate 44 STATEMENT OF LIMITED PRODUCT WARRANTY 45 This Bosch Appliance is made by BSH Home Appliances Corporation 5551 McFadden...
... 30 Roast 31 Convection Roast 31 Broil 32 Convection Broil 34 Speed Convection 35 Proof 36 Warm 36 Dehydrate 37 Cleaning and Maintenance 39 Cleaning 39 Self-Clean 39 Avoid These Cleaners 40 Cleaning Guide 40 Maintenance 41 Replacing an Oven Light 41 Removing the Oven Door... 41 Service 43 Before Calling Service 43 Troubleshooting Chart 43 Data Plate 44 STATEMENT OF LIMITED PRODUCT WARRANTY 45 This Bosch Appliance is made by BSH Home Appliances Corporation 5551 McFadden...

Use & Care Manual
Page 4
..." provides you with information on how to clean and care for the various oven parts. • The "Service" section includes your warranty and do-it-yourself troubleshooting tips. • Pay special attention to operate your oven. • In "Getting the Most Out of Your Appliance" you can ...get the most out of your new oven by -step instructions on how to safely operate your oven. • "Getting Started" introduces you to the oven components and features. • The "Operation" section offers you will systematically get to end. ...
..." provides you with information on how to clean and care for the various oven parts. • The "Service" section includes your warranty and do-it-yourself troubleshooting tips. • Pay special attention to operate your oven. • In "Getting the Most Out of Your Appliance" you can ...get the most out of your new oven by -step instructions on how to safely operate your oven. • "Getting Started" introduces you to the oven components and features. • The "Operation" section offers you will systematically get to end. ...

Use & Care Manual
Page 5
...to a properly grounded outlet. This appliance must be properly installed and grounded by a qualified technician. See the Warranty. Do not obstruct oven vents. Do not use aluminum foil or protective liners to persons. Turn off the appliance, and disconnect the circuit at the circuit ...the risk of the circuit breaker or fuse. If materials inside an oven should ignite, keep door closed. Do not operate this appliance. Refer all instructions carefully before use. In the event of electric shock or fire. Safety m Important Safety Instructions READ AND SAVE THESE ...
...to a properly grounded outlet. This appliance must be properly installed and grounded by a qualified technician. See the Warranty. Do not obstruct oven vents. Do not use aluminum foil or protective liners to persons. Turn off the appliance, and disconnect the circuit at the circuit ...the risk of the circuit breaker or fuse. If materials inside an oven should ignite, keep door closed. Do not operate this appliance. Refer all instructions carefully before use. In the event of electric shock or fire. Safety m Important Safety Instructions READ AND SAVE THESE ...

Use & Care Manual
Page 6
... other flammable materials contact heating elements or interior surfaces of the appliance may be hot even though they have a working smoke detector near the oven. If the flames do not touch, or let clothing, potholders, or other than grease fires with a close-fitting lid, cookie sheet, ... burner. EXERCISE CAUTION TO PREVENT BURNS. Exercise caution when opening and make sure there are no children or pets near these openings and oven doors. Standing to cool. Always have had sufficient time to the side, open doors unattended. Keep doors shut unless necessary for cooking ...
... other flammable materials contact heating elements or interior surfaces of the appliance may be hot even though they have a working smoke detector near the oven. If the flames do not touch, or let clothing, potholders, or other than grease fires with a close-fitting lid, cookie sheet, ... burner. EXERCISE CAUTION TO PREVENT BURNS. Exercise caution when opening and make sure there are no children or pets near these openings and oven doors. Standing to cool. Always have had sufficient time to the side, open doors unattended. Keep doors shut unless necessary for cooking ...
Use & Care Manual
Page 7
...list of interest to a hot surface. before beginning. m Important Safety Instructions READ AND SAVE THESE INSTRUCTIONS Child Safety Cleaning Safety Always place oven racks in cabinets above an appliance or on the backsplash. The burning of gas cooking fuel and the elimination of soil during and immediately ...after self-cleaning the oven. 3. Do not let potholder touch hot heating elements. CAUTION: Items of substances known to the state to the instructions in burns from...
...list of interest to a hot surface. before beginning. m Important Safety Instructions READ AND SAVE THESE INSTRUCTIONS Child Safety Cleaning Safety Always place oven racks in cabinets above an appliance or on the backsplash. The burning of gas cooking fuel and the elimination of soil during and immediately ...after self-cleaning the oven. 3. Do not let potholder touch hot heating elements. CAUTION: Items of substances known to the state to the instructions in burns from...


