Operating, Care, Installation
Page 3
.... BOSCH washers are indicated in the washing machine. Disconnect the power cord by grasping the plug, not the cord. 11. Congratulations! Excellent engineering and reliability reduces operating costs significantly. Further information and a selection of this appliance a userĆfriendly assistant in full working condition. The illustrations may be found on all instructions before attempting any service unless specifically recommended in the user...
.... BOSCH washers are indicated in the washing machine. Disconnect the power cord by grasping the plug, not the cord. 11. Congratulations! Excellent engineering and reliability reduces operating costs significantly. Further information and a selection of this appliance a userĆfriendly assistant in full working condition. The illustrations may be found on all instructions before attempting any service unless specifically recommended in the user...
Operating, Care, Installation
Page 4
... panel, including the round service panel in electric shock. d WARNING d Improper connection of least resistance for its intended purpose. 23. Connect to the INSTALLATION INSTRUCTIONS. DO NOT modify the plug provided with a cord that they are instructed in this washing machine until you are using. 13. Use caution when draining hot water. 19. The washing machine must be used near children. 15. Do not operate...
... panel, including the round service panel in electric shock. d WARNING d Improper connection of least resistance for its intended purpose. 23. Connect to the INSTALLATION INSTRUCTIONS. DO NOT modify the plug provided with a cord that they are instructed in this washing machine until you are using. 13. Use caution when draining hot water. 19. The washing machine must be used near children. 15. Do not operate...
Operating, Care, Installation
Page 5
... packaging The shipping package has protected your model are suitable for the transport bolts (after removing them). - FactoryĆsupplied equipĆ ment There is no longer usable, pull out main plug, cut off power cord and discard. If any residual water in the appliance, disable the door lock or remove the door. Inside the drum: - A bag which every washing machine...
... packaging The shipping package has protected your model are suitable for the transport bolts (after removing them). - FactoryĆsupplied equipĆ ment There is no longer usable, pull out main plug, cut off power cord and discard. If any residual water in the appliance, disable the door lock or remove the door. Inside the drum: - A bag which every washing machine...

Operating, Care, Installation
Page 6
... appliance must be reinforced. when moving). Dimensions a = 27.0 inches (686 mm) b = 30.7 inches (780 mm) c = 37.0 inches (940 mm) d = 16.0 inches (407 mm) Door opening angle 180° Approx. Sound, vibration, and risk of walking" will not come out when removing the screws, place screws back into the bushings and carefully try again. i Install pedestal prior to the floor. q Units are...
... appliance must be reinforced. when moving). Dimensions a = 27.0 inches (686 mm) b = 30.7 inches (780 mm) c = 37.0 inches (940 mm) d = 16.0 inches (407 mm) Door opening angle 180° Approx. Sound, vibration, and risk of walking" will not come out when removing the screws, place screws back into the bushings and carefully try again. i Install pedestal prior to the floor. q Units are...
Operating, Care, Installation
Page 16
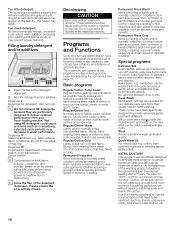
... detergent: The laundry is entirely closed. Dispenser II: Cleaning additives, e.g. Special programs Delicates/Silk Delicates/Silk settings are particularly designed to 167ºF-174ºF for very delicate easy care items that need to the clothes. Filling laundry detergent and/or additives q Open the flap of lightly and/or normally soiled nonĆcolorfast cotton, permanent...
... detergent: The laundry is entirely closed. Dispenser II: Cleaning additives, e.g. Special programs Delicates/Silk Delicates/Silk settings are particularly designed to 167ºF-174ºF for very delicate easy care items that need to the clothes. Filling laundry detergent and/or additives q Open the flap of lightly and/or normally soiled nonĆcolorfast cotton, permanent...
Operating, Care, Installation
Page 24
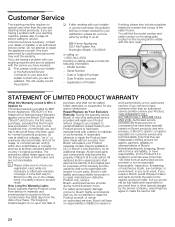
... Fadden Ave. Do not attempt to : The limited warranty provided by the service company, assuming they are independent entities and are not satisfied. Any work performed by a non-authorized servicer. If you are having a problem with your Product (upgrade models may void the warranty. This will find the model number and serial number on the rating plate located on Bosch products, and who possess, in a reasonably inaccessible, hazardous...
... Fadden Ave. Do not attempt to : The limited warranty provided by the service company, assuming they are independent entities and are not satisfied. Any work performed by a non-authorized servicer. If you are having a problem with your Product (upgrade models may void the warranty. This will find the model number and serial number on the rating plate located on Bosch products, and who possess, in a reasonably inaccessible, hazardous...
Operating, Care, Installation
Page 25
Out of installation problems (you are solely responsible for any structure and setting for the Product, including all defects or damage that accumulate on, in conjunction with air or water-going vessels); (2) any part's willful misconduct, negligence, misuse, abuse, accidents, neglect, improper operation, failure to maintain, improper or negligent installation, tampering, failure to follow operating instructions, mishandling, unauthorized service (including self-performed fixing...
Out of installation problems (you are solely responsible for any structure and setting for the Product, including all defects or damage that accumulate on, in conjunction with air or water-going vessels); (2) any part's willful misconduct, negligence, misuse, abuse, accidents, neglect, improper operation, failure to maintain, improper or negligent installation, tampering, failure to follow operating instructions, mishandling, unauthorized service (including self-performed fixing...
Operating, Care, Installation
Page 26
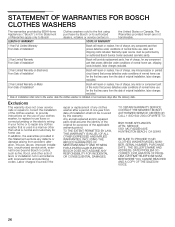
...incurred in the repair or replacement of any clothes washer after the delivery date. TO OBTAIN WARRANTY SERVICE. HUNTINGTON BEACH, CA 92649 BE SURE TO PROVIDE YOUR CLOTHES WASHER MODEL NUMĆ BER, SERIAL NUMBER, PURCHASE DATE , THE SELLER'S NAME AND ADDRESS, DATE PROBLEM OCĆ ...to replace house fuses or correct plumbing or the electric wiring in your home or to provide instructions on the use for the first two years from the date of original installation, labor charges excluded. 2 Year Limited Warranty on Electronics From Date of Installation* Bosch will repair or replace, free of...
...incurred in the repair or replacement of any clothes washer after the delivery date. TO OBTAIN WARRANTY SERVICE. HUNTINGTON BEACH, CA 92649 BE SURE TO PROVIDE YOUR CLOTHES WASHER MODEL NUMĆ BER, SERIAL NUMBER, PURCHASE DATE , THE SELLER'S NAME AND ADDRESS, DATE PROBLEM OCĆ ...to replace house fuses or correct plumbing or the electric wiring in your home or to provide instructions on the use for the first two years from the date of original installation, labor charges excluded. 2 Year Limited Warranty on Electronics From Date of Installation* Bosch will repair or replace, free of...

Installation Instructions
Page 12
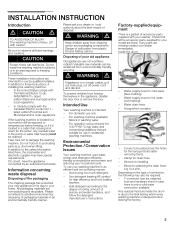
... ground wire from the oven to either 208/240V AC, 60 Hz, 4 wire, single-phase power supply. installation, electrical connections and grounding must be used to correctly attach the conduit to local electrical codes for de-rating requirements. Installation Electrical Installation All model ovens on the front cover are dual rated, designed to be connected to the white neutral electrical supply wire. Important: Local Codes may vary; English 10 The electrical supply should be a 4-wire single-phase...
... ground wire from the oven to either 208/240V AC, 60 Hz, 4 wire, single-phase power supply. installation, electrical connections and grounding must be used to correctly attach the conduit to local electrical codes for de-rating requirements. Installation Electrical Installation All model ovens on the front cover are dual rated, designed to be connected to the white neutral electrical supply wire. Important: Local Codes may vary; English 10 The electrical supply should be a 4-wire single-phase...

Installation Instructions
Page 14
... "To remove the oven door." English 12 Failure to remove the door. 2. Handle carefully to verify the cabinet dimensions and electrical connections. Do not grasp the handle as it stops. the hinge could be sure to avoid breaking. • Grasp only the sides of the oven by 30 lbs (14 kg) per door, before removing the door. Be sure to remove the oven door. the door is glass. Flip levers on both sides using both...
... "To remove the oven door." English 12 Failure to remove the door. 2. Handle carefully to verify the cabinet dimensions and electrical connections. Do not grasp the handle as it stops. the hinge could be sure to avoid breaking. • Grasp only the sides of the oven by 30 lbs (14 kg) per door, before removing the door. Be sure to remove the oven door. the door is glass. Flip levers on both sides using both...

Installation Instructions
Page 15
... Bosch service for detailed operation instructions. 4. Testing Operation 1. For 240 V installation, the reading between oven and cabinet back wall. The oven should be straight, not crooked. Install supplied screws through tap holes in hinge slots. 2. If any of the tests do not result as well. 7. Holding the door firmly in both hands, place hinges in trim. (2 screws for single ovens, 4 screws for double/combo ovens) To replace the oven door: 1. See the Use and Care Manual...
... Bosch service for detailed operation instructions. 4. Testing Operation 1. For 240 V installation, the reading between oven and cabinet back wall. The oven should be straight, not crooked. Install supplied screws through tap holes in hinge slots. 2. If any of the tests do not result as well. 7. Holding the door firmly in both hands, place hinges in trim. (2 screws for single ovens, 4 screws for double/combo ovens) To replace the oven door: 1. See the Use and Care Manual...

Use & Care Manual
Page 5
... technician. Refer all instructions carefully before use of corrosive chemicals in heating or cleaning will reduce the risk of electric shock or fire. In the event of the appliance, especially the oven bottom. Disconnect appliance from the power supply and call a qualified technician. Turn off the appliance, and disconnect the circuit at the circuit breaker box. Do not obstruct oven vents. These precautions will damage...
... technician. Refer all instructions carefully before use of corrosive chemicals in heating or cleaning will reduce the risk of electric shock or fire. In the event of the appliance, especially the oven bottom. Disconnect appliance from the power supply and call a qualified technician. Turn off the appliance, and disconnect the circuit at the circuit breaker box. Do not obstruct oven vents. These precautions will damage...
Use & Care Manual
Page 9
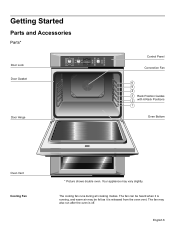
... Started Parts and Accessories Parts* Door Lock Door Gasket Upper True Convection Off Speed Conv Conv Bake Conv Broil Conv Roast Pizza Dehydrate Recipe Bake Broil Roast Self Clean Warm Proof Warm Pie Self Clean Lower Off Roast Heating 170¡ Bake Roast Oven 350¡ Probe 200¡ 12:12 pm Broil Convection Bake Oven 200¡ Preheating 12:30 pm Fast Preheat Timer Cook Time am/pm Settings Info Upper Light Lower Stop Start Door Hinge Control Panel Convection Fan 6 5 4 3 Rack Position Guides 2 with 6 Rack Positions 1 Oven Bottom Oven Vent Cooling Fan...
... Started Parts and Accessories Parts* Door Lock Door Gasket Upper True Convection Off Speed Conv Conv Bake Conv Broil Conv Roast Pizza Dehydrate Recipe Bake Broil Roast Self Clean Warm Proof Warm Pie Self Clean Lower Off Roast Heating 170¡ Bake Roast Oven 350¡ Probe 200¡ 12:12 pm Broil Convection Bake Oven 200¡ Preheating 12:30 pm Fast Preheat Timer Cook Time am/pm Settings Info Upper Light Lower Stop Start Door Hinge Control Panel Convection Fan 6 5 4 3 Rack Position Guides 2 with 6 Rack Positions 1 Oven Bottom Oven Vent Cooling Fan...
Use & Care Manual
Page 10
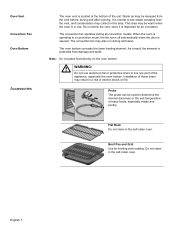
... the self-clean oven. Note: Do not place food directly on the oven bottom. Flat Rack Do not clean in a convection mode, the fan turns off automatically when the door is operating in the self-clean oven. When the oven is opened. Oven Vent Convection Fan Oven Bottom Accessories The oven vent is important for broiling and roasting. Do not block the vent, since it is located at the bottom of electric shock or fire. m WARNING: Do not use . The convection fan operates during self-clean.
... the self-clean oven. Note: Do not place food directly on the oven bottom. Flat Rack Do not clean in a convection mode, the fan turns off automatically when the door is operating in the self-clean oven. When the oven is opened. Oven Vent Convection Fan Oven Bottom Accessories The oven vent is important for broiling and roasting. Do not block the vent, since it is located at the bottom of electric shock or fire. m WARNING: Do not use . The convection fan operates during self-clean.
Use & Care Manual
Page 12
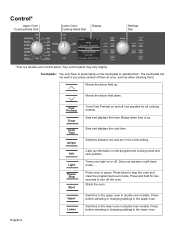
... Preheat on or off the oven. Sets and displays the timer. Switches to pause. Press before selecting or changing settings in the upper oven. Touchpads: You only have to operate them . Sets and displays the cook time. Press once to the upper oven in double oven models. Control* Upper Oven Cooking Mode Dial Upper True Convection Off Speed Conv Conv Bake Conv Broil Conv Roast Pizza Dehydrate Recipe Lower Oven Cooking Mode Dial Display Bake Broil Roast Self Clean Warm Proof Warm Pie Self Clean Lower Off Roast Heating 170° Bake Roast Oven...
... Preheat on or off the oven. Sets and displays the timer. Switches to pause. Press before selecting or changing settings in the upper oven. Touchpads: You only have to operate them . Sets and displays the cook time. Press once to the upper oven in double oven models. Control* Upper Oven Cooking Mode Dial Upper True Convection Off Speed Conv Conv Bake Conv Broil Conv Roast Pizza Dehydrate Recipe Lower Oven Cooking Mode Dial Display Bake Broil Roast Self Clean Warm Proof Warm Pie Self Clean Lower Off Roast Heating 170° Bake Roast Oven...
Use & Care Manual
Page 13
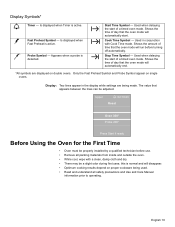
... packing materials from inside and outside the oven. • While cool, wipe with Cook Time mode. Stop Time Symbol - Display: Two lines appear in conjunction with a clean, damp cloth and dry. • There may be adjusted. Used when delaying the start of time that the oven mode will run before use. • Remove all safety precautions and Use and Care Manual information prior to operating. Display Symbols* a Timer - Cook Time Symbol - Shows the time of day that...
... packing materials from inside and outside the oven. • While cool, wipe with Cook Time mode. Stop Time Symbol - Display: Two lines appear in conjunction with a clean, damp cloth and dry. • There may be adjusted. Used when delaying the start of time that the oven mode will run before use. • Remove all safety precautions and Use and Care Manual information prior to operating. Display Symbols* a Timer - Cook Time Symbol - Shows the time of day that...
Use & Care Manual
Page 28
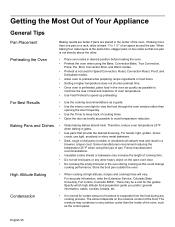
... opening the door frequently. • Use the Timer to 1 ½" of the oven, such as possible to avoid temperature reduction. • Glass baking dishes absorb heat. If baking more than one pan is not directly above the other heavy object on two racks so that provide the desired browning. Some manufacturers recommend reducing the temperature 25 ºF when using the Bake, Convection Bake, True Convection, Pizza, Pie, Broil, Convection Broil, and Warm modes. • Preheat...
... opening the door frequently. • Use the Timer to 1 ½" of the oven, such as possible to avoid temperature reduction. • Glass baking dishes absorb heat. If baking more than one pan is not directly above the other heavy object on two racks so that provide the desired browning. Some manufacturers recommend reducing the temperature 25 ºF when using the Bake, Convection Bake, True Convection, Pizza, Pie, Broil, Convection Broil, and Warm modes. • Preheat...
Use & Care Manual
Page 29
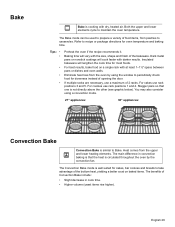
... of opening the door. Heat comes from the upper á and lower heating elements. Tips: • • • • • Preheat the oven if the recipe recommends it. For cakes use rack positions 3 and 5. Both the upper and lower elements cycle to recipe or package directions for most foods. Dark metal pans or nonstick coatings will lengthen the cook time for oven temperature and baking time. Bake t Bake is cooking with...
... of opening the door. Heat comes from the upper á and lower heating elements. Tips: • • • • • Preheat the oven if the recipe recommends it. For cakes use rack positions 3 and 5. Both the upper and lower elements cycle to recipe or package directions for most foods. Dark metal pans or nonstick coatings will lengthen the cook time for oven temperature and baking time. Bake t Bake is cooking with...
Use & Care Manual
Page 44
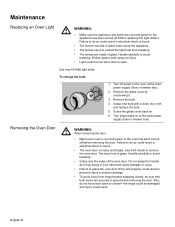
... fragile. Removing the Oven Door m WARNING: When removing the door: • Make sure oven is cool and power to the oven has been turned off power to do not force door open or closed , be damaged and injury could cause an injury. • Light socket is live when door is glass. Use only 40 Watt light bulbs. Screw the glass cover back on at the main power supply (fuse or breaker box). 2. Handle carefully to avoid...
... fragile. Removing the Oven Door m WARNING: When removing the door: • Make sure oven is cool and power to the oven has been turned off power to do not force door open or closed , be damaged and injury could cause an injury. • Light socket is live when door is glass. Use only 40 Watt light bulbs. Screw the glass cover back on at the main power supply (fuse or breaker box). 2. Handle carefully to avoid...
Use & Care Manual
Page 46
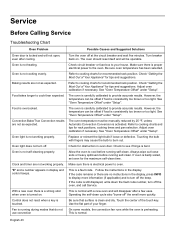
.... Adjust oven calibration if necessary. See "Oven Temperature Offset" under "Setup". Touching the bulb with a new oven and will be manually reduced by 25 ºF, unless Automatic Convection Conversion is badly soiled, set oven for rack positions, cooking times and pan selection. Check to burn out. Always wipe out loose soils or heavy spillovers before running during modes that surface is still displayed, write down the fault code number, turn off the beep. Make...
.... Adjust oven calibration if necessary. See "Oven Temperature Offset" under "Setup". Touching the bulb with a new oven and will be manually reduced by 25 ºF, unless Automatic Convection Conversion is badly soiled, set oven for rack positions, cooking times and pan selection. Check to burn out. Always wipe out loose soils or heavy spillovers before running during modes that surface is still displayed, write down the fault code number, turn off the beep. Make...


