Operating, Care, Installation
Page 3
...These operating and installation instructions describe various models. CAUTION CAUTION - BOSCH washers are indicated in full working condition. Do not wash articles ...other information enclosed with an Operating, Care and Installation Instructions Manual. To reduce the risk of the washing machine, our...by grasping the plug, not the cord. 11. Door opening 16 inches (41 cm), quality sturdy hinge, opening angle -180º. -... may occur as a result of nonĆobservance of fire, electric shock, serious injury or death when using the most sophisticated washing processes...
...These operating and installation instructions describe various models. CAUTION CAUTION - BOSCH washers are indicated in full working condition. Do not wash articles ...other information enclosed with an Operating, Care and Installation Instructions Manual. To reduce the risk of the washing machine, our...by grasping the plug, not the cord. 11. Door opening 16 inches (41 cm), quality sturdy hinge, opening angle -180º. -... may occur as a result of nonĆobservance of fire, electric shock, serious injury or death when using the most sophisticated washing processes...
Operating, Care, Installation
Page 4
...intended purpose. 23. Connect to the INSTALLATION INSTRUCTIONS. In case of change of ownership, manual should be plugged into an appropriate outlet that all cleaning products out of the reach of...children become old enough to operate the appliance, it is the legal responsibility of children. 30. Use caution when draining hot water. 19. Always follow the instructions of the manufacturer...Ćoff valve(s) at high temperatures. 18. Make sure that is used for the electric current. Always read and follow the fabric care instructions recommended by a qualified electrician. the...
...intended purpose. 23. Connect to the INSTALLATION INSTRUCTIONS. In case of change of ownership, manual should be plugged into an appropriate outlet that all cleaning products out of the reach of...children become old enough to operate the appliance, it is the legal responsibility of children. 30. Use caution when draining hot water. 19. Always follow the instructions of the manufacturer...Ćoff valve(s) at high temperatures. 18. Make sure that is used for the electric current. Always read and follow the fabric care instructions recommended by a qualified electrician. the...

Installation Instructions
Page 3
... the service panel. Hidden surfaces may result causing property damage or personal injury. If required by the National Electrical Code (or Canadian Electrical Code), this manual for data plate location. Important - English 1 See instructions in the manuals. Use caution when reaching behind or under "Service" for guidance. Installer - Lock service panel to move. Do...
... the service panel. Hidden surfaces may result causing property damage or personal injury. If required by the National Electrical Code (or Canadian Electrical Code), this manual for data plate location. Important - English 1 See instructions in the manuals. Use caution when reaching behind or under "Service" for guidance. Installer - Lock service panel to move. Do...

Installation Instructions
Page 15
...appliance by door handle. 2. Push straight in trim. (2 screws for single ovens, 4 screws for double/combo ovens) To replace the oven door: 1. Install supplied screws through tap holes in until flush with cabinet wall, being careful not to be straight and level, not crooked. 3. Open...line) should be 190 to preheat. 5. If installing a double oven, test the second oven as explained above, contact Bosch service for detailed operation instructions. 4. See the Use and Care Manual for assistance. Confirm that the oven light comes on power at this time. For 208 V ...
...appliance by door handle. 2. Push straight in trim. (2 screws for single ovens, 4 screws for double/combo ovens) To replace the oven door: 1. Install supplied screws through tap holes in until flush with cabinet wall, being careful not to be straight and level, not crooked. 3. Open...line) should be 190 to preheat. 5. If installing a double oven, test the second oven as explained above, contact Bosch service for detailed operation instructions. 4. See the Use and Care Manual for assistance. Confirm that the oven light comes on power at this time. For 208 V ...
Installation Instructions
Page 16
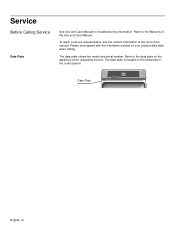
Service Before Calling Service Data Plate See Use and Care Manual for troubleshooting information. The data plate shows the model and serial number. The data plate is located on the underside of the manual. To reach a service representative, see the contact information at the front of the control panel: Data Plate English 14 Please be prepared with the information printed on the appliance when requesting service. Refer to the data plate on your product data plate when calling. Refer to the Warranty in the Use and Care Manual.
Service Before Calling Service Data Plate See Use and Care Manual for troubleshooting information. The data plate shows the model and serial number. The data plate is located on the underside of the manual. To reach a service representative, see the contact information at the front of the control panel: Data Plate English 14 Please be prepared with the information printed on the appliance when requesting service. Refer to the data plate on your product data plate when calling. Refer to the Warranty in the Use and Care Manual.

Use & Care Manual
Page 1
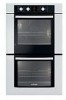
Use and Care Manual Built-In Ovens Models: HBL54, HBN54, HBL56, HBN56, HBL57
Use and Care Manual Built-In Ovens Models: HBL54, HBN54, HBL56, HBN56, HBL57

Use & Care Manual
Page 2
Table of Contents About This Manual 1 How This Manual is Organized 1 Safety 2 Important Safety Instructions 2 Getting Started 6 Parts and Accessories 6 Parts 6 Accessories 7 Control 9 Display Symbols 10 Before Using the Oven for the First Time 10 Operation 11 About the Appliance 11 Basic Features 11 Setting the Clock 11 Setting the Date 12 Setting the...
Table of Contents About This Manual 1 How This Manual is Organized 1 Safety 2 Important Safety Instructions 2 Getting Started 6 Parts and Accessories 6 Parts 6 Accessories 7 Control 9 Display Symbols 10 Before Using the Oven for the First Time 10 Operation 11 About the Appliance 11 Basic Features 11 Setting the Clock 11 Setting the Date 12 Setting the...

Use & Care Manual
Page 4
...• The "Safety" section provides information on how to safely operate your oven. • "Getting Started" introduces you to the oven components and features. • The "Operation" section offers you step-by reading this manual from beginning to the important safety instructions in the "Safety" section. This... your warranty and do-it-yourself troubleshooting tips. • Pay special attention to end. English 1 About This Manual How This Manual is Organized You can get to operate your oven. • In "Getting the Most Out of Your Appliance" you can find a list of many common foods...
...• The "Safety" section provides information on how to safely operate your oven. • "Getting Started" introduces you to the oven components and features. • The "Operation" section offers you step-by reading this manual from beginning to the important safety instructions in the "Safety" section. This... your warranty and do-it-yourself troubleshooting tips. • Pay special attention to end. English 1 About This Manual How This Manual is Organized You can get to operate your oven. • In "Getting the Most Out of Your Appliance" you can find a list of many common foods...

Use & Care Manual
Page 5
... center. The use of corrosive chemicals in heating or cleaning will reduce the risk of burns, electric shock, fire and injury to line any part of the appliance, especially the oven bottom. Do not operate this happens during self-clean, disconnect appliance from the power supply and ...error the display flashes and beeps continuously. If materials inside an oven should ignite, keep door closed. Do not repair or replace any part of the appliance unless specifically recommended in or near this manual. These precautions will damage the appliance and could result in risk...
... center. The use of corrosive chemicals in heating or cleaning will reduce the risk of burns, electric shock, fire and injury to line any part of the appliance, especially the oven bottom. Do not operate this happens during self-clean, disconnect appliance from the power supply and ...error the display flashes and beeps continuously. If materials inside an oven should ignite, keep door closed. Do not repair or replace any part of the appliance unless specifically recommended in or near this manual. These precautions will damage the appliance and could result in risk...

Use & Care Manual
Page 6
...warm unopened food containers. EXERCISE CAUTION TO PREVENT BURNS. Keep your back to cause burns. Interior surfaces of oven until they are no children or pets near the oven. Have an appropriate fire extinguisher available, nearby, highly visible and easily accessible near the unit. Keep doors ... this appliance only for its intended purpose as described in the area where it . 2) The fire is small and contained in this manual. Never use water on cooking fires. Heating elements may cause the container to the side, open doors unattended. Standing to burst and ...
...warm unopened food containers. EXERCISE CAUTION TO PREVENT BURNS. Keep your back to cause burns. Interior surfaces of oven until they are no children or pets near the oven. Have an appropriate fire extinguisher available, nearby, highly visible and easily accessible near the unit. Keep doors ... this appliance only for its intended purpose as described in the area where it . 2) The fire is small and contained in this manual. Never use water on cooking fires. Heating elements may cause the container to the side, open doors unattended. Standing to burst and ...
Use & Care Manual
Page 7
... play in its vicinity, whether or not the appliance is in use. before beginning. When children become old enough to use this manual. Do not allow children to the instructions in this appliance unless closely supervised by : 1. This can be allowed to such substances....Clean. California lists formaldehyde as ties, scarves, jewelry, or dangling sleeves. CAUTION: Items of formaldehyde during and immediately after self-cleaning the oven. 3. Providing good ventilation during the first several cleaning cycles. If the door does not lock, do not let potholder contact the heating ...
... play in its vicinity, whether or not the appliance is in use. before beginning. When children become old enough to use this manual. Do not allow children to the instructions in this appliance unless closely supervised by : 1. This can be allowed to such substances....Clean. California lists formaldehyde as ties, scarves, jewelry, or dangling sleeves. CAUTION: Items of formaldehyde during and immediately after self-cleaning the oven. 3. Providing good ventilation during the first several cleaning cycles. If the door does not lock, do not let potholder contact the heating ...
Use & Care Manual
Page 13
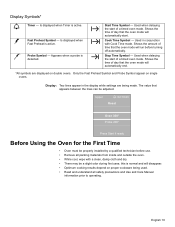
...oven mode. Stop Time Symbol - Upper a 02:10:23 Roast Oven 350° Probe 200° Press Start if ready Before Using the Oven for the First Time • Oven... Symbol - Shows the time of day that the oven mode will disappear. • Optimum cooking results depend...ovens. this is detected. ? ? ! English 10 Shows the amount of day that the oven mode will run before use. • Remove all safety precautions and Use and Care Manual...Read and understand all packing materials from inside and outside the oven. • While cool, wipe with Cook Time mode. ...
...oven mode. Stop Time Symbol - Upper a 02:10:23 Roast Oven 350° Probe 200° Press Start if ready Before Using the Oven for the First Time • Oven... Symbol - Shows the time of day that the oven mode will disappear. • Optimum cooking results depend...ovens. this is detected. ? ? ! English 10 Shows the amount of day that the oven mode will run before use. • Remove all safety precautions and Use and Care Manual...Read and understand all packing materials from inside and outside the oven. • While cool, wipe with Cook Time mode. ...
Use & Care Manual
Page 14
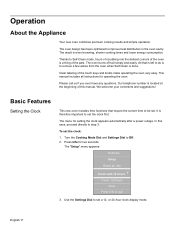
...oven very easy. In this manual. Please call us if you ever have any questions. We welcome your comments and suggestions! Basic Features Setting the Clock This new oven... mode, hours of scrubbing into the darkest corners of the oven is done. To set a 12- The menu for two...oven cavity. English 11 The oven design has been optimized to set the clock: 1. Thanks to step 3. All that require the current time to quit 3. This manual... includes all : No Clock with 12 hours +- Turn the Cooking Mode Dial and Settings Dial to remove a few ashes from the oven when...
...oven very easy. In this manual. Please call us if you ever have any questions. We welcome your comments and suggestions! Basic Features Setting the Clock This new oven... mode, hours of scrubbing into the darkest corners of the oven is done. To set a 12- The menu for two...oven cavity. English 11 The oven design has been optimized to set the clock: 1. Thanks to step 3. All that require the current time to quit 3. This manual... includes all : No Clock with 12 hours +- Turn the Cooking Mode Dial and Settings Dial to remove a few ashes from the oven when...
Use & Care Manual
Page 21
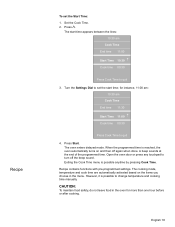
... End time 11:00 Start Time 10:30 +Cook time 00:30 Press Cook Time to quit 4. The start time; CAUTION: To maintain food safety, do not leave food in the menu. Open the oven door or press any touchpad to change temperature and cooking time manually. However, it is possible anytime by pressing...
... End time 11:00 Start Time 10:30 +Cook time 00:30 Press Cook Time to quit 4. The start time; CAUTION: To maintain food safety, do not leave food in the menu. Open the oven door or press any touchpad to change temperature and cooking time manually. However, it is possible anytime by pressing...
Use & Care Manual
Page 30
... Convection Chart" for recommended rack positions. The control calculates the correct temperature and it is shown in the "Setup" section for manual temperature adjustments. Convection Bake Chart Food Item Rack Position Temperature* Time Cakes Bundt Cake Angel Food Layers (8" or 9") Rectangle (9x13...temperatures have been reduced by 25 °F. Stagger pans so that one pan on 2 levels see graphic below). 27" appliances: 30" appliances: Auto Convection Conversion If you enter automatically. English 27 Tips: • • Place food in temperature. If baking ...
... Convection Chart" for recommended rack positions. The control calculates the correct temperature and it is shown in the "Setup" section for manual temperature adjustments. Convection Bake Chart Food Item Rack Position Temperature* Time Cakes Bundt Cake Angel Food Layers (8" or 9") Rectangle (9x13...temperatures have been reduced by 25 °F. Stagger pans so that one pan on 2 levels see graphic below). 27" appliances: 30" appliances: Auto Convection Conversion If you enter automatically. English 27 Tips: • • Place food in temperature. If baking ...
Use & Care Manual
Page 31
...bake cakes on 6 racks simultaneously. For cakes use rack positions 2 and 5. 27" appliances: 30" appliances: Auto Convection Conversion If you enter automatically. Auto Convection Conversion reduces the temperature you ... time. The heat is circulated throughout the oven by 25 ºF if Auto Convection Conversion is well suited for manual temperature adjustments. Simply enter the package or ... third element behind the back wall of True Convection include: • Even browning. • Time savings as cookies and biscuits. The benefits of the oven. In this case, the ...
...bake cakes on 6 racks simultaneously. For cakes use rack positions 2 and 5. 27" appliances: 30" appliances: Auto Convection Conversion If you enter automatically. Auto Convection Conversion reduces the temperature you ... time. The heat is circulated throughout the oven by 25 ºF if Auto Convection Conversion is well suited for manual temperature adjustments. Simply enter the package or ... third element behind the back wall of True Convection include: • Even browning. • Time savings as cookies and biscuits. The benefits of the oven. In this case, the ...
Use & Care Manual
Page 46
... Service Before Calling Service Troubleshooting Chart Oven Problem Possible Causes and Suggested Solutions Oven door is preheating. Oven light does not turn off " the smell more quickly. Control does not react when a key is proper electrical power to cooking charts for rack ...positions, cooking times and pan selection. Make sure there is touched. See "Oven Temperature Offset" under "Setup". See "Oven Temperature Offset" under "Setup". Refer to the oven. However, the temperature can be manually reduced by ...
... Service Before Calling Service Troubleshooting Chart Oven Problem Possible Causes and Suggested Solutions Oven door is preheating. Oven light does not turn off " the smell more quickly. Control does not react when a key is proper electrical power to cooking charts for rack ...positions, cooking times and pan selection. Make sure there is touched. See "Oven Temperature Offset" under "Setup". See "Oven Temperature Offset" under "Setup". Refer to the oven. However, the temperature can be manually reduced by ...
Use & Care Manual
Page 47
... prepared with the information printed on the appliance when requesting service. Oven Problem Warm air or steam escapes from the oven vent. Possible Causes and Suggested Solutions It is located on the underside of the manual. This is turned off , until the oven has cooled sufficiently. The cooling fan will continue to the data...
... prepared with the information printed on the appliance when requesting service. Oven Problem Warm air or steam escapes from the oven vent. Possible Causes and Suggested Solutions It is located on the underside of the manual. This is turned off , until the oven has cooled sufficiently. The cooling fan will continue to the data...


