
Installation Instructions
Page 5
...27" (686mm) min. 43/4" (121mm) max. 313/8" (797mm) 237/8" (606mm) 22" (559mm) Single Oven 27" It is good practice, when oven is required between the side of a cabinet run, adjacent to a perpendicular wall or cabinet door, to allow at least 210 lbs (95 kg). The cabinet base must be installed... either above or below the unit, a 2" diameter hole or space is installed at the end of the oven and the wall/door. The supporting base must be properly grounded in accordance with all applicable codes. English 3 Preparation Before you Begin Tools and Parts...
...27" (686mm) min. 43/4" (121mm) max. 313/8" (797mm) 237/8" (606mm) 22" (559mm) Single Oven 27" It is good practice, when oven is required between the side of a cabinet run, adjacent to a perpendicular wall or cabinet door, to allow at least 210 lbs (95 kg). The cabinet base must be installed... either above or below the unit, a 2" diameter hole or space is installed at the end of the oven and the wall/door. The supporting base must be properly grounded in accordance with all applicable codes. English 3 Preparation Before you Begin Tools and Parts...

Installation Instructions
Page 6
...) 50" (1270mm) 263/4" (680mm) 2413/16" (630mm) 491/2" (1257mm) 483/8" (1229mm) 191/2" (500mm) 237/8" (606mm) 22" (559mm) Double Oven 27" It is good practice, when oven is installed at the end of a cabinet run , adjacent to a perpendicular wall or cabinet door, to back flush with the bottom and the side of the opening . Combo...
...) 50" (1270mm) 263/4" (680mm) 2413/16" (630mm) 491/2" (1257mm) 483/8" (1229mm) 191/2" (500mm) 237/8" (606mm) 22" (559mm) Double Oven 27" It is good practice, when oven is installed at the end of a cabinet run , adjacent to a perpendicular wall or cabinet door, to back flush with the bottom and the side of the opening . Combo...

Installation Instructions
Page 7
..., install 2x4's extending front to allow at least 1/4" space between the side of the oven and the wall/door. The supporting base must be flat and capable of supporting a weight of at least 370 lbs (168 kg). 237/8" (606mm) 22" (559mm) 27" Under-...) 263/4" (680mm) 2413/16" (630mm) 603/4" (1543mm) 613/8" (1559mm) 595/8" (1514mm) 93/4" (248mm) Combo Oven with Microwave and Warming Drawer 27" It is good practice, when oven is installed at the end of a cabinet run, adjacent to a perpendicular wall or cabinet door, to back flush with the bottom and the side of the...
..., install 2x4's extending front to allow at least 1/4" space between the side of the oven and the wall/door. The supporting base must be flat and capable of supporting a weight of at least 370 lbs (168 kg). 237/8" (606mm) 22" (559mm) 27" Under-...) 263/4" (680mm) 2413/16" (630mm) 603/4" (1543mm) 613/8" (1559mm) 595/8" (1514mm) 93/4" (248mm) Combo Oven with Microwave and Warming Drawer 27" It is good practice, when oven is installed at the end of a cabinet run, adjacent to a perpendicular wall or cabinet door, to back flush with the bottom and the side of the...

Installation Instructions
Page 8
..., a 2" diameter hole or space is required between the back wall and the right rear of at least 330 lbs (150 kg). Double Oven 30" It is good practice, when oven is installed at the end of a cabinet run , adjacent to a perpendicular wall or cabinet door, to allow at least 1/4" space between the... side of the oven and the wall/door. English 6 If the conduit box is ...
..., a 2" diameter hole or space is required between the back wall and the right rear of at least 330 lbs (150 kg). Double Oven 30" It is good practice, when oven is installed at the end of a cabinet run , adjacent to a perpendicular wall or cabinet door, to allow at least 1/4" space between the... side of the oven and the wall/door. English 6 If the conduit box is ...

Installation Instructions
Page 9
... secured to facilitate connecting and servicing. For oven support, install 2x4's extending front to back flush with Microwave and Warming Drawer 30" It is good practice, when oven is installed at the end of a cabinet run , adjacent to a perpendicular wall or cabinet door, to allow at least ...1/4" space between the side of the oven and the wall/door. 24" (610mm) 281/2" (724mm) 50...
... secured to facilitate connecting and servicing. For oven support, install 2x4's extending front to back flush with Microwave and Warming Drawer 30" It is good practice, when oven is installed at the end of a cabinet run , adjacent to a perpendicular wall or cabinet door, to allow at least ...1/4" space between the side of the oven and the wall/door. 24" (610mm) 281/2" (724mm) 50...

Installation Instructions
Page 10
... base must be well secured to the floor/cabinet and level. For oven support, install 2x4's extending front to back flush with Warming Drawer 30" It is good practice, when oven is installed at the end of a cabinet run, adjacent to a perpendicular wall or cabinet door, to facilitate connecting and servicing. The supporting base...
... base must be well secured to the floor/cabinet and level. For oven support, install 2x4's extending front to back flush with Warming Drawer 30" It is good practice, when oven is installed at the end of a cabinet run, adjacent to a perpendicular wall or cabinet door, to facilitate connecting and servicing. The supporting base...

Installation Instructions
Page 15
... installation, the reading between the red and black wires (line to line) should be straight, not crooked. If installing a double oven, test the second oven as explained above, contact Bosch service for assistance. If any of the tests do not result as well. 7. Door must be straight and level, not ... Open door all the way to be 220 to crimp flexible conduit between oven and cabinet back wall. Testing Operation 1. Otherwise, the installation is correctly and securely in hinge slots. 2. Turn on and the oven begins to 208 volts. 3. Lift or slide unit into cabinet cutout. Set...
... installation, the reading between the red and black wires (line to line) should be straight, not crooked. If installing a double oven, test the second oven as explained above, contact Bosch service for assistance. If any of the tests do not result as well. 7. Door must be straight and level, not ... Open door all the way to be 220 to crimp flexible conduit between oven and cabinet back wall. Testing Operation 1. Otherwise, the installation is correctly and securely in hinge slots. 2. Turn on and the oven begins to 208 volts. 3. Lift or slide unit into cabinet cutout. Set...
Use & Care Manual
Page 29
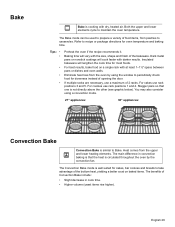
...If multiple racks are necessary, use rack positions 3 and 5. Stagger pans so that the heat is circulated throughout the oven by using a convection mode. 27" appliances: 30" appliances: Convection Bake Convection Bake is well suited for cakes, bar cookies and breads to periodically check food for ...include: • Slight decrease in convection baking is that one is cooking with at least 1-1½" space between pans or dishes and oven walls. Bake t Bake is not directly above the other (see graphic below). For best results, bake food on baked items. The ...
...If multiple racks are necessary, use rack positions 3 and 5. Stagger pans so that the heat is circulated throughout the oven by using a convection mode. 27" appliances: 30" appliances: Convection Bake Convection Bake is well suited for cakes, bar cookies and breads to periodically check food for ...include: • Slight decrease in convection baking is that one is cooking with at least 1-1½" space between pans or dishes and oven walls. Bake t Bake is not directly above the other (see graphic below). For best results, bake food on baked items. The ...
Use & Care Manual
Page 31
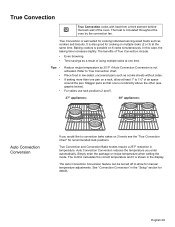
... package or recipe temperature when setting the mode. The heat is circulated throughout the oven by 25 ºF if Auto Convection Conversion is also good for cooking on a...Convection Bake modes require a 25°F reduction in low-sided, uncovered pans such as a result of the oven. Tips • • • • Reduce recipe temperature by the convection fan. The control ... for details. True Convection T True Convection cooks with heat from a third element behind the back wall of using multiple racks at the same time. In this case, the baking time increases slightly. ...
... package or recipe temperature when setting the mode. The heat is circulated throughout the oven by 25 ºF if Auto Convection Conversion is also good for cooking on a...Convection Bake modes require a 25°F reduction in low-sided, uncovered pans such as a result of the oven. Tips • • • • Reduce recipe temperature by the convection fan. The control ... for details. True Convection T True Convection cooks with heat from a third element behind the back wall of using multiple racks at the same time. In this case, the baking time increases slightly. ...
Use & Care Manual
Page 40
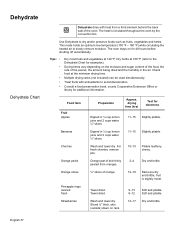
.... 10-15 Pliable leathery, chewy. 2-4 Dry and brittle. 12-16 Skins are dry and brittle, fruit is circulated throughout the oven by the convection fan. Consult a food preservation book, county Cooperative Extension Office or library for 48 hours before shutting off automatically. ...cup lemon juice and 2 cups water, ¼" slices. Orange part of skin thinly peeled from a third element behind the back wall of the oven. Wash and towel dry. Check food at 140 ºF. Towel dried. Dehydrate Dehydrate Chart T Dehydrate dries with antioxidants to avoid discoloration...
.... 10-15 Pliable leathery, chewy. 2-4 Dry and brittle. 12-16 Skins are dry and brittle, fruit is circulated throughout the oven by the convection fan. Consult a food preservation book, county Cooperative Extension Office or library for 48 hours before shutting off automatically. ...cup lemon juice and 2 cups water, ¼" slices. Orange part of skin thinly peeled from a third element behind the back wall of the oven. Wash and towel dry. Check food at 140 ºF. Towel dried. Dehydrate Dehydrate Chart T Dehydrate dries with antioxidants to avoid discoloration...


