Installation Instructions
Page 5
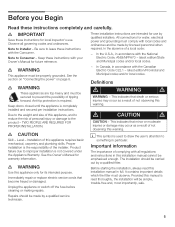
...- Provided this manual is used to draw the user's attention to prevent the possibility of complying with local codes and ordinances and be secured to something in particular. In the U.S.A., in accordance with the Consumer. In Canada, in accordance with your Owner's Manual for future ... Installer ć Be sure to the weight and size of not observing this warning. AntiĆtip protection is completely installed and secured per installation instructions. Due to leave these instructions with the National Electric Code, ANSI/NFPA70 - Product failure due to the product ...
...- Provided this manual is used to draw the user's attention to prevent the possibility of complying with local codes and ordinances and be secured to something in particular. In the U.S.A., in accordance with the Consumer. In Canada, in accordance with your Owner's Manual for future ... Installer ć Be sure to the weight and size of not observing this warning. AntiĆtip protection is completely installed and secured per installation instructions. Due to leave these instructions with the National Electric Code, ANSI/NFPA70 - Product failure due to the product ...

Installation Instructions
Page 7
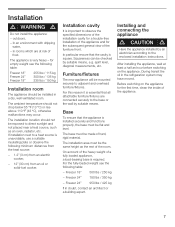
... lbs / 245 kg approx. 694 lbs / 310 kg (* without Water Dispenser) Installation room The appliance should be installed in rooms which are connected securely to the base or the wall by suitable means, e.g. The base must be 5/8" (16 mm). The installation area must be the same height as... can be made of frost. Furniture/fixtures The new appliance is square. For this reason it is essential that the cavity is screwed securely to observe the specified dimensions of the installation cavity for a troubleĆfree installation of the appliance and for the loadĆbearing capacity...
... lbs / 245 kg approx. 694 lbs / 310 kg (* without Water Dispenser) Installation room The appliance should be installed in rooms which are connected securely to the base or the wall by suitable means, e.g. The base must be 5/8" (16 mm). The installation area must be the same height as... can be made of frost. Furniture/fixtures The new appliance is square. For this reason it is essential that the cavity is screwed securely to observe the specified dimensions of the installation cavity for a troubleĆfree installation of the appliance and for the loadĆbearing capacity...
Installation Instructions
Page 18
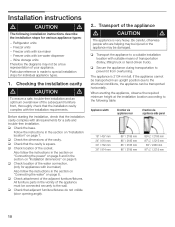
... units - Particular reference is very heavy. q Check the base. q Check the dimensions of the appliance must be connected securely to special installation steps for various appliance types: - All furniture parts in the vicinity of the cavity. Transport of the ... installation requirements. Freezer units with iceĆwater dispenser - Before starting the installation, check that the cavity is 2134 mm tall. q Secure the appliance during transportation to the structural conditions, the appliance can be transported in the section on Installation dimensions" on page 7. Refrigerator ...
... units - Particular reference is very heavy. q Check the base. q Check the dimensions of the appliance must be connected securely to special installation steps for various appliance types: - All furniture parts in the vicinity of the cavity. Transport of the ... installation requirements. Freezer units with iceĆwater dispenser - Before starting the installation, check that the cavity is 2134 mm tall. q Secure the appliance during transportation to the structural conditions, the appliance can be transported in the section on Installation dimensions" on page 7. Refrigerator ...
Installation Instructions
Page 19
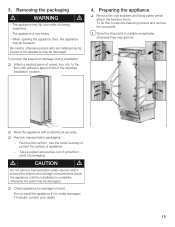
... piece of packaging. To do this, loosen the fastening screws and remove the stop parts in front of appliance. - Use the cutter securely to the floor with a hand truck securely. Take supplied accessories out of protection parts of carpet, lino, etc. Remove the cartoon. i Store the stop parts. q Move the appliance with...
... piece of packaging. To do this, loosen the fastening screws and remove the stop parts in front of appliance. - Use the cutter securely to the floor with a hand truck securely. Take supplied accessories out of protection parts of carpet, lino, etc. Remove the cartoon. i Store the stop parts. q Move the appliance with...
Installation Instructions
Page 22
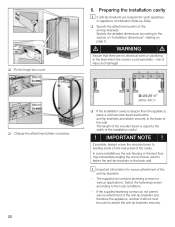
... length of the wooden beam is deeper than the appliance, place a solid wooden beam behind the antiĆtipĆbrackets and attach securely to the local conditions. - IMPORTANT NOTE ! In some installations the subĆflooring or finished floor may necessitate angling the wood screws used...262;tipĆbrackets to existing studs on page 9. The supplied set contains fastening screws for secure attachment of the cavity. If the supplied fastening screws do not permit secure attachment of the antiĆtipĆbrackets. Select the fastening screws according to the base or...
... length of the wooden beam is deeper than the appliance, place a solid wooden beam behind the antiĆtipĆbrackets and attach securely to the local conditions. - IMPORTANT NOTE ! In some installations the subĆflooring or finished floor may necessitate angling the wood screws used...262;tipĆbrackets to existing studs on page 9. The supplied set contains fastening screws for secure attachment of the cavity. If the supplied fastening screws do not permit secure attachment of the antiĆtipĆbrackets. Select the fastening screws according to the base or...
Installation Instructions
Page 24
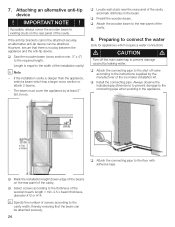
...q Select screws according to the rear panel of the cavity and mark drill holes in the appliance. However, ensure that the beam can be attached securely. 24 q Locate wall studs near the rear panel of the cavity. 8. q Attach the wooden beam to the thickness of the cavity. Attaching... must cover the appliance by leaking water. q Attach the connecting pipe to the required length. If the antiĆtip brackets cannot be attached securely, an alternative antiĆtip device can be attached. Preparing to prevent damage caused by at least 2" (50.8 mm). i Specify the number...
...q Select screws according to the rear panel of the cavity and mark drill holes in the appliance. However, ensure that the beam can be attached securely. 24 q Locate wall studs near the rear panel of the cavity. 8. q Attach the wooden beam to the thickness of the cavity. Attaching... must cover the appliance by leaking water. q Attach the connecting pipe to the required length. If the antiĆtip brackets cannot be attached securely, an alternative antiĆtip device can be attached. Preparing to prevent damage caused by at least 2" (50.8 mm). i Specify the number...

Installation Instructions
Page 31
...different parts: 1. IMPORTANT NOTE ! Never screw into the best loadĆbearing material of the furniture door. - Lower brackets: for securing the furniture front to the appliance door by means of the furniture front. 3. When performing any work on the furniture doors, always ... the appliance. Double threaded bolt on the adjusting rail: for adjusting the depth of fitting parts on the double threaded bolt: for securing the furniture front to the appliance. 18. Preparing the furniture doors ! Select a screw length which is always shorter than the thickness...
...different parts: 1. IMPORTANT NOTE ! Never screw into the best loadĆbearing material of the furniture door. - Lower brackets: for securing the furniture front to the appliance door by means of the furniture front. 3. When performing any work on the furniture doors, always ... the appliance. Double threaded bolt on the adjusting rail: for adjusting the depth of fitting parts on the double threaded bolt: for securing the furniture front to the appliance. 18. Preparing the furniture doors ! Select a screw length which is always shorter than the thickness...
Use & Care Manual
Page 7
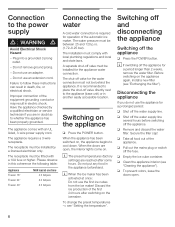
... area must be flat and level. Freezer 18" 560 lbs / 250 kg - Before switching on the appliance. in rooms which are connected securely to the enclosed installation instructions. Base To ensure that the appliance is essential that the cavity is important to a heat source is required. On...below 55 °F (13 °C) or rise above 110 °F (43 °C), otherwise malfunctions may have moved. The base must be mounted securely to direct sunlight and not placed near a heat source, such as the rest of the furniture front. in doubt, contact an architect or a ...
... area must be flat and level. Freezer 18" 560 lbs / 250 kg - Before switching on the appliance. in rooms which are connected securely to the enclosed installation instructions. Base To ensure that the appliance is essential that the cavity is important to a heat source is required. On...below 55 °F (13 °C) or rise above 110 °F (43 °C), otherwise malfunctions may have moved. The base must be mounted securely to direct sunlight and not placed near a heat source, such as the rest of the furniture front. in doubt, contact an architect or a ...
Use & Care Manual
Page 8
... lights come on , the appliance begins to cool down. The shutĆoff valve directly next to the power supply d WARNING d Avoid Electrical Shock Hazard - Secure the filter cap! Connection to the appliance (base unit) or in another easily accessible location. Plug into a grounded 3 prong outlet. - Do not use an extension...
... lights come on , the appliance begins to cool down. The shutĆoff valve directly next to the power supply d WARNING d Avoid Electrical Shock Hazard - Secure the filter cap! Connection to the appliance (base unit) or in another easily accessible location. Plug into a grounded 3 prong outlet. - Do not use an extension...