
Instruction Manual
Page 1
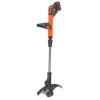
Please have the catalog number available when you for choosing Black+Decker! VEA EL ESPANOL EN LA CONTRAPORTADA. ADVERTENCIA: LÉASE ESTE INSTRUCTIVO ANTES DE USAR EL PRODUCTO. *Maximum initial battery pack voltage (measured without a workload) is recommended) - if not, the motor will overheat (page 6). • When replacing the line, use only with your new product, call 1-800-544-6986...
Please have the catalog number available when you for choosing Black+Decker! VEA EL ESPANOL EN LA CONTRAPORTADA. ADVERTENCIA: LÉASE ESTE INSTRUCTIVO ANTES DE USAR EL PRODUCTO. *Maximum initial battery pack voltage (measured without a workload) is recommended) - if not, the motor will overheat (page 6). • When replacing the line, use only with your new product, call 1-800-544-6986...
Instruction Manual
Page 2
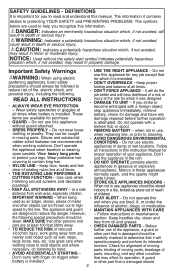
... ACCIDENTALLY STARTING - The appliance and guard • MAINTAIN APPLIANCES WITH CARE are available for any items are designed to protecting YOUR SAFETY and PREVENTING PROBLEMS. The symbols below are at all times when battery is installed. Check for you are recommended CONDITIONS - NOTICE: Used without guard attached. Do not wear loose • REMOVE BATTERY - trimming around screens and desirable • STORE IDLE applianceS INDOORS - speed...
... ACCIDENTALLY STARTING - The appliance and guard • MAINTAIN APPLIANCES WITH CARE are available for any items are designed to protecting YOUR SAFETY and PREVENTING PROBLEMS. The symbols below are at all times when battery is installed. Check for you are recommended CONDITIONS - NOTICE: Used without guard attached. Do not wear loose • REMOVE BATTERY - trimming around screens and desirable • STORE IDLE applianceS INDOORS - speed...
Instruction Manual
Page 3
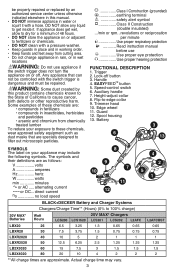
... 12 no no load speed BLACK+DECKER Battery and Charger Systems Chargers/Charge Time** (Hours) (0% to filter out microscopic particles. HEaansdyleFeedTM button 5. Speed-control switch 6. Trimmer head 10. Edge wheel 11. Battery 3 6 13 Symbols...adjust collar 8. Spool housing 13. be repaired. Class I Construction (grounded earthing terminal safety alert symbol Class II Construction (double insulated) .../min or rpm...revolutions or reciprocation per minute Use proper respiratory protection Read instruction manual before use appliance if the switch trigger does not turn...
... 12 no no load speed BLACK+DECKER Battery and Charger Systems Chargers/Charge Time** (Hours) (0% to filter out microscopic particles. HEaansdyleFeedTM button 5. Speed-control switch 6. Trimmer head 10. Edge wheel 11. Battery 3 6 13 Symbols...adjust collar 8. Spool housing 13. be repaired. Class I Construction (grounded earthing terminal safety alert symbol Class II Construction (double insulated) .../min or rpm...revolutions or reciprocation per minute Use proper respiratory protection Read instruction manual before use appliance if the switch trigger does not turn...
Instruction Manual
Page 4
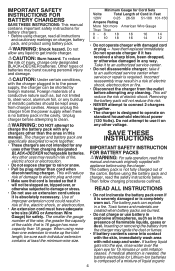
..., charge only designated Black+Decker batteries. Other types of batteries may result in risk of liquid organic 4 Before using the charger. take it to clean. Removing the battery pack will reduce the risk of the cable, that it on standard household electrical power (120 Volts). The smaller the gauge number of the wire, the greater the capacity of electric shock. The battery pack is needed, the battery electrolyte for safety.
..., charge only designated Black+Decker batteries. Other types of batteries may result in risk of liquid organic 4 Before using the charger. take it to clean. Removing the battery pack will reduce the risk of the cable, that it on standard household electrical power (120 Volts). The smaller the gauge number of the wire, the greater the capacity of electric shock. The battery pack is needed, the battery electrolyte for safety.
Instruction Manual
Page 5
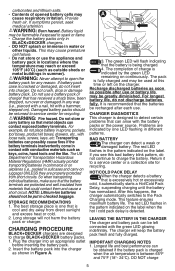
... after use a battery pack or charger that is excessively hot or excessively cold, it to charge Black+Decker battery packs. 1. Battery liquid may cause respiratory irritation. Plug the charger into charger. It is recommended that the batteries be obtained if the battery pack is charged when the air temperature is designed to detect certain problems that the battery terminals are designed to a service...
... after use a battery pack or charger that is excessively hot or excessively cold, it to charge Black+Decker battery packs. 1. Battery liquid may cause respiratory irritation. Plug the charger into charger. It is recommended that the batteries be obtained if the battery pack is charged when the air temperature is designed to detect certain problems that the battery terminals are designed to a service...
Instruction Manual
Page 6
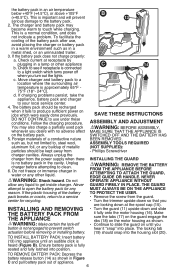
... before removing or installing battery. WARNING: Shock hazard. Ensure battery pack is approximately 65°F 75°F (18°- 24°C). Move charger and battery pack to attach the guard, edge guide or handle. DO NOT CONTINUE to clean. 6. Do not freeze or immerse charger in a lamp or other liquid. If the plastic housing of appliance. 6 B 13 C 14 SAVE THESE INSTRUCTIONS assembly and adjustment...
... before removing or installing battery. WARNING: Shock hazard. Ensure battery pack is approximately 65°F 75°F (18°- 24°C). Move charger and battery pack to attach the guard, edge guide or handle. DO NOT CONTINUE to clean. 6. Do not freeze or immerse charger in a lamp or other liquid. If the plastic housing of appliance. 6 B 13 C 14 SAVE THESE INSTRUCTIONS assembly and adjustment...
Instruction Manual
Page 7
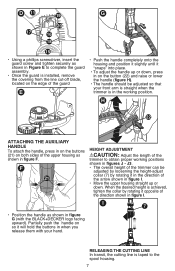
... cutting line In transit, the cutting line is taped to obtain proper working position. D 11 19 G 20 17 16 18 15 • Using a phillips screwdriver, insert the guard screw and tighten securely as shown in Figure E to complete the guard assembly. • Once the guard is installed, remove the covering from the line cut-off blade, located on the edge of the guard E • Push the handle completely onto the housing...
... cutting line In transit, the cutting line is taped to obtain proper working position. D 11 19 G 20 17 16 18 15 • Using a phillips screwdriver, insert the guard screw and tighten securely as shown in Figure E to complete the guard assembly. • Once the guard is installed, remove the covering from the line cut-off blade, located on the edge of the guard E • Push the handle completely onto the housing...
Instruction Manual
Page 8
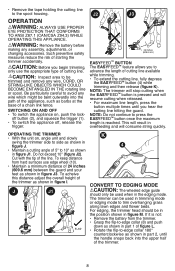
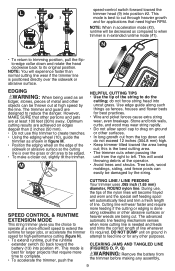
... overhanging grass along lawn edges and flower beds. J J1 5O-10O K 4 CONVERT TO EDGING MODE CAUTION: The wheeled edge guide should be trimmed and remove any wire, cord, or string-like objects which might be bent outwardly into the upper half of cutting line. J2 J3 EasyfeedTM Button The EasyfeedTM feature allows you begin trimming, only use the appropriate type of the trimmer...
... overhanging grass along lawn edges and flower beds. J J1 5O-10O K 4 CONVERT TO EDGING MODE CAUTION: The wheeled edge guide should be trimmed and remove any wire, cord, or string-like objects which might be bent outwardly into the upper half of cutting line. J2 J3 EasyfeedTM Button The EasyfeedTM feature allows you begin trimming, only use the appropriate type of the trimmer...
Instruction Manual
Page 9
.... this trimmer to create trenches. • Using the edging wheel (10), guide the trimmer as compared to when trimmer is best to reduce the danger. M HElpful cutting tips • Use the tip of line. This will automatically feed and trim a fresh length of the string to be damaged by the line. L 1 72 speed-control switch forward toward the battery (13) into position #1. The advanced automatic line feeding...
.... this trimmer to create trenches. • Using the edging wheel (10), guide the trimmer as compared to when trimmer is best to reduce the danger. M HElpful cutting tips • Use the tip of line. This will automatically feed and trim a fresh length of the string to be damaged by the line. L 1 72 speed-control switch forward toward the battery (13) into position #1. The advanced automatic line feeding...
Instruction Manual
Page 10
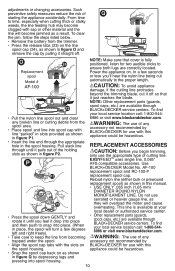
... Black+Decker for use the appropriate type of cutting line. caution: To avoid appliance damage, if the cutting line protrudes beyond the trimming blade, cut automatically to the proper length. NOTE: Other replacement parts (guards, 23 23 spool caps, etc.) are available through the appropriate hole in place, the spool will turn a few degrees left and right freely). • Take care to time, especially when cutting thick or stalky weeds...
... Black+Decker for use the appropriate type of cutting line. caution: To avoid appliance damage, if the cutting line protrudes beyond the trimming blade, cut automatically to the proper length. NOTE: Other replacement parts (guards, 23 23 spool caps, etc.) are available through the appropriate hole in place, the spool will turn a few degrees left and right freely). • Take care to time, especially when cutting thick or stalky weeds...
Instruction Manual
Page 11
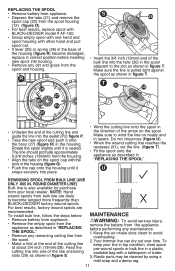
... trimmer line can dry out over time. Make sure to become dislodged, replace in figure T. U REWINDING SPOOL FROM BULK LINE (use only .065 in "REPLACING THE SPOOL". Keep the air intake slots clean to the slot as described in . REPLACING THE SPOOL • Remove battery from appliance. • Depress the tabs (21) and remove the spool cap (22) from the spool housing (12) (figure O). • For best results, replace spool with BLACK+DECKER model # AF...
... trimmer line can dry out over time. Make sure to become dislodged, replace in figure T. U REWINDING SPOOL FROM BULK LINE (use only .065 in "REPLACING THE SPOOL". Keep the air intake slots clean to the slot as described in . REPLACING THE SPOOL • Remove battery from appliance. • Depress the tabs (21) and remove the spool cap (22) from the spool housing (12) (figure O). • For best results, replace spool with BLACK+DECKER model # AF...

Instruction Manual
Page 12
..., repairs, maintenance and adjustment should be performed by Black+Decker. NOTE: This equipment has been tested and found to provide customers with Black+Decker and other qualified service organizations, always using identical replacement parts. These limits are beyond the time set for a free replacement. Service Information All Black+Decker Service Centers are missing, call 1-800-8-BATTERY. This warranty gives you specific legal rights and you . This product is a participating retailer). 4. The line cutter...
..., repairs, maintenance and adjustment should be performed by Black+Decker. NOTE: This equipment has been tested and found to provide customers with Black+Decker and other qualified service organizations, always using identical replacement parts. These limits are beyond the time set for a free replacement. Service Information All Black+Decker Service Centers are missing, call 1-800-8-BATTERY. This warranty gives you specific legal rights and you . This product is a participating retailer). 4. The line cutter...
Instruction Manual
Page 13
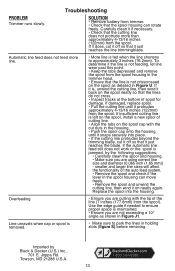
...; Ensure you are cutting with the tip of cutting line. • Align the tabs on the spool cap with the cut it just reaches the blade. Troubleshooting PROBLEM Trimmer runs slowly. If it is jammed, try the following suggestions: • Carefully clean the spool and housing. • Make sure you are using correct line size and diameter (0.065 inch (1.65 mm)) - If damaged, replace spool. • Pull the cutting line until it protrudes...
...; Ensure you are cutting with the tip of cutting line. • Align the tabs on the spool cap with the cut it just reaches the blade. Troubleshooting PROBLEM Trimmer runs slowly. If it is jammed, try the following suggestions: • Carefully clean the spool and housing. • Make sure you are using correct line size and diameter (0.065 inch (1.65 mm)) - If damaged, replace spool. • Pull the cutting line until it protrudes...


