Warranty
Page 1
... part. ET Saturday 9 a.m. - 8 p.m. LIMITED ONE WARRANTY Subject to product used for ONE year any nature associated with new or remanufactured components or products), at BISSELL's option, free of charge from the date of purchase by E-mail, telephone, or regular mail as filters, bags, belts, or brushes. This warranty applies to the *EXCEPTIONS AND EXCLUSIONS identified below on "If your warranty, contact BISSELL Consumer Services. OR CALL: BISSELL...
... part. ET Saturday 9 a.m. - 8 p.m. LIMITED ONE WARRANTY Subject to product used for ONE year any nature associated with new or remanufactured components or products), at BISSELL's option, free of charge from the date of purchase by E-mail, telephone, or regular mail as filters, bags, belts, or brushes. This warranty applies to the *EXCEPTIONS AND EXCLUSIONS identified below on "If your warranty, contact BISSELL Consumer Services. OR CALL: BISSELL...

User Guide
Page 1
USER'S GUIDE 12B1, 68C7 SERIES 2 Thank You 3 Safety Instructions 4-5 Product View 6 Assembly 7-8 Operations 9-12 Maintenance and Care 13 Troubleshooting 14 Replacement Parts 15 Warranty 16 Product Registration 16 Consumer Care
USER'S GUIDE 12B1, 68C7 SERIES 2 Thank You 3 Safety Instructions 4-5 Product View 6 Assembly 7-8 Operations 9-12 Maintenance and Care 13 Troubleshooting 14 Replacement Parts 15 Warranty 16 Product Registration 16 Consumer Care
User Guide
Page 2
... a limited one year warranty. Today, BISSELL is well made, and we know about floor care went into the design and construction of us at BISSELL. Thanks for buying a BISSELL vacuum We're glad you 'll receive fast, considerate assistance. My great-grandfather invented the floor sweeper in the design, manufacture, and service of high quality homecare products like your BISSELL PowerForce Bagless vacuum. Mark J. Thanks...
... a limited one year warranty. Today, BISSELL is well made, and we know about floor care went into the design and construction of us at BISSELL. Thanks for buying a BISSELL vacuum We're glad you 'll receive fast, considerate assistance. My great-grandfather invented the floor sweeper in the design, manufacture, and service of high quality homecare products like your BISSELL PowerForce Bagless vacuum. Mark J. Thanks...
User Guide
Page 3
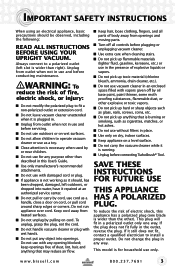
... parts. ■■ Turn off by cord, use cord as a handle, close a door on a level surface. ■■ Do not carry the vacuum cleaner while it is wider than right). WARNING: To reduce the risk of explosive liquids or vapors. ■■ Do not pick up anything that is for any opening blocked; To reduce the risk of electric shock, this User's Guide...
... parts. ■■ Turn off by cord, use cord as a handle, close a door on a level surface. ■■ Do not carry the vacuum cleaner while it is wider than right). WARNING: To reduce the risk of explosive liquids or vapors. ■■ Do not pick up anything that is for any opening blocked; To reduce the risk of electric shock, this User's Guide...
User Guide
Page 4
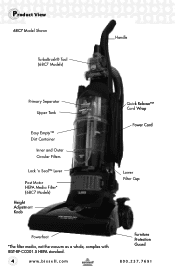
Product View 68C7 Model Shown TurboBrush® Tool (68C7 Models) Handle Primary Separator Upper Tank Easy Empty™ Dirt Container Inner and Outer Circular Filters Lock 'n Seal™ Lever Post Motor HEPA Media Filter* (68C7 Models) Height Adjustment Knob Quick Release™ Cord Wrap Power Cord Lower Filter Cup Powerfoot *The filter media, not the vacuum as a whole, complies with IEST-RP-CC001.5 HEPA standard. 4 Furniture Protection Guard
Product View 68C7 Model Shown TurboBrush® Tool (68C7 Models) Handle Primary Separator Upper Tank Easy Empty™ Dirt Container Inner and Outer Circular Filters Lock 'n Seal™ Lever Post Motor HEPA Media Filter* (68C7 Models) Height Adjustment Knob Quick Release™ Cord Wrap Power Cord Lower Filter Cup Powerfoot *The filter media, not the vacuum as a whole, complies with IEST-RP-CC001.5 HEPA standard. 4 Furniture Protection Guard
User Guide
Page 5
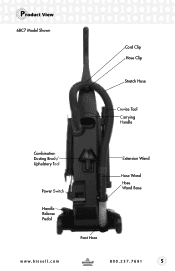
Product View 68C7 Model Shown Cord Clip Hose Clip Stretch Hose Crevice Tool Carrying Handle Combination Dusting Brush/ Upholstery Tool Power Switch Handle Release Pedal Foot Hose Extension Wand Hose Wand Hose Wand Base 5
Product View 68C7 Model Shown Cord Clip Hose Clip Stretch Hose Crevice Tool Carrying Handle Combination Dusting Brush/ Upholstery Tool Power Switch Handle Release Pedal Foot Hose Extension Wand Hose Wand Hose Wand Base 5
User Guide
Page 6
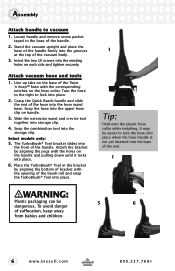
... tools 1. Stand the vacuum upright and place the base of the handle firmly into the grooves at the top of the Twist 'n Snap™ hose with the opening of the unit. 1 ! Select models only: 5. It may be 5 6 dangerous. WARNING: Plastic packaging can be easier to the base of the hose into the hose wand base. Line up tabs on the hose collar. Assembly Attach handle...
... tools 1. Stand the vacuum upright and place the base of the handle firmly into the grooves at the top of the Twist 'n Snap™ hose with the opening of the unit. 1 ! Select models only: 5. It may be 5 6 dangerous. WARNING: Plastic packaging can be easier to the base of the hose into the hose wand base. Line up tabs on the hose collar. Assembly Attach handle...
User Guide
Page 7
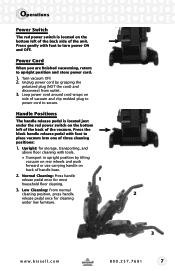
... cleaning under the red power switch on the bottom left of the back side of the unit. Unplug power cord by tilting vacuum on rear wheels and push forward or use carrying handle on back of handle base. 2. Press the black handle release pedal with tools. • Transport in upright position by grasping the polarized plug (NOT the cord) and disconnect from outlet. 3. Upright: for most 1 household floor cleaning. 3. Loop power cord...
... cleaning under the red power switch on the bottom left of the back side of the unit. Unplug power cord by tilting vacuum on rear wheels and push forward or use carrying handle on back of handle base. 2. Press the black handle release pedal with tools. • Transport in upright position by grasping the polarized plug (NOT the cord) and disconnect from outlet. 3. Upright: for most 1 household floor cleaning. 3. Loop power cord...
User Guide
Page 8
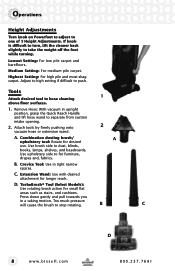
.... Remove Hose: With vacuum in upright position, grasp the Quick Reach Handle and lift hose wand to take the weight off the foot while turning. C. Extension Wand: Use with desired attachment for small flat areas such as stairs, and cushions. A. Press down gently and pull towards you in tight narrow spaces. B C D 8 Highest Setting: For high pile and most shag carpet. B. TurboBrush® Tool (Select Models): Use rotating brush action...
.... Remove Hose: With vacuum in upright position, grasp the Quick Reach Handle and lift hose wand to take the weight off the foot while turning. C. Extension Wand: Use with desired attachment for small flat areas such as stairs, and cushions. A. Press down gently and pull towards you in tight narrow spaces. B C D 8 Highest Setting: For high pile and most shag carpet. B. TurboBrush® Tool (Select Models): Use rotating brush action...
User Guide
Page 9
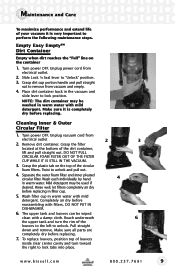
... the louvers to the left to remove from electrical outlet. 2. Turn power OFF. Slide Lock 'n Seal lever to unlock and pull out. 4. Cleaning Inner & Outer Circular Filter 1. Grasp the filter located at the bottom of your vacuum it is very important to lock position. Rinse well, let filters completely air dry before replacing. 7. Completely air dry before replacing. Grasp dirt cup portion handle and pull straight out to unlock...
... the louvers to the left to remove from electrical outlet. 2. Turn power OFF. Slide Lock 'n Seal lever to unlock and pull out. 4. Cleaning Inner & Outer Circular Filter 1. Grasp the filter located at the bottom of your vacuum it is very important to lock position. Rinse well, let filters completely air dry before replacing. 7. Completely air dry before replacing. Grasp dirt cup portion handle and pull straight out to unlock...
User Guide
Page 10
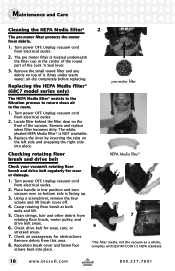
... clean air to the room. 1. Turn power OFF. Using a screwdriver, remove the four screws and lift brush cover off. 4. HEPA Media filter* 3 7 4 *The filter media, not the vacuum as a whole, complies with IEST-RP-CC001.5 HEPA standard. 10 The white, pleated HEPA Media filter* is located underneath the filter cup in the center of the round part of it. Check drive belt for wear or damage. 1. Replacing the HEPA Media filter* (68C7 model series only) pre-motor filter The HEPA...
... clean air to the room. 1. Turn power OFF. Using a screwdriver, remove the four screws and lift brush cover off. 4. HEPA Media filter* 3 7 4 *The filter media, not the vacuum as a whole, complies with IEST-RP-CC001.5 HEPA standard. 10 The white, pleated HEPA Media filter* is located underneath the filter cup in the center of the round part of it. Check drive belt for wear or damage. 1. Replacing the HEPA Media filter* (68C7 model series only) pre-motor filter The HEPA...
User Guide
Page 11
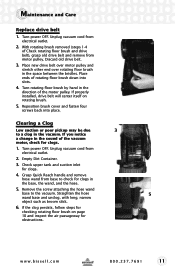
... motor pulley. Check upper tank and suction inlet for obstructions. 11 Straighten the hose 5 wand base and unclog, with long, narrow object such as broom stick. 6. Unplug vacuum cord from base to the vacuum. If the clog persists, follow steps for clogs in the vacuum. If properly installed, drive belt will center itself on page 10 and inspect the air passageway for clogs. 4. Empty Dirt Container. 3. Turn rotating floor brush...
... motor pulley. Check upper tank and suction inlet for obstructions. 11 Straighten the hose 5 wand base and unclog, with long, narrow object such as broom stick. 6. Unplug vacuum cord from base to the vacuum. If the clog persists, follow steps for clogs in the vacuum. If properly installed, drive belt will center itself on page 10 and inspect the air passageway for clogs. 4. Empty Dirt Container. 3. Turn rotating floor brush...
User Guide
Page 12
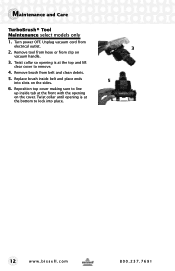
Turn power OFF. Remove brush from clip on vacuum handle. 3. Remove tool from hose or from belt and clean debris. 5. Reposition top cover making sure to remove. 4. Maintenance and Care TurboBrush® Tool Maintenance select models only 1. Twist collar so opening is at the top and lift clear cover to line up inside belt and place ends into place. 12 Twist collar until opening on the sides. 5 6. Unplug vacuum cord from electrical outlet. 3 2. Replace brush inside tab at the front with the opening is at the bottom to lock into slots on the cover.
Turn power OFF. Remove brush from clip on vacuum handle. 3. Remove tool from hose or from belt and clean debris. 5. Reposition top cover making sure to remove. 4. Maintenance and Care TurboBrush® Tool Maintenance select models only 1. Twist collar so opening is at the top and lift clear cover to line up inside belt and place ends into place. 12 Twist collar until opening on the sides. 5 6. Unplug vacuum cord from electrical outlet. 3 2. Replace brush inside tab at the front with the opening is at the bottom to lock into slots on the cover.
User Guide
Page 13
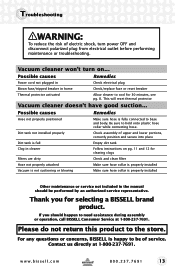
... need assistance during assembly or operation, call BISSELL Consumer Service at 1-800-237-7691. 13 For any questions or concerns, BISSELL is fully connected to the store. Possible causes Remedies Power cord not plugged in Check electrical plug Blown fuse/tripped breaker in the manual should happen to hold onto plastic hose collar while connecting hose. Troubleshooting ! Vacuum cleaner won't turn power OFF and disconnect polarized plug from electrical outlet before performing maintenance or troubleshooting...
... need assistance during assembly or operation, call BISSELL Consumer Service at 1-800-237-7691. 13 For any questions or concerns, BISSELL is fully connected to the store. Possible causes Remedies Power cord not plugged in Check electrical plug Blown fuse/tripped breaker in the manual should happen to hold onto plastic hose collar while connecting hose. Troubleshooting ! Vacuum cleaner won't turn power OFF and disconnect polarized plug from electrical outlet before performing maintenance or troubleshooting...
User Guide
Page 14
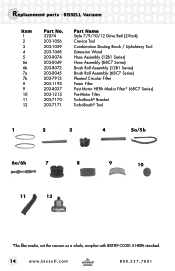
... 203-1192 203-8037 203-1215 203-7170 203-7171 Part Name Style 7/9/10/12 Drive Belt (2-Pack) Crevice Tool Combination Dusting Brush / Upholstery Tool Extension Wand Hose Assembly (12B1 Series) Hose Assembly (68C7 Series) Brush Roll Assembly (12B1 Series) Brush Roll Assembly (68C7 Series) Pleated Circular Filter Foam Filter Post Motor HEPA Media Filter* (68C7 Series) Pre-Motor Filter TurboBrush® Bracket TurboBrush® Tool 1 2 3 4 5a/5b 6a/6b 7 8 11 12 9 10 *The filter media, not the vacuum as a whole, complies with IEST-RP-CC001.5 HEPA standard. 14 Replacement parts -
... 203-1192 203-8037 203-1215 203-7170 203-7171 Part Name Style 7/9/10/12 Drive Belt (2-Pack) Crevice Tool Combination Dusting Brush / Upholstery Tool Extension Wand Hose Assembly (12B1 Series) Hose Assembly (68C7 Series) Brush Roll Assembly (12B1 Series) Brush Roll Assembly (68C7 Series) Pleated Circular Filter Foam Filter Post Motor HEPA Media Filter* (68C7 Series) Pre-Motor Filter TurboBrush® Bracket TurboBrush® Tool 1 2 3 4 5a/5b 6a/6b 7 8 11 12 9 10 *The filter media, not the vacuum as a whole, complies with IEST-RP-CC001.5 HEPA standard. 14 Replacement parts -
User Guide
Page 15
... as filters, belts, or brushes. PO Box 3606 Grand Rapids, MI 49501 ATTN: Consumer Care BISSELL IS NOT LIABLE FOR INCIDENTAL OR CONSEQUENTIAL DAMAGES OF ANY NATURE ASSOCIATED WITH THE USE OF THIS PRODUCT. If you need additional instruction regarding this warranty or have questions about repairs or replacement parts, or if you need information about your warranty, contact BISSELL Consumer Care. Or Call: BISSELL Consumer...
... as filters, belts, or brushes. PO Box 3606 Grand Rapids, MI 49501 ATTN: Consumer Care BISSELL IS NOT LIABLE FOR INCIDENTAL OR CONSEQUENTIAL DAMAGES OF ANY NATURE ASSOCIATED WITH THE USE OF THIS PRODUCT. If you need additional instruction regarding this warranty or have questions about repairs or replacement parts, or if you need information about your warranty, contact BISSELL Consumer Care. Or Call: BISSELL Consumer...
User Guide
Page 16
.... Don't forget to contact us with any important product maintenance reminders and alerts. Printed in the event of cleaner available. Visit www.bissell.com/registration now! BISSELL consumer care For information about repairs or replacement parts, or questions about your product. Registering is quick, easy and offers you with questions regarding your warranty, call: BISSELL Consumer Care 1-800-237-7691 Monday - PO...
.... Don't forget to contact us with any important product maintenance reminders and alerts. Printed in the event of cleaner available. Visit www.bissell.com/registration now! BISSELL consumer care For information about repairs or replacement parts, or questions about your product. Registering is quick, easy and offers you with questions regarding your warranty, call: BISSELL Consumer Care 1-800-237-7691 Monday - PO...


