User Guide
Page 1
User's Guide Video Baby Monitor with Touchless Thermometer Models: MBP27T, MBP27T/2, MBP27T/3, MBP27T/4 The features described in this User's Guide are subject to modifications without prior notice.
User's Guide Video Baby Monitor with Touchless Thermometer Models: MBP27T, MBP27T/2, MBP27T/3, MBP27T/4 The features described in this User's Guide are subject to modifications without prior notice.

User Guide
Page 2
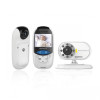
... warranty coverage. Thank you insert and fully charge the battery in their playroom. Now you install the units. Registration is not required for purchasing the MBP27T, MBP27T/2, MBP27T/3, MBP27T/4. Got everything? • 1 x Parent Unit • 1 x Baby Unit (camera) • 1 x Rechargeable Ni-MH battery pack for...the Parent Unit • 1 x Power adapter for the Parent Unit • 1 x Power adapter for your new Motorola Video Baby Monitor! Welcome... Please read the Safety Instructions on page 6 before you can see and hear your dated sales receipt to your records. to ...
... warranty coverage. Thank you insert and fully charge the battery in their playroom. Now you install the units. Registration is not required for purchasing the MBP27T, MBP27T/2, MBP27T/3, MBP27T/4. Got everything? • 1 x Parent Unit • 1 x Baby Unit (camera) • 1 x Rechargeable Ni-MH battery pack for...the Parent Unit • 1 x Power adapter for the Parent Unit • 1 x Power adapter for your new Motorola Video Baby Monitor! Welcome... Please read the Safety Instructions on page 6 before you can see and hear your dated sales receipt to your records. to ...

User Guide
Page 3
... and hold to turn the Unit Press to return to turn the more than one camera). Press to switch camera units (if paired with In monitor mode, press to previous menu level. Red) Power / Video On-Off Button P 6. Forehead temperature mode Blue LED light. Audio Level LED (Green, Orange, Red, 4. display...
... and hold to turn the Unit Press to return to turn the more than one camera). Press to switch camera units (if paired with In monitor mode, press to previous menu level. Red) Power / Video On-Off Button P 6. Forehead temperature mode Blue LED light. Audio Level LED (Green, Orange, Red, 4. display...

User Guide
Page 4
... 9. Camera Lens 3. Power Adapter Socket 7. Photo Sensor (Night Vision Mode) 2. ON/OFF Switch 6. Speaker Important guidelines for installing your Baby Monitor and the Parent Unit • To use your Video Monitor Baby and Parent Units together, you must be able to establish a radio link between them off if they appear to be..., such as wireless networks (Wi-Fi® routers), Bluetooth® systems, or microwave ovens, may cause interference with this product, so keep the Baby Monitor Monitor at least 1 to 1.5 meters (3 to different positions in the rooms. Pair Key 8. Power LED 5.
... 9. Camera Lens 3. Power Adapter Socket 7. Photo Sensor (Night Vision Mode) 2. ON/OFF Switch 6. Speaker Important guidelines for installing your Baby Monitor and the Parent Unit • To use your Video Monitor Baby and Parent Units together, you must be able to establish a radio link between them off if they appear to be..., such as wireless networks (Wi-Fi® routers), Bluetooth® systems, or microwave ovens, may cause interference with this product, so keep the Baby Monitor Monitor at least 1 to 1.5 meters (3 to different positions in the rooms. Pair Key 8. Power LED 5.

User Guide
Page 5
... a camera 15 4.5.3 Delete a camera 16 4.5.4 Scan the cameras 16 4.6 Body Temperature Measurement Review 17 4.7 Change of The Device (environment 18 6. Help...20 8. Using the Baby Monitor 12 3.1 Setting up 12 3.2 Night Vision Mode 12 3.3 Video ON/OFF 12 3.4 Talk Mode 12 3.5 Touchless Thermometer 12 3.5.1 Forehead Temperature Mode 13 3.5.2 Object Temperature Mode...
... a camera 15 4.5.3 Delete a camera 16 4.5.4 Scan the cameras 16 4.6 Body Temperature Measurement Review 17 4.7 Change of The Device (environment 18 6. Help...20 8. Using the Baby Monitor 12 3.1 Setting up 12 3.2 Night Vision Mode 12 3.3 Video ON/OFF 12 3.4 Talk Mode 12 3.5 Touchless Thermometer 12 3.5.1 Forehead Temperature Mode 13 3.5.2 Object Temperature Mode...

User Guide
Page 6
... read the instructions in this user's guide for future reference. • Keep the cords out of reach of children. • Do not cover the Baby Monitor with all relevant standards regarding electromagnetic fields and is, when handled as a dresser, bureau, or shelf or mount the Unit to a wall securely using the.... ● Place the BABY UNIT on a flat surface, such as described in the cot or within the cot. Only use . WARNING This Digital Video Baby Monitor is not a toy. Keep small parts away from the cot and out of the baby (the unit and cords should be more than 1 meter from...
... read the instructions in this user's guide for future reference. • Keep the cords out of reach of children. • Do not cover the Baby Monitor with all relevant standards regarding electromagnetic fields and is, when handled as a dresser, bureau, or shelf or mount the Unit to a wall securely using the.... ● Place the BABY UNIT on a flat surface, such as described in the cot or within the cot. Only use . WARNING This Digital Video Baby Monitor is not a toy. Keep small parts away from the cot and out of the baby (the unit and cords should be more than 1 meter from...

User Guide
Page 7
.... • Do not touch the plug contacts with it prior to actual use. • Do not use the Baby Monitor in damp areas or close to water. • Do not install the Baby Monitor in extreme cold or heat, direct sunlight, or close to a heat source. • Only use other chargers or... power adapters as this monitor and all its functions so that you are familiar with sharp or metal objects. • Connect...
.... • Do not touch the plug contacts with it prior to actual use. • Do not use the Baby Monitor in damp areas or close to water. • Do not install the Baby Monitor in extreme cold or heat, direct sunlight, or close to a heat source. • Only use other chargers or... power adapters as this monitor and all its functions so that you are familiar with sharp or metal objects. • Connect...

User Guide
Page 11
... the button to enter. You do not need to confirm. 2. 1 / 2 / 3 / 4 will appear while searching. 3. To re-register your Parent Unit. ENGLISH 2.4 Registration (Pairing) The Baby Monitor Camera is not found within about 30 seconds, the search will end and the Parent Unit will overwrite the old registration. The Green Audio Level...
... the button to enter. You do not need to confirm. 2. 1 / 2 / 3 / 4 will appear while searching. 3. To re-register your Parent Unit. ENGLISH 2.4 Registration (Pairing) The Baby Monitor Camera is not found within about 30 seconds, the search will end and the Parent Unit will overwrite the old registration. The Green Audio Level...

User Guide
Page 12
... ON/OFF Press the VIDEO ON/OFF button V on the Parent Unit to turn the LCD display on or off, but still leave the audio monitor on. 3.4 Talk Mode Press and hold the T TALK button on a table) and point the camera lens towards the area you want to... monitor. • Adjust the Baby Unit's head angle by rotating the camera up, down, left and right until you take a person's temperature at the same temple ...
... ON/OFF Press the VIDEO ON/OFF button V on the Parent Unit to turn the LCD display on or off, but still leave the audio monitor on. 3.4 Talk Mode Press and hold the T TALK button on a table) and point the camera lens towards the area you want to... monitor. • Adjust the Baby Unit's head angle by rotating the camera up, down, left and right until you take a person's temperature at the same temple ...

User Guide
Page 13
... about 1 cm away from the body temperature. Drinking hot or cold drinks may change the body temperature by one degree or more. Using the Baby Monitor 13 Note: a. Avoid bathing or strenuous movement for at least 30 minutes prior to time of day and body location. Note: a. c. Application include temperature measurements...
... about 1 cm away from the body temperature. Drinking hot or cold drinks may change the body temperature by one degree or more. Using the Baby Monitor 13 Note: a. Avoid bathing or strenuous movement for at least 30 minutes prior to time of day and body location. Note: a. c. Application include temperature measurements...
User Guide
Page 14
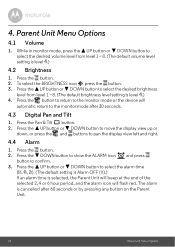
... 8. (The default brightness level setting is level 4.) 4.2 Brightness 1. Press the - DOWN button to show the ALARM icon and press button to the monitor mode after 60 seconds or by pressing any button on the Parent Unit. 14 Parent Unit Menu Options Press the button. 2. Press the + UP button...time is cancelled after 30 seconds. 4.3 Digital Pan and Tilt 1. DOWN button to pan the display view left and right. 4.4 Alarm 1. While in monitor mode, press the + UP button or - Press the button. 2. The alarm is selected, the Parent Unit will beep at the end of the selected...
... 8. (The default brightness level setting is level 4.) 4.2 Brightness 1. Press the - DOWN button to show the ALARM icon and press button to the monitor mode after 60 seconds or by pressing any button on the Parent Unit. 14 Parent Unit Menu Options Press the button. 2. Press the + UP button...time is cancelled after 30 seconds. 4.3 Digital Pan and Tilt 1. DOWN button to pan the display view left and right. 4.4 Alarm 1. While in monitor mode, press the + UP button or - Press the button. 2. The alarm is selected, the Parent Unit will beep at the end of the selected...

User Guide
Page 16
... the button to View Cameras instead of range, the scan will pop up, press the + UP button or - Press the - 4.5.3 Delete a camera 1. DOWN button to monitor your baby. TIP Quick Method to confirm. 3. 1 / 2 / 3 / 4 will stop at the missing camera (e.g. NOTE If the Parent Unit is turned off or out of using...
... the button to View Cameras instead of range, the scan will pop up, press the + UP button or - Press the - 4.5.3 Delete a camera 1. DOWN button to monitor your baby. TIP Quick Method to confirm. 3. 1 / 2 / 3 / 4 will stop at the missing camera (e.g. NOTE If the Parent Unit is turned off or out of using...

User Guide
Page 21
... they appear to be causing interference. • If the signal is too far away it may cause interference with this product, so keep the Baby Monitor away at room temperature for 30 minutes prior, keep the forehead clean and dry before use. • Wrong measurement area Users should measure the correct...
... they appear to be causing interference. • If the signal is too far away it may cause interference with this product, so keep the Baby Monitor away at room temperature for 30 minutes prior, keep the forehead clean and dry before use. • Wrong measurement area Users should measure the correct...

User Guide
Page 29
... of Conformity We the manufacturer / Importer : Binatone Telecom Plc 1 Apsley Way London NW2 7HF, United Kingdom. Any Unauthorized modification of the product voids this Declaration. 0 1 2 0 Manufacturer / Importer (Signature of the Directive 1999/5/EC and the following product Type of equipment: Digital Baby Monitor Model Name: MBP27T, MBP27T/2, MBP27T/3, MBP27T/4 Country of Origin: China Brand: Motorola complies...
... of Conformity We the manufacturer / Importer : Binatone Telecom Plc 1 Apsley Way London NW2 7HF, United Kingdom. Any Unauthorized modification of the product voids this Declaration. 0 1 2 0 Manufacturer / Importer (Signature of the Directive 1999/5/EC and the following product Type of equipment: Digital Baby Monitor Model Name: MBP27T, MBP27T/2, MBP27T/3, MBP27T/4 Country of Origin: China Brand: Motorola complies...


