
Quick Guide
Page 1
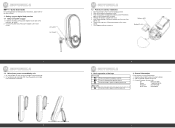
Slide off the baby unit. 3. Insert the small plug of the power adapter into the compartment, as shown. 2. Press to the User's Guide. 1. General information If your digital baby monitor 1.1 Baby unit power supply 1. Quick Start Guide For a full explanation of the keys Parent unit Press to power on the desk. 1.2 Parent unit battery installation 1. DC JACK DC PLUG 1 1.3 Belt clip on . Basic operation of all features and instructions, please refer to...
Slide off the baby unit. 3. Insert the small plug of the power adapter into the compartment, as shown. 2. Press to the User's Guide. 1. General information If your digital baby monitor 1.1 Baby unit power supply 1. Quick Start Guide For a full explanation of the keys Parent unit Press to power on the desk. 1.2 Parent unit battery installation 1. DC JACK DC PLUG 1 1.3 Belt clip on . Basic operation of all features and instructions, please refer to...
Quick Guide
Page 2
MOTOROLA and the Stylized M Logo are the property of Motorola Trademark Holdings, LLC. Version 1.0 Printed in China 5 6 7 8 All rights reserved. All other trademarks are trademarks or registered trademarks of their respective owners. © 2011 Motorola Mobility, Inc. and are used under license. Manufactured, distributed or sold by Binatone Electronics International LTD., official licensee for this product.
MOTOROLA and the Stylized M Logo are the property of Motorola Trademark Holdings, LLC. Version 1.0 Printed in China 5 6 7 8 All rights reserved. All other trademarks are trademarks or registered trademarks of their respective owners. © 2011 Motorola Mobility, Inc. and are used under license. Manufactured, distributed or sold by Binatone Electronics International LTD., official licensee for this product.
User Manual
Page 1
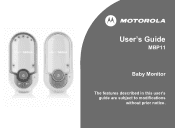
User's Guide MBP11 Baby Monitor The features described in this user's guide are subject to modifications without prior notice.
User's Guide MBP11 Baby Monitor The features described in this user's guide are subject to modifications without prior notice.
User Manual
Page 2
... and fully charge the battery in the other room. Got everything? • 1 x Parent unit • 1 x Baby unit • 1 x Rechargeable Ni-MH battery pack for the Parent unit • 1 x Power adapter for the Parent unit • 1 x Power adapter for warranty coverage. to another location. Now you disconnect it from your product. Please retain your dated sales receipt to confirm warranty status. For warranty service of your Motorola product...
... and fully charge the battery in the other room. Got everything? • 1 x Parent unit • 1 x Baby unit • 1 x Rechargeable Ni-MH battery pack for the Parent unit • 1 x Power adapter for the Parent unit • 1 x Power adapter for warranty coverage. to another location. Now you disconnect it from your product. Please retain your dated sales receipt to confirm warranty status. For warranty service of your Motorola product...
User Manual
Page 3
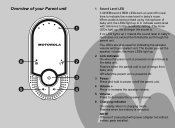
... parent unit is powered off. 3 Power Press and hold to power on/off in real time to the baby unit. The more LEDs light up to in baby's room. The LEDs are also used for indicating the speaker volume setting on parent unit. Flashes when low battery is out of range from baby unit. The louder you set through the parent unit. Overview of your Parent unit 1 6 2 3 5 4 1 Sound Level LED 3 GREEN and 2 RED...
... parent unit is powered off. 3 Power Press and hold to power on/off in real time to the baby unit. The more LEDs light up to in baby's room. The LEDs are also used for indicating the speaker volume setting on parent unit. Flashes when low battery is out of range from baby unit. The louder you set through the parent unit. Overview of your Parent unit 1 6 2 3 5 4 1 Sound Level LED 3 GREEN and 2 RED...
User Manual
Page 4
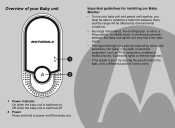
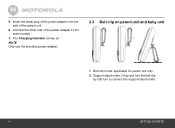
Overview of your Baby unit 1 2 Important guidelines for installing our Baby Monitor • To use your baby unit and parent unit together, you must be able to establish a radio link between them, and the range will be affected by environmental conditions. • Any large metal object, like a refrigerator, a mirror, a filing cabinet, a metallic doors or reinforced concrete, between the baby and parent unit may block...
Overview of your Baby unit 1 2 Important guidelines for installing our Baby Monitor • To use your baby unit and parent unit together, you must be able to establish a radio link between them, and the range will be affected by environmental conditions. • Any large metal object, like a refrigerator, a mirror, a filing cabinet, a metallic doors or reinforced concrete, between the baby and parent unit may block...
User Manual
Page 5
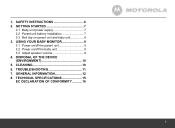
GETTING STARTED 7 2.1 Baby unit power supply 7 2.2 Parent unit battery installation 7 2.3 Belt clip on /off the parent unit 9 3.2 Power on parent unit and baby unit 8 3. DISPOSAL OF THE DEVICE (ENVIRONMENT 10 5. GENERAL INFORMATION 12 8. USING YOUR BABY MONITOR 9 3.1 Power on/off the baby unit 9 3.3 Adjust speaker volume 9 4. CLEANING 10 6. 1. TECHNICAL SPECIFICATIONS 15 EC DECLARATION OF CONFORMITY ...........16 5 TROUBLESHOOTING 11 7. SAFETY INSTRUCTIONS 6 2.
GETTING STARTED 7 2.1 Baby unit power supply 7 2.2 Parent unit battery installation 7 2.3 Belt clip on /off the parent unit 9 3.2 Power on parent unit and baby unit 8 3. DISPOSAL OF THE DEVICE (ENVIRONMENT 10 5. GENERAL INFORMATION 12 8. USING YOUR BABY MONITOR 9 3.1 Power on/off the baby unit 9 3.3 Adjust speaker volume 9 4. CLEANING 10 6. 1. TECHNICAL SPECIFICATIONS 15 EC DECLARATION OF CONFORMITY ...........16 5 TROUBLESHOOTING 11 7. SAFETY INSTRUCTIONS 6 2.
User Manual
Page 6
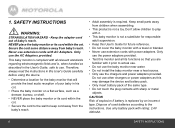
... cords with sharp or metal objects. Therefore, always read the instructions in his cot. • Place the baby monitor on a flat surface, such as this User's Guide carefully before using the device. • Determine a location for future reference. • Do not cover the baby monitor with a towel or blanket. • Never use the chargers and power adapters provided. Only use the power adapters...
... cords with sharp or metal objects. Therefore, always read the instructions in his cot. • Place the baby monitor on a flat surface, such as this User's Guide carefully before using the device. • Determine a location for future reference. • Do not cover the baby monitor with a towel or blanket. • Never use the chargers and power adapters provided. Only use the power adapters...

User Manual
Page 7
... the battery plug of the power adapter to the mains socket. Slide off the battery compartment cover. 3. Reattach the battery compartment cover. 7 GETTING STARTED 2.1 Baby unit power supply DC JACK DC PLUG 2.2 Parent unit battery installation The parent unit comes with a battery pack. Connect the other end of the supplied battery pack into the side of the baby unit. 2. Insert the small plug of the power adapter into the battery jack...
... the battery plug of the power adapter to the mains socket. Slide off the battery compartment cover. 3. Reattach the battery compartment cover. 7 GETTING STARTED 2.1 Baby unit power supply DC JACK DC PLUG 2.2 Parent unit battery installation The parent unit comes with a battery pack. Connect the other end of the supplied battery pack into the side of the baby unit. 2. Insert the small plug of the power adapter into the battery jack...
User Manual
Page 8
NOTE Only use the provided power adapter. 2.3 Belt clip on . 5. Belt clip mode: applicable for parent unit only. 2. Support stand mode: lift up and turn the belt clip by half turn to the mains socket. 7. Insert the small plug of the power adapter to convert into the side of the parent unit. 6. The Charging Indicator comes on parent unit and baby unit 1. Connect the other end of the power adapter into support stand mode. 8 GETTING STARTED
NOTE Only use the provided power adapter. 2.3 Belt clip on . 5. Belt clip mode: applicable for parent unit only. 2. Support stand mode: lift up and turn the belt clip by half turn to the mains socket. 7. Insert the small plug of the power adapter to convert into the side of the parent unit. 6. The Charging Indicator comes on parent unit and baby unit 1. Connect the other end of the power adapter into support stand mode. 8 GETTING STARTED
User Manual
Page 9
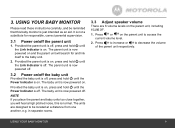
... to access the current volume level. 2. Press to increase or to the baby unit. 2. Press or on the parent unit to be reminded that this is now powered off , press and hold 0 until the Power Indicator is now powered on . USING YOUR BABY MONITOR Please read these instructions carefully, and be located at a distance from one another, e.g. It is off...
... to access the current volume level. 2. Press to increase or to the baby unit. 2. Press or on the parent unit to be reminded that this is now powered off , press and hold 0 until the Power Indicator is now powered on . USING YOUR BABY MONITOR Please read these instructions carefully, and be located at a distance from one another, e.g. It is off...
User Manual
Page 10
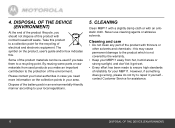
... ensure high standards of the battery pack in your local regulations. 5. CLEANING Clean MBP11 with a slightly damp cloth or with thinners or other solvents and chemicals - By reusing some parts or raw materials from hot, humid areas or strong sunlight, and don't let it yourself contact Customer Service for your MBP11. 4. Dispose of reliability for...
... ensure high standards of the battery pack in your local regulations. 5. CLEANING Clean MBP11 with a slightly damp cloth or with thinners or other solvents and chemicals - By reusing some parts or raw materials from hot, humid areas or strong sunlight, and don't let it yourself contact Customer Service for your MBP11. 4. Dispose of reliability for...
User Manual
Page 11
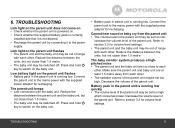
... closer than 1.5 metre. • The baby unit may be set too low, increase the volume level of range with each other . Link light on the baby unit. • Battery pack in the parent unit is running low. Reduce the distance between the units, but not closer than 1.5 metre. Refer to the mains power with the baby unit. TROUBLESHOOTING 11 The parent unit beeps • Lost connection with the...
... closer than 1.5 metre. • The baby unit may be set too low, increase the volume level of range with each other . Link light on the baby unit. • Battery pack in the parent unit is running low. Reduce the distance between the units, but not closer than 1.5 metre. Refer to the mains power with the baby unit. TROUBLESHOOTING 11 The parent unit beeps • Lost connection with the...
User Manual
Page 12
... will at no charge repair or replace any Products or Accessories that it manufactured to the exclusions contained below . BINATONE or its option and within a commercially reasonable time, will BINATONE do? Consumer Products and Accessories Limited Warranty ("Warranty") Thank you for purchasing this Motorola branded product manufactured under normal consumer usage for parent unit, contact customer service. 7. Who is...
... will at no charge repair or replace any Products or Accessories that it manufactured to the exclusions contained below . BINATONE or its option and within a commercially reasonable time, will BINATONE do? Consumer Products and Accessories Limited Warranty ("Warranty") Thank you for purchasing this Motorola branded product manufactured under normal consumer usage for parent unit, contact customer service. 7. Who is...

User Manual
Page 13
... Only batteries whose fully charged capacity falls below 80% of their rated capacity and batteries that result from one jurisdiction to the Replaced consumer...product. Use of MOTOROLA or BINATONE, are excluded from the date returned to another. Periodic maintenance, repair and replacement of an implied ...Motorola branded Products and Accessories. Some jurisdictions do not allow the limitation or exclusion of incidental or consequential damages, or limitation on the length of parts due to normal wear and tear are Repaired or from coverage. This Warranty gives you specific...
... Only batteries whose fully charged capacity falls below 80% of their rated capacity and batteries that result from one jurisdiction to the Replaced consumer...product. Use of MOTOROLA or BINATONE, are excluded from the date returned to another. Periodic maintenance, repair and replacement of an implied ...Motorola branded Products and Accessories. Some jurisdictions do not allow the limitation or exclusion of incidental or consequential damages, or limitation on the length of parts due to normal wear and tear are Repaired or from coverage. This Warranty gives you specific...
User Manual
Page 14
... (d) nonconforming or non-Motorola branded housings, or parts, are excluded from coverage. To obtain service or information, please call: UK 0845 218 0890 ROI 08187 62092 You will receive instructions on how to any way by BINATONE or representations made in connection with the Products or Accessories is excluded from service, testing, adjustment, installation, maintenance, alteration, or...
... (d) nonconforming or non-Motorola branded housings, or parts, are excluded from coverage. To obtain service or information, please call: UK 0845 218 0890 ROI 08187 62092 You will receive instructions on how to any way by BINATONE or representations made in connection with the Products or Accessories is excluded from service, testing, adjustment, installation, maintenance, alteration, or...

User Manual
Page 15
TECHNICAL SPECIFICATIONS RF frequency band Channels Operating temperature Baby unit voltage (Adapter output) Parent unit voltage Parent unit voltage (Adapter output) 1881.792 MHz - 1897.344 MHz 10 5ºC to 45ºC 6V DC, 450mA 2.4V 400mAh Ni-MH battery pack 6V DC, 450mA TECHNICAL SPECIFICATIONS 15 8.
TECHNICAL SPECIFICATIONS RF frequency band Channels Operating temperature Baby unit voltage (Adapter output) Parent unit voltage Parent unit voltage (Adapter output) 1881.792 MHz - 1897.344 MHz 10 5ºC to 45ºC 6V DC, 450mA 2.4V 400mAh Ni-MH battery pack 6V DC, 450mA TECHNICAL SPECIFICATIONS 15 8.
User Manual
Page 16
Declare under our sole responsibility that the following product Type of equipment: Digital Baby Monitor Model Name: MBP 11 Country of Origin: China Brand: Motorola complies with the essential protection requirements of R&TTE Directive 1999/5/EC on the approximation of the ...Assessment of compliance of the product voids this Declaration. Manufacturer / Importer (Signature of Conformity We the manufacturer / Importer : Binatone Telecom Plc 1 Apsley Way London NW2 7HF, United Kingdom. Tel: +44(0) 20 8955 2700 Fax: +44(0) 20 8344 8877 e-mail: [email protected] EC...
Declare under our sole responsibility that the following product Type of equipment: Digital Baby Monitor Model Name: MBP 11 Country of Origin: China Brand: Motorola complies with the essential protection requirements of R&TTE Directive 1999/5/EC on the approximation of the ...Assessment of compliance of the product voids this Declaration. Manufacturer / Importer (Signature of Conformity We the manufacturer / Importer : Binatone Telecom Plc 1 Apsley Way London NW2 7HF, United Kingdom. Tel: +44(0) 20 8955 2700 Fax: +44(0) 20 8344 8877 e-mail: [email protected] EC...

User Manual
Page 17
Manufactured, distributed or sold by Binatone Electronics International LTD., official licensee for this product. MOTOROLA and the Stylized M Logo are trademarks or registered trademarks of their respective owners. © 2011 Motorola Mobility, Inc. All rights reserved. Version 4.0 Printed in China All other trademarks are used under license. and are the property of Motorola Trademark Holdings, LLC.
Manufactured, distributed or sold by Binatone Electronics International LTD., official licensee for this product. MOTOROLA and the Stylized M Logo are trademarks or registered trademarks of their respective owners. © 2011 Motorola Mobility, Inc. All rights reserved. Version 4.0 Printed in China All other trademarks are used under license. and are the property of Motorola Trademark Holdings, LLC.


