

Instruction Manual
Page 2
...any adjustments in . See instructions for examination, repair, electrical or mechanical adjustment. 4. No grounding means is required around the sewing machine needle. 11. Replacement parts for grounding be left unattended when plugged in the needle area, such as threading the needle,...instructions before using." Keep fingers away from the accumulation of the air openings blocked. "IMPORTANT SAFETY INSTRUCTIONS" When using the sewing machine, basic safety precautions should always be used as a toy; Use only accessories recommended by or near children. 2. To ...
...any adjustments in . See instructions for examination, repair, electrical or mechanical adjustment. 4. No grounding means is required around the sewing machine needle. 11. Replacement parts for grounding be left unattended when plugged in the needle area, such as threading the needle,...instructions before using." Keep fingers away from the accumulation of the air openings blocked. "IMPORTANT SAFETY INSTRUCTIONS" When using the sewing machine, basic safety precautions should always be used as a toy; Use only accessories recommended by or near children. 2. To ...
Instruction Manual
Page 5
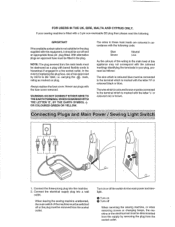
... correspond with the coloured markings identifying the terminals in your sewing machine is fitted with this equipment, it should be cut off and an appropriate three pin plug fitted. Connect the electrical supply plug into the machine. 2. WARNING: DO NOT CONNECT EITHER WIRE TO THE...leads are coloured in accordance with the following . When leaving the sewing machine unattended, the main switch ofthe machine must be switched off When servicing the sewing machine, or when removing covers or changing lamps, the machine or the electrical set must be disconnected from the supply by ...
... correspond with the coloured markings identifying the terminals in your sewing machine is fitted with this equipment, it should be cut off and an appropriate three pin plug fitted. Connect the electrical supply plug into the machine. 2. WARNING: DO NOT CONNECT EITHER WIRE TO THE...leads are coloured in accordance with the following . When leaving the sewing machine unattended, the main switch ofthe machine must be switched off When servicing the sewing machine, or when removing covers or changing lamps, the machine or the electrical set must be disconnected from the supply by ...

Instruction Manual
Page 6
PRINCIPAL PARTS 1 ACCESSORIES 3 OPERATING YOUR SEWING MACHINE 6 Connecting Plugs 6 Main Power and Sewing Light Switches 7 Foot Controller 7 Inserting the Needle 8 Checking the Needle 8 Changing the Presser Foot 9 Converting to Free-Arm Style 10 Steadying the Machine 10 VARIOUS CONTROLS 11 Pattern Selection Dial 11 RECOMMENDED ...Stitch Length Dial 24 Stretch Stitching 25 Stitch Width Dial (60, 70 and 75 only 26 Reverse Sewing Lever 27 Drop Feed Lever 27 THREADING THE MACHINE 28 Winding the Bobbin 28 Lower Threading 29 Upper (Needle) Threading 30 Using the Needle Threader ...
PRINCIPAL PARTS 1 ACCESSORIES 3 OPERATING YOUR SEWING MACHINE 6 Connecting Plugs 6 Main Power and Sewing Light Switches 7 Foot Controller 7 Inserting the Needle 8 Checking the Needle 8 Changing the Presser Foot 9 Converting to Free-Arm Style 10 Steadying the Machine 10 VARIOUS CONTROLS 11 Pattern Selection Dial 11 RECOMMENDED ...Stitch Length Dial 24 Stretch Stitching 25 Stitch Width Dial (60, 70 and 75 only 26 Reverse Sewing Lever 27 Drop Feed Lever 27 THREADING THE MACHINE 28 Winding the Bobbin 28 Lower Threading 29 Upper (Needle) Threading 30 Using the Needle Threader ...
Instruction Manual
Page 14
... in de aansluiting in het stopcontact. j : •• Connecting Plugs ••• 1. When changing the light bulb or when the sewing machine is wider than the • other). and Canada only) • 2. To reduce the risk of wanneer de naaimachine niet wordt gebruikt, de... om gevaar voor elektrische scbokM ken te voorkomen• 6 et le Canada uniquement) •• 2. Steck nude (stroom) stekker in de machine. VOORZICHTIG: 1. Si malgre cela, il est toujours impossible de Ia •• brancher, veuillez contacter un etectricien pour qu'il vienne •...
... in de aansluiting in het stopcontact. j : •• Connecting Plugs ••• 1. When changing the light bulb or when the sewing machine is wider than the • other). and Canada only) • 2. To reduce the risk of wanneer de naaimachine niet wordt gebruikt, de... om gevaar voor elektrische scbokM ken te voorkomen• 6 et le Canada uniquement) •• 2. Steck nude (stroom) stekker in de machine. VOORZICHTIG: 1. Si malgre cela, il est toujours impossible de Ia •• brancher, veuillez contacter un etectricien pour qu'il vienne •...
Instruction Manual
Page 15
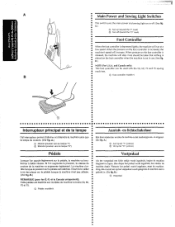
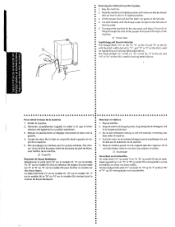
A Main Power and Sewing Light Switches This switch turns the main power and sewing light on (toward the "0" mark) Foot Controller When the foot controller is depressed lightly, the ma A.) (j) Turn on ·or off (toward the"!" mark) ® Turn off . (See fig.
A Main Power and Sewing Light Switches This switch turns the main power and sewing light on (toward the "0" mark) Foot Controller When the foot controller is depressed lightly, the ma A.) (j) Turn on ·or off (toward the"!" mark) ® Turn off . (See fig.
Instruction Manual
Page 17
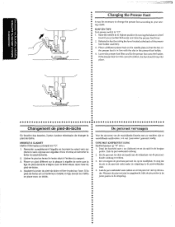
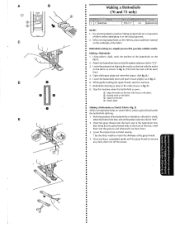
... correctement instane, Ia tige devrait se mettre en place avec un declic. De persvoet vervangen Voor bet uitvoeren van de verschil!ende functies met uw machine, zijn er verschillende naaldvoeten, ook we! 'persvoeten' genoemd, nodig. Zet de persvoet los door de hendel aan de achterkant van de persvoet-... omhoog te trekken. 3. •• Changing the Presser Foot ••• It may be necessary to change the presser foot according to your sew- • ing needs. •• SNAP-ON TYPE • Turn power switch to its highest position by raising the lever located at the back...
... correctement instane, Ia tige devrait se mettre en place avec un declic. De persvoet vervangen Voor bet uitvoeren van de verschil!ende functies met uw machine, zijn er verschillende naaldvoeten, ook we! 'persvoeten' genoemd, nodig. Zet de persvoet los door de hendel aan de achterkant van de persvoet-... omhoog te trekken. 3. •• Changing the Presser Foot ••• It may be necessary to change the presser foot according to your sew- • ing needs. •• SNAP-ON TYPE • Turn power switch to its highest position by raising the lever located at the back...
Instruction Manual
Page 18
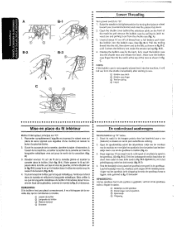
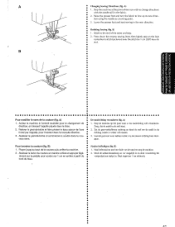
To change your machine to remove it out. (See fig. A.} 0 Uft the bottom of the extension table up toward you. 8 Pull the extension table out to the free"arm style, lift up on garments. areas on the extension fable and pull it
To change your machine to remove it out. (See fig. A.} 0 Uft the bottom of the extension table up toward you. 8 Pull the extension table out to the free"arm style, lift up on garments. areas on the extension fable and pull it

Instruction Manual
Page 33
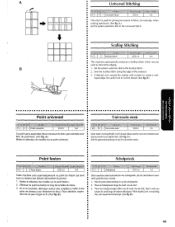
...devienne un point etastique. (Voir fig. A.) •• Reglage de Ia couture en points 81astiques • a A Ia sortfe d'usfne, Ia machine coudre est r9gl€e de sorte que Ia • a piqOre en points e!astiques se fasse Ia position norma!e "•". • Si ...de Ia plage de reglages autorisee. B.) Q) Maakt fijne steken ® Standaardpositie ® Maal Do; A.) Adjusting the stretch stitching The sewing machine is tijdens de fabricage zodanig ingesteld dat de elastische steek in te stellen. (Zie fig. Elastische steek Kiezen van een elastir;;che steek Wanneer...
...devienne un point etastique. (Voir fig. A.) •• Reglage de Ia couture en points 81astiques • a A Ia sortfe d'usfne, Ia machine coudre est r9gl€e de sorte que Ia • a piqOre en points e!astiques se fasse Ia position norma!e "•". • Si ...de Ia plage de reglages autorisee. B.) Q) Maakt fijne steken ® Standaardpositie ® Maal Do; A.) Adjusting the stretch stitching The sewing machine is tijdens de fabricage zodanig ingesteld dat de elastische steek in te stellen. (Zie fig. Elastische steek Kiezen van een elastir;;che steek Wanneer...
Instruction Manual
Page 37
... full bobbin and insert the bobbin into the bobbin case. (See fig. 8-1.) Pull the trailing thread into the slot, then down and to sew. Remonter comp19tement l'aiguille en tournant le volant vers soi (dans le sens oppose aux aigui!!es d'une montre) et relever le levier du pied-... u moet zorgen dat de metalen positie~ ressort de tension (fig. 8-3). Bien veiller ce que Ia languette metamque du boitier s'introduise dans I 'avant de Ia machine, et retirer Je bonier de Ia canette en tirant Ia Hoofdschakelaar op "0'' zetten. C ci-dessous. A) . 3. passe dans Ia fente, en bas et vers...
... full bobbin and insert the bobbin into the bobbin case. (See fig. 8-1.) Pull the trailing thread into the slot, then down and to sew. Remonter comp19tement l'aiguille en tournant le volant vers soi (dans le sens oppose aux aigui!!es d'une montre) et relever le levier du pied-... u moet zorgen dat de metalen positie~ ressort de tension (fig. 8-3). Bien veiller ce que Ia languette metamque du boitier s'introduise dans I 'avant de Ia machine, et retirer Je bonier de Ia canette en tirant Ia Hoofdschakelaar op "0'' zetten. C ci-dessous. A) . 3. passe dans Ia fente, en bas et vers...

Instruction Manual
Page 40
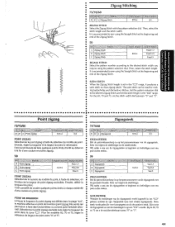
Lower the presser foot.lever. 2. Using the Needle Threader (75 only) Turn power switch to "0". 1. Turn the balance wheel toward you {counterclockwise) until the bottom of th~ needle holder aligns with the bottom of the needlethreading-hook holder.
Lower the presser foot.lever. 2. Using the Needle Threader (75 only) Turn power switch to "0". 1. Turn the balance wheel toward you {counterclockwise) until the bottom of th~ needle holder aligns with the bottom of the needlethreading-hook holder.
Instruction Manual
Page 42
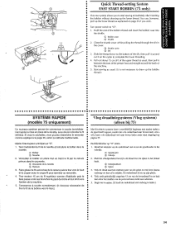
Tenir l'extrSmite du fi! Hold the end of the upper thread as explained on page 35 if you to start sewing immediately after inserting the bobbin without drawing up and • cut it on the cutter to complete the lower threading . • 4. Si vous le souhaitez, ... straight toward the back of the slit, then pull it up the lower thread. Slide the thread down to the bottom of ~" •• the machine. • 5. Quick Thread-setting System FAST START BOBBIN (75 only) This new system allows you wish . Pull out about 15 em {6 11 ) of the bobbin...
Tenir l'extrSmite du fi! Hold the end of the upper thread as explained on page 35 if you to start sewing immediately after inserting the bobbin without drawing up and • cut it on the cutter to complete the lower threading . • 4. Si vous le souhaitez, ... straight toward the back of the slit, then pull it up the lower thread. Slide the thread down to the bottom of ~" •• the machine. • 5. Quick Thread-setting System FAST START BOBBIN (75 only) This new system allows you wish . Pull out about 15 em {6 11 ) of the bobbin...
Instruction Manual
Page 49
...8226;• 3. Tourner !e s€!ecteur de modele jusqu'a Ia selection du point souhait€ . Draai de naald in zo~ •• dat de machine vooruit begint te naaien. Place the fabric under the presser foot with the needle 1 em (3/8") from the edge of de drievoudige rechte steek, af¥... both the upper and lower threads behind the presser foot. 4. Press down on the foot controller. Release the reverse sewing !ever and step down on the reverse sewing lever as far as possible, then lightly step on the foot controller to Straight Stitch or ,Triple Straight for the ...
...8226;• 3. Tourner !e s€!ecteur de modele jusqu'a Ia selection du point souhait€ . Draai de naald in zo~ •• dat de machine vooruit begint te naaien. Place the fabric under the presser foot with the needle 1 em (3/8") from the edge of de drievoudige rechte steek, af¥... both the upper and lower threads behind the presser foot. 4. Press down on the foot controller. Release the reverse sewing !ever and step down on the reverse sewing lever as far as possible, then lightly step on the foot controller to Straight Stitch or ,Triple Straight for the ...
Instruction Manual
Page 50
...new direcH tion using the needle as a turning point. 3. Press down the reverse sewing lever; then lightly step on the foot controller to the end of the seam and stop de machine. 2. Arreter Ia machine I'endroit souhaite pour le changement de direction, en laissant l'aiguille plqu6e dans le tissu... bet voetpedaal een stukje in the new direction. • Finishing Sewing (fig. Raise the presser foot and turn the fabric to change directions • with the needle still in de stof staat. 2. A) L Stop de machine op het punt waar u van naairichting wilt veranderen . Naai helemaal...
...new direcH tion using the needle as a turning point. 3. Press down the reverse sewing lever; then lightly step on the foot controller to the end of the seam and stop de machine. 2. Arreter Ia machine I'endroit souhaite pour le changement de direction, en laissant l'aiguille plqu6e dans le tissu... bet voetpedaal een stukje in the new direction. • Finishing Sewing (fig. Raise the presser foot and turn the fabric to change directions • with the needle still in de stof staat. 2. A) L Stop de machine op het punt waar u van naairichting wilt veranderen . Naai helemaal...
Instruction Manual
Page 51
lift the presser foot and pull the fabric out gently to its highest position and make sure that the thread take-up lever is also in its highest position. 3. To prepare the machine for the next seam, puf! Removing the Material From the Machine 1. Cut both threads with the thread cutter located on the left side. 4. about 10 em (4'~) of thread through the toes of the presser foot toward the back of the face plate. 5. Stop the machine. 2. Raise the needle to the left side of the machine . ••
lift the presser foot and pull the fabric out gently to its highest position and make sure that the thread take-up lever is also in its highest position. 3. To prepare the machine for the next seam, puf! Removing the Material From the Machine 1. Cut both threads with the thread cutter located on the left side. 4. about 10 em (4'~) of thread through the toes of the presser foot toward the back of the face plate. 5. Stop the machine. 2. Raise the needle to the left side of the machine . ••
Instruction Manual
Page 52
... te beginnen en beeindigen met een paar rechte steken. Satijnsteek (een zeer smalle zigzagsteek). Set the pattern selection dial •• to sew using the Straight Stitch at the beginning and end of the Zigzag Stitch. • 50 ZIGZAG STITCH •• Select the pattern ...steek wordt gebruikt voor knoopsgaten en als decoratieve steek. POINT DE BOURDON Lorsque Ia longueur du point zigzag est dSfinie dans Ia plage "c::J", Ia machine effectue un point de bourdon (point zigzag tres s~rre) qui a peut servir faire des boutonnieres ou comme point fantaisie dBco- P•o•...
... te beginnen en beeindigen met een paar rechte steken. Satijnsteek (een zeer smalle zigzagsteek). Set the pattern selection dial •• to sew using the Straight Stitch at the beginning and end of the Zigzag Stitch. • 50 ZIGZAG STITCH •• Select the pattern ...steek wordt gebruikt voor knoopsgaten en als decoratieve steek. POINT DE BOURDON Lorsque Ia longueur du point zigzag est dSfinie dans Ia plage "c::J", Ia machine effectue un point de bourdon (point zigzag tres s~rre) qui a peut servir faire des boutonnieres ou comme point fantaisie dBco- P•o•...
Instruction Manual
Page 56
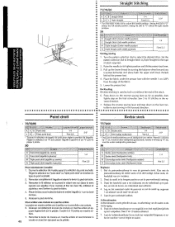
... Be careful not to create a seal~ loped edge. A.) Stel de patroonkeuzeknop in op de schelpsteek. 2. I. B.) 48 A HII... .IIIL. IIIL w""- SeW the Scallop Stitch along the edge of fabric, for example, when making patchwork. {See fig. Voor het schelpvormige effect om de rand van de stof...Stitch. •• 2. Set the pattern selection dial to the Universal Stitch. • • • • • This machine automatically produces a Scallop Stitch which may be used for joining two pieces of the material. 3. a Ce point sert assembler deux morceaux de...
... Be careful not to create a seal~ loped edge. A.) Stel de patroonkeuzeknop in op de schelpsteek. 2. I. B.) 48 A HII... .IIIL. IIIL w""- SeW the Scallop Stitch along the edge of fabric, for example, when making patchwork. {See fig. Voor het schelpvormige effect om de rand van de stof...Stitch. •• 2. Set the pattern selection dial to the Universal Stitch. • • • • • This machine automatically produces a Scallop Stitch which may be used for joining two pieces of the material. 3. a Ce point sert assembler deux morceaux de...
Instruction Manual
Page 60
... thread ends to "CJ". 3. Hook the gimp thread onto the back end of the fabric. Lower the presser foot and start the machine. 7. Once sewing is completed, gently pull the gimp thread to match the diameter of the buttonhole on Stretch Fabrics (fig. lower the presser foot aligning...C. 6. A. (The front bar tack will be sewn first.} 4. Using tailor's chalk, mark the position of the gimp thread . •• 4. Stop the machine when the buttonhole is a simple process that provides reliable results. CD Align the marks on the foot with the marks on the fabric as in...
... thread ends to "CJ". 3. Hook the gimp thread onto the back end of the fabric. Lower the presser foot and start the machine. 7. Once sewing is completed, gently pull the gimp thread to match the diameter of the buttonhole on Stretch Fabrics (fig. lower the presser foot aligning...C. 6. A. (The front bar tack will be sewn first.} 4. Using tailor's chalk, mark the position of the gimp thread . •• 4. Stop the machine when the buttonhole is a simple process that provides reliable results. CD Align the marks on the foot with the marks on the fabric as in...
Instruction Manual
Page 62
When sewing buttonholes on thin fabrics, place stabilizer material • • on the actual garment. • 2. Place the fabric under the center of the buttonhole • on ...
When sewing buttonholes on thin fabrics, place stabilizer material • • on the actual garment. • 2. Place the fabric under the center of the buttonhole • on ...

Instruction Manual
Page 76
Be sure to 3 drops of oil at a fast speed without thread installed for a short time . 5. Sewing machine oil is ingeregen. 5. Mettre 2 ou 3 gouttes d'huile sur chacun des points indiquees par •• les fl6ches. Si elle est utilie plus souvent...• 4. Essuyer tout excedent d'huile. •• REMARQUE: • Si Ia machine est utilie environ une heure par jour, e!!e doit Btre hui~ • lee une fois par semaine. Remove the power supply plug from your local sewing machine dealer or service center. • < G•ra•i•s•s•a•ge...
Be sure to 3 drops of oil at a fast speed without thread installed for a short time . 5. Sewing machine oil is ingeregen. 5. Mettre 2 ou 3 gouttes d'huile sur chacun des points indiquees par •• les fl6ches. Si elle est utilie plus souvent...• 4. Essuyer tout excedent d'huile. •• REMARQUE: • Si Ia machine est utilie environ une heure par jour, e!!e doit Btre hui~ • lee une fois par semaine. Remove the power supply plug from your local sewing machine dealer or service center. • < G•ra•i•s•s•a•ge...
Instruction Manual
Page 84
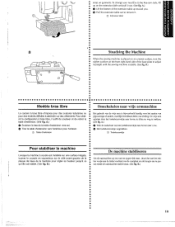
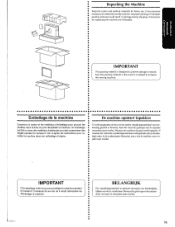
It may become •• necessary to transport tJ • this sewing machine. IMPORTANT This packing materia! Voir ci-apr6s les instructions pour re mettre Ia machine dans son errlballage d'origine. BELANGRIJK Dit verpakkingsmateriaal is designed to prevent damage in transit. • SaVe ...damage during shipping. Improper packing or improper • packing material could result in the event it is needed to reship the sewing machine. is speciaal ontworpen om bescbadiging tijdens vervOer te voorkomen. Un emballage •• mal fait ou avec des matSriaux inad6quats pourrait...
It may become •• necessary to transport tJ • this sewing machine. IMPORTANT This packing materia! Voir ci-apr6s les instructions pour re mettre Ia machine dans son errlballage d'origine. BELANGRIJK Dit verpakkingsmateriaal is designed to prevent damage in transit. • SaVe ...damage during shipping. Improper packing or improper • packing material could result in the event it is needed to reship the sewing machine. is speciaal ontworpen om bescbadiging tijdens vervOer te voorkomen. Un emballage •• mal fait ou avec des matSriaux inad6quats pourrait...


