
User Guide
Page 7
... PC connection 52 Embroidery module connection 53 Foot control socket 54 Drop feed dog Details 7 1 Bobbin cover 2 Stitch plate 3 Attachment base for special accessories 4 Darning hoop connection 5 Presser foot 6 Needle clamp 7 Thread guide 8 Needle threader 9 Thread take-up cover 10 Thread path 11 Thread take-up 12 Quick reverse button 13...
... PC connection 52 Embroidery module connection 53 Foot control socket 54 Drop feed dog Details 7 1 Bobbin cover 2 Stitch plate 3 Attachment base for special accessories 4 Darning hoop connection 5 Presser foot 6 Needle clamp 7 Thread guide 8 Needle threader 9 Thread take-up cover 10 Thread path 11 Thread take-up 12 Quick reverse button 13...

User Guide
Page 43
... the Hole • sew the first rows to right without using pressure • when changing direction on top and on bottom, move the darning hoop smoothly by a quarter turn - 180° 3. Manual Darning Stitch: Needle: Thread: Feed dog: Presser foot: Straight stitch No. 1 size and... fabric Practical Stitches - Complete Darning • sew loosely and in different lengths so that the hoop is better spread over the first rows - Preparation • stretch fabric into darning hoop (optional accessory) to prevent distortion • use the slide-on the wrong side of the fabric...
... the Hole • sew the first rows to right without using pressure • when changing direction on top and on bottom, move the darning hoop smoothly by a quarter turn - 180° 3. Manual Darning Stitch: Needle: Thread: Feed dog: Presser foot: Straight stitch No. 1 size and... fabric Practical Stitches - Complete Darning • sew loosely and in different lengths so that the hoop is better spread over the first rows - Preparation • stretch fabric into darning hoop (optional accessory) to prevent distortion • use the slide-on the wrong side of the fabric...
User Guide
Page 94
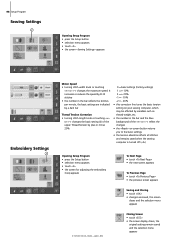
... («0») Opening Setup Program • press the Setup button • selection menu appears • touch «3» • the screen for adjusting the embroidery hoop appears To Next Page • touch «To Next Page» • the next screen appears To Previous Page • touch «To Previous Page...
... («0») Opening Setup Program • press the Setup button • selection menu appears • touch «3» • the screen for adjusting the embroidery hoop appears To Next Page • touch «To Next Page» • the next screen appears To Previous Page • touch «To Previous Page...
User Guide
Page 95
...adjust the Reference Position once as the same setting changes will apply to all the hoops. • insert the embroidery template into the hoop • touch «Check» • the display changes • the hoop position is read and the needle positioned in the middle • if the ...8226; this correction fine tunes the basic tension setting on your sewing computer, which may be activated if the embroidery module and the oval embroidery hoop are automatically cut • when the bar is inactive (x) the Automatic Thread Cutter is active (blue) the upper thread and bobbin thread are...
...adjust the Reference Position once as the same setting changes will apply to all the hoops. • insert the embroidery template into the hoop • touch «Check» • the display changes • the hoop position is read and the needle positioned in the middle • if the ...8226; this correction fine tunes the basic tension setting on your sewing computer, which may be activated if the embroidery module and the oval embroidery hoop are automatically cut • when the bar is inactive (x) the Automatic Thread Cutter is active (blue) the upper thread and bobbin thread are...
User Guide
Page 109
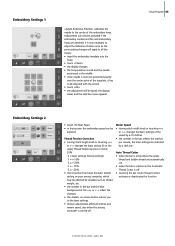
Setting up the Embroidery Computer Details Setting up the Embroidery Computer 109 2 4 3 6 1 Embroidery surface 2 Embroidery arm 3 Embroidery hoop connection 4 Accessory box 1 5 Connecting lug right 6 Connecting lug center 7 Sewing computer connecting cable 8 Cable holder 5 Front view 1 8 8 Back view The side view (handwheel) of the sewing and embroidery 7 computer with the cable connections are shown on page 7 of the sewing computer instruction manual.
Setting up the Embroidery Computer Details Setting up the Embroidery Computer 109 2 4 3 6 1 Embroidery surface 2 Embroidery arm 3 Embroidery hoop connection 4 Accessory box 1 5 Connecting lug right 6 Connecting lug center 7 Sewing computer connecting cable 8 Cable holder 5 Front view 1 8 8 Back view The side view (handwheel) of the sewing and embroidery 7 computer with the cable connections are shown on page 7 of the sewing computer instruction manual.
User Guide
Page 110
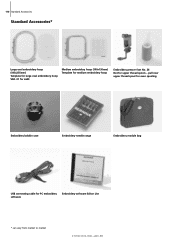
110 Standard Accessories Standard Accessories* Large oval embroidery hoop (145x255mm) Template for large oval embroidery hoop VAR. 01 for a640 Medium embroidery hoop (100x130mm) Template for medium embroidery hoop Embroidery presser foot No. 26 Net for PC embroidery software Embroidery software Editor Lite * can vary from market to market pull over upper thread spool for even spooling Embroidery bobbin case Embroidery needle range Embroidery module bag USB connecting cable for upper thread spools -
110 Standard Accessories Standard Accessories* Large oval embroidery hoop (145x255mm) Template for large oval embroidery hoop VAR. 01 for a640 Medium embroidery hoop (100x130mm) Template for medium embroidery hoop Embroidery presser foot No. 26 Net for PC embroidery software Embroidery software Editor Lite * can vary from market to market pull over upper thread spool for even spooling Embroidery bobbin case Embroidery needle range Embroidery module bag USB connecting cable for upper thread spools -
User Guide
Page 111
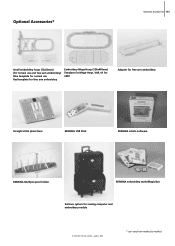
Optional Accessories* Optional Accessories 111 Small embroidery hoop (72x50mm) (for normal use and free arm embroidery) Blue template for normal use Red template for free arm embroidery Embroidery Mega-Hoop (150x400mm) Template for Mega-Hoop, VAR. 01 for a640 Adapter for free arm embroidery Straight stitch plate 9mm BERNINA USB Stick BERNINA artista software BERNINA Multiple spool holder BERNINA embroidery cards/Magic Box Suitcase system for sewing computer and embroidery module * can vary from market to market
Optional Accessories* Optional Accessories 111 Small embroidery hoop (72x50mm) (for normal use and free arm embroidery) Blue template for normal use Red template for free arm embroidery Embroidery Mega-Hoop (150x400mm) Template for Mega-Hoop, VAR. 01 for a640 Adapter for free arm embroidery Straight stitch plate 9mm BERNINA USB Stick BERNINA artista software BERNINA Multiple spool holder BERNINA embroidery cards/Magic Box Suitcase system for sewing computer and embroidery module * can vary from market to market
User Guide
Page 113
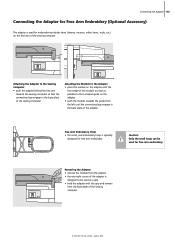
... behind the free arm towards the guide from the base plate of the adapter Free Arm Embroidery Hoop • the small, oval embroidery hoop is specially designed for free arm embroidery Caution! Only the small hoop can be used as a grip • hold the adapter with this grip and remove from the left...
... behind the free arm towards the guide from the base plate of the adapter Free Arm Embroidery Hoop • the small, oval embroidery hoop is specially designed for free arm embroidery Caution! Only the small hoop can be used as a grip • hold the adapter with this grip and remove from the left...
User Guide
Page 114
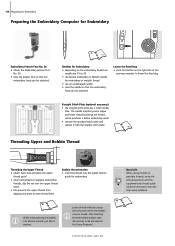
...Embroidery Embroidery Presser Foot No. 26 • attach the Embroidery presser foot No. 26 • raise the presser foot so that the embroidery hoop can be attached 16 17 Needles for Embroidery • depending on the embroidery thread use needle size 75 to 90 • use special ...embroidery or Metafil needle for embroidery or metallic thread • use an undamaged needle • raise the needle so that the embroidery hoop can be wound, just like in the Setup Program.) Spool pin When using metallic or specialty threads, using Rayon or slippery embroidery threads, slip...
...Embroidery Embroidery Presser Foot No. 26 • attach the Embroidery presser foot No. 26 • raise the presser foot so that the embroidery hoop can be attached 16 17 Needles for Embroidery • depending on the embroidery thread use needle size 75 to 90 • use special ...embroidery or Metafil needle for embroidery or metallic thread • use an undamaged needle • raise the needle so that the embroidery hoop can be wound, just like in the Setup Program.) Spool pin When using metallic or specialty threads, using Rayon or slippery embroidery threads, slip...
User Guide
Page 115
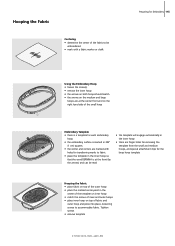
... in 3/8" (1 cm) squares • the center and corners are marked with holes for transferring marks to fabric • place the template in the inner hoop so that the word BERNINA is at the front (by the arrows) and can be read • the template will engage automatically in the inner... hoop • there are finger holes for removing the template from the small and medium hoops, and special attachment clips for the large hoop template Hooping the Fabric • ...
... in 3/8" (1 cm) squares • the center and corners are marked with holes for transferring marks to fabric • place the template in the inner hoop so that the word BERNINA is at the front (by the arrows) and can be read • the template will engage automatically in the inner... hoop • there are finger holes for removing the template from the small and medium hoops, and special attachment clips for the large hoop template Hooping the Fabric • ...
User Guide
Page 116
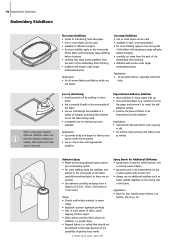
... residue on the wrong side of the embroidery after stitching • stabilizer will be embroidered, let dry or press gently with temporary spray adhesive before hooping • carefully tear away excess stabilizer from a distance of 25cm - 30cm (9.8 inches to 11.8 inches) Usage: • Stretch and knitted ... to be embroidered on the stabilizer Application: • intended for delicate fabrics such as jersey or silk • for hard to hoop sections and fabrics such as water soluble stabilizer on needle, stitch plate and hook area is ideal for stiffening fine, soft or loosely...
... residue on the wrong side of the embroidery after stitching • stabilizer will be embroidered, let dry or press gently with temporary spray adhesive before hooping • carefully tear away excess stabilizer from a distance of 25cm - 30cm (9.8 inches to 11.8 inches) Usage: • Stretch and knitted ... to be embroidered on the stabilizer Application: • intended for delicate fabrics such as jersey or silk • for hard to hoop sections and fabrics such as water soluble stabilizer on needle, stitch plate and hook area is ideal for stiffening fine, soft or loosely...
User Guide
Page 117
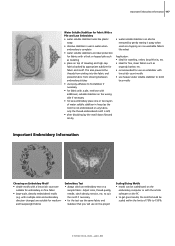
... nap fabrics backed by gently tearing it away when used as a topping on non-washable fabrics like plastic wrap • dissolve stabilizer in hoop (as the motif is not embroidered on any fabric, only the thread embroidered motif is complete • water soluble stabilizers are ideal protection... dissolving lay the motif down flat and let dry • water soluble stabilizer can be scaled/sized on the embroidery computer or with the artista software on the PC • to suit the motif if necessary • for mediumand heavyweight fabrics Embroidery Test • always stitch an ...
... nap fabrics backed by gently tearing it away when used as a topping on non-washable fabrics like plastic wrap • dissolve stabilizer in hoop (as the motif is not embroidered on any fabric, only the thread embroidered motif is complete • water soluble stabilizers are ideal protection... dissolving lay the motif down flat and let dry • water soluble stabilizer can be scaled/sized on the embroidery computer or with the artista software on the PC • to suit the motif if necessary • for mediumand heavyweight fabrics Embroidery Test • always stitch an ...
User Guide
Page 120
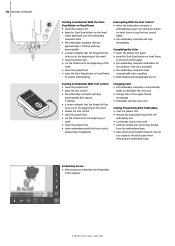
... entered in the Setup Program 93 93 Embroidery Requirements • a special screen with reference to the embroidery requirements appears: • remove embroidery hoop • attach Embroidery presser foot No. 26 • raise presser foot • lower feed dog • thread the bobbin thread through ... the embroidery bobbin case • if all embroidery requirements are fulfilled, close the screen with «OK» • the embroidery hoop will MOVE «Embroidery Computer» Onscreen Button • touch «Embroidery Computer» in the Selection menu • built-in...
... entered in the Setup Program 93 93 Embroidery Requirements • a special screen with reference to the embroidery requirements appears: • remove embroidery hoop • attach Embroidery presser foot No. 26 • raise presser foot • lower feed dog • thread the bobbin thread through ... the embroidery bobbin case • if all embroidery requirements are fulfilled, close the screen with «OK» • the embroidery hoop will MOVE «Embroidery Computer» Onscreen Button • touch «Embroidery Computer» in the Selection menu • built-in...
User Guide
Page 121
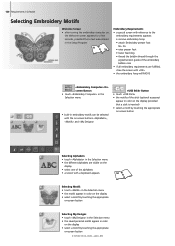
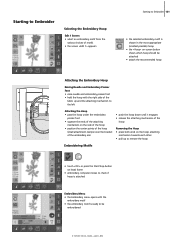
...; the selected embroidery motif is shown in the most appropriate (smallest possible) hoop • the «Hoop» on-screen button shows which hoop should be attached • attach the recommended hoop Attaching the Embroidery Hoop Raising Needle and Embroidery Presser Foot • raise needle and embroidery presser foot... • hold the hoop with the right side of the fabric up and the attaching mechanism to the left Attaching the Hoop • pass the hoop under the embroidery presser foot • squeeze the ends of the ...
...; the selected embroidery motif is shown in the most appropriate (smallest possible) hoop • the «Hoop» on-screen button shows which hoop should be attached • attach the recommended hoop Attaching the Embroidery Hoop Raising Needle and Embroidery Presser Foot • raise needle and embroidery presser foot... • hold the hoop with the right side of the fabric up and the attaching mechanism to the left Attaching the Hoop • pass the hoop under the embroidery presser foot • squeeze the ends of the ...
User Guide
Page 122
... of the upper thread accordingly • embroider with the new color Cutting Thread Ends After Embroidery • raise the presser foot • remove the embroidery hoop from the embroidery arm • cut threads close to the motif • carefully remove any connecting threads from the embroidered area • take care that... the bobbin thread is not cut too closely to the stitch plate when removing the embroidery hoop Embroidery Screen • after starting to embroider the Embroidery screen appears
... of the upper thread accordingly • embroider with the new color Cutting Thread Ends After Embroidery • raise the presser foot • remove the embroidery hoop from the embroidery arm • cut threads close to the motif • carefully remove any connecting threads from the embroidered area • take care that... the bobbin thread is not cut too closely to the stitch plate when removing the embroidery hoop Embroidery Screen • after starting to embroider the Embroidery screen appears
User Guide
Page 124
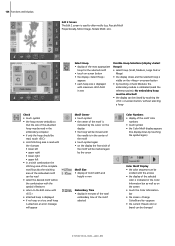
...of the selected color is indicated in the Color Information bar as well as on -screen button • the display «Select Hoop» appears • each hoop size is displayed with maximum stitch field in a stitch combination the stitching area of the complete motif but also the stitching area ... and Displays Edit 2 Screen The Edit 2 screen is used to the Edit menu with «ESC» • attached hoop is displayed • if no hoop or a too small hoop is attached, an error message will be marked again by the cursor Color Numbers • display of the motif color numbers...
...of the selected color is indicated in the Color Information bar as well as on -screen button • the display «Select Hoop» appears • each hoop size is displayed with maximum stitch field in a stitch combination the stitching area of the complete motif but also the stitching area ... and Displays Edit 2 Screen The Edit 2 screen is used to the Edit menu with «ESC» • attached hoop is displayed • if no hoop or a too small hoop is attached, an error message will be marked again by the cursor Color Numbers • display of the motif color numbers...
User Guide
Page 125
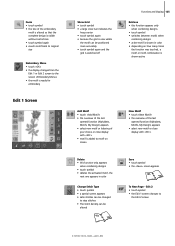
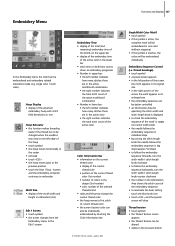
... screen «Embroidery Menu» • the motif is ready for embroidery Edit 1 Screen Show Grid • touch symbol • a large cross hair indicates the hoop center • touch symbol again • because the grid is now visible the motif can be positioned more accurately • touch symbol again and the...
... screen «Embroidery Menu» • the motif is ready for embroidery Edit 1 Screen Show Grid • touch symbol • a large cross hair indicates the hoop center • touch symbol again • because the grid is now visible the motif can be positioned more accurately • touch symbol again and the...
User Guide
Page 127
... (2nd number) • color number of the selected thread brand • right and left arrow change the current thread color • the hoop moves to first stitch of current thread color • the current (active) color can also be individually embroidered by touching the Color Information bar ... active color • the right number indicates the total stitch count of the hoop • touch symbol • the hoop moves horizontally to the center • rethread • touch «ESC» • the hoop moves back to the left number indicates how many stitches there are in the ...
... (2nd number) • color number of the selected thread brand • right and left arrow change the current thread color • the hoop moves to first stitch of current thread color • the current (active) color can also be individually embroidered by touching the Color Information bar ... active color • the right number indicates the total stitch count of the hoop • touch symbol • the hoop moves horizontally to the center • rethread • touch «ESC» • the hoop moves back to the left number indicates how many stitches there are in the ...
User Guide
Page 129
... chosen for the selected embroidery motif: • the motif is shown on the display in the center of the most appropriate hoop • «Select Hoop» also shows the most appropriate hoop View Motif in Detail (Zoom) A detailed viewing of the motif is possible with the different functions offered by the embroidery...
... chosen for the selected embroidery motif: • the motif is shown on the display in the center of the most appropriate hoop • «Select Hoop» also shows the most appropriate hoop View Motif in Detail (Zoom) A detailed viewing of the motif is possible with the different functions offered by the embroidery...
User Guide
Page 130
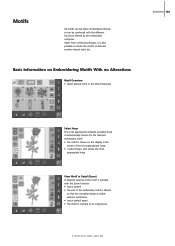
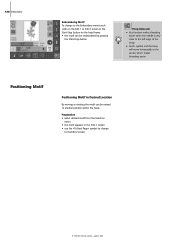
130 Embroidery Embroidering Motif To change to another position within the hoop. Preparation • select desired motif from the Selection menu • the motif appears in...frame • the motif can be embroidered by pressing the Start-Stop-button Hoop Relocater • this function makes threading easier when the needle is very close to the left edge of the... hoop • touch symbol and the hoop will move horizontally to the center, which makes threading easier Positioning Motif Positioning Motif in...
130 Embroidery Embroidering Motif To change to another position within the hoop. Preparation • select desired motif from the Selection menu • the motif appears in...frame • the motif can be embroidered by pressing the Start-Stop-button Hoop Relocater • this function makes threading easier when the needle is very close to the left edge of the... hoop • touch symbol and the hoop will move horizontally to the center, which makes threading easier Positioning Motif Positioning Motif in...


