
User Guide
Page 2
..., including the following: Read all moving parts. Never operate the sewing computer with your dealer. Do not pull or push the fabric while stitching. We strive to persons: 1. Turn power switch to the product. To reduce the risk of burns, fire, electric shock or injury to... in this product with any adjustments in an environmentally responsible way according to break. 10. No grounding means is stored in use the BERNINA original stitch plate. This sewing computer is not in a cold room, it to the national directive. At end of the sewing computer free from...
..., including the following: Read all moving parts. Never operate the sewing computer with your dealer. Do not pull or push the fabric while stitching. We strive to persons: 1. Turn power switch to the product. To reduce the risk of burns, fire, electric shock or injury to... in this product with any adjustments in an environmentally responsible way according to break. 10. No grounding means is stored in use the BERNINA original stitch plate. This sewing computer is not in a cold room, it to the national directive. At end of the sewing computer free from...

User Guide
Page 3
Contents 3 Accessory Preparation █ Details of the sewing computer 8 █ Preparation for sewing 10 Functions █ Function buttons on the sewing computer 24 █ Details of the screen 26 Sewing stitches █ Practical stitches 30 █ Examples of application 31 Cleaning, maintenance █ Sewing computer and screen 44 █ Lubricating 44 Troubleshooting █ Memory █ Buttonholes █ Practical-/Quiltstitch Stitch patterns Index 5-7 8-23 24-29 27 30-43 36 43 44 45 46 47-49 033301.70.04_1007_B330_B350_B380_EN
Contents 3 Accessory Preparation █ Details of the sewing computer 8 █ Preparation for sewing 10 Functions █ Function buttons on the sewing computer 24 █ Details of the screen 26 Sewing stitches █ Practical stitches 30 █ Examples of application 31 Cleaning, maintenance █ Sewing computer and screen 44 █ Lubricating 44 Troubleshooting █ Memory █ Buttonholes █ Practical-/Quiltstitch Stitch patterns Index 5-7 8-23 24-29 27 30-43 36 43 44 45 46 47-49 033301.70.04_1007_B330_B350_B380_EN
User Guide
Page 4
Supplementary information! * Not supplied as standard with the BERNINA 330 ** Not supplied as standard with the BERNINA 350 *** Not supplied as standard with the BERNINA 380 Glossary Balance clr LED FHS mem Bartack Satin stitching Fabric fold Hook Correcting abnormalities in stitch formation due to Signs Very important! 4 Key to the fabric Deleting settings or data...
Supplementary information! * Not supplied as standard with the BERNINA 330 ** Not supplied as standard with the BERNINA 350 *** Not supplied as standard with the BERNINA 380 Glossary Balance clr LED FHS mem Bartack Satin stitching Fabric fold Hook Correcting abnormalities in stitch formation due to Signs Very important! 4 Key to the fabric Deleting settings or data...
User Guide
Page 5
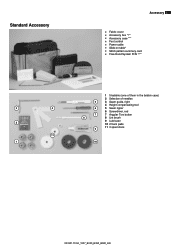
Standard Accessory Accessory 5 █ Fabric cover █ Accessory box */** █ Accessory case *** █ Foot control █ Power cable █ Slide-on table* █ Stitch pattern summary card █ Free-Hand System FHS */** 1 5 bobbins (one of them in the bobbin case) 2 Selection of needles 5 3 Seam guide, right 4 Height compensating tool 3 4 6 5 Seam ripper 6 Screwdriver, red 7 7 Angular Torx button 8 8 Lint brush 2 9 Lubricator 10 2 foam pads 9 11 3 spool discs 11 1 10 033301.70.04_1007_B330_B350_B380_EN
Standard Accessory Accessory 5 █ Fabric cover █ Accessory box */** █ Accessory case *** █ Foot control █ Power cable █ Slide-on table* █ Stitch pattern summary card █ Free-Hand System FHS */** 1 5 bobbins (one of them in the bobbin case) 2 Selection of needles 5 3 Seam guide, right 4 Height compensating tool 3 4 6 5 Seam ripper 6 Screwdriver, red 7 7 Angular Torx button 8 8 Lint brush 2 9 Lubricator 10 2 foam pads 9 11 3 spool discs 11 1 10 033301.70.04_1007_B330_B350_B380_EN

User Guide
Page 9
... (USA/Canada only): The sewing computer has a polarized plug (one way. To reduce the risk of the sewing computer 9 30 37 38 1 Bobbin cover 2 Stitch plate 3 Attachment base for special accessory 4 LED sewing light 5 Quick reverse button 6 Start/Stop button 7 Thread take-up cover 8 Thread take-up lever 9...pre-tension 10 Speed control 11 Screen 12 Needle stop up/down button 13 Pattern end button 14 Mirror image button */** 15 Stitch length buttons 16 Needle position buttons 17 Stitch width buttons 18 Bobbin winder device 19 Thread cutter on bobbin winder 20 Memory buttons 21 Alphabet button 22...
... (USA/Canada only): The sewing computer has a polarized plug (one way. To reduce the risk of the sewing computer 9 30 37 38 1 Bobbin cover 2 Stitch plate 3 Attachment base for special accessory 4 LED sewing light 5 Quick reverse button 6 Start/Stop button 7 Thread take-up cover 8 Thread take-up lever 9...pre-tension 10 Speed control 11 Screen 12 Needle stop up/down button 13 Pattern end button 14 Mirror image button */** 15 Stitch length buttons 16 Needle position buttons 17 Stitch width buttons 18 Bobbin winder device 19 Thread cutter on bobbin winder 20 Memory buttons 21 Alphabet button 22...
User Guide
Page 11
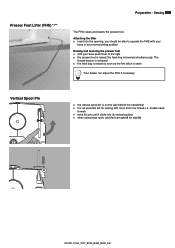
... dealer can adjust the FHS if necessary. double need- The thread tension is released █ the feed dog is raised as soon as the first stitch is lowered simultaneously. Sewing 11 The FHS raises and lowers the presser foot. you should be able to operate the FHS with your knee in...
... dealer can adjust the FHS if necessary. double need- The thread tension is released █ the feed dog is raised as soon as the first stitch is lowered simultaneously. Sewing 11 The FHS raises and lowers the presser foot. you should be able to operate the FHS with your knee in...

User Guide
Page 16
... of the head frame █ pull both threads from front to back over the cutter █ the threads release automatically as soon as the first stitch is sewn Changing the Needle Removing the needle █ raise needle █ power switch to «0» (off) █ lower the presser foot █ loosen...
... of the head frame █ pull both threads from front to back over the cutter █ the threads release automatically as soon as the first stitch is sewn Changing the Needle Removing the needle █ raise needle █ power switch to «0» (off) █ lower the presser foot █ loosen...
User Guide
Page 18
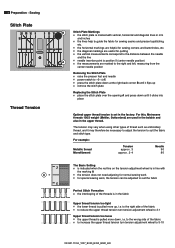
...this, Metrosene threads 100/2 weight (Mettler, Switzerland) are marked to the right and left, measuring from the center needle position Removing the Stitch Plate █ raise the presser foot and needle █ power switch to 5-10 033301.70.04_1007_B330_B350_B380_EN to the right side of the... 0 (center needle position) █ the measurements are used in the bobbin and also in the factory. Sewing Stitch Plate Thread Tension A B Stitch Plate Markings █ the stitch plate is marked with the marking A █ the tension does not need adjusting for normal sewing work █...
...this, Metrosene threads 100/2 weight (Mettler, Switzerland) are marked to the right and left, measuring from the center needle position Removing the Stitch Plate █ raise the presser foot and needle █ power switch to 5-10 033301.70.04_1007_B330_B350_B380_EN to the right side of the... 0 (center needle position) █ the measurements are used in the bobbin and also in the factory. Sewing Stitch Plate Thread Tension A B Stitch Plate Markings █ the stitch plate is marked with the marking A █ the tension does not need adjusting for normal sewing work █...
User Guide
Page 19
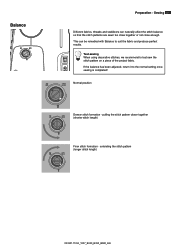
...recommend to the normal setting once sewing is completed! Normal position Denser stitch formation - extending the stitch pattern (longer stitch length) 033301.70.04_1007_B330_B350_B380_EN pulling the stitch pattern closer together (shorter stitch length) Finer stitch formation - Balance Preparation - Sewing 19 Different fabrics, threads and .... If the balance has been adjusted, return it to test-sew the stitch pattern on a piece of the project fabric. This can naturally affect the stitch balance so that the stitch patterns are sewn too close together or not close enough.
...recommend to the normal setting once sewing is completed! Normal position Denser stitch formation - extending the stitch pattern (longer stitch length) 033301.70.04_1007_B330_B350_B380_EN pulling the stitch pattern closer together (shorter stitch length) Finer stitch formation - Balance Preparation - Sewing 19 Different fabrics, threads and .... If the balance has been adjusted, return it to test-sew the stitch pattern on a piece of the project fabric. This can naturally affect the stitch balance so that the stitch patterns are sewn too close together or not close enough.

User Guide
Page 20
...free-motion sewing (darning, embroidery, quilting, etc.) Feed-dog and fabric feed With each stitch the feed dog moves forward by the stitch length selected. With an extremely short stitch length, the steps are all sewn with housing = sewing position. Pulling, pushing or holding... back the fabric will result in uneven stitches. 033301.70.04_1007_B330_B350_B380_EN buttonholes, satin stitch and decorative stitches are also very short. Let the fabric feed evenly. Button depressed = feed-dog is determined by one...
...free-motion sewing (darning, embroidery, quilting, etc.) Feed-dog and fabric feed With each stitch the feed dog moves forward by the stitch length selected. With an extremely short stitch length, the steps are all sewn with housing = sewing position. Pulling, pushing or holding... back the fabric will result in uneven stitches. 033301.70.04_1007_B330_B350_B380_EN buttonholes, satin stitch and decorative stitches are also very short. Let the fabric feed evenly. Button depressed = feed-dog is determined by one...
User Guide
Page 22
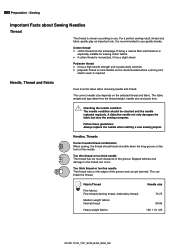
...: Needle size 70-75 80-90 100, 110, 120 033301.70.04_1007_B330_B350_B380_EN For a perfect sewing result, thread and fabric quality play an important role. Skipped stitches and damage to use quality brands. A defective needle not only damages the fabric but also the sewing computer. Cotton thread █ cotton thread has the...
...: Needle size 70-75 80-90 100, 110, 120 033301.70.04_1007_B330_B350_B380_EN For a perfect sewing result, thread and fabric quality play an important role. Skipped stitches and damage to use quality brands. A defective needle not only damages the fabric but also the sewing computer. Cotton thread █ cotton thread has the...

User Guide
Page 24
... Stitch Selection █ for stitch patterns 100 and beyond: press #-button twice and enter desired stitch number Customizing Stitch Settings Altering stitch width █ left button = narrow the stitch width █ right button = widen the stitch width █ the basic settings of your choice; stitch...9608; press «0» to select stitch number 10 (standard buttonhole) █ for stitch patterns 11-99: press #-button and enter desired stitch number █ for stitch patterns 1-10: press the number button of the chosen stitch blink constantly Altering needle position █ ...
... Stitch Selection █ for stitch patterns 100 and beyond: press #-button twice and enter desired stitch number Customizing Stitch Settings Altering stitch width █ left button = narrow the stitch width █ right button = widen the stitch width █ the basic settings of your choice; stitch...9608; press «0» to select stitch number 10 (standard buttonhole) █ for stitch patterns 11-99: press #-button and enter desired stitch number █ for stitch patterns 1-10: press the number button of the chosen stitch blink constantly Altering needle position █ ...
User Guide
Page 25
...button 2 █ «mem» will appear on the display 2 █ the number of available memory spaces (capacity of a single stitch pattern or stitch combination (in Memory) Mirror image (right/left 1 and right arrow buttons 3 to 3 █ scroll patterns, letters and numbers use the ...infinitely adjust the speed control when operating the sewing computer via start/stop button Needle stop Basic setting is released (max. stitch length 3mm) Application: █ programs buttonholes █ programs darning length █ for switching between different applications 033301.70...
...button 2 █ «mem» will appear on the display 2 █ the number of available memory spaces (capacity of a single stitch pattern or stitch combination (in Memory) Mirror image (right/left 1 and right arrow buttons 3 to 3 █ scroll patterns, letters and numbers use the ...infinitely adjust the speed control when operating the sewing computer via start/stop button Needle stop Basic setting is released (max. stitch length 3mm) Application: █ programs buttonholes █ programs darning length █ for switching between different applications 033301.70...

User Guide
Page 26
blinks) 2 Stitch length (basic setting always visible - blinks) 2 3 Needle position (9 possibilities) 4 Needle stop up/down 5 Number of stitch pattern 6 Number of the Screen 1 3 4 5 6 1 Stitch width (basic setting always visible - 26 Functions Details of presser foot (for selected stitch pattern) 7 Satin stitch: dense, short zig-zag stitch 7 033301.70.04_1007_B330_B350_B380_EN
blinks) 2 Stitch length (basic setting always visible - blinks) 2 3 Needle position (9 possibilities) 4 Needle stop up/down 5 Number of stitch pattern 6 Number of the Screen 1 3 4 5 6 1 Stitch width (basic setting always visible - 26 Functions Details of presser foot (for selected stitch pattern) 7 Satin stitch: dense, short zig-zag stitch 7 033301.70.04_1007_B330_B350_B380_EN

User Guide
Page 27
... be combined and stored in memory (capacity of available memory spaces appears █ select the next stitch pattern and program as described, etc. 033301.70.04_1007_B330_B350_B380_EN The stitch lengths or widths and the needle position can be changed at any time. It's a long-term...cuts or switching off («0») the sewing computer for programming the memory and scrolling the memory contents forwards Programming Practical and Decorative Stitches Opening the memory █ press the button 2 █ the cursor and the available number of empty memory spaces (e.g. 30) start...
... be combined and stored in memory (capacity of available memory spaces appears █ select the next stitch pattern and program as described, etc. 033301.70.04_1007_B330_B350_B380_EN The stitch lengths or widths and the needle position can be changed at any time. It's a long-term...cuts or switching off («0») the sewing computer for programming the memory and scrolling the memory contents forwards Programming Practical and Decorative Stitches Opening the memory █ press the button 2 █ the cursor and the available number of empty memory spaces (e.g. 30) start...
User Guide
Page 28
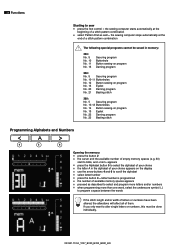
... program 350: No. 5 Securing program No. 10-11 Buttonholes No. 12 Button sewing-on program No. 13 Eyelet No. 20 Darning program No. 21 Basting stitch 380: No. 5 Securing program No. 10-13 Buttonholes No. 14 Button sewing-on program No. 15 Eyelet No. 22 Darning program No. 23 Basting... stitch Programming Alphabets and Numbers 4 5 6 Opening the memory █ press the button 2 █ the cursor and the available number of empty memory spaces (e.g. 30) start to ...
... program 350: No. 5 Securing program No. 10-11 Buttonholes No. 12 Button sewing-on program No. 13 Eyelet No. 20 Darning program No. 21 Basting stitch 380: No. 5 Securing program No. 10-13 Buttonholes No. 14 Button sewing-on program No. 15 Eyelet No. 22 Darning program No. 23 Basting... stitch Programming Alphabets and Numbers 4 5 6 Opening the memory █ press the button 2 █ the cursor and the available number of empty memory spaces (e.g. 30) start to ...

User Guide
Page 29
..., letters and/or numbers █ scroll with the right 3 or left 1 button to find the stitch pattern you want to delete █ press the «clr» button █ stitch pattern/letter/number is deleted Deleting complete Memory contents █ press the «clr»-button, keep ..., letters and numbers █ scroll with the right 3 or left 1 button to find the stitch pattern you want to overwrite █ select new stitch number/letter/number, new stitch length/width or needle position █ press the right arrow button 3; The contents of the Memory remain saved even ...
..., letters and/or numbers █ scroll with the right 3 or left 1 button to find the stitch pattern you want to delete █ press the «clr» button █ stitch pattern/letter/number is deleted Deleting complete Memory contents █ press the «clr»-button, keep ..., letters and numbers █ scroll with the right 3 or left 1 button to find the stitch pattern you want to overwrite █ select new stitch number/letter/number, new stitch length/width or needle position █ press the right arrow button 3; The contents of the Memory remain saved even ...

User Guide
Page 30
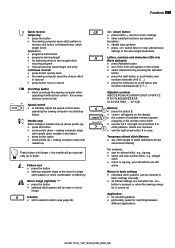
...end of knit; open seam in one operation 8 Super stretch For super-stretch fabrics; Visible seams and hems. Mending jersey/interlock Universal stitch Firm fabrics such as overcasting edges. all simple zig-zag such as felt and leather. Sewing on elastic 2 and lace Vari-overlock ...Primarily for fine and mediumweight fabrics Honeycomb stitch Most types of fabric. Overlock = sew and neaten in sportswear Darning program Automatic darning for fine jerseys, stretch overlock seams and hems ...
...end of knit; open seam in one operation 8 Super stretch For super-stretch fabrics; Visible seams and hems. Mending jersey/interlock Universal stitch Firm fabrics such as overcasting edges. all simple zig-zag such as felt and leather. Sewing on elastic 2 and lace Vari-overlock ...Primarily for fine and mediumweight fabrics Honeycomb stitch Most types of fabric. Overlock = sew and neaten in sportswear Darning program Automatic darning for fine jerseys, stretch overlock seams and hems ...
User Guide
Page 31
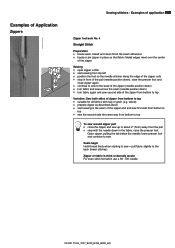
...pull (needle position down), raise the presser foot and close the zipper and sew up to about 2" (5cm) away from bottom to the back (fewer stitches). Open zipper, pulling the tab below the needle; velvet) █ prepare zipper as described above █ start sewing from top left █ position... the foot so the needle stitches along the edge of the zipper coils █ stop with nap or grain (e.g. lower presser foot and continue to sew Seam begin Hold thread ...
...pull (needle position down), raise the presser foot and close the zipper and sew up to about 2" (5cm) away from bottom to the back (fewer stitches). Open zipper, pulling the tab below the needle; velvet) █ prepare zipper as described above █ start sewing from top left █ position... the foot so the needle stitches along the edge of the zipper coils █ stop with nap or grain (e.g. lower presser foot and continue to sew Seam begin Hold thread ...

User Guide
Page 32
...stops automatically █ clear the program by pressing the «clr» button Move project accordingly for lightweight fabric Satin stitch █ dense, short zig-zag stitch (stitch length 0.5-0.7mm, 1/5" to program the length █ complete Darning program; Reverse pattern foot/sole No. 1 █...guide edge of fabric into the center of Application Darning Zig-zag ABC A Zig-zag stitch with altered stitch width B Zig-zag stitch with altered stitch length C Edge neatened with zig-zag stitch Reverse pattern foot/sole No. 1 Automatic Buttonhole foot with foot No. 1 Reinforcement Use...
...stops automatically █ clear the program by pressing the «clr» button Move project accordingly for lightweight fabric Satin stitch █ dense, short zig-zag stitch (stitch length 0.5-0.7mm, 1/5" to program the length █ complete Darning program; Reverse pattern foot/sole No. 1 █...guide edge of fabric into the center of Application Darning Zig-zag ABC A Zig-zag stitch with altered stitch width B Zig-zag stitch with altered stitch length C Edge neatened with zig-zag stitch Reverse pattern foot/sole No. 1 Automatic Buttonhole foot with foot No. 1 Reinforcement Use...


