
Manual
Page 2
... causing it has been dropped or damaged or dropped into any air openings blocked. Keep ventilation openings of the sewing machine and foot controller free from the electricity supply when not in this appliance is used or where oxygen is required around the sewing needle and knife...replacement parts. Close attention is provided with any opening. 12. Use only attachments recommended by or near children. 2. To disconnect, turn all controls to break. This appliance is necessary when this manual. The wrong plate can cause the needle to the off («O») when making ...
... causing it has been dropped or damaged or dropped into any air openings blocked. Keep ventilation openings of the sewing machine and foot controller free from the electricity supply when not in this appliance is used or where oxygen is required around the sewing needle and knife...replacement parts. Close attention is provided with any opening. 12. Use only attachments recommended by or near children. 2. To disconnect, turn all controls to break. This appliance is necessary when this manual. The wrong plate can cause the needle to the off («O») when making ...
Manual
Page 5
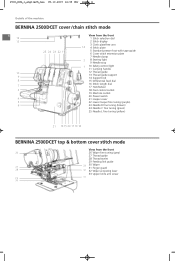
... Stitch length dial 17 Handwheel 18 Foot control socket 19 Machine socket 20 Power switch 21 Looper cover 22 Lower looper fine tuning (purple) 23 Needle R fine tuning (brown) 24 Needle C fine tuning (green) 25 Needle L fine tuning (yellow) 21 16 15 20 17 19 18 BERNINA 2500DCET top & bottom cover stitch mode View...
... Stitch length dial 17 Handwheel 18 Foot control socket 19 Machine socket 20 Power switch 21 Looper cover 22 Lower looper fine tuning (purple) 23 Needle R fine tuning (brown) 24 Needle C fine tuning (green) 25 Needle L fine tuning (yellow) 21 16 15 20 17 19 18 BERNINA 2500DCET top & bottom cover stitch mode View...
Manual
Page 6
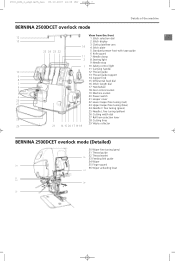
... of the machine BERNINA 2500DCET overlock mode View from the front 7 12 1 Stitch selection dial 13 2 Stitch display 3 Cloth plate/free arm 14 4 Stitch plate 25 24 23 22 5 Standard presser foot with tape guide 6 Knife guard 11 7 Needle clamp 2 8 Sewing light 9 Needle stop 1 10 Safety control light 11 Carrying ...) 26 Cutting width dial 27 Roll hem selection lever 28 28 Cutting lines 29 Waste collector 29 21 16 15 20 17 19 18 BERNINA 2500DCET overlock mode (Detailed) 30 Wiper fine tuning (grey) 31 Thread guide 32 Thread eyelet 35 33 Feeding link guide 2 34 Wiper 30...
... of the machine BERNINA 2500DCET overlock mode View from the front 7 12 1 Stitch selection dial 13 2 Stitch display 3 Cloth plate/free arm 14 4 Stitch plate 25 24 23 22 5 Standard presser foot with tape guide 6 Knife guard 11 7 Needle clamp 2 8 Sewing light 9 Needle stop 1 10 Safety control light 11 Carrying ...) 26 Cutting width dial 27 Roll hem selection lever 28 28 Cutting lines 29 Waste collector 29 21 16 15 20 17 19 18 BERNINA 2500DCET overlock mode (Detailed) 30 Wiper fine tuning (grey) 31 Thread guide 32 Thread eyelet 35 33 Feeding link guide 2 34 Wiper 30...

Manual
Page 7
YC-425 47 48 2500_DCE_1_englisch_neu 09.10.2007 14:33 Uhr Seite 8 Details of the machine BERNINA 2500DCET overlock mode 8 View from the back 38 Thread stand 39 Foam pad 40 Spool stabilizers 41 Spool pin 42 First thread guide 43 Presser foot pressure control 44 Presser foot lifter 45 Light switch 46 Thread cutter 47 Foot control 48 Power cord 42 41 43 44 40 45 46 39 38 Foot control: Model Nr.
YC-425 47 48 2500_DCE_1_englisch_neu 09.10.2007 14:33 Uhr Seite 8 Details of the machine BERNINA 2500DCET overlock mode 8 View from the back 38 Thread stand 39 Foam pad 40 Spool stabilizers 41 Spool pin 42 First thread guide 43 Presser foot pressure control 44 Presser foot lifter 45 Light switch 46 Thread cutter 47 Foot control 48 Power cord 42 41 43 44 40 45 46 39 38 Foot control: Model Nr.
Manual
Page 10
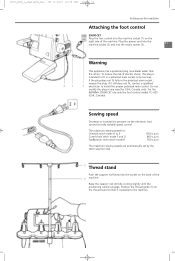
..., turning slightly until the positioning catches engage. 2500_DCE_1_englisch_neu 09.10.2007 14:33 Uhr Seite 11 Setting up the machine Attaching the foot control 2500DCET Plug the foot control into the machine socket (1) on the right side of the 4 machine. If it is intended to the machine. To reduce ... of electric shock, this plug is parallel to fit in a polarized main socket only one blade wider than the other). For the BERNINA 2500DCET use only the foot control model YC-425 (USA, Canada). Plug the power cord into the machine socket (2) and into the mains socket (3). 11 2 1...
..., turning slightly until the positioning catches engage. 2500_DCE_1_englisch_neu 09.10.2007 14:33 Uhr Seite 11 Setting up the machine Attaching the foot control 2500DCET Plug the foot control into the machine socket (1) on the right side of the 4 machine. If it is intended to the machine. To reduce ... of electric shock, this plug is parallel to fit in a polarized main socket only one blade wider than the other). For the BERNINA 2500DCET use only the foot control model YC-425 (USA, Canada). Plug the power cord into the machine socket (2) and into the mains socket (3). 11 2 1...

Manual
Page 13
... if it has not been prepared correctly. cover and chain stitch formations end with electronic operating and safety features. Note: If you stop Your Bernina overlocker is automatically interrupted. O = OFF I = ON Light switch The light switch is positioned on the handwheel side of the machine in ... motor is equipped with the needle in their highest position, the ideal position for threading etc. The control lamp also lights up when the presser foot is raised, when the presser foot is swung out or the looper cover is generally up (4). 2500_DCE_1_englisch_neu 09.10.2007 14:33 Uhr...
... if it has not been prepared correctly. cover and chain stitch formations end with electronic operating and safety features. Note: If you stop Your Bernina overlocker is automatically interrupted. O = OFF I = ON Light switch The light switch is positioned on the handwheel side of the machine in ... motor is equipped with the needle in their highest position, the ideal position for threading etc. The control lamp also lights up when the presser foot is raised, when the presser foot is swung out or the looper cover is generally up (4). 2500_DCE_1_englisch_neu 09.10.2007 14:33 Uhr...

Manual
Page 72
...cover-/chain stitch or JLx2 for cover stitch. Poor stitch formation: Sewing position incorrect. Guide fabric slightly. Replace the needles. Presser foot pressure is too high. 2500_DCE_2_englisch_neu 09.10.2007 15:02 Uhr Seite 72 Trouble shooting guide Problem: Cause: Solution: The machine ...does not sew. The presser foot is up or the looper cover is open, the safety control lamp is not on . Lower the presser foot. Close the looper cover. Switch machine on. Main switch to the correct ...
...cover-/chain stitch or JLx2 for cover stitch. Poor stitch formation: Sewing position incorrect. Guide fabric slightly. Replace the needles. Presser foot pressure is too high. 2500_DCE_2_englisch_neu 09.10.2007 15:02 Uhr Seite 72 Trouble shooting guide Problem: Cause: Solution: The machine ...does not sew. The presser foot is up or the looper cover is open, the safety control lamp is not on . Lower the presser foot. Close the looper cover. Switch machine on. Main switch to the correct ...
Manual
Page 74
... binding 68, 70 · flat joining seams 67 · edges with elastic 68 · simple hems 67 Cutting width 17, 18 · overlock 27 Foot control · attaching 11 Free arm 15 G Gathering 62 H Handwheel 15 Hems with cover stitch/ top & bottom cover stitch 67 K Knives · position lower ...stretch 26, 27 26, 27 26, 27 26, 27 22 15 26, 27 26, 27 26, 27 26, 27 26, 27 26, 27 P Safety control light 14 Safety features 14, 40 · cover stitch 40 · overlock 14 Safety regulations 3 Seams · adjusting width 18 · allowances/ neatening ...
... binding 68, 70 · flat joining seams 67 · edges with elastic 68 · simple hems 67 Cutting width 17, 18 · overlock 27 Foot control · attaching 11 Free arm 15 G Gathering 62 H Handwheel 15 Hems with cover stitch/ top & bottom cover stitch 67 K Knives · position lower ...stretch 26, 27 26, 27 26, 27 26, 27 22 15 26, 27 26, 27 26, 27 26, 27 26, 27 26, 27 P Safety control light 14 Safety features 14, 40 · cover stitch 40 · overlock 14 Safety regulations 3 Seams · adjusting width 18 · allowances/ neatening ...
Manual
Page 76
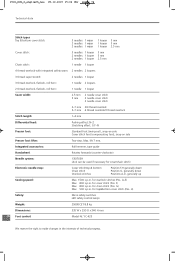
...: 1-4 mm Differential feed: Pushing effect: N-2 Stretching effect: 0.7-N Presser foot: Standard foot (swing-out), snap-on sole Cover stitch foot (compensating foot), snap-on sole Presser foot lifter: Two-step. A-E) Max. 800 s.p.m. F) Max. 800 s.p.m. G) Max. 500 s.p.m. lift 7 mm. Max. H) Safety: Micro safety switches LED safety control lamps Weight: 2500DCET 8.8 kg Dimensions: 335 W x 295 D x 340 H mm 76 Foot control: Model Nr.
...: 1-4 mm Differential feed: Pushing effect: N-2 Stretching effect: 0.7-N Presser foot: Standard foot (swing-out), snap-on sole Cover stitch foot (compensating foot), snap-on sole Presser foot lifter: Two-step. A-E) Max. 800 s.p.m. F) Max. 800 s.p.m. G) Max. 500 s.p.m. lift 7 mm. Max. H) Safety: Micro safety switches LED safety control lamps Weight: 2500DCET 8.8 kg Dimensions: 335 W x 295 D x 340 H mm 76 Foot control: Model Nr.


