
Manual
Page 2
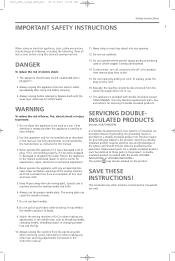
...on cord. The symbol may deflect the needle causing it has been dropped or damaged or dropped into any air openings blocked. This overlock/cover stitch machine is provided on a double-insulated product nor should a means for its intended use . 17. Always unplug the machine from the...all controls to those parts in use as described in the needle area, such as threading needle, changing needle, threading looper, or changing presser foot and the like. 10. Always use only. 7. Close attention is required around the sewing needle and knife. 6. Use only identical replacement ...
...on cord. The symbol may deflect the needle causing it has been dropped or damaged or dropped into any air openings blocked. This overlock/cover stitch machine is provided on a double-insulated product nor should a means for its intended use . 17. Always unplug the machine from the...all controls to those parts in use as described in the needle area, such as threading needle, changing needle, threading looper, or changing presser foot and the like. 10. Always use only. 7. Close attention is required around the sewing needle and knife. 6. Use only identical replacement ...
Manual
Page 5
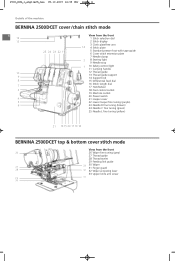
2500_DCE_1_englisch_neu 09.10.2007 14:33 Uhr Seite 6 Details of the machine BERNINA 2500DCET cover /chain stitch mode 6 12 13 10 9 8 7 3 4 5 6 25 24 23 22 11 View from the front 1 Stitch selection dial 2 Stitch display 3 Cloth plate/free arm 14 4 Stitch plate 5 Standard presser foot with tape guide 6 Cover stitch extension plate 7 Needle clamp 2 8 Sewing light 9 Needle stop 1 10 Safety control...
2500_DCE_1_englisch_neu 09.10.2007 14:33 Uhr Seite 6 Details of the machine BERNINA 2500DCET cover /chain stitch mode 6 12 13 10 9 8 7 3 4 5 6 25 24 23 22 11 View from the front 1 Stitch selection dial 2 Stitch display 3 Cloth plate/free arm 14 4 Stitch plate 5 Standard presser foot with tape guide 6 Cover stitch extension plate 7 Needle clamp 2 8 Sewing light 9 Needle stop 1 10 Safety control...
Manual
Page 9
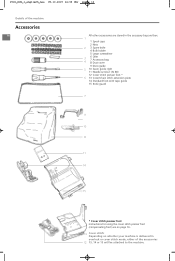
... 5 10 Seam guide right 11 Needle set JLx2 (3x 80) 12 Cover stitch presser foot * 6 13 Cover/chain stitch extension plate 14 Standard foot with tape guide 15 Knife guard 7 9 10 8 11 14 15 * Cover stitch presser foot Instructions for using the cover stitch presser foot (compensating foot) are on page 16. 13 Cover stitch: Depending on whether your machine is delivered in overlock or...
... 5 10 Seam guide right 11 Needle set JLx2 (3x 80) 12 Cover stitch presser foot * 6 13 Cover/chain stitch extension plate 14 Standard foot with tape guide 15 Knife guard 7 9 10 8 11 14 15 * Cover stitch presser foot Instructions for using the cover stitch presser foot (compensating foot) are on page 16. 13 Cover stitch: Depending on whether your machine is delivered in overlock or...
Manual
Page 10
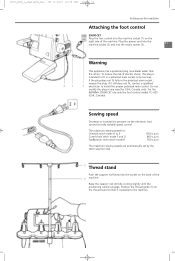
If it is intended to E Cover/chain stitch mode F and G Top&botom cover stitch mode H 1500 s.p.m. 800 s.p.m. 500 s.p.m. Sewing speed Decrease or increase the pressure on the thread stand so that it still does not fit, contact a qualified 3 electrician ... automatically set by the stitch selection dial. 5 Thread stand Push the support rod firmly into the socket on the right side of the machine. If the plug does not fit fully in a polarized main socket only one blade wider than the other). For the BERNINA 2500DCET use only the foot control model YC-425...
If it is intended to E Cover/chain stitch mode F and G Top&botom cover stitch mode H 1500 s.p.m. 800 s.p.m. 500 s.p.m. Sewing speed Decrease or increase the pressure on the thread stand so that it still does not fit, contact a qualified 3 electrician ... automatically set by the stitch selection dial. 5 Thread stand Push the support rod firmly into the socket on the right side of the machine. If the plug does not fit fully in a polarized main socket only one blade wider than the other). For the BERNINA 2500DCET use only the foot control model YC-425...
Manual
Page 14
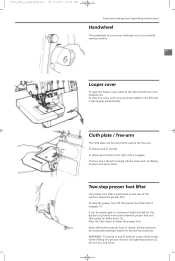
...positioned on a household 15 sewing machine. 15 15 Looper cover To open the looper cover, press to the right and tilt the cover towards you. WARNING: If sewing in this position to provide more space between presser foot and stitch plate for sewing tubular items such as on the rear ...of the machine above the presser foot. 2 To raise the presser foot, lift the presser foot lifter until it engages (1). 1 It can be raised again to maximum height and held in top & bottom cover stitch mode, when lifting the presser foot to the right until it engages. The free...
...positioned on a household 15 sewing machine. 15 15 Looper cover To open the looper cover, press to the right and tilt the cover towards you. WARNING: If sewing in this position to provide more space between presser foot and stitch plate for sewing tubular items such as on the rear ...of the machine above the presser foot. 2 To raise the presser foot, lift the presser foot lifter until it engages (1). 1 It can be raised again to maximum height and held in top & bottom cover stitch mode, when lifting the presser foot to the right until it engages. The free...

Manual
Page 15
... and prevent sideways movement. The indents on the foot. The cover stitch presser foot (compensating foot - 2500_DCE_1_englisch_neu 09.10.2007 14:33 Uhr Seite 16 Functions and general operating instructions Swing-out presser foot 16 The swing-out foot (exclusive by BERNINA) provides easy access for sewing: · Push the foot from the clamp (2) and remove it to the...
... and prevent sideways movement. The indents on the foot. The cover stitch presser foot (compensating foot - 2500_DCE_1_englisch_neu 09.10.2007 14:33 Uhr Seite 16 Functions and general operating instructions Swing-out presser foot 16 The swing-out foot (exclusive by BERNINA) provides easy access for sewing: · Push the foot from the clamp (2) and remove it to the...

Manual
Page 20
... clamp BERNINA 2500DCET needle clamp 21 There are inserted into the needle clamp (2).Tighten the needle setscrew firmly (3). Note: The third needle position (R) is slightly higher than the needle C. To remove: · Raise the needles (Needle stop). · Raise the presser foot and swing out or remove. Needle L is for cover and chain stitch. Place...
... clamp BERNINA 2500DCET needle clamp 21 There are inserted into the needle clamp (2).Tighten the needle setscrew firmly (3). Note: The third needle position (R) is slightly higher than the needle C. To remove: · Raise the needles (Needle stop). · Raise the presser foot and swing out or remove. Needle L is for cover and chain stitch. Place...
Manual
Page 29
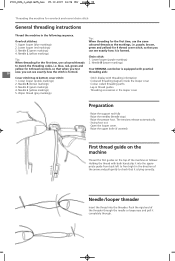
...overlock, so that you can see exactly how the stitch is equipped with practical 30 sew, you 3. Needle R (brown markings) 3. Tip: Overlock stitches: When threading for 4 thread cover stitch, so that when you test Your BERNINA overlocker is formed. Upper looper (blue markings) coloured... the needles (Needle stop) · Raise the presser foot. Push the rigid end of the threader through . Needle C (green markings) can see exactly how it is lying correctly. threading aids: Cover stitch/top & bottom cover stitch: 1. Lower looper (red markings) green and yellow) ...
...overlock, so that you can see exactly how the stitch is equipped with practical 30 sew, you 3. Needle R (brown markings) 3. Tip: Overlock stitches: When threading for 4 thread cover stitch, so that when you test Your BERNINA overlocker is formed. Upper looper (blue markings) coloured... the needles (Needle stop) · Raise the presser foot. Push the rigid end of the threader through . Needle C (green markings) can see exactly how it is lying correctly. threading aids: Cover stitch/top & bottom cover stitch: 1. Lower looper (red markings) green and yellow) ...

Manual
Page 38
...side. The 2.5 mm top & bottom cover stitch is completed or interrupted, the needles stay in top & bottom cover stitch mode, when lifting the presser foot to all stretch fabrics. The wiper thread covers the seam on the right side, while the looper thread covers and neatens the seam on the right ...side of cover stitch makes it ideal for positioning your work while...
...side. The 2.5 mm top & bottom cover stitch is completed or interrupted, the needles stay in top & bottom cover stitch mode, when lifting the presser foot to all stretch fabrics. The wiper thread covers the seam on the right side, while the looper thread covers and neatens the seam on the right ...side of cover stitch makes it ideal for positioning your work while...
Manual
Page 41
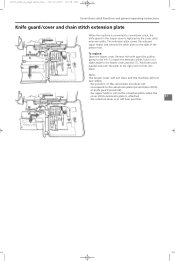
...cover stitch extension plate is attached 41 · the selection lever is in the looper cover is converted to cover/chain stitch, the knife guard in roll hem position. ▼ 1 ▲ Note: The looper cover will not close and the machine will not sew when: · the position of the presser foot.... ▼ To replace: ▲ Open the looper cover. The extension plate covers the released upper looper and extends the stitch plate to the right of the conversion arm does not correspond to the right...
...cover stitch extension plate is attached 41 · the selection lever is in the looper cover is converted to cover/chain stitch, the knife guard in roll hem position. ▼ 1 ▲ Note: The looper cover will not close and the machine will not sew when: · the position of the presser foot.... ▼ To replace: ▲ Open the looper cover. The extension plate covers the released upper looper and extends the stitch plate to the right of the conversion arm does not correspond to the right...
Manual
Page 43
Take the thread under the foot. 8 Thread guide on the spool pin as illustrated. 1. 2500_DCE_2_englisch_neu 09.10.2007 15:00 Uhr Seite 43 Cover stitch needle R (brown markings) 1 2 2 42 42 3 5 6 4 7 8 Threading 4-thread cover stitch Place the spool on the needle clamp. 8. Take the thread through the take up from the spool and lay it from front...
Take the thread under the foot. 8 Thread guide on the spool pin as illustrated. 1. 2500_DCE_2_englisch_neu 09.10.2007 15:00 Uhr Seite 43 Cover stitch needle R (brown markings) 1 2 2 42 42 3 5 6 4 7 8 Threading 4-thread cover stitch Place the spool on the needle clamp. 8. Take the thread through the take up from the spool and lay it from front...
Manual
Page 44
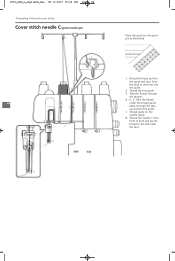
... the left under the thread guide plate, through the groove. 44 4., 5., 6. Thread the first guide. 3. Take the thread under the foot. 2500_DCE_2_englisch_neu 09.10.2007 15:00 Uhr Seite 44 Threading 4-thread cover stitch Cover stitch needle C (green markings) 1 2 2 44 3 5 6 7 4 8 8 Place the spool on the needle clamp. 8. Bring the thread up from the spool and...
... the left under the thread guide plate, through the groove. 44 4., 5., 6. Thread the first guide. 3. Take the thread under the foot. 2500_DCE_2_englisch_neu 09.10.2007 15:00 Uhr Seite 44 Threading 4-thread cover stitch Cover stitch needle C (green markings) 1 2 2 44 3 5 6 7 4 8 8 Place the spool on the needle clamp. 8. Bring the thread up from the spool and...
Manual
Page 45
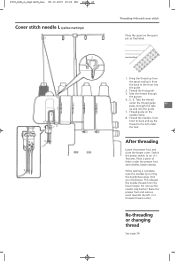
... remove work towards the left under the presser foot and needles, begin sewing. Bring the thread up and into the guide. 2. When sewing is complete, raise the needles by turning the handwheel away from ... 45 plate, through the groove. 4., 5., 6. After threading Lower the presser foot and close the looper cover. Test sew: Place a piece of fabric under the foot. 2500_DCE_2_englisch_neu 09.10.2007 15:00 Uhr Seite 45 Cover stitch needle L (yellow markings) 1 2 2 44 44 3 5 6 74 8 8 Threading 4-thread cover stitch Place the spool on the needle clamp. 8. Take the thread through...
... remove work towards the left under the presser foot and needles, begin sewing. Bring the thread up and into the guide. 2. When sewing is complete, raise the needles by turning the handwheel away from ... 45 plate, through the groove. 4., 5., 6. After threading Lower the presser foot and close the looper cover. Test sew: Place a piece of fabric under the foot. 2500_DCE_2_englisch_neu 09.10.2007 15:00 Uhr Seite 45 Cover stitch needle L (yellow markings) 1 2 2 44 44 3 5 6 74 8 8 Threading 4-thread cover stitch Place the spool on the needle clamp. 8. Take the thread through...
Manual
Page 46
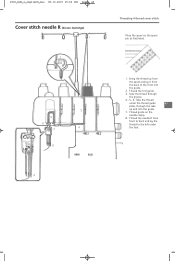
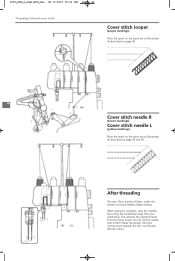
... 5 6 74 4 88 88 After threading Test sew: Place a piece of fabric under the presser foot and needles, begin sewing. 2500_DCE_2_englisch_neu 09.10.2007 15:00 Uhr Seite 46 Threading 3-thread cover stitch 2 Cover stitch looper (purple markings) 1 Place the spool on the spool pin as illustrated. Raise the presser... foot and remove work towards the left. When sewing is complete, raise ...
... 5 6 74 4 88 88 After threading Test sew: Place a piece of fabric under the presser foot and needles, begin sewing. 2500_DCE_2_englisch_neu 09.10.2007 15:00 Uhr Seite 46 Threading 3-thread cover stitch 2 Cover stitch looper (purple markings) 1 Place the spool on the spool pin as illustrated. Raise the presser... foot and remove work towards the left. When sewing is complete, raise ...
Manual
Page 48
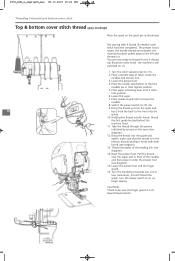
....2007 15:00 Uhr Seite 48 Threading 5-thread top & bottom cover stitch Top & bottom cover stitch thread (grey markings) Place the spool on «l», begin sewing. Press wiper activating lever until it under the needles and presser foot. 3. Bring the thread up from the spool and 48 lay it... firmly with 4 thread (3-needles) cover stitch has been completed. Take the thread through the groove indicated by pulling it from the...
....2007 15:00 Uhr Seite 48 Threading 5-thread top & bottom cover stitch Top & bottom cover stitch thread (grey markings) Place the spool on «l», begin sewing. Press wiper activating lever until it under the needles and presser foot. 3. Bring the thread up from the spool and 48 lay it... firmly with 4 thread (3-needles) cover stitch has been completed. Take the thread through the groove indicated by pulling it from the...

Manual
Page 49
... 09.10.2007 15:00 Uhr Seite 49 Threading 4-thread top & bottom cover stitch (5mm) Top & bottom cover stitch thread (grey markings) Test sewing with 3 thread (2-needles, 5mm) cover stitch has been completed. The presser foot is raised, the needle threads are now ready to the left and threads cut.... See threading for the 4 thread top & bottom cover stitch. The machine is in its lowest fixed position. 49 ...
... 09.10.2007 15:00 Uhr Seite 49 Threading 4-thread top & bottom cover stitch (5mm) Top & bottom cover stitch thread (grey markings) Test sewing with 3 thread (2-needles, 5mm) cover stitch has been completed. The presser foot is raised, the needle threads are now ready to the left and threads cut.... See threading for the 4 thread top & bottom cover stitch. The machine is in its lowest fixed position. 49 ...

Manual
Page 50
See threading for the 4 thread top & bottom narrow cover stitch. CAUTION: Check to be sure the finger guard is raised, the needle threads are now ready to the left and threads cut. The presser foot is in its lowest fixed position. 50 You are released, the material has been pulled ...away to thread for 5 thread top & bottom cover stitch on «l». The machine is still switched on page 48. 2500_DCE_2_englisch_neu ...
See threading for the 4 thread top & bottom narrow cover stitch. CAUTION: Check to be sure the finger guard is raised, the needle threads are now ready to the left and threads cut. The presser foot is in its lowest fixed position. 50 You are released, the material has been pulled ...away to thread for 5 thread top & bottom cover stitch on «l». The machine is still switched on page 48. 2500_DCE_2_englisch_neu ...
Manual
Page 70
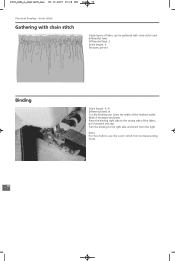
... of the fabric, pin if wanted and sew. 2500_DCE_2_englisch_neu 09.10.2007 15:02 Uhr Seite 70 Practical Sewing - Note: For fine fabrics use the cover stitch foot (compensating foot). chain stitch Gathering with chain stitch Single layers of the finished width.
... of the fabric, pin if wanted and sew. 2500_DCE_2_englisch_neu 09.10.2007 15:02 Uhr Seite 70 Practical Sewing - Note: For fine fabrics use the cover stitch foot (compensating foot). chain stitch Gathering with chain stitch Single layers of the finished width.
Manual
Page 74
...; with decorative threads 23 14 · with differential 69 6, 7, 8 18, 19 12 (chain stitch) · upper looper threading · upper looper release (converter) 53 Presser foot · changing 31 · cover stitch foot · raising 22 · markings feed 16 Skipped stitches 10 Slow sewing 15 Spare knife 62 Special accessories 18, 19 72 11, 38...
...; with decorative threads 23 14 · with differential 69 6, 7, 8 18, 19 12 (chain stitch) · upper looper threading · upper looper release (converter) 53 Presser foot · changing 31 · cover stitch foot · raising 22 · markings feed 16 Skipped stitches 10 Slow sewing 15 Spare knife 62 Special accessories 18, 19 72 11, 38...
Manual
Page 76
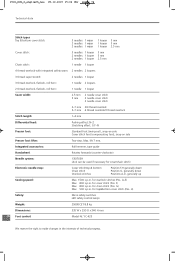
... Sewing speed: Max. 1500 s.p.m. H) Safety: Micro safety switches LED safety control lamps Weight: 2500DCET 8.8 kg Dimensions: 335 W x 295 D x 340 H mm 76 Foot control: Model Nr. A-E) Max. 800 s.p.m. for cover stitch (Pos. for chain stitch (Pos. lift 7 mm. F) Max. 800 s.p.m. for top&bottom cover stitch (Pos. YC-425 We reserve the right to make changes in the interests...
... Sewing speed: Max. 1500 s.p.m. H) Safety: Micro safety switches LED safety control lamps Weight: 2500DCET 8.8 kg Dimensions: 335 W x 295 D x 340 H mm 76 Foot control: Model Nr. A-E) Max. 800 s.p.m. for cover stitch (Pos. for chain stitch (Pos. lift 7 mm. F) Max. 800 s.p.m. for top&bottom cover stitch (Pos. YC-425 We reserve the right to make changes in the interests...


