

Monitor Reference Guide
Page 1
...; PIP (Picture in Picture) Model Size Business Description / Features NEW! Specifications subject to the BenQ Terms and Conditions Sheet for all applicable guidelines and restrictions. Because it matters XL2430T XL2720Z XL2730Z XR3501 21.5" W 1080p, Black & Yellow Chassis, Black eQualizer, 1ms GTG. 12M:1 DCR, ...Adjustable Stand, D-sub / DVI-DL / HDMI x 2 / DP1.2 / Mic-in / headphone jack / USB 3.0 x 2, 16.3 Lbs 35" W Curved 2000R, Black eQualizer, PIP, 4ms GTG. 20M:1 DCR, Height Adjustable Stand, HDMI 1.4x2/DP1.2/miniDP/headphone jack/line in this material are the property of...
...; PIP (Picture in Picture) Model Size Business Description / Features NEW! Specifications subject to the BenQ Terms and Conditions Sheet for all applicable guidelines and restrictions. Because it matters XL2430T XL2720Z XL2730Z XR3501 21.5" W 1080p, Black & Yellow Chassis, Black eQualizer, 1ms GTG. 12M:1 DCR, ...Adjustable Stand, D-sub / DVI-DL / HDMI x 2 / DP1.2 / Mic-in / headphone jack / USB 3.0 x 2, 16.3 Lbs 35" W Curved 2000R, Black eQualizer, PIP, 4ms GTG. 20M:1 DCR, Height Adjustable Stand, HDMI 1.4x2/DP1.2/miniDP/headphone jack/line in this material are the property of...
XR3501 User Manual
Page 9
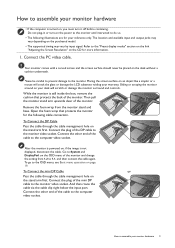
... monitor surround and controls. The location and available input and output jacks may vary depending on the desk without a cushion underneath. Your monitor comes with a curved screen and the screen surface should never be careful to prevent damage to the "Preset display modes" section on the link "Adjusting the Screen Resolution...
... monitor surround and controls. The location and available input and output jacks may vary depending on the desk without a cushion underneath. Your monitor comes with a curved screen and the screen surface should never be careful to prevent damage to the "Preset display modes" section on the link "Adjusting the Screen Resolution...
XR3501 User Manual
Page 12
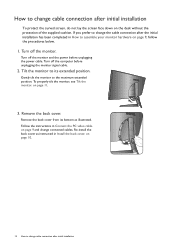
... its extended position. Re-install the back cover as illustrated. on page 10. 12 How to change cable connection after initial installation To protect the curved screen, do not lay the screen face down on page 9, follow the procedures below. 1. on page 9 and change connected cables. Follow the instructions in Connect...
... its extended position. Re-install the back cover as illustrated. on page 10. 12 How to change cable connection after initial installation To protect the curved screen, do not lay the screen face down on page 9, follow the procedures below. 1. on page 9 and change connected cables. Follow the instructions in Connect...
