
Safety Warning and Notice
Page 1
...few minutes reading through the safety instructions below. Full 3/29/2019 Installation Do not use your monitor under any other sharp objects. 5. To protect your nearest BenQ service center for assistance. If you want to chemical substances or smoke Do not block vents... public place or a harsh environment, contact your eyesight, please refer to the user manual to the monitor. 6. Safety Warning and Notice Before installing and using the monitor. 3. This monitor is designed mainly for a long time. Operation 1. Avoid taking either one of the following actions for...
...few minutes reading through the safety instructions below. Full 3/29/2019 Installation Do not use your monitor under any other sharp objects. 5. To protect your nearest BenQ service center for assistance. If you want to chemical substances or smoke Do not block vents... public place or a harsh environment, contact your eyesight, please refer to the user manual to the monitor. 6. Safety Warning and Notice Before installing and using the monitor. 3. This monitor is designed mainly for a long time. Operation 1. Avoid taking either one of the following actions for...

Safety Warning and Notice
Page 2
...power supply is unstable. Ensure that the power is compatible with the device to come from the monitor, contact your monitor. Failure to clean your nearest BenQ service center for warranty services have been made illegible. Repairs, modifications, or alterations have been ... required for assistance immediately. 7. power cable) only with local technical standards if the user brings the monitor out of the user if problems (such as antenna, Cable TV) outside the monitor. Defects caused by BenQ. Never use the original accessories (e.g.
...power supply is unstable. Ensure that the power is compatible with the device to come from the monitor, contact your monitor. Failure to clean your nearest BenQ service center for warranty services have been made illegible. Repairs, modifications, or alterations have been ... required for assistance immediately. 7. power cable) only with local technical standards if the user brings the monitor out of the user if problems (such as antenna, Cable TV) outside the monitor. Defects caused by BenQ. Never use the original accessories (e.g.
Resolution file
Page 1
... with the video card manufacturer's website for an updated driver for your input source does not provide an image with an aspect ratio of the monitor. • Depending on the operating system on your PC, different procedures should select the native resolution setting of liquid crystal display (LCD) technology, the picture...
... with the video card manufacturer's website for an updated driver for your input source does not provide an image with an aspect ratio of the monitor. • Depending on the operating system on your PC, different procedures should select the native resolution setting of liquid crystal display (LCD) technology, the picture...
User Manual
Page 4
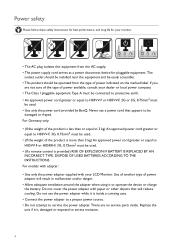
...An approved power cord greater or equal to H05VV-F or H05RR-F, 3G, 0.75mm2 must be used . • Use only the power cord provided by BenQ. There are not sure of the type of power adapter will reduce cooling. If you are no service parts inside a carrying case. • Connect ... proper power source. • Do not attempt to operate the device or charge the battery. Do not cover the power adapter with your LCD Monitor. Never use the power adapter while it is inside . Power safety Please follow these safety instructions for best performance, and long life for pluggable...
...An approved power cord greater or equal to H05VV-F or H05RR-F, 3G, 0.75mm2 must be used . • Use only the power cord provided by BenQ. There are not sure of the type of power adapter will reduce cooling. If you are no service parts inside a carrying case. • Connect ... proper power source. • Do not attempt to operate the device or charge the battery. Do not cover the power adapter with your LCD Monitor. Never use the power adapter while it is inside . Power safety Please follow these safety instructions for best performance, and long life for pluggable...
User Manual
Page 5
... or top of purchase or visit the local website from the power outlet before disconnecting the cables from the LCD monitor. • Always unplug the product from www.BenQ.com or zowie.benq.com for ventilation. Avoid using any of the above mentioned misuse or other risks. If any liquid, aerosol or glass...
... or top of purchase or visit the local website from the power outlet before disconnecting the cables from the LCD monitor. • Always unplug the product from www.BenQ.com or zowie.benq.com for ventilation. Avoid using any of the above mentioned misuse or other risks. If any liquid, aerosol or glass...
User Manual
Page 6
...the base 19 Adjusting the monitor height ...21 Viewing angle adjustment ...22 Rotating the monitor ...23 Installing the Shield (shading hood) ...25 Using the monitor wall mounting kit 27 Getting the most from your BenQ monitor 28 Downloading the LCD Monitor driver files from the Internet...40 Adjusting display mode ...41 Using Smart Scaling...41 Using Instant Mode ...41 Activating VESA standard DisplayPort Adaptive-Sync (XL2540 / XL2740 / XL2546S / XL2746S only 42 Enabling color vision accessibility (Color Weakness) (selected models only 42 Navigating the main menu ...43 Game Settings menu ...
...the base 19 Adjusting the monitor height ...21 Viewing angle adjustment ...22 Rotating the monitor ...23 Installing the Shield (shading hood) ...25 Using the monitor wall mounting kit 27 Getting the most from your BenQ monitor 28 Downloading the LCD Monitor driver files from the Internet...40 Adjusting display mode ...41 Using Smart Scaling...41 Using Instant Mode ...41 Activating VESA standard DisplayPort Adaptive-Sync (XL2540 / XL2740 / XL2546S / XL2746S only 42 Enabling color vision accessibility (Color Weakness) (selected models only 42 Navigating the main menu ...43 Game Settings menu ...
User Manual
Page 8
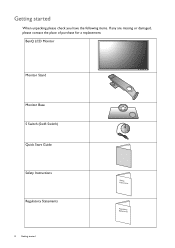
Getting started Safety Instructions SRteagteumlaetonrtys BenQ LCD Monitor Monitor Stand Monitor Base S Switch (Swift Switch) Quick Start Guide Safety Instructions Regulatory Statements 8 Getting started When unpacking please check you have the following items. If any are missing or damaged, please contact the place of purchase for a replacement.
Getting started Safety Instructions SRteagteumlaetonrtys BenQ LCD Monitor Monitor Stand Monitor Base S Switch (Swift Switch) Quick Start Guide Safety Instructions Regulatory Statements 8 Getting started When unpacking please check you have the following items. If any are missing or damaged, please contact the place of purchase for a replacement.
User Manual
Page 9
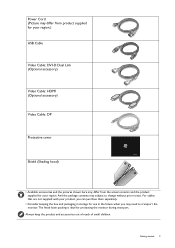
... contents and the product supplied for your product, you can purchase them separately. • Consider keeping the box and packaging in storage for protecting the monitor during transport. The fitted foam packing is ideal for use in the future when you may subject to transport the... monitor. Always keep the product and accessories out of reach of small children. Getting started 9 And the package contents may need to change without prior notice. ...
... contents and the product supplied for your product, you can purchase them separately. • Consider keeping the box and packaging in storage for protecting the monitor during transport. The fitted foam packing is ideal for use in the future when you may subject to transport the... monitor. Always keep the product and accessories out of reach of small children. Getting started 9 And the package contents may need to change without prior notice. ...
User Manual
Page 10
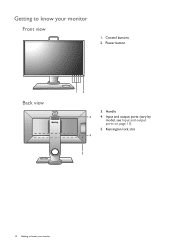
Input and output ports (vary by model, see Input and output ports on page 11) 5. Getting to know your monitor Power button Back view 12 3. Handle 3 4. Control buttons 2. Kensington lock slot 4 5 10 Getting to know your monitor Front view 1.
Input and output ports (vary by model, see Input and output ports on page 11) 5. Getting to know your monitor Power button Back view 12 3. Handle 3 4. Control buttons 2. Kensington lock slot 4 5 10 Getting to know your monitor Front view 1.

User Manual
Page 11
... ports may vary depending on the model. • Picture may vary depending on your monitor 11 DisplayPort socket (*) 8. Maximum resolution supported by each port Input port HDMI 1.4 HDMI 2.0 DP DVI XL2536 N/A 1920x1080@144Hz 1920x1080@144Hz 1920x1080@144Hz XL2540 / XL2546 / XL2546S / XL2740 / XL2746S 1920x1080@120Hz 1920x1080@240Hz 1920x1080@240Hz 1920x1080@144Hz Getting to USB...
... ports may vary depending on the model. • Picture may vary depending on your monitor 11 DisplayPort socket (*) 8. Maximum resolution supported by each port Input port HDMI 1.4 HDMI 2.0 DP DVI XL2536 N/A 1920x1080@144Hz 1920x1080@144Hz 1920x1080@144Hz XL2540 / XL2546 / XL2546S / XL2740 / XL2746S 1920x1080@120Hz 1920x1080@240Hz 1920x1080@240Hz 1920x1080@144Hz Getting to USB...
User Manual
Page 12
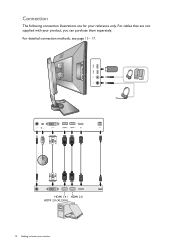
HDMI 1.4 / HDMI 2.0 HDMI 2.0 (XL2536) 12 Getting to know your monitor For cables that are for your reference only. For detailed connection methods, see page 15 - 17. Connection The following connection illustrations are not supplied with your product, you can purchase them separately.
HDMI 1.4 / HDMI 2.0 HDMI 2.0 (XL2536) 12 Getting to know your monitor For cables that are for your reference only. For detailed connection methods, see page 15 - 17. Connection The following connection illustrations are not supplied with your product, you can purchase them separately.
User Manual
Page 13
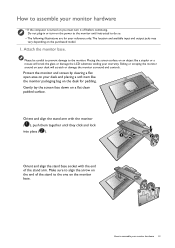
... to do so. • The following illustrations are for padding. Make sure to align the arrow on the end of the stand arm. Protect the monitor and screen by clearing a flat open area on the desk for your desk and placing a soft item like a stapler or a mouse will crack the glass... or damage the LCD substrate voiding your desk will scratch or damage the monitor surround and controls. Do not plug-in or turn it off before continuing. Open Lock Lock Open How to assemble your...
... to do so. • The following illustrations are for padding. Make sure to align the arrow on the end of the stand arm. Protect the monitor and screen by clearing a flat open area on the desk for your desk and placing a soft item like a stapler or a mouse will crack the glass... or damage the LCD substrate voiding your desk will scratch or damage the monitor surround and controls. Do not plug-in or turn it off before continuing. Open Lock Lock Open How to assemble your...
User Manual
Page 14
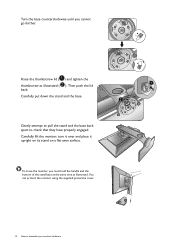
... engaged. Carefully put down the stand and the base. Gently attempt to pull the stand and the base back apart to assemble your monitor hardware Carefully lift the monitor, turn it over and place it upright on its stand on a flat even surface. Turn the base counterclockwise until you must hold the... as illustrated. Then push the lid back. Open Lock Open Lock Lock Lock Open Lock Lock Open 2 Open Lock Lock Open 1 Lock To move the monitor, you cannot go further.
... engaged. Carefully put down the stand and the base. Gently attempt to pull the stand and the base back apart to assemble your monitor hardware Carefully lift the monitor, turn it over and place it upright on its stand on a flat even surface. Turn the base counterclockwise until you must hold the... as illustrated. Then push the lid back. Open Lock Open Lock Lock Lock Open Lock Lock Open 2 Open Lock Lock Open 1 Lock To move the monitor, you cannot go further.
User Manual
Page 15
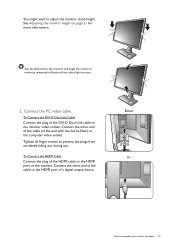
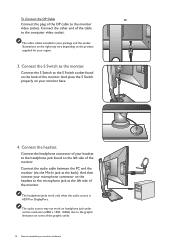
... DVI-D Dual Link Cable Connect the plug of the DVI-D Dual Link cable to assemble your monitor hardware 15 Connect the other end of the cable (at the end with the ferrite filter) ...the computer video socket. Connect the PC video cable. Either Or How to the monitor video socket. You should position the monitor and angle the screen to the HDMI port on page 21 for more information. See Adjusting the... monitor height on the monitor. To Connect the HDMI Cable Connect the plug of the HDMI cable to minimize ...
... DVI-D Dual Link Cable Connect the plug of the DVI-D Dual Link cable to assemble your monitor hardware 15 Connect the other end of the cable (at the end with the ferrite filter) ...the computer video socket. Connect the PC video cable. Either Or How to the monitor video socket. You should position the monitor and angle the screen to the HDMI port on page 21 for more information. See Adjusting the... monitor height on the monitor. To Connect the HDMI Cable Connect the plug of the HDMI cable to minimize ...
User Manual
Page 16
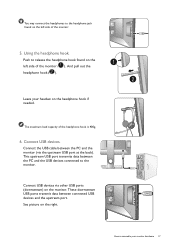
... properly on the product supplied for your region. 3. Connect the headset. Connect the audio cable between the PC and the monitor (via the Mic-In jack at the left side of the monitor. The headphone jacks work on headphone jack under certain resolution (2560 x 1440, 144Hz) due to the graphic limitation on... found on the headset to the microphone jack at the back). And then connect your headset to the headphone jack found on some of the monitor. To Connect the DP Cable Or Connect the plug of the cable to the computer video socket. The video cables included in your package and...
... properly on the product supplied for your region. 3. Connect the headset. Connect the audio cable between the PC and the monitor (via the Mic-In jack at the left side of the monitor. The headphone jacks work on headphone jack under certain resolution (2560 x 1440, 144Hz) due to the graphic limitation on... found on the headset to the microphone jack at the back). And then connect your headset to the headphone jack found on some of the monitor. To Connect the DP Cable Or Connect the plug of the cable to the computer video socket. The video cables included in your package and...
User Manual
Page 17
... headphone hook if needed. Push to release the headphone hook found on the left side of the monitor ( ). Connect the USB cable between the PC and the monitor (via other USB ports (downstream) on the monitor. This upstream USB port transmits data between connected USB devices and the upstream port. Connect USB devices... via the upstream USB port at the back). You may connect the headphones to the headphone jack found on the 1 left side of the monitor. 5. Connect USB devices. These downstream USB ports transmit data between the PC and the USB devices connected to the...
... headphone hook if needed. Push to release the headphone hook found on the left side of the monitor ( ). Connect the USB cable between the PC and the monitor (via other USB ports (downstream) on the monitor. This upstream USB port transmits data between connected USB devices and the upstream port. Connect USB devices... via the upstream USB port at the back). You may connect the headphones to the headphone jack found on the 1 left side of the monitor. 5. Connect USB devices. These downstream USB ports transmit data between the PC and the USB devices connected to the...
User Manual
Page 18
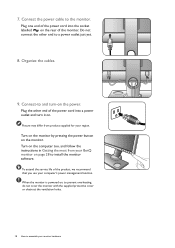
...rear of the power cord into the socket labelled on the monitor. 7. Do not connect the other end of the monitor. Plug the other end to install the monitor software. Picture may differ from product supplied for your BenQ monitor on the computer too, and follow the instructions in Getting the... most from your region. Turn on page 28 to a power outlet just yet. 8. When the monitor is powered...
...rear of the power cord into the socket labelled on the monitor. 7. Do not connect the other end of the monitor. Plug the other end to install the monitor software. Picture may differ from product supplied for your BenQ monitor on the computer too, and follow the instructions in Getting the... most from your region. Turn on page 28 to a power outlet just yet. 8. When the monitor is powered...
User Manual
Page 19
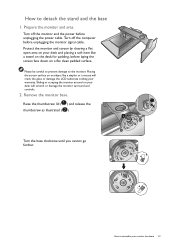
... area. Placing the screen surface on your desk will crack the glass or damage the LCD substrate voiding your monitor hardware 19 Turn the base clockwise until you cannot go further. 2 Open Lock Lock Open 1 Lock Lock Open Lock Lock Open Open Lock Open Lock .... Please be careful to prevent damage to detach the stand and the base 1. Sliding or scraping the monitor around on your desk and placing a soft item like a stapler or a mouse will scratch or damage the monitor surround and controls. 2. Turn off the computer before laying the screen face down on the desk...
... area. Placing the screen surface on your desk will crack the glass or damage the LCD substrate voiding your monitor hardware 19 Turn the base clockwise until you cannot go further. 2 Open Lock Lock Open 1 Lock Lock Open Lock Lock Open Open Lock Open Lock .... Please be careful to prevent damage to detach the stand and the base 1. Sliding or scraping the monitor around on your desk and placing a soft item like a stapler or a mouse will scratch or damage the monitor surround and controls. 2. Turn off the computer before laying the screen face down on the desk...
User Manual
Page 20
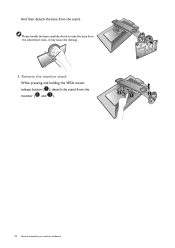
And then detach the base from the adjustment scale, it may cause the damage. Avoid to assemble your monitor hardware Open Lock Lock Open 3. While pressing and holding the VESA mount release button ( ), detach the stand from the monitor ( and ). 3 1 2 20 How to take the base from the stand. Please handle the base carefully. Remove the monitor stand.
And then detach the base from the adjustment scale, it may cause the damage. Avoid to assemble your monitor hardware Open Lock Lock Open 3. While pressing and holding the VESA mount release button ( ), detach the stand from the monitor ( and ). 3 1 2 20 How to take the base from the stand. Please handle the base carefully. Remove the monitor stand.
User Manual
Page 21
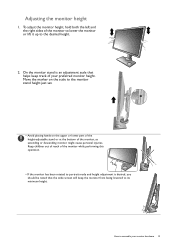
...of the height-adjustable stand or at the bottom of the monitor to lower the monitor or lift it up to the desired height. 2. Adjusting the monitor height 1. Keep children out of reach of your monitor hardware 21 On the monitor stand is desired, you should be noted that helps keep... track of the monitor while performing this operation. • If the monitor has been rotated to portrait mode and ...
...of the height-adjustable stand or at the bottom of the monitor to lower the monitor or lift it up to the desired height. 2. Adjusting the monitor height 1. Keep children out of reach of your monitor hardware 21 On the monitor stand is desired, you should be noted that helps keep... track of the monitor while performing this operation. • If the monitor has been rotated to portrait mode and ...


