XL2420T User Manual
Page 2
... of the type of power available, consult your monitor. • The AC plug isolates this equipment from the AC supply. • The power supply cord serves as opening or removing covers may be reproduced, transmitted, transcribed, stored in a retrieval system or translated into this publication and to make changes from time to time in any form or by BenQ Corporation. Servicing Do not attempt...
... of the type of power available, consult your monitor. • The AC plug isolates this equipment from the AC supply. • The power supply cord serves as opening or removing covers may be reproduced, transmitted, transcribed, stored in a retrieval system or translated into this publication and to make changes from time to time in any form or by BenQ Corporation. Servicing Do not attempt...
XL2420T User Manual
Page 4
Switch ...29 Basic menu operation...30 Picture optimization ...32 Customizing the hot keys...32 Setting up your monitor 28 The control panel...28 The S. Table of Contents Copyright ...2 Disclaimer ...2 Power Safety ...2 Getting started ...5 Getting to know your monitor 7 Front view...7 Back view ...7 How to assemble your monitor hardware 9 How to detach the stand and the base 15 Adjusting the monitor height ...17 Rotating the monitor ...18 Viewing angle adjustment ...19 Using the monitor wall mounting kit 20 Getting...
Switch ...29 Basic menu operation...30 Picture optimization ...32 Customizing the hot keys...32 Setting up your monitor 28 The control panel...28 The S. Table of Contents Copyright ...2 Disclaimer ...2 Power Safety ...2 Getting started ...5 Getting to know your monitor 7 Front view...7 Back view ...7 How to assemble your monitor hardware 9 How to detach the stand and the base 15 Adjusting the monitor height ...17 Rotating the monitor ...18 Viewing angle adjustment ...19 Using the monitor wall mounting kit 20 Getting...
XL2420T User Manual
Page 13
... . Plug the other end to the monitor. Switch to the monitor. You can place the S. How to and turn it on the rear of the monitor base. 6. Organize the cables. 8. Picture may differ from product supplied for your region. Switch socket found on the power. And place the S. Connect the power cable to the S. Do not connect the other end of the monitor. Connect-to assemble your monitor base. 5. Connect the S. Switch either...
... . Plug the other end to the monitor. Switch to the monitor. You can place the S. How to and turn it on the rear of the monitor base. 6. Organize the cables. 8. Picture may differ from product supplied for your region. Switch socket found on the power. And place the S. Connect the power cable to the S. Do not connect the other end of the monitor. Connect-to assemble your monitor base. 5. Connect the S. Switch either...

XL2420T User Manual
Page 21
... the purchased model, refer to the specification label on the BenQ LCD Monitor CD-ROM. Follow the wizard instructions until it asks you to which version of Microsoft Windows you are using, and whether you are connecting the monitor and installing the software onto a new computer (without existing monitor driver software), or whether you are upgrading an existing installation (which has security access requirements, network policy settings may...
... the purchased model, refer to the specification label on the BenQ LCD Monitor CD-ROM. Follow the wizard instructions until it asks you to which version of Microsoft Windows you are using, and whether you are connecting the monitor and installing the software onto a new computer (without existing monitor driver software), or whether you are upgrading an existing installation (which has security access requirements, network policy settings may...
XL2420T User Manual
Page 22
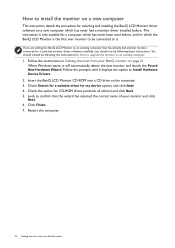
... install the monitor on a new computer This instruction details the procedure for selecting and installing the BenQ LCD Monitor driver software on a new computer which the BenQ LCD Monitor is the first ever monitor to be connected to it (and has monitor driver software installed), you are adding the BenQ LCD Monitor to an existing computer that the wizard has selected the correct name of your BenQ monitor When Windows starts, it displays the option to upgrade...
... install the monitor on a new computer This instruction details the procedure for selecting and installing the BenQ LCD Monitor driver software on a new computer which the BenQ LCD Monitor is the first ever monitor to be connected to it (and has monitor driver software installed), you are adding the BenQ LCD Monitor to an existing computer that the wizard has selected the correct name of your BenQ monitor When Windows starts, it displays the option to upgrade...
XL2420T User Manual
Page 23
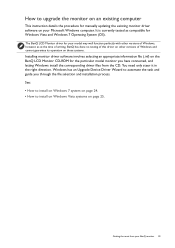
... cannot guarantee its operation on those systems. Installing monitor driver software involves selecting an appropriate information file (.inf) on the BenQ LCD Monitor CD-ROM for manually updating the existing monitor driver software on your BenQ monitor 23 Getting the most from the CD. How to upgrade the monitor on an existing computer This instruction details the procedure for the particular model monitor you through the file selection and...
... cannot guarantee its operation on those systems. Installing monitor driver software involves selecting an appropriate information file (.inf) on the BenQ LCD Monitor CD-ROM for manually updating the existing monitor driver software on your BenQ monitor 23 Getting the most from the CD. How to upgrade the monitor on an existing computer This instruction details the procedure for the particular model monitor you through the file selection and...
XL2420T User Manual
Page 24
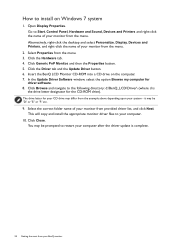
... be 'D:' or 'E:' or 'F:' etc. 9. Click the Hardware tab. 4. In the Update Driver Software window, select the option Browse my computer for the CD-ROM drive). Select the correct folder name of your monitor from the menu. This will copy and install the appropriate monitor driver files to Start, Control Panel, Hardware and Sound, Devices and Printers and right-click the name of your...
... be 'D:' or 'E:' or 'F:' etc. 9. Click the Hardware tab. 4. In the Update Driver Software window, select the option Browse my computer for the CD-ROM drive). Select the correct folder name of your monitor from the menu. This will copy and install the appropriate monitor driver files to Start, Control Panel, Hardware and Sound, Devices and Printers and right-click the name of your...
XL2420T User Manual
Page 25
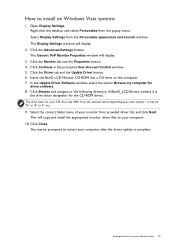
Open Display Settings. Right-click the desktop and select Personalize from the Personalize appearance and sounds window. The Display Settings window will display. 3. Click the Advanced Settings button. Click Continue in the prompted User Account Control window. 5. Click the Driver tab and the Update Driver button. 6. Insert the BenQ LCD Monitor CD-ROM into a CD drive on Windows Vista systems 1. This will copy and install the appropriate monitor driver files to your BenQ monitor 25 You may differ...
Open Display Settings. Right-click the desktop and select Personalize from the Personalize appearance and sounds window. The Display Settings window will display. 3. Click the Advanced Settings button. Click Continue in the prompted User Account Control window. 5. Click the Driver tab and the Update Driver button. 6. Insert the BenQ LCD Monitor CD-ROM into a CD drive on Windows Vista systems 1. This will copy and install the appropriate monitor driver files to your BenQ monitor 25 You may differ...
XL2420T User Manual
Page 26
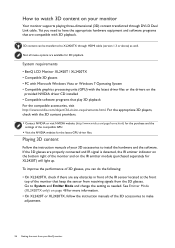
... be transferred to XL2420TX through DVI-D Dual Link cable. Playing 3D content Follow the instruction manuals of the compatible GPU. • Visit the NVIDIA website for the latest GPU driver files. See Emitter Mode (XL2420TX only) on your monitor Your monitor supports playing three-dimensional (3D) content transferred through HDMI cable (version 1.3 or above) as needed. Go to System and Emitter Mode and change the setting as well...
... be transferred to XL2420TX through DVI-D Dual Link cable. Playing 3D content Follow the instruction manuals of the compatible GPU. • Visit the NVIDIA website for the latest GPU driver files. See Emitter Mode (XL2420TX only) on your monitor Your monitor supports playing three-dimensional (3D) content transferred through HDMI cable (version 1.3 or above) as needed. Go to System and Emitter Mode and change the setting as well...
XL2420T User Manual
Page 30
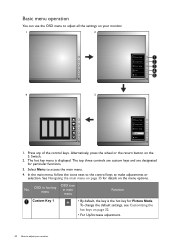
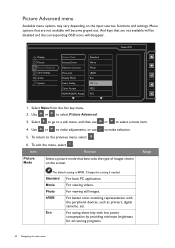
... displayed. To change the default settings, see Customizing the hot keys on page 32. • For Up/Increase adjustment. 30 How to adjust your monitor. 1 2 Picture Mode Display Mode Smart Scaling Menu Exit 4 3 Picture Mode Display Mode Smart Scaling Menu Exit 1. Select Menu to make adjustments or selection. Press any of the control keys. The hot key menu is the hot key for Picture Mode. No. Basic menu operation You can use the OSD menu to adjust all the settings...
... displayed. To change the default settings, see Customizing the hot keys on page 32. • For Up/Increase adjustment. 30 How to adjust your monitor. 1 2 Picture Mode Display Mode Smart Scaling Menu Exit 4 3 Picture Mode Display Mode Smart Scaling Menu Exit 1. Select Menu to make adjustments or selection. Press any of the control keys. The hot key menu is the hot key for Picture Mode. No. Basic menu operation You can use the OSD menu to adjust all the settings...
XL2420T User Manual
Page 32
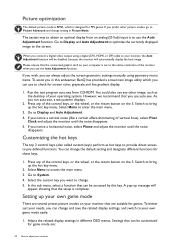
... direct access to obtain an optimal display from CD-ROM. Picture optimization The default picture mode is FPS1, which you can use the Auto Adjustment function. Run the test program auto.exe from an analog (D-Sub) input is designed for screen color, grayscale and line gradient display. 1. Press any of your monitor that the setup is complete. Select the custom key you connect a digital video output using geometry menu items. To assist you...
... direct access to obtain an optimal display from CD-ROM. Picture optimization The default picture mode is FPS1, which you can use the Auto Adjustment function. Run the test program auto.exe from an analog (D-Sub) input is designed for screen color, grayscale and line gradient display. 1. Press any of your monitor that the setup is complete. Select the custom key you connect a digital video output using geometry menu items. To assist you...
XL2420T User Manual
Page 36
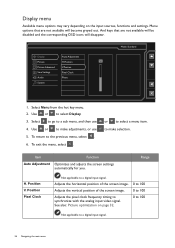
... to make adjustments, or use 4. Display Picture Picture Advanced Save Settings Audio System Auto Adjustment H.Position V.Postion Pixel Clock Phase Mode: Standard 50 1. Select Menu from the hot key menu. 2. To exit the menu, select . Range H. Adjusts the horizontal position of the screen image. 0 to 100 Adjusts the vertical position of the screen image. 0 to 100 Adjusts the pixel clock frequency timing to a digital input signal. Position Pixel Clock Not applicable to synchronize with the analog input video signal. See also: Picture optimization on the input sources...
... to make adjustments, or use 4. Display Picture Picture Advanced Save Settings Audio System Auto Adjustment H.Position V.Postion Pixel Clock Phase Mode: Standard 50 1. Select Menu from the hot key menu. 2. To exit the menu, select . Range H. Adjusts the horizontal position of the screen image. 0 to 100 Adjusts the vertical position of the screen image. 0 to 100 Adjusts the pixel clock frequency timing to a digital input signal. Position Pixel Clock Not applicable to synchronize with the analog input video signal. See also: Picture optimization on the input sources...
XL2420T User Manual
Page 40
... use or to make selection. 5. To return to select Picture Advanced. 3. Photo For viewing still images. Menu options that are not available will be disabled and the corresponding OSD icons will become grayed out. And keys that best suits the type of images shown on the input sources, functions and settings. Select Menu from the hot key menu. 2. Range The default setting is FPS1. Movie For viewing videos. Eco For saving...
... use or to make selection. 5. To return to select Picture Advanced. 3. Photo For viewing still images. Menu options that are not available will be disabled and the corresponding OSD icons will become grayed out. And keys that best suits the type of images shown on the input sources, functions and settings. Select Menu from the hot key menu. 2. Range The default setting is FPS1. Movie For viewing videos. Eco For saving...

XL2420T User Manual
Page 48
... remote diagnostics. Normal Mode Sets the signal distance in Off power saving mode. • OFF • 10min. • 20min. • 30min. televisions or DVD players). Sets the function to be accessed by custom key 3. • Picture mode • Display Mode • Smart Scaling • Brightness • Contrast • Smart Focus • Volume • Mute • Input • Black eQualizer Auto Power Sets the time to power off the monitor automatically in normal power mode. Sets...
... remote diagnostics. Normal Mode Sets the signal distance in Off power saving mode. • OFF • 10min. • 20min. • 30min. televisions or DVD players). Sets the function to be accessed by custom key 3. • Picture mode • Display Mode • Smart Scaling • Brightness • Contrast • Smart Focus • Volume • Mute • Input • Black eQualizer Auto Power Sets the time to power off the monitor automatically in normal power mode. Sets...
XL2420T User Manual
Page 50
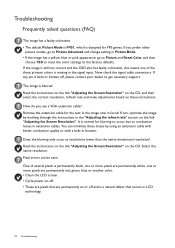
... pixels is permanently black, one or more pixels are permanently red, green, blue or another color. • Clean the LCD screen. • Cycle power on-off. • These are pixels that occurs in extension cables. Read the instructions on the link "Adjusting the Screen Resolution" on the CD, and then select the correct resolution, refresh rate and make adjustments based on or off , please contact your dealer to conduction losses in LCD technology. 50 Troubleshooting...
... pixels is permanently black, one or more pixels are permanently red, green, blue or another color. • Clean the LCD screen. • Cycle power on-off. • These are pixels that occurs in extension cables. Read the instructions on the link "Adjusting the Screen Resolution" on the CD, and then select the correct resolution, refresh rate and make adjustments based on or off , please contact your dealer to conduction losses in LCD technology. 50 Troubleshooting...

XL2420T User Manual
Page 51
... orange? Check the power supply mains socket, the external power supply and the mains switch. The image is active. Read the instructions on the link "Adjusting the Screen Resolution" on the CD, and then select the correct resolution, refresh rate and make adjustments based on the screen, this monitor does not support, please change the setting to set a proper aspect ratio for the input sources. To have the optimal display performance of each type of Range on these instructions.
... orange? Check the power supply mains socket, the external power supply and the mains switch. The image is active. Read the instructions on the link "Adjusting the Screen Resolution" on the CD, and then select the correct resolution, refresh rate and make adjustments based on the screen, this monitor does not support, please change the setting to set a proper aspect ratio for the input sources. To have the optimal display performance of each type of Range on these instructions.

XL2420TX Data Sheet
Page 1
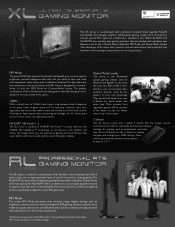
... D-sub + DVI-DL + HDMI1.4x2 + DP1.2/headphone jack Built-in this materials are the property of BenQ Corp. Switch Height Adjustment, Game Mode Loader Embedded 3D IR Emitter XL2420TX Images Display Mode Smart Scaling eQBDuMlaiasoclpikdzDlMeaiyrsopdlaey S.SSSwcmaitlaSiScnrcmhtgalainrtg GaemLQoeBeaulQdMaaBceluoiklrzaadecleirkzer S.SSw.Siwtcithch GGamLamoLeoaedMadMeoerodrdee Product Color Back Light Unit Panel Type LCD Size Aspect Ratio Native Resolution Display Area Pixel Pitch (mm) Brightness ( typ.) Contrast ( typ. ) DCR (Dynamic Contrast Ratio) (typ.) Viewing Angle (L/R;U/D) (CR...
... D-sub + DVI-DL + HDMI1.4x2 + DP1.2/headphone jack Built-in this materials are the property of BenQ Corp. Switch Height Adjustment, Game Mode Loader Embedded 3D IR Emitter XL2420TX Images Display Mode Smart Scaling eQBDuMlaiasoclpikdzDlMeaiyrsopdlaey S.SSSwcmaitlaSiScnrcmhtgalainrtg GaemLQoeBeaulQdMaaBceluoiklrzaadecleirkzer S.SSw.Siwtcithch GGamLamoLeoaedMadMeoerodrdee Product Color Back Light Unit Panel Type LCD Size Aspect Ratio Native Resolution Display Area Pixel Pitch (mm) Brightness ( typ.) Contrast ( typ. ) DCR (Dynamic Contrast Ratio) (typ.) Viewing Angle (L/R;U/D) (CR...
- Gaming Monitor eBrochure
Page 2
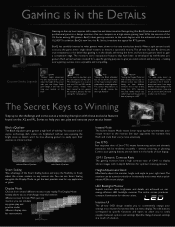
... to any game play on different screen sizes without smearing or ghosting. Height Adjustment Stand Effortlessly adjust the monitor height and angle to design monitors that synchronizes your mouse motion to display vibrant images with just one monitor, you can be rendered smoothly - Quickly change your settings in Instant Mode means lower input lag that can assign different screen settings to gaming so the S Switch is in -depth definition for...
... to any game play on different screen sizes without smearing or ghosting. Height Adjustment Stand Effortlessly adjust the monitor height and angle to design monitors that synchronizes your mouse motion to display vibrant images with just one monitor, you can be rendered smoothly - Quickly change your settings in Instant Mode means lower input lag that can assign different screen settings to gaming so the S Switch is in -depth definition for...
- Gaming Monitor eBrochure
Page 3
Every in the future so you can always stay on the S Switch to quickly navigate and change your monitor image display settings such as brightness, contrast and color tint accordingly for RTS gaming. Each mode is out. Use the scroll button on top of the super fast response rate and razor-sharp clarity and don't let hardware shortcomings compromise your winning chances. Now, you 're...
Every in the future so you can always stay on the S Switch to quickly navigate and change your monitor image display settings such as brightness, contrast and color tint accordingly for RTS gaming. Each mode is out. Use the scroll button on top of the super fast response rate and razor-sharp clarity and don't let hardware shortcomings compromise your winning chances. Now, you 're...
- Gaming Monitor eBrochure
Page 4
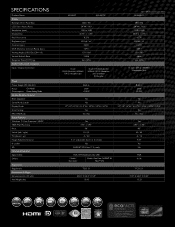
...) Brightness (typ.) Contrast (typ.) DCR (Dynamic Contrast Ratio) (typ.) Viewing Angle (L/R;U/D) (CR>=10) Vertical Refresh Rate Response Time (Tr+Tf) typ. Audio / Video Inputs / Outputs Input / Output Connector Power Power Supply (90~264 AC) Power On Mode* Consumption Power Saving Mode Gaming Exclusive Features Black eQualizer Game Mode Loader Display Mode Smart Scaling FPS / RTS Mode Special Features Windows 7 / Vista Premium / HDCP VESA Wall Mounting Pivot Swivel (left / right) Tilt (down / up) Height Adjustment Stand K Locker 3D Included Accessories Signal Cable Others...
...) Brightness (typ.) Contrast (typ.) DCR (Dynamic Contrast Ratio) (typ.) Viewing Angle (L/R;U/D) (CR>=10) Vertical Refresh Rate Response Time (Tr+Tf) typ. Audio / Video Inputs / Outputs Input / Output Connector Power Power Supply (90~264 AC) Power On Mode* Consumption Power Saving Mode Gaming Exclusive Features Black eQualizer Game Mode Loader Display Mode Smart Scaling FPS / RTS Mode Special Features Windows 7 / Vista Premium / HDCP VESA Wall Mounting Pivot Swivel (left / right) Tilt (down / up) Height Adjustment Stand K Locker 3D Included Accessories Signal Cable Others...


