

User Manual
Page 1
X2000W/X2200W LCD Color Monitor User Manual Welcome
X2000W/X2200W LCD Color Monitor User Manual Welcome

User Manual
Page 2
... the type of power available, consult your dealer or local power company. Clean the LCD monitor surface with respect to time in installation unless proper ventilation is provided. • Never push objects or spill liquid of BenQ Corporation. Disclaimer BenQ Corporation makes no representations or warranties, either expressed or implied, with a lint-free, non...
... the type of power available, consult your dealer or local power company. Clean the LCD monitor surface with respect to time in installation unless proper ventilation is provided. • Never push objects or spill liquid of BenQ Corporation. Disclaimer BenQ Corporation makes no representations or warranties, either expressed or implied, with a lint-free, non...
User Manual
Page 4
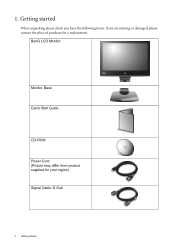
BenQ LCD Monitor Monitor Base Quick Start Guide CD-ROM Power Cord (Picture may differ from product supplied for your region) Signal Cable: D-Sub 4 Getting started When unpacking please check you have the following items. If any are missing or damaged, please contact the place of purchase for a replacement. 1. Getting started
BenQ LCD Monitor Monitor Base Quick Start Guide CD-ROM Power Cord (Picture may differ from product supplied for your region) Signal Cable: D-Sub 4 Getting started When unpacking please check you have the following items. If any are missing or damaged, please contact the place of purchase for a replacement. 1. Getting started

User Manual
Page 7
... is turned on you must turn it over and place it off before continuing. Carefully lift the monitor, turn it upright on its stand on your desk will crack the glass or damage the LCD substrate voiding your desk and placing a soft item like a stapler or a mouse will scratch or damage ...the monitor surround and controls. Gently attempt to pull them together until instructed to check that they click and ...
... is turned on you must turn it over and place it off before continuing. Carefully lift the monitor, turn it upright on its stand on your desk will crack the glass or damage the LCD substrate voiding your desk and placing a soft item like a stapler or a mouse will scratch or damage ...the monitor surround and controls. Gently attempt to pull them together until instructed to check that they click and ...
User Manual
Page 8
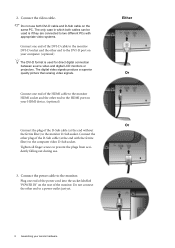
... the plug of the D-Sub cable (at the end with appropriate video systems. Connect one end of the monitor. Do not connect the other end to the HDMI port on your monitor hardware Either Or Or 8 Assembling your computer. (optional) The DVI-D format is used is if they are...filter) to prevent the plugs from accidently falling out during use both cables can be used for direct digital connection between source video and digital LCD monitors or projectors. Tighten all finger screws to the computer video D-Sub socket. Connect the power cable to a power outlet just yet. 2. Connect...
... the plug of the D-Sub cable (at the end with appropriate video systems. Connect one end of the monitor. Do not connect the other end to the HDMI port on your monitor hardware Either Or Or 8 Assembling your computer. (optional) The DVI-D format is used is if they are...filter) to prevent the plugs from accidently falling out during use both cables can be used for direct digital connection between source video and digital LCD monitors or projectors. Tighten all finger screws to the computer video D-Sub socket. Connect the power cable to a power outlet just yet. 2. Connect...

User Manual
Page 10
...before unplugging the monitor signal cable. Turn off the monitor and the power before laying the screen face down on an object like a stapler or a mouse will scratch or damage the monitor surround and ... padded surface. 2. Please be careful to prevent damage to detach the stand base 1. Protect the monitor and screen by clearing a flat open area on your desk and placing a soft item like a...cable. Press the locking clips to detach the monitor base from the monitor stand arm. 10 Assembling your warranty. Sliding or scraping the monitor around on your desk will crack the glass or ...
...before unplugging the monitor signal cable. Turn off the monitor and the power before laying the screen face down on an object like a stapler or a mouse will scratch or damage the monitor surround and ... padded surface. 2. Please be careful to prevent damage to detach the stand base 1. Protect the monitor and screen by clearing a flat open area on your desk and placing a soft item like a...cable. Press the locking clips to detach the monitor base from the monitor stand arm. 10 Assembling your warranty. Sliding or scraping the monitor around on your desk will crack the glass or ...

User Manual
Page 11
...Password to login to your Windows computer, you turn on your computer (after connecting the monitor to your new BenQ color LCD flat screen monitor, you should install the custom BenQ LCD Monitor driver software as a member of Microsoft Windows you are using, and whether you are ...upgrading an existing installation (which already has existing monitor driver software) with a newer monitor. Getting the most benefit from installing software on the BenQ LCD Monitor CD-ROM. 4. The circumstances under which you connect and install your computer is connected...
...Password to login to your Windows computer, you turn on your computer (after connecting the monitor to your new BenQ color LCD flat screen monitor, you should install the custom BenQ LCD Monitor driver software as a member of Microsoft Windows you are using, and whether you are ...upgrading an existing installation (which already has existing monitor driver software) with a newer monitor. Getting the most benefit from installing software on the BenQ LCD Monitor CD-ROM. 4. The circumstances under which you connect and install your computer is connected...
User Manual
Page 12
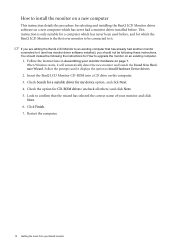
... to Install Hardware Device drivers. 2. Follow the instructions in Assembling your monitor hardware on the computer. 3. How to install the monitor on a new computer This instruction details the procedure for selecting and installing the BenQ LCD Monitor driver software on a new computer which the BenQ LCD Monitor is only suitable for a computer which has never been used before...
... to Install Hardware Device drivers. 2. Follow the instructions in Assembling your monitor hardware on the computer. 3. How to install the monitor on a new computer This instruction details the procedure for selecting and installing the BenQ LCD Monitor driver software on a new computer which the BenQ LCD Monitor is only suitable for a computer which has never been used before...

User Manual
Page 13
...the time of writing, BenQ has done no testing of this driver on other versions of Windows, however, as compatible for the particular model monitor you through the file selection and installation process. Windows has an Upgrade Device Driver Wizard to upgrade the monitor on an existing computer...Windows Vista systems on page 14. • How to install on Windows XP system on the BenQ LCD Monitor CD-ROM for Windows XP and Windows Vista Operating System (OS). The BenQ LCD Monitor driver for your model may well function perfectly with other versions of Windows and cannot guarantee its ...
...the time of writing, BenQ has done no testing of this driver on other versions of Windows, however, as compatible for the particular model monitor you through the file selection and installation process. Windows has an Upgrade Device Driver Wizard to upgrade the monitor on an existing computer...Windows Vista systems on page 14. • How to install on Windows XP system on the BenQ LCD Monitor CD-ROM for Windows XP and Windows Vista Operating System (OS). The BenQ LCD Monitor driver for your model may well function perfectly with other versions of Windows and cannot guarantee its ...

User Manual
Page 14
... 'E:' or 'F:' etc. 9. Click 'Browse' and navigate to install on the computer. 7. This will display. 3. The Generic PnP Monitor Properties window will copy and install the appropriate monitor driver files to restart Windows Vista, as the BenQ LCD monitor drivers will display. 2. You do not need to your system - Click Continue in the prompted User Account...
... 'E:' or 'F:' etc. 9. Click 'Browse' and navigate to install on the computer. 7. This will display. 3. The Generic PnP Monitor Properties window will copy and install the appropriate monitor driver files to restart Windows Vista, as the BenQ LCD monitor drivers will display. 2. You do not need to your system - Click Continue in the prompted User Account...

User Manual
Page 15
... will operate immediately with these instructions. 5. Cancel out of view is selected for you to restart Windows XP, as the BenQ LCD monitor drivers will already be selected for your monitor model. 9. Insert the BenQ LCD Monitor CD-ROM into a CD drive on the CD appropriate to Display Properties is through the Windows desktop. Check the option...
... will operate immediately with these instructions. 5. Cancel out of view is selected for you to restart Windows XP, as the BenQ LCD monitor drivers will already be selected for your monitor model. 9. Insert the BenQ LCD Monitor CD-ROM into a CD drive on the CD appropriate to Display Properties is through the Windows desktop. Check the option...
User Manual
Page 27
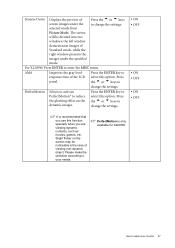
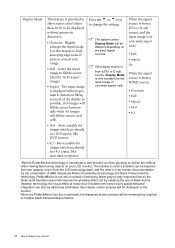
...demonstrates images of Standard mode, while the right window presents the images under the selected mode from Picture Mode. For X2200W, Press ENTER to your monitor 27 select this option. Please make the selection according to enter the MISC menu. PerfectMotion is recommended that you use...be noticeable in the case of the LCD select this option. Press panel. Press the t or u keys to change the settings. • ON • OFF • ON • OFF • ON • OFF It is only available for X2200W. PerfectMotion Selects to activate Press the ...
...demonstrates images of Standard mode, while the right window presents the images under the selected mode from Picture Mode. For X2200W, Press ENTER to your monitor 27 select this option. Please make the selection according to enter the MISC menu. PerfectMotion is recommended that you use...be noticeable in the case of the LCD select this option. Press panel. Press the t or u keys to change the settings. • ON • OFF • ON • OFF • ON • OFF It is only available for X2200W. PerfectMotion Selects to activate Press the ...
User Manual
Page 28
... D-sub source, Display Mode is from human eye's spatial-temporal integration can be displayed on the monitor. The solution to adjust your monitor Scales the input image to change the settings. Press the t or u keys to fill the screen... prevent you from a HDMI source: • Overscan • Full • Aspect • 16:9 • 4:3 *BenQ's PerfectMotion technology is from ghosting or motion blur effects while viewing fast moving objects on the input signal sources. When the signal...achieving faster gray-to hide annoying edge noise if present around your LCD monitor.
... D-sub source, Display Mode is from human eye's spatial-temporal integration can be displayed on the monitor. The solution to adjust your monitor Scales the input image to change the settings. Press the t or u keys to fill the screen... prevent you from a HDMI source: • Overscan • Full • Aspect • 16:9 • 4:3 *BenQ's PerfectMotion technology is from ghosting or motion blur effects while viewing fast moving objects on the input signal sources. When the signal...achieving faster gray-to hide annoying edge noise if present around your LCD monitor.
User Manual
Page 32
...pixels are permanently white, one or more pixels are permanently red, green, blue or another color. • Clean the LCD screen. • Cycle power on-off , please contact your computer and monitor go into a low power "sleep" mode when not actively in green? 7. It is bent or broken off . &#...asked questions (FAQ) The image is missing in booster. If the image is still not correct and the OSD also has faulty coloration, this monitor does not support, please change the setting to get necessary support. Read the instructions on the link "Adjusting the Screen Resolution" on the screen...
...pixels are permanently white, one or more pixels are permanently red, green, blue or another color. • Clean the LCD screen. • Cycle power on-off , please contact your computer and monitor go into a low power "sleep" mode when not actively in green? 7. It is bent or broken off . &#...asked questions (FAQ) The image is missing in booster. If the image is still not correct and the OSD also has faulty coloration, this monitor does not support, please change the setting to get necessary support. Read the instructions on the link "Adjusting the Screen Resolution" on the screen...


