

User Manual
Page 2
..., chemical, manual or otherwise, without obligation of BenQ Corporation to make changes from the AC supply. • The power supply cord serves as a power disconnect device for ventilation. Always unplug your dealer or local power company. Your monitor should be placed near the equipment and be easily accessible. • This product should never be operated from the wall outlet before cleaning. Servicing • Do...
..., chemical, manual or otherwise, without obligation of BenQ Corporation to make changes from the AC supply. • The power supply cord serves as a power disconnect device for ventilation. Always unplug your dealer or local power company. Your monitor should be placed near the equipment and be easily accessible. • This product should never be operated from the wall outlet before cleaning. Servicing • Do...
User Manual
Page 3
... monitor 6 Front view ...6 Back view ...6 Assembling your monitor hardware 7 How to detach the stand base 10 Getting the most from your BenQ monitor 11 How to install the monitor on a new computer 12 How to upgrade the monitor on an existing computer 13 How to install on Windows Vista systems 14 How to install on Windows XP system 15 Picture optimization ...16 How to adjust your monitor 17 The control panel (1): X2200W 17 The control panel...
... monitor 6 Front view ...6 Back view ...6 Assembling your monitor hardware 7 How to detach the stand base 10 Getting the most from your BenQ monitor 11 How to install the monitor on a new computer 12 How to upgrade the monitor on an existing computer 13 How to install on Windows Vista systems 14 How to install on Windows XP system 15 Picture optimization ...16 How to adjust your monitor 17 The control panel (1): X2200W 17 The control panel...

User Manual
Page 7
... apart to pull them together until instructed to do so. 1. Please be careful to prevent damage to minimize unwanted reflections from other light sources. Orient and align the stand base socket with the end of the monitor. Gently attempt to check that they click and lock into place. Carefully lift the monitor, turn it upright on its stand on a flat clean padded surface. Assembling your monitor...
... apart to pull them together until instructed to do so. 1. Please be careful to prevent damage to minimize unwanted reflections from other light sources. Orient and align the stand base socket with the end of the monitor. Gently attempt to check that they click and lock into place. Carefully lift the monitor, turn it upright on its stand on a flat clean padded surface. Assembling your monitor...
User Manual
Page 8
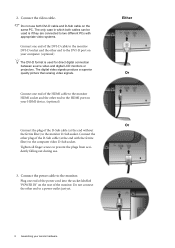
... appropriate video systems. Connect one end of the HDMI cable to the monitor HDMI socket and the other end to the HDMI port on your monitor hardware Connect the power cable to prevent the plugs from accidently falling out during use both cables can be used for direct digital connection between source video and digital LCD monitors or projectors. The digital video signals produce a superior quality picture than analog video signals. Either Or Or 8 Assembling your computer. (optional) The DVI-D format is used...
... appropriate video systems. Connect one end of the HDMI cable to the monitor HDMI socket and the other end to the HDMI port on your monitor hardware Connect the power cable to prevent the plugs from accidently falling out during use both cables can be used for direct digital connection between source video and digital LCD monitors or projectors. The digital video signals produce a superior quality picture than analog video signals. Either Or Or 8 Assembling your computer. (optional) The DVI-D format is used...
User Manual
Page 9
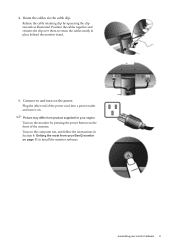
... from product supplied for your region. Plug the other end of the monitor. Turn on the monitor by squeezing the clip inwards as illustrated. Connect-to install the monitor software. Assembling your BenQ monitor on the front of the power cord into a power outlet and turn -on . Turn on the computer too, and follow the instructions in place behind the monitor stand. 5. Picture may differ from your monitor hardware 9 Release the cable retaining...
... from product supplied for your region. Plug the other end of the monitor. Turn on the monitor by squeezing the clip inwards as illustrated. Connect-to install the monitor software. Assembling your BenQ monitor on the front of the power cord into a power outlet and turn -on . Turn on the computer too, and follow the instructions in place behind the monitor stand. 5. Picture may differ from your monitor hardware 9 Release the cable retaining...
User Manual
Page 11
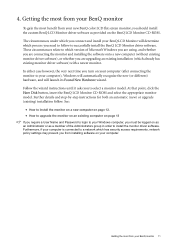
... existing monitor driver software), or whether you are upgrading an existing installation (which process you connect and install your BenQ LCD Monitor will launch its Found New Hardware wizard. Getting the most from your BenQ monitor To gain the most from your new BenQ color LCD flat screen monitor, you require a User Name and Password to login to your computer (after connecting the monitor to successfully install the BenQ LCD Monitor driver software. Follow the wizard instructions until it...
... existing monitor driver software), or whether you are upgrading an existing installation (which process you connect and install your BenQ LCD Monitor will launch its Found New Hardware wizard. Getting the most from your BenQ monitor To gain the most from your new BenQ color LCD flat screen monitor, you require a User Name and Password to login to your computer (after connecting the monitor to successfully install the BenQ LCD Monitor driver software. Follow the wizard instructions until it...
User Manual
Page 12
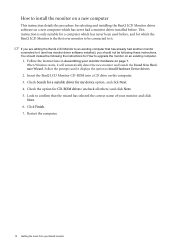
Follow the instructions in Assembling your monitor hardware on the computer. 3. Insert the BenQ LCD Monitor CD-ROM into a CD drive on page 7. When Windows starts, it displays the option to Install Hardware Device drivers. 2. Look to confirm that has already had a monitor driver installed before , and for which has never had another monitor connected to it (and has monitor driver software installed), you should instead be following these instructions. Follow the...
Follow the instructions in Assembling your monitor hardware on the computer. 3. Insert the BenQ LCD Monitor CD-ROM into a CD drive on page 7. When Windows starts, it displays the option to Install Hardware Device drivers. 2. Look to confirm that has already had a monitor driver installed before , and for which has never had another monitor connected to it (and has monitor driver software installed), you should instead be following these instructions. Follow the...

User Manual
Page 13
...; How to install on Windows XP system on page 15. How to upgrade the monitor on an existing computer This instruction details the procedure for manually updating the existing monitor driver software on your model may well function perfectly with other versions of Windows, however, as compatible for Windows XP and Windows Vista Operating System (OS). The BenQ LCD Monitor driver for your Microsoft Windows computer. You need only steer it...
...; How to install on Windows XP system on page 15. How to upgrade the monitor on an existing computer This instruction details the procedure for manually updating the existing monitor driver software on your model may well function perfectly with other versions of Windows, however, as compatible for Windows XP and Windows Vista Operating System (OS). The BenQ LCD Monitor driver for your Microsoft Windows computer. You need only steer it...

User Manual
Page 14
... the Properties button. 4. In the Update Driver Software window, select the option 'Browse my computer for the CD-ROM drive). Click Close. Open Display Settings. Click the Driver tab and the Update Driver button. 6. The drive letter for your CD drive may be 'D:' or 'E:' or 'F:' etc. 9. You do not need to restart Windows Vista, as the BenQ LCD monitor drivers will copy and install the appropriate monitor driver files to install on...
... the Properties button. 4. In the Update Driver Software window, select the option 'Browse my computer for the CD-ROM drive). Click Close. Open Display Settings. Click the Driver tab and the Update Driver button. 6. The drive letter for your CD drive may be 'D:' or 'E:' or 'F:' etc. 9. You do not need to restart Windows Vista, as the BenQ LCD monitor drivers will copy and install the appropriate monitor driver files to install on...
User Manual
Page 15
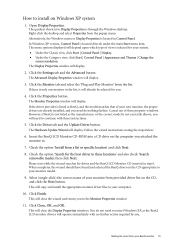
Click the Settings tab and the Advanced button. The Advanced Display Properties window will display. Click the Monitor tab and select the 'Plug and Play Monitor' from provided driver list on the computer you need do not need to your monitor model. 9. If the driver provider is listed as the BenQ LCD monitor drivers will operate immediately with these instructions. 5. Check the option 'Search for the best driver in Control Panel. Select (single-click) the...
Click the Settings tab and the Advanced button. The Advanced Display Properties window will display. Click the Monitor tab and select the 'Plug and Play Monitor' from provided driver list on the computer you need do not need to your monitor model. 9. If the driver provider is listed as the BenQ LCD monitor drivers will operate immediately with these instructions. 5. Check the option 'Search for the best driver in Control Panel. Select (single-click) the...
User Manual
Page 16
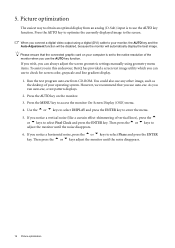
... an analog (D-Sub) input is set to the native resolution of the monitor when you notice a vertical noise (like a curtain effect-shimmering of your monitor, the AUTO key and the Auto Adjustment function will be disabled, because the monitor will automatically display the best image. As you connect a digital video output using geometry menu items. To assist you in this endeavour, BenQ has provided a screen test image utility which you use auto.exe. If you use the AUTO...
... an analog (D-Sub) input is set to the native resolution of the monitor when you notice a vertical noise (like a curtain effect-shimmering of your monitor, the AUTO key and the Auto Adjustment function will be disabled, because the monitor will automatically display the best image. As you connect a digital video output using geometry menu items. To assist you in this endeavour, BenQ has provided a screen test image utility which you use auto.exe. If you use the AUTO...

User Manual
Page 17
... displaying. Hot-key displays will only operate while the OSD menu is also the hot key for PerfectMotion. 5. How to adjust your monitor The control panel (1): X2200W 1. See Hot key mode (1): X2200W on or off. 2. "MENU" key: Activate OSD main menu and return to adjust your monitor 17 t / PerfectMotion key: For Up/Increase adjustment. "AUTO": Adjust vertical position, phase, horizontal position and pixel clock automatically. 3. OSD = On Screen Display. 6. "Power": Turn the power on page 19. u /Mode key: For Down/Decrease adjustment...
... displaying. Hot-key displays will only operate while the OSD menu is also the hot key for PerfectMotion. 5. How to adjust your monitor The control panel (1): X2200W 1. See Hot key mode (1): X2200W on or off. 2. "MENU" key: Activate OSD main menu and return to adjust your monitor 17 t / PerfectMotion key: For Up/Increase adjustment. "AUTO": Adjust vertical position, phase, horizontal position and pixel clock automatically. 3. OSD = On Screen Display. 6. "Power": Turn the power on page 19. u /Mode key: For Down/Decrease adjustment...

User Manual
Page 18
... for Mode. 6. u /Mode key: For Down/Decrease adjustment. The control panel (2): X2000W 1. The key is not currently displaying. OSD = On Screen Display. "ENTER" key: Enter sub menus and select items. The key is also the hot key for adjusting the value of no key activity. "AUTO": Adjust vertical position, phase, horizontal position and pixel clock automatically. 3. t /Contrast/Brightness key: For Up/Increase adjustment. Hot-key displays will display a graduated scale for Input. The...
... for Mode. 6. u /Mode key: For Down/Decrease adjustment. The control panel (2): X2000W 1. The key is not currently displaying. OSD = On Screen Display. "ENTER" key: Enter sub menus and select items. The key is also the hot key for adjusting the value of no key activity. "AUTO": Adjust vertical position, phase, horizontal position and pixel clock automatically. 3. t /Contrast/Brightness key: For Up/Increase adjustment. Hot-key displays will display a graduated scale for Input. The...
User Manual
Page 19
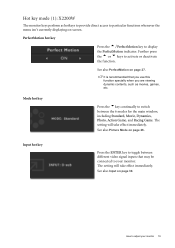
... connected to particular functions whenever the menu isn't currently displaying on page 27. Mode hot key Press the ukey continually to switch between different video signal inputs that you use this function specially when you are viewing dynamic contents, such as hotkeys to provide direct access to your monitor 19 See also Input on page 26. See also Picture Mode on page 30. The setting...
... connected to particular functions whenever the menu isn't currently displaying on page 27. Mode hot key Press the ukey continually to switch between different video signal inputs that you use this function specially when you are viewing dynamic contents, such as hotkeys to provide direct access to your monitor 19 See also Input on page 26. See also Picture Mode on page 30. The setting...
User Manual
Page 21
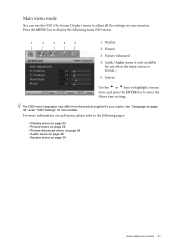
... OSD menu languages may differ from the product supplied to your monitor. Main menu mode You can use when the input source is only available for more information on each menu, please refer to adjust all the settings on page 30 How to enter the Menu item settings. For more details. Display 2. Picture Advanced 4. Audio (Audio menu is HDMI.) 5. Picture 3. Press the MENU key to display the following pages: • Display menu on page 22 • Picture menu...
... OSD menu languages may differ from the product supplied to your monitor. Main menu mode You can use when the input source is only available for more information on each menu, please refer to adjust all the settings on page 30 How to enter the Menu item settings. For more details. Display 2. Picture Advanced 4. Audio (Audio menu is HDMI.) 5. Picture 3. Press the MENU key to display the following pages: • Display menu on page 22 • Picture menu...

User Manual
Page 22
... the menu. 3. To return to display the main menu. 2. Press the MENU key to the previous menu, press the MENU button. The AUTO key is a 'hot-key' for you connect a digital video output using a digital (DVI) cable to your monitor, the AUTO key and the Auto Adjustment function will be disabled. 22 How to select this function. Item Auto Adjustment Function Optimizes and adjusts the screen settings automatically for this option and make adjustments or selections. 5. Range When you . Display menu 1.
... the menu. 3. To return to display the main menu. 2. Press the MENU key to the previous menu, press the MENU button. The AUTO key is a 'hot-key' for you connect a digital video output using a digital (DVI) cable to your monitor, the AUTO key and the Auto Adjustment function will be disabled. 22 How to select this function. Item Auto Adjustment Function Optimizes and adjusts the screen settings automatically for this option and make adjustments or selections. 5. Range When you . Display menu 1.
User Manual
Page 28
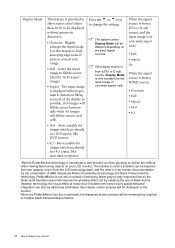
The input image is displayed without geometric distortion. • Overscan -Slightly enlarges the input image. Most suitable for the input image of multiple black frames between frames. 28 How to adjust your monitor The options under Display Mode will be different depending on the input signal sources. When the PerfectMotion function is activated, the displayed motion pictures will be enhanced by adopting the use of Black Frame Insertion technology, the...
The input image is displayed without geometric distortion. • Overscan -Slightly enlarges the input image. Most suitable for the input image of multiple black frames between frames. 28 How to adjust your monitor The options under Display Mode will be different depending on the input signal sources. When the PerfectMotion function is activated, the displayed motion pictures will be enhanced by adopting the use of Black Frame Insertion technology, the...

User Manual
Page 31
... the 'OSD Lock' submenu from being accidentally changed. Adjusts the vertical position of the OSD menu. Press the t or u keys to change the settings. 0 to 100 0 to the factory default values. Press the t or ukeys to leave the OSD Settings menu. Adjusts the display time of the OSD menu. Alternatively, you may use the t or u keys to adjust your monitor 31 Position Display Time Adjusts the horizontal position of the OSD menu. Press MENU to change the settings. Position V. H. Press the the software on...
... the 'OSD Lock' submenu from being accidentally changed. Adjusts the vertical position of the OSD menu. Press the t or u keys to change the settings. 0 to 100 0 to the factory default values. Press the t or ukeys to leave the OSD Settings menu. Adjusts the display time of the OSD menu. Alternatively, you may use the t or u keys to adjust your monitor 31 Position Display Time Adjusts the horizontal position of the OSD menu. Press MENU to change the settings. Position V. H. Press the the software on...
User Manual
Page 32
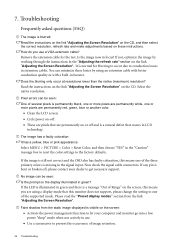
... "Adjusting the Screen Resolution" on these losses by working through the instructions in focus? Select MENU > PICTURE > Color > Reset Color, and then choose "YES" in green? Remove the extension cable for blurring to occur due to the factory defaults. Select the native resolution. No image can be seen: One of several pixels is permanently black, one or more pixels are permanently white, one or more pixels are permanently red, green, blue or another color. • Clean the LCD screen. •...
... "Adjusting the Screen Resolution" on these losses by working through the instructions in focus? Select MENU > PICTURE > Color > Reset Color, and then choose "YES" in green? Remove the extension cable for blurring to occur due to the factory defaults. Select the native resolution. No image can be seen: One of several pixels is permanently black, one or more pixels are permanently white, one or more pixels are permanently red, green, blue or another color. • Clean the LCD screen. •...
User Manual
Page 33
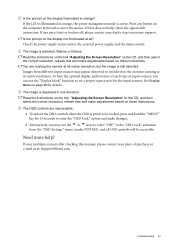
... at its native resolution, but the image is distorted, flashes or flickers: Read the instructions on the link "Adjusting the Screen Resolution" on the CD, and then select the correct resolution, refresh rate and make changes. • Alternatively, you can use the t or u keys to select "OFF" in the "OSD Lock" submenu from different input sources may use the "Display Mode" function to get necessary support. If that does not help ? Images from the "OSD Settings" menu (under...
... at its native resolution, but the image is distorted, flashes or flickers: Read the instructions on the link "Adjusting the Screen Resolution" on the CD, and then select the correct resolution, refresh rate and make changes. • Alternatively, you can use the t or u keys to select "OFF" in the "OSD Lock" submenu from different input sources may use the "Display Mode" function to get necessary support. If that does not help ? Images from the "OSD Settings" menu (under...


