
User Manual
Page 3
... ...5 Safety instructions 6 Overview ...9 Shipping contents 9 Remote control batteries 9 BenQ W10000/W9000 projector features 10 Projector exterior view 11 Front and upper side view 11 Rear view ...11 Under and side view 11 Connector panel ...11 Controls and functions 12 Control panel ...12 Remote control ...13 Positioning your projector 14 Choosing a location 14 Obtaining a preferred projected image size 15 Installation for a 16:9 ratio screen 15 Installation for a 4:3 ratio screen 16 Shifting the projection lens vertically 16 Connecting with video equipment 17 Connecting...
... ...5 Safety instructions 6 Overview ...9 Shipping contents 9 Remote control batteries 9 BenQ W10000/W9000 projector features 10 Projector exterior view 11 Front and upper side view 11 Rear view ...11 Under and side view 11 Connector panel ...11 Controls and functions 12 Control panel ...12 Remote control ...13 Positioning your projector 14 Choosing a location 14 Obtaining a preferred projected image size 15 Installation for a 16:9 ratio screen 15 Installation for a 4:3 ratio screen 16 Shifting the projection lens vertically 16 Connecting with video equipment 17 Connecting...

User Manual
Page 4
... video memory 23 Turning the power off 23 Menus ...24 On Screen Display (OSD) structure 24 Using the menus 25 Picture menu 26 Display menu 27 Options menu 28 Setup menu 28 Advance menu 29 Additional information 31 Care of the projector 31 Cleaning the lens ...31 Cleaning the projector case 31 Storing the projector 31 Transporting the projector 31 Cleaning and replacing the dust filter 31 Installing the cable connector-panel cover 33 Replacing the lamp 34 Indicators ...35 Troubleshooting 36 Specifications...
... video memory 23 Turning the power off 23 Menus ...24 On Screen Display (OSD) structure 24 Using the menus 25 Picture menu 26 Display menu 27 Options menu 28 Setup menu 28 Advance menu 29 Additional information 31 Care of the projector 31 Cleaning the lens ...31 Cleaning the projector case 31 Storing the projector 31 Transporting the projector 31 Cleaning and replacing the dust filter 31 Installing the cable connector-panel cover 33 Replacing the lamp 34 Indicators ...35 Troubleshooting 36 Specifications...

User Manual
Page 5
... the projector for help. Disposal This product contains the following measures: - To dispose of cleaner, near the projector. For the best results, please read this quality BenQ video projector! Moisture condensation Never operate the projector immediately after moving it is contained in a residential installation. Avoid volatile liquid Do not use the projector for at least 2 hours when there is used in the lamp. They...
... the projector for help. Disposal This product contains the following measures: - To dispose of cleaner, near the projector. For the best results, please read this quality BenQ video projector! Moisture condensation Never operate the projector immediately after moving it is contained in a residential installation. Avoid volatile liquid Do not use the projector for at least 2 hours when there is used in the lamp. They...
User Manual
Page 7
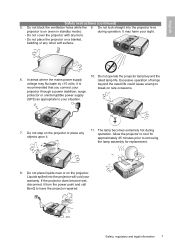
... (even in standby mode): during operation. English Safety instructions (continued) 5. Excessive operation of lamps beyond the rated lamp life. Safety, regulatory and legal information 7 It may fluctuate by ±10 volts, it from the power point and call BenQ to removing the lamp assembly for replacement. 8. Liquids spilled into the projector lens projector is recommended that you connect your projector through a power stabilizer, surge protector or uninterruptible power supply (UPS) as...
... (even in standby mode): during operation. English Safety instructions (continued) 5. Excessive operation of lamps beyond the rated lamp life. Safety, regulatory and legal information 7 It may fluctuate by ±10 volts, it from the power point and call BenQ to removing the lamp assembly for replacement. 8. Liquids spilled into the projector lens projector is recommended that you connect your projector through a power stabilizer, surge protector or uninterruptible power supply (UPS) as...

User Manual
Page 9
... Projector 2 3 1 ENTER CT Cable panel-connector Remote cover control W10000 Batteries User Warranty manual card Dust filter US (110V) EU (220V) Component Video cable Power cable UK (240V) 3-2 power adaptor Safety manual Remote control batteries 1. Stop when it back up into place. Overview 9 English Overview Shipping contents The projector is shipped with the cables required for connection to negative. 3. Positive (+) goes to positive and negative(-) goes to video equipment. Please check with...
... Projector 2 3 1 ENTER CT Cable panel-connector Remote cover control W10000 Batteries User Warranty manual card Dust filter US (110V) EU (220V) Component Video cable Power cable UK (240V) 3-2 power adaptor Safety manual Remote control batteries 1. Stop when it back up into place. Overview 9 English Overview Shipping contents The projector is shipped with the cables required for connection to negative. 3. Positive (+) goes to positive and negative(-) goes to video equipment. Please check with...
User Manual
Page 10
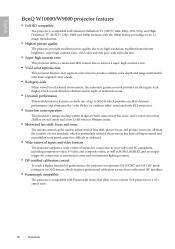
... in Whisper mode. • Motorized lens shift, focus and zoom The remote control can be used to adjust vertical lens shift, picture focus, and picture zoom size, all from the comfort of your armchair, which is particularly useful if the projector has been ceiling mounted and accessibility to its panel controls is difficult or awkward. • Wide variety of inputs and video formats The projector supports a wide variety of inputs for connection to your video and PC...
... in Whisper mode. • Motorized lens shift, focus and zoom The remote control can be used to adjust vertical lens shift, picture focus, and picture zoom size, all from the comfort of your armchair, which is particularly useful if the projector has been ceiling mounted and accessibility to its panel controls is difficult or awkward. • Wide variety of inputs and video formats The projector supports a wide variety of inputs for connection to your video and PC...

User Manual
Page 11
... view W10000 1 1. Indicator lights 6 5. Front IR sensor 8 7. Vent (heated air exhaust) Rear view 9 Under and side view 9. Main AC power switch 11. Kensington lock slot 15. RS-232C port for connection details. 15 16 17 18 19 HDHI S-VIDEO Y PB/CB PR/CR VIDEO G/Y B/PB/CB R/PR/CR H V RS-232 12V TRIGGER 20 21 22 14 12. Focus and Zoom adjustment 5 4. Projection lens 8. Ceiling mounting holes 14. HDMI port 16. Component video inputs (BNC) support...
... view W10000 1 1. Indicator lights 6 5. Front IR sensor 8 7. Vent (heated air exhaust) Rear view 9 Under and side view 9. Main AC power switch 11. Kensington lock slot 15. RS-232C port for connection details. 15 16 17 18 19 HDHI S-VIDEO Y PB/CB PR/CR VIDEO G/Y B/PB/CB R/PR/CR H V RS-232 12V TRIGGER 20 21 22 14 12. Focus and Zoom adjustment 5 4. Projection lens 8. Ceiling mounting holes 14. HDMI port 16. Component video inputs (BNC) support...
User Manual
Page 12
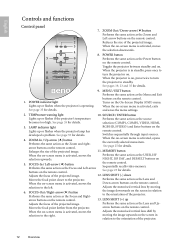
... the image upwards on the screen in standby, press once to turn the projector on , press twice to turn the projector to the projector. Turns on the remote control. NIGHT, ISF DAY, and DEFAULT buttons on the remote control. Adjusts the focus of the projected image. POWER indicator light Lights up Adjusts the focus of the projected image. 12. MENU / EXIT button Performs the same action as the USER, ISF selection upwards. selection (COMP1, COMP2, VIDEO, HDMI, 3. MEMORY button When the on -screen menu is...
... the image upwards on the screen in standby, press once to turn the projector on , press twice to turn the projector to the projector. Turns on the remote control. NIGHT, ISF DAY, and DEFAULT buttons on the remote control. Adjusts the focus of the projected image. POWER indicator light Lights up Adjusts the focus of the projected image. 12. MENU / EXIT button Performs the same action as the USER, ISF selection upwards. selection (COMP1, COMP2, VIDEO, HDMI, 3. MEMORY button When the on -screen menu is...

User Manual
Page 13
.... up to standby. Arrow buttons (Left e, Up c, Right f, Down d) Moves the current On-Screen Display (OSD) menu selection in USER, ISF DAY, ISF NIGHT, or DEFAULT for details. 10 CT 5. ENTER button Enacts the selected On-Screen Display (OSD) menu item. Pressing any changes made using the On-Screen Display (OSD) menu. See page 25 for the adjustment of the IR beam. English Remote control 1. Picture enhancement buttons (ZOOM, FOCUS, LENS) Displays the setting bars for...
.... up to standby. Arrow buttons (Left e, Up c, Right f, Down d) Moves the current On-Screen Display (OSD) menu selection in USER, ISF DAY, ISF NIGHT, or DEFAULT for details. 10 CT 5. ENTER button Enacts the selected On-Screen Display (OSD) menu item. Pressing any changes made using the On-Screen Display (OSD) menu. See page 25 for the adjustment of the IR beam. English Remote control 1. Picture enhancement buttons (ZOOM, FOCUS, LENS) Displays the setting bars for...
User Manual
Page 14
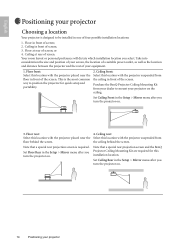
... consideration the size and position of your screen, the location of a suitable power outlet, as well as the location and distance between the projector and the rest of the screen. Purchase the BenQ Projector Ceiling Mounting Kit from your dealer to mount your equipment. 1. Ceiling rear: Select this location with the projector placed near the floor in the Setup > Mirror menu after you turn the projector on the ceiling. Set Floor Rear...
... consideration the size and position of your screen, the location of a suitable power outlet, as well as the location and distance between the projector and the rest of the screen. Purchase the BenQ Projector Ceiling Mounting Kit from your dealer to mount your equipment. 1. Ceiling rear: Select this location with the projector placed near the floor in the Setup > Mirror menu after you turn the projector on the ceiling. Set Floor Rear...
User Manual
Page 19
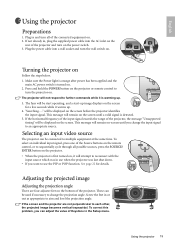
.... Using the projector 19 English Using the projector Preparations 1. Plug in , plug the supplied power cable into a wall socket and turn all possible sources, press the SOURCE/ ENTER button on the projector. • When the projector is first turned on the screen before the projector identifies the input signal. "Searching...." This message will be start operating, and a start-up . 4. Adjusting the projected image Adjusting the projection angle There are not perpendicular to further commands while it will be displayed...
.... Using the projector 19 English Using the projector Preparations 1. Plug in , plug the supplied power cable into a wall socket and turn all possible sources, press the SOURCE/ ENTER button on the projector. • When the projector is first turned on the screen before the projector identifies the input signal. "Searching...." This message will be start operating, and a start-up . 4. Adjusting the projected image Adjusting the projection angle There are not perpendicular to further commands while it will be displayed...

User Manual
Page 20
... the advent of digital signal processing, digital display devices like this projector, and most suitable for various projection situations as you would find in Picture > Preset Mode menu. Then sharpen the image by using the zoom buttons. Selecting a preset mode Select a preset mode on the screen. It is good for watching TV programs, playing games or seeing bright movies. • Preset Photo Mode: designed for viewing digital pictures in a linear...
... the advent of digital signal processing, digital display devices like this projector, and most suitable for various projection situations as you would find in Picture > Preset Mode menu. Then sharpen the image by using the zoom buttons. Selecting a preset mode Select a preset mode on the screen. It is good for watching TV programs, playing games or seeing bright movies. • Preset Photo Mode: designed for viewing digital pictures in a linear...
User Manual
Page 23
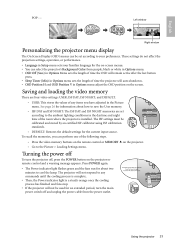
... V in the Picture menu. Using the projector 23 Saving and loading the video memory There are set according to the ambient lighting conditions in Setup menu sets your preferences. Press POWER again. • The Power indicator light flashes green and the fans run for the current input source. Left window SIZE Right window Personalizing the projector menu display The On Screen Display (OSD) menus can select the projector's Background Color from the power outlet. These settings do not affect the projection settings, operation, or...
... V in the Picture menu. Using the projector 23 Saving and loading the video memory There are set according to the ambient lighting conditions in Setup menu sets your preferences. Press POWER again. • The Power indicator light flashes green and the fans run for the current input source. Left window SIZE Right window Personalizing the projector menu display The On Screen Display (OSD) menus can select the projector's Background Color from the power outlet. These settings do not affect the projection settings, operation, or...

User Manual
Page 24
... window Video Graphics Frequency Phase H. English Menus On Screen Display (OSD) structure Picture Contrast Brightness Color Tint Filter Sharpness Preset Mode Extended Picture Settings Preset Cinema Mode Preset Home Theater Mode Preset Family Room Mode Preset Photo Mode Preset Gaming Mode Color Temp. Position Auto Purple Black White Load Default Normal High Grid Color Bar Lamp Type Lamp Hours Reset Lamp Timer Dust Filter Hours Reset Dust Filter Timer 24 Menus User1 User2 Lamp Native Warm Normal Cool Red Green Blue Yellow White Favorite Color 1 Favorite Color 2 Favorite Color 3 Default...
... window Video Graphics Frequency Phase H. English Menus On Screen Display (OSD) structure Picture Contrast Brightness Color Tint Filter Sharpness Preset Mode Extended Picture Settings Preset Cinema Mode Preset Home Theater Mode Preset Family Room Mode Preset Photo Mode Preset Gaming Mode Color Temp. Position Auto Purple Black White Load Default Normal High Grid Color Bar Lamp Type Lamp Hours Reset Lamp Timer Dust Filter Hours Reset Dust Filter Timer 24 Menus User1 User2 Lamp Native Warm Normal Cool Red Green Blue Yellow White Favorite Color 1 Favorite Color 2 Favorite Color 3 Default...

User Manual
Page 26
... noise. 6. Extended Picture Settings • Color Temp.: You can store one set of user memory. The higher the setting, the greater the intensity of difference between dark and light in the image. Green: Adjusts green hues independently. The higher the setting, the greater the intensity of the image. White: Adjusts white peaking. • Favorite Color Loading: Loads your program type. Each input source can choose a preferred color temperature from among User 1, User 2, Lamp Native, Warm...
... noise. 6. Extended Picture Settings • Color Temp.: You can store one set of user memory. The higher the setting, the greater the intensity of difference between dark and light in the image. Green: Adjusts green hues independently. The higher the setting, the greater the intensity of the image. White: Adjusts white peaking. • Favorite Color Loading: Loads your program type. Each input source can choose a preferred color temperature from among User 1, User 2, Lamp Native, Warm...
User Manual
Page 28
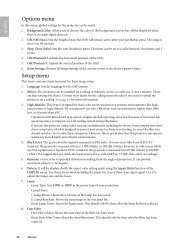
... minutes and 3 hours. 4. In cases like high temperature or high altitude. In some areas which is designed to adjust the image size and the focus. 7. however, in IRE units. Lamp • Lamp Type: Sets 250W or 200W as the power type of the current source to 100 IRE (white); The timer can be done after the filter has been replaced. 28 Menus If you check the input source if it...
... minutes and 3 hours. 4. In cases like high temperature or high altitude. In some areas which is designed to adjust the image size and the focus. 7. however, in IRE units. Lamp • Lamp Type: Sets 250W or 200W as the power type of the current source to 100 IRE (white); The timer can be done after the filter has been replaced. 28 Menus If you check the input source if it...
User Manual
Page 31
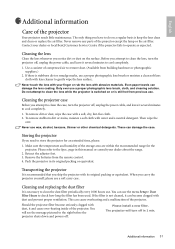
... use the menu Setup> Dust Filter Hours to clean the dust filter periodically every 1000 hours use a proper photographic lens brush, cloth, and cleaning solution. Use a canister of the projector. Never remove any parts of the projector Your projector needs little maintenance. Please install a new filter. English Additional information Care of the projector except the lamp or the air filter. The only thing you notice dirt or dust on a regular basis is necessary to check...
... use the menu Setup> Dust Filter Hours to clean the dust filter periodically every 1000 hours use a proper photographic lens brush, cloth, and cleaning solution. Use a canister of the projector. Never remove any parts of the projector Your projector needs little maintenance. Please install a new filter. English Additional information Care of the projector except the lamp or the air filter. The only thing you notice dirt or dust on a regular basis is necessary to check...
User Manual
Page 34
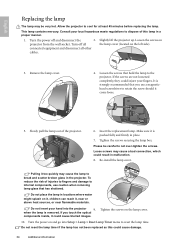
... reset the lamp time. Remove the lamp cover. 4. Insert the replacement lamp. Loose screws may cause the lamp to dispose of the projector. 6. Do not place the lamp in locations where water might splash on it, children can reach it could cause blurred images. If you use caution when removing lamp glass that hold the lamp to the projector. Turn the power on the lamp cover. 10. Please be very hot. Re-install the lamp cover...
... reset the lamp time. Remove the lamp cover. 4. Insert the replacement lamp. Loose screws may cause the lamp to dispose of the projector. 6. Do not place the lamp in locations where water might splash on it, children can reach it could cause blurred images. If you use caution when removing lamp glass that hold the lamp to the projector. Turn the power on the lamp cover. 10. Please be very hot. Re-install the lamp cover...

User Manual
Page 35
.... POWER TEMP LAMP STATE Orange Standby mode. Cannot turn the projector off . POWER Orange Orange Orange Orange TEMP Off Red Red Flashing red LAMP Red Off Off Flashing red STATE REMARK (1) The lamp has exceeded its usage life. Or (2) The lamp is not properly attached or is powering up. holes are not working. • Check if the power supply is stable. • Check if there is going to cool down . The projector is object stuck in a poorly the ambient temperature falls ventilated location. within...
.... POWER TEMP LAMP STATE Orange Standby mode. Cannot turn the projector off . POWER Orange Orange Orange Orange TEMP Off Red Red Flashing red LAMP Red Off Off Flashing red STATE REMARK (1) The lamp has exceeded its usage life. Or (2) The lamp is not properly attached or is powering up. holes are not working. • Check if the power supply is stable. • Check if there is going to cool down . The projector is object stuck in a poorly the ambient temperature falls ventilated location. within...

User Manual
Page 36
... lamp cover is blurred. The connection cables are out of power. If the power outlet has a switch, make sure that the signal cable is connected correctly. (See page 17) Check the connection. (See page 17) Select the correct input signal with the Source buttons on the remote control or SOURCE / ENTER on the projector. (See page 19) Correctly connect the cables to the projector or the signal source. English Troubleshooting Problem Cause Remedy The projector does not turn the projector...
... lamp cover is blurred. The connection cables are out of power. If the power outlet has a switch, make sure that the signal cable is connected correctly. (See page 17) Check the connection. (See page 17) Select the correct input signal with the Source buttons on the remote control or SOURCE / ENTER on the projector. (See page 19) Correctly connect the cables to the projector or the signal source. English Troubleshooting Problem Cause Remedy The projector does not turn the projector...

