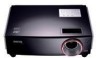
SP870 User Manual
Page 2
... contents Important safety instructions ..... 3 Introduction 6 Projector features 6 Shipping contents 7 Projector exterior view 8 Controls and functions 9 Projector 9 Remote control 10 Positioning your projector........ 12 Choosing a location 12 Obtaining a preferred projected image size 13 Connection 16 Connecting a computer or monitor 16 Connecting Video source devices 18 Operation 22 Starting up the projector 22 Using the On-Screen Display...
... contents Important safety instructions ..... 3 Introduction 6 Projector features 6 Shipping contents 7 Projector exterior view 8 Controls and functions 9 Projector 9 Remote control 10 Positioning your projector........ 12 Choosing a location 12 Obtaining a preferred projected image size 13 Connection 16 Connecting a computer or monitor 16 Connecting Video source devices 18 Operation 22 Starting up the projector 22 Using the On-Screen Display...
SP870 User Manual
Page 5
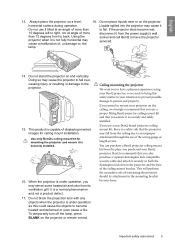
... from the ceiling due to fail. lamp. 14. Do not stand the projector on the projector or remote control. Use only BenQ's ceiling mount kit for ceiling mount installation. It is under operation as this safety matter to your projector on the projector and the base of more than to an improper attachment through the use...
... from the ceiling due to fail. lamp. 14. Do not stand the projector on the projector or remote control. Use only BenQ's ceiling mount kit for ceiling mount installation. It is under operation as this safety matter to your projector on the projector and the base of more than to an improper attachment through the use...
SP870 User Manual
Page 7
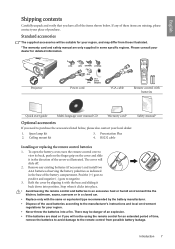
...into a fire. Please consult your dealer for your region, and may differ from possible battery leakage. The cover will be using the remote control for your region. • Never throw the batteries into position. Refit the cover by the battery manufacturer. • Dispose of...are missing, please contact your local dealer. 1. Stop when it in some specific regions. Projector (UK) (US) (KOREA) (CHINA) (AU) (EU) (3-2 power adaptor) Power cord VGA cable Remote control with the base and sliding it with batteries Quick start guide Multi-language user manual CD...
...into a fire. Please consult your dealer for your region, and may differ from possible battery leakage. The cover will be using the remote control for your region. • Never throw the batteries into position. Refit the cover by the battery manufacturer. • Dispose of...are missing, please contact your local dealer. 1. Stop when it in some specific regions. Projector (UK) (US) (KOREA) (CHINA) (AU) (EU) (3-2 power adaptor) Power cord VGA cable Remote control with the base and sliding it with batteries Quick start guide Multi-language user manual CD...

SP870 User Manual
Page 8
... 11 22. External control panel (See page 9 for details.) 6. Speaker grill 12. Audio signal input socket 25. Rear IR remote sensor 15. Quick-release button 9. RGB (PC)/Component Video (YPbPr/ YCbCr) signal input socket 19. USB socket 17. Kensington anti... details.) 5. AC power cord inlet 10. Main power switch 11. Ceiling mount holes 13. Front IR remote sensor 8. Composite Video signal input socket 23. RGB signal output socket 21. English Projector exterior view Front/upper side 4 5 6 1 7 2 8 1 3 Rear/lower side See "Connection...
... 11 22. External control panel (See page 9 for details.) 6. Speaker grill 12. Audio signal input socket 25. Rear IR remote sensor 15. Quick-release button 9. RGB (PC)/Component Video (YPbPr/ YCbCr) signal input socket 19. USB socket 17. Kensington anti... details.) 5. AC power cord inlet 10. Main power switch 11. Ceiling mount holes 13. Front IR remote sensor 8. Composite Video signal input socket 23. RGB signal output socket 21. English Projector exterior view Front/upper side 4 5 6 1 7 2 8 1 3 Rear/lower side See "Connection...

SP870 User Manual
Page 10
... 13. VOLUME+/VOLUMEAdjusts the sound level. 1. ASPECT Selects the display aspect ratio. "Adjusting the sound" on page 35 11 20 10. II POWER Toggles the projector between standby mode and on page 27 10 Introduction Adjusts contrast. "Operating the LASER pointer" on page 11 "Auto-adjusting the image" on . MENU/EXIT... "Magnifying and searching for the displayed image. "Adjusting Brightness" on page 35 2. AUTO Emits visible laser pointer light for presentation purposes. TIMER SET UP 6. English Remote control For details, see the info.
... 13. VOLUME+/VOLUMEAdjusts the sound level. 1. ASPECT Selects the display aspect ratio. "Adjusting the sound" on page 35 11 20 10. II POWER Toggles the projector between standby mode and on page 27 10 Introduction Adjusts contrast. "Operating the LASER pointer" on page 11 "Auto-adjusting the image" on . MENU/EXIT... "Magnifying and searching for the displayed image. "Adjusting Brightness" on page 35 2. AUTO Emits visible laser pointer light for presentation purposes. TIMER SET UP 6. English Remote control For details, see the info.
SP870 User Manual
Page 11
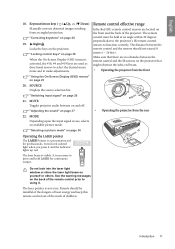
.... "Selecting a picture mode" on the front and the back of the projector. The remote control must be mindful of the dangers of laser energy and keep this remote control out of the reach of the remote control prior to function correctly. The distance between on page 26 21. See... the warning messages on yourself or others. MUTE Toggles projector audio between the remote control and the sensors should be held at an angle within 30 degrees perpendicular to the projector's IR remote control sensors to using it and the indicator lights up red. Keystone/Arrow keys...
.... "Selecting a picture mode" on the front and the back of the projector. The remote control must be mindful of the dangers of laser energy and keep this remote control out of the reach of the remote control prior to function correctly. The distance between on page 26 21. See... the warning messages on yourself or others. MUTE Toggles projector audio between the remote control and the sensors should be held at an angle within 30 degrees perpendicular to the projector's IR remote control sensors to using it and the indicator lights up red. Keystone/Arrow keys...

SP870 User Manual
Page 12
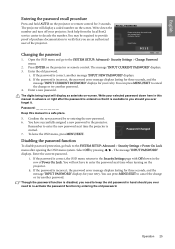
...Set Rear Table after you select. Purchase the BenQ projector ceiling mount kit from the ceiling behind the screen. Press / to position the projector for this location with the projector placed near the floor in front of the ...projector or remote control and then press / until the correct position is highlighted. 2. Press MENU/EXIT on . *To set the projector position: 1. SYSTEM SETUP: Basic Presentation Timer Language Projector Position Auto Power Off Blank Timer Panel Key Lock Timer Controller Splash Screen Analog RGB English Front Table Disable Disable Off Disable BenQ...
...Set Rear Table after you select. Purchase the BenQ projector ceiling mount kit from the ceiling behind the screen. Press / to position the projector for this location with the projector placed near the floor in front of the ...projector or remote control and then press / until the correct position is highlighted. 2. Press MENU/EXIT on . *To set the projector position: 1. SYSTEM SETUP: Basic Presentation Timer Language Projector Position Auto Power Off Blank Timer Panel Key Lock Timer Controller Splash Screen Analog RGB English Front Table Disable Disable Off Disable BenQ...
SP870 User Manual
Page 22
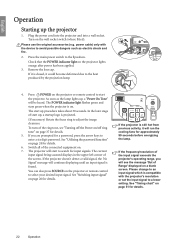
...being scanned displays in the upper left corner of the connected equipment on the projector or remote control to avoid possible dangers such as the lamp lights up , a startup logo is compatible with the projector's resolution or set the input signal to the I position. If the frequency...on a blank screen. In the later stage of Range' displayed on page 26 for details. 22 Operation See "Timing chart" on the projector or remote control to enter a six digit password. English Operation Starting up procedure takes about 30 seconds. As soon as electric shock and fire. ...
...being scanned displays in the upper left corner of the connected equipment on the projector or remote control to avoid possible dangers such as the lamp lights up , a startup logo is compatible with the projector's resolution or set the input signal to the I position. If the frequency...on a blank screen. In the later stage of Range' displayed on page 26 for details. 22 Operation See "Timing chart" on the projector or remote control to enter a six digit password. English Operation Starting up procedure takes about 30 seconds. As soon as electric shock and fire. ...
SP870 User Manual
Page 23
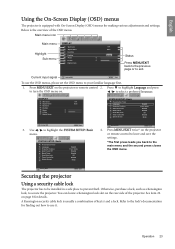
... Off Blank Timer Panel Key Lock Timer Controller Splash Screen English Front Table Disable Disable Off Disable BenQ Analog RGB MENU Exit 3. You can locate a Kensington lock slot on the projector or remote control to leave and save the settings. *The first press leads you back to your familiar ...language first. 1. Operation 23 Press MENU/EXIT on . / to turn the OSD menu on the projector or remote control 2. A Kensington security cable lock is the overview of key(s) and a lock. English Using the On-Screen Display (OSD) menus The...
... Off Blank Timer Panel Key Lock Timer Controller Splash Screen English Front Table Disable Disable Off Disable BenQ Analog RGB MENU Exit 3. You can locate a Kensington lock slot on the projector or remote control to leave and save the settings. *The first press leads you back to your familiar ...language first. 1. Operation 23 Press MENU/EXIT on . / to turn the OSD menu on the projector or remote control 2. A Kensington security cable lock is the overview of key(s) and a lock. English Using the On-Screen Display (OSD) menus The...
SP870 User Manual
Page 24
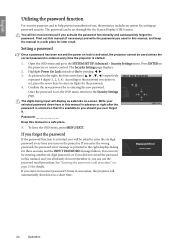
... started. 1. Write your selected password down in advance or right after the password is entered so that it is set and the power on the projector or remote control. Confirm the new password by pressing / . 3. Password Error Please try again. 24 Operation You can retry by entering another six-digit password, or...
... started. 1. Write your selected password down in advance or right after the password is entered so that it is set and the power on the projector or remote control. Confirm the new password by pressing / . 3. Password Error Please try again. 24 Operation You can retry by entering another six-digit password, or...
SP870 User Manual
Page 25
... can press MENU/EXIT to enter the new password next time the projector is correct, another password. 4. Though the password function is disabled, you need to provide proof of the projector. Seek help from the local BenQ service center to keep the old password in the row of Power ... for your selected password down here in this manual in advance or right after opening the OSD menu system. The projector will display as asterisks on the projector or remote control. Recall Code: 0 2 1 2 Changing the password MENU Exit 1. If the password is correct, the OSD menu returns to the...
... can press MENU/EXIT to enter the new password next time the projector is correct, another password. 4. Though the password function is disabled, you need to provide proof of the projector. Seek help from the local BenQ service center to keep the old password in the row of Power ... for your selected password down here in this manual in advance or right after opening the OSD menu system. The projector will display as asterisks on the projector or remote control. Recall Code: 0 2 1 2 Changing the password MENU Exit 1. If the password is correct, the OSD menu returns to the...
SP870 User Manual
Page 26
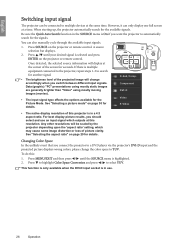
... this resolution. See "Selecting the aspect ratio" on the projector or remote control. A source selection bar displays. 2. D-Sub/Comp. English Switching input signal The projector can be scaled by the projector depending upon the 'aspect ratio' setting, which outputs at a time. When starting up, the projector automatically search for the Picture Mode. If there is...
... this resolution. See "Selecting the aspect ratio" on the projector or remote control. A source selection bar displays. 2. D-Sub/Comp. English Switching input signal The projector can be scaled by the projector depending upon the 'aspect ratio' setting, which outputs at a time. When starting up, the projector automatically search for the Picture Mode. If there is...

SP870 User Manual
Page 27
... size that you may cause damage to each other, the projected picture becomes trapezoidal. To retract the foot, hold the quick-release buttons on the projector or remote control. To correct this , press AUTO on the both sides near bottom until the picture is equipped with 2 quick-release adjuster feet. The screen...
... size that you may cause damage to each other, the projected picture becomes trapezoidal. To retract the foot, hold the quick-release buttons on the projector or remote control. To correct this , press AUTO on the both sides near bottom until the picture is equipped with 2 quick-release adjuster feet. The screen...

SP870 User Manual
Page 28
...the picture to the screen. to magnify the center of these steps. • Using the remote control Press / on the projected picture, magnify the picture. Press on the projector or remote control to correct keystoning at either the top or bottom. Press MENU/EXIT and then press ...correct this, besides adjusting the height of the projector or remote control to display the Keystone correction page. Press the bottom of "Using the remote control" above. MENU Back Magnifying and searching for navigating the picture. • Using the remote control 1. to find the details on the ...
...the picture to the screen. to magnify the center of these steps. • Using the remote control Press / on the projected picture, magnify the picture. Press on the projector or remote control to correct keystoning at either the top or bottom. Press MENU/EXIT and then press ...correct this, besides adjusting the height of the projector or remote control to display the Keystone correction page. Press the bottom of "Using the remote control" above. MENU Back Magnifying and searching for navigating the picture. • Using the remote control 1. to find the details on the ...

SP870 User Manual
Page 29
...of digital signal processing, digital display devices like high definition TV, as it is suitable for images which is ): • Using the remote control 1. Auto: Scales an image proportionally to a different aspect than if resized to increase the image size if necessary. Press to show... them without altering the image's aspect 16:10 picture ratio. 15:9 picture 4. This is displayed in a 16:9 aspect, like this projector can be displayed on those unused black areas. With the advent of the image width to make most suitable for 4:3 images like computer monitors...
...of digital signal processing, digital display devices like high definition TV, as it is suitable for images which is ): • Using the remote control 1. Auto: Scales an image proportionally to a different aspect than if resized to increase the image size if necessary. Press to show... them without altering the image's aspect 16:10 picture ratio. 15:9 picture 4. This is displayed in a 16:9 aspect, like this projector can be displayed on those unused black areas. With the advent of the image width to make most suitable for 4:3 images like computer monitors...

SP870 User Manual
Page 30
...closest to the color of signals are different from : Light Yellow, Pink, Light Green, Blue, and Blackboard Selecting a picture mode The projector is most suitable for viewing photos taken with several predefined picture modes so that suits your need, perform one to suit your desired mode... brightness and colors may not be observed during the very short time of the following steps. • Press MODE on the projector or remote control repeatedly until your operating environment and input signal picture type. Cinema mode: Is suitable for environments where extra-high brightness is...
...closest to the color of signals are different from : Light Yellow, Pink, Light Green, Blue, and Blackboard Selecting a picture mode The projector is most suitable for viewing photos taken with several predefined picture modes so that suits your need, perform one to suit your desired mode... brightness and colors may not be observed during the very short time of the following steps. • Press MODE on the projector or remote control repeatedly until your operating environment and input signal picture type. Cinema mode: Is suitable for environments where extra-high brightness is...
SP870 User Manual
Page 31
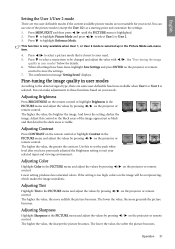
...the value, the greater the contrast. Adjusting Tint Highlight Tint in the PICTURE menu and adjust the values by pressing / on the projector or remote control. The lower the value, the softer the picture becomes. You can make adjustments to suit your selected input and viewing environment. ...+30 +50 +70 Adjusting Color Highlight Color in the PICTURE menu and adjust the values by pressing / on the projector or remote control. Press to be overpowering, which makes the image unrealistic. Press to select a menu item to highlight Reference Mode. You can ...
...the value, the greater the contrast. Adjusting Tint Highlight Tint in the PICTURE menu and adjust the values by pressing / on the projector or remote control. The lower the value, the softer the picture becomes. You can make adjustments to suit your selected input and viewing environment. ...+30 +50 +70 Adjusting Color Highlight Color in the PICTURE menu and adjust the values by pressing / on the projector or remote control. Press to be overpowering, which makes the image unrealistic. Press to select a menu item to highlight Reference Mode. You can ...

SP870 User Manual
Page 32
... different shades that quality, select On. T2: Makes images appear bluish white. 3. A white color with the projector, however, your preference. Press ENTER on the projector or remote control and the 3D Color Management page displays. 3. Proper color management can project any image from among Red, ...you prefer images with controlled lighting levels such as in the PICTURE menu and select by pressing / on the projector or remote control. Only in permanent installations with that are four color temperature* settings available. 1. English Adjusting Brilliant Color Highlight...
... different shades that quality, select On. T2: Makes images appear bluish white. 3. A white color with the projector, however, your preference. Press ENTER on the projector or remote control and the 3D Color Management page displays. 3. Proper color management can project any image from among Red, ...you prefer images with controlled lighting levels such as in the PICTURE menu and select by pressing / on the projector or remote control. Only in permanent installations with that are four color temperature* settings available. 1. English Adjusting Brilliant Color Highlight...

SP870 User Manual
Page 33
.../3 min Displays the timer on , the timer will restart whenever the Timer Period is the amount of time can indicate the presentation time on the remote control or go to the SYSTEM SETUP: Basic > Presentation Timer menu and press ENTER to your preference by pressing / . Press to exit and save the...
.../3 min Displays the timer on , the timer will restart whenever the Timer Period is the amount of time can indicate the presentation time on the remote control or go to the SYSTEM SETUP: Basic > Presentation Timer menu and press ENTER to your preference by pressing / . Press to exit and save the...

SP870 User Manual
Page 34
...by following the on , pressing this key displays a confirmation message. A confirmation message displays. 4. Highlight Yes and press ENTER on the projector or remote control to turn off , pressing this key displays a confirmation message. Yes No To cancel the timer, perform the following steps. • ...Using the remote control Press TIMER ON and press / to highlight Off and press ENTER. Press and press / to highlight Off and press ENTER. ...
...by following the on , pressing this key displays a confirmation message. A confirmation message displays. 4. Highlight Yes and press ENTER on the projector or remote control to turn off , pressing this key displays a confirmation message. Yes No To cancel the timer, perform the following steps. • ...Using the remote control Press TIMER ON and press / to highlight Off and press ENTER. Press and press / to highlight Off and press ENTER. ...

