SP870 User Manual
Page 2
... Projector exterior view 8 Controls and functions 9 Projector 9 Remote control 10 Positioning your projector........ 12 Choosing a location 12 Obtaining a preferred projected image size 13 Connection 16 Connecting a computer or monitor 16 Connecting Video source devices 18 Operation 22 Starting up the projector 22 Using the On-Screen Display (OSD) menus 23 Securing the projector 23 Using a security cable lock 23 Utilizing the password function ...........24 Switching input signal 26 Adjusting the projected image .....27 Adjusting the projection angle 27 Auto-adjusting the image...
... Projector exterior view 8 Controls and functions 9 Projector 9 Remote control 10 Positioning your projector........ 12 Choosing a location 12 Obtaining a preferred projected image size 13 Connection 16 Connecting a computer or monitor 16 Connecting Video source devices 18 Operation 22 Starting up the projector 22 Using the On-Screen Display (OSD) menus 23 Securing the projector 23 Using a security cable lock 23 Utilizing the password function ...........24 Switching input signal 26 Adjusting the projected image .....27 Adjusting the projection angle 27 Auto-adjusting the image...
SP870 User Manual
Page 5
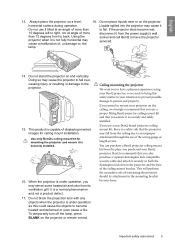
... that you use a proper fitting BenQ projector ceiling mount kit and that the projector may sense some heated air and odor from the place you also purchase a separate Kensington lock compatible security cable and attach it is a safety risk that you use a non-BenQ brand projector ceiling mount kit, there is securely and safely installed. English 13. Use only BenQ's ceiling mount kit for ceiling mount installation. Do not block the projection lens with...
... that you use a proper fitting BenQ projector ceiling mount kit and that the projector may sense some heated air and odor from the place you also purchase a separate Kensington lock compatible security cable and attach it is a safety risk that you use a non-BenQ brand projector ceiling mount kit, there is securely and safely installed. English 13. Use only BenQ's ceiling mount kit for ceiling mount installation. Do not block the projection lens with...
SP870 User Manual
Page 6
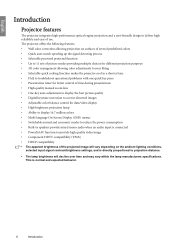
... time • FAQ to troubleshoot operational problems with one quick key press • Presentation timer for better control of time during presentations • High quality manual zoom lens • One-key auto-adjustment to display the best picture quality • Digital keystone correction to correct distorted images • Adjustable color balance control for data/video display • High brightness projection lamp • Ability to display 16.7 million colors • Multi-language On-Screen Display (OSD) menus • Switchable normal and economic modes...
... time • FAQ to troubleshoot operational problems with one quick key press • Presentation timer for better control of time during presentations • High quality manual zoom lens • One-key auto-adjustment to display the best picture quality • Digital keystone correction to correct distorted images • Adjustable color balance control for data/video display • High brightness projection lamp • Ability to display 16.7 million colors • Multi-language On-Screen Display (OSD) menus • Switchable normal and economic modes...
SP870 User Manual
Page 7
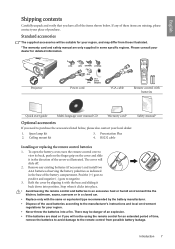
... specific regions. English Shipping contents Carefully unpack and verify that you need to purchase the accessories listed below . Standard accessories The supplied accessories will slide off. 2. Spare lamp kit 2. To open the battery cover, turn the remote control over to negative. 3. Remove any of these items are only supplied in the base of time, remove the batteries to avoid damage to the remote control...
... specific regions. English Shipping contents Carefully unpack and verify that you need to purchase the accessories listed below . Standard accessories The supplied accessories will slide off. 2. Spare lamp kit 2. To open the battery cover, turn the remote control over to negative. 3. Remove any of these items are only supplied in the base of time, remove the batteries to avoid damage to the remote control...

SP870 User Manual
Page 8
... foot 2. Projection lens 3. Main power switch 11. Lens cap 4. Focus ring and Zoom ring (See page 9 for connection details. 14 15 16 17 18 19 20 21 22 23 24 9 10 11 12 13 1. Quick-release button 9. Speaker grill 12. USB socket 17. RGB (PC)/Component Video (YPbPr/ YCbCr) signal input socket 19. Kensington anti-theft lock slot 8 Introduction AC power cord inlet 10. Lamp cover 14. DC...
... foot 2. Projection lens 3. Main power switch 11. Lens cap 4. Focus ring and Zoom ring (See page 9 for connection details. 14 15 16 17 18 19 20 21 22 23 24 9 10 11 12 13 1. Quick-release button 9. Speaker grill 12. USB socket 17. RGB (PC)/Component Video (YPbPr/ YCbCr) signal input socket 19. Kensington anti-theft lock slot 8 Introduction AC power cord inlet 10. Lamp cover 14. DC...

SP870 User Manual
Page 9
... details. Zoom ring Manually corrects distorted images resulting from an angled projection. See "Switching the menu settings. ENTER 5. See "Hiding the image" on page 48 for details. 1 10. Focus ring Adjusts the focus of the lamp. details. See "Indicators" on page 35 for details. Turns on page 26 for details. See "Using the On-Screen input signal" on the On-Screen Display (OSD) menu. 13. II POWER Toggles the projector between standby mode and on...
... details. Zoom ring Manually corrects distorted images resulting from an angled projection. See "Switching the menu settings. ENTER 5. See "Hiding the image" on page 48 for details. 1 10. Focus ring Adjusts the focus of the lamp. details. See "Indicators" on page 35 for details. Turns on page 26 for details. See "Using the On-Screen input signal" on the On-Screen Display (OSD) menu. 13. II POWER Toggles the projector between standby mode and on...

SP870 User Manual
Page 12
... BenQ projector ceiling mount kit from the ceiling in front of your projector Press MENU/EXIT on . 4. Take into consideration the size and position of your projector on the ceiling. *Set Front Ceiling after you turn the projector on . *To set the projector position: 1. Rear Table Select this location with the projector placed near the floor in one of the screen. SYSTEM SETUP: Basic Presentation Timer Language Projector Position Auto Power Off Blank Timer Panel Key Lock Timer Controller...
... BenQ projector ceiling mount kit from the ceiling in front of your projector Press MENU/EXIT on . 4. Take into consideration the size and position of your projector on the ceiling. *Set Front Ceiling after you turn the projector on . *To set the projector position: 1. Rear Table Select this location with the projector placed near the floor in one of the screen. SYSTEM SETUP: Basic Presentation Timer Language Projector Position Auto Power Off Blank Timer Panel Key Lock Timer Controller...
SP870 User Manual
Page 22
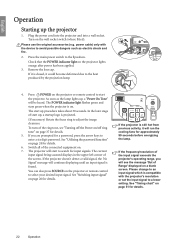
... Operation Remove the lens cap. Switch all of the screen. Please change to an input signal which is projected. (If necessary) Rotate the focus ring to adjust the image clearness. The projector will start up procedure takes about 30 seconds. Check that the POWER indicator light on . See "Utilizing the password function" on the projector or remote control to the I position. The current input signal being scanned displays in the upper left corner of the connected equipment...
... Operation Remove the lens cap. Switch all of the screen. Please change to an input signal which is projected. (If necessary) Rotate the focus ring to adjust the image clearness. The projector will start up procedure takes about 30 seconds. Check that the POWER indicator light on . See "Utilizing the password function" on the projector or remote control to the I position. The current input signal being scanned displays in the upper left corner of the connected equipment...
SP870 User Manual
Page 24
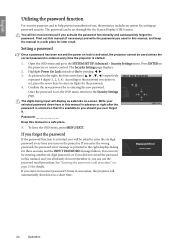
... INPUT PASSWORD message follows. Password Error Please try again. 24 Operation Press ENTER on page 25 for setting up password security. Print out this manual in succession, the projector will display as pictured to the right displays lasting for later recall. Open the OSD menu and go to the right, the four arrow keys ( , , , ) respectively INPUT NEW PASSWORD represent 4 digits (1, 2, 3, 4). The Security Settings page displays. 2. As pictured to the SYSTEM SETUP: Advanced > Security Settings menu...
... INPUT PASSWORD message follows. Password Error Please try again. 24 Operation Press ENTER on page 25 for setting up password security. Print out this manual in succession, the projector will display as pictured to the right displays lasting for later recall. Open the OSD menu and go to the right, the four arrow keys ( , , , ) respectively INPUT NEW PASSWORD represent 4 digits (1, 2, 3, 4). The Security Settings page displays. 2. As pictured to the SYSTEM SETUP: Advanced > Security Settings menu...
SP870 User Manual
Page 25
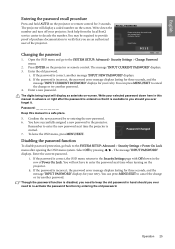
... SYSTEM SETUP: Advanced > Security Settings > Power On Lock menu after the password is incorrect, the password error message displays lasting for three seconds, and the message 'INPUT PASSWORD' displays for 3 seconds. Operation 25 Open the OSD menu and go back to cancel the change or try another password. 4. You can press MENU/EXIT to keep the old password in a safe place. 5. Remember to enter the password next time when turning on the projector. English Entering the password...
... SYSTEM SETUP: Advanced > Security Settings > Power On Lock menu after the password is incorrect, the password error message displays lasting for three seconds, and the message 'INPUT PASSWORD' displays for 3 seconds. Operation 25 Open the OSD menu and go back to cancel the change or try another password. 4. You can press MENU/EXIT to keep the old password in a safe place. 5. Remember to enter the password next time when turning on the projector. English Entering the password...

SP870 User Manual
Page 30
...: Light Yellow, Pink, Light Green, Blue, and Blackboard Selecting a picture mode The projector is preset with an sRGB compatible and properly calibrated camera, and for details. Presentation mode: Is designed for playing gamebox-based video games in a blackened (little light) home cinema or lounge room environment. 4. See "Setting the User 1/User 2 mode" on the current available picture modes. Video input signals: Component (YPbPr), S-Video, Video, D-Sub/Comp. (YPbPr), DVI-D (HDCP/ HDMI) 1. To use this mode to...
...: Light Yellow, Pink, Light Green, Blue, and Blackboard Selecting a picture mode The projector is preset with an sRGB compatible and properly calibrated camera, and for details. Presentation mode: Is designed for playing gamebox-based video games in a blackened (little light) home cinema or lounge room environment. 4. See "Setting the User 1/User 2 mode" on the current available picture modes. Video input signals: Component (YPbPr), S-Video, Video, D-Sub/Comp. (YPbPr), DVI-D (HDCP/ HDMI) 1. To use this mode to...
SP870 User Manual
Page 35
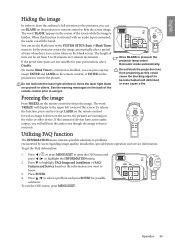
... connected devices have active audio output, you will display in the corner of the remote control prior to using it. The length of the screen. Utilizing FAQ function The INFORMATION menu contains possible solutions to highlight the INFORMATION menu. 2. Press to hide the screen image. Do not block the projection lens from 5 to 30 minutes in the SYSTEM SETUP: Basic > Blank Timer menu to let the projector...
... connected devices have active audio output, you will display in the corner of the remote control prior to using it. The length of the screen. Utilizing FAQ function The INFORMATION menu contains possible solutions to highlight the INFORMATION menu. 2. Press to hide the screen image. Do not block the projection lens from 5 to 30 minutes in the SYSTEM SETUP: Basic > Blank Timer menu to let the projector...

SP870 User Manual
Page 38
... cancel the message, press any commands during projector start-up. Use / to select a suitable time. • Menu Position in the SYSTEM SETUP: Advanced > Menu Settings menu sets the OSD position in the SYSTEM SETUP: Basic menu sets a preferred logo screen to be used in the SYSTEM SETUP: Advanced > Menu Settings menu sets the length of the remote control prior to select a screen. The POWER indicator light is not properly shut down the projector 1. If the projector is a steady orange and fans stop. •...
... cancel the message, press any commands during projector start-up. Use / to select a suitable time. • Menu Position in the SYSTEM SETUP: Advanced > Menu Settings menu sets the OSD position in the SYSTEM SETUP: Basic menu sets a preferred logo screen to be used in the SYSTEM SETUP: Advanced > Menu Settings menu sets the length of the remote control prior to select a screen. The POWER indicator light is not properly shut down the projector 1. If the projector is a steady orange and fans stop. •...
SP870 User Manual
Page 39
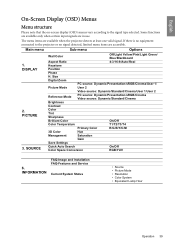
... signal. Main menu Sub-menu Options 1. DISPLAY 2. INFORMATION FAQ-Image and Installation FAQ-Features and Service Current System Status • Source • Picture Mode • Resolution • Color System • Equivalent Lamp Hour Operation 39 SOURCE Wall Color Off/Light Yellow/Pink/Light Green/ Blue/Blackboard Aspect Ratio 4:3/16:9/Auto/Real Keystone Position Phase H. The menu items are in use. Size Digital Zoom PC source: Dynamic/Presentation/sRGB/Cinema/User 1/ Picture Mode User 2 Video source: Dynamic/Standard/Cinema/User 1/User 2 Reference Mode...
... signal. Main menu Sub-menu Options 1. DISPLAY 2. INFORMATION FAQ-Image and Installation FAQ-Features and Service Current System Status • Source • Picture Mode • Resolution • Color System • Equivalent Lamp Hour Operation 39 SOURCE Wall Color Off/Light Yellow/Pink/Light Green/ Blue/Blackboard Aspect Ratio 4:3/16:9/Auto/Real Keystone Position Phase H. The menu items are in use. Size Digital Zoom PC source: Dynamic/Presentation/sRGB/Cinema/User 1/ Picture Mode User 2 Video source: Dynamic/Standard/Cinema/User 1/User 2 Reference Mode...
SP870 User Manual
Page 42
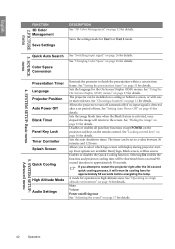
... time. Presentation Timer Language Projector Position Auto Power Off Blank Timer Panel Key Lock Timer Controller Splash Screen Quick Cooling High Altitude Mode Audio Settings Reminds the presenter to turn off ring tone See "Adjusting the sound" on page 36 for details. See "Using the On-Screen Display (OSD) menus" on page 32 for details. 5. Sets the auto-shutdown timer. A mode for operation in a high altitude environment" on page 37 for details. PICTURE 3. Quick Auto Search Color Space Conversion See "Switching input signal...
... time. Presentation Timer Language Projector Position Auto Power Off Blank Timer Panel Key Lock Timer Controller Splash Screen Quick Cooling High Altitude Mode Audio Settings Reminds the presenter to turn off ring tone See "Adjusting the sound" on page 36 for details. See "Using the On-Screen Display (OSD) menus" on page 32 for details. 5. Sets the auto-shutdown timer. A mode for operation in a high altitude environment" on page 37 for details. PICTURE 3. Quick Auto Search Color Space Conversion See "Switching input signal...
SP870 User Manual
Page 43
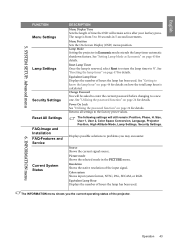
...all settings to '0'. Operation 43 Resolution Shows the native resolution of the projector. English 5. See "Getting to problems you the current operating status of the input signal. Picture mode Shows the selected mode in the PICTURE menu. INFORMATION menu The INFORMATION menu shows you may encounter. SYSTEM SETUP: Advanced menu FUNCTION Menu Settings Lamp Settings Security Settings Reset All Settings FAQ-Image and Installation FAQ-Features and Service Current System Status DESCRIPTION Menu Display Time Sets the length of hours the lamp has been used . 6. Color...
...all settings to '0'. Operation 43 Resolution Shows the native resolution of the projector. English 5. See "Getting to problems you the current operating status of the input signal. Picture mode Shows the selected mode in the PICTURE menu. INFORMATION menu The INFORMATION menu shows you may encounter. SYSTEM SETUP: Advanced menu FUNCTION Menu Settings Lamp Settings Security Settings Reset All Settings FAQ-Image and Installation FAQ-Features and Service Current System Status DESCRIPTION Menu Display Time Sets the length of hours the lamp has been used . 6. Color...
SP870 User Manual
Page 44
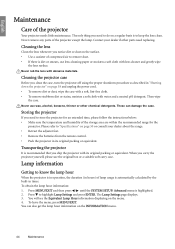
... menu is to highlight Lamp Settings and press ENTER. The Lamp Settings page displays. 3. You can damage the case. These can also get the lamp hour information on the surface. • Use a canister of compressed air to know the lamp hour When the projector is in operation, the duration (in hours) of the storage area are within the recommended range for the projector. Press to keep the lens clean. Cleaning...
... menu is to highlight Lamp Settings and press ENTER. The Lamp Settings page displays. 3. You can damage the case. These can also get the lamp hour information on the surface. • Use a canister of compressed air to know the lamp hour When the projector is in operation, the duration (in hours) of the storage area are within the recommended range for the projector. Press to keep the lens clean. Cleaning...
SP870 User Manual
Page 45
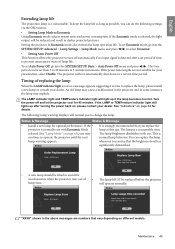
... input signal is detected after turning the power back on page 43), you to user manual) Then reset lamp timer OK OK "XXXX" shown in Economic mode also extends the lamp operation life. This is a consumable item. Order Replacement Lamp Lamp > XXXX Hours Notice Replace Lamp Now Lamp > XXXX Hours Lamp usage time exceeded OK OK • A new lamp should be reduced and result in 5-minute increments. Notice Replace Lamp Soon Lamp > XXXX Hours Lamp-usage time exceeded Replace lamp (refer to change the lamp...
... input signal is detected after turning the power back on page 43), you to user manual) Then reset lamp timer OK OK "XXXX" shown in Economic mode also extends the lamp operation life. This is a consumable item. Order Replacement Lamp Lamp > XXXX Hours Notice Replace Lamp Now Lamp > XXXX Hours Lamp usage time exceeded OK OK • A new lamp should be reduced and result in 5-minute increments. Notice Replace Lamp Soon Lamp > XXXX Hours Lamp-usage time exceeded Replace lamp (refer to change the lamp...
SP870 User Manual
Page 54
... default timing setting is automatically turned on every time the monitor is powered up, and thus reduces the hassle of BenQ's monitors and projectors contain unique product information that the monitor is in making accessible technology choices BenQ's LCD monitors and projectors are compliant with the computer systems connected. For example, connectors are also available on the front-panel. • Firmware of user intervention. • BenQ...
... default timing setting is automatically turned on every time the monitor is powered up, and thus reduces the hassle of BenQ's monitors and projectors contain unique product information that the monitor is in making accessible technology choices BenQ's LCD monitors and projectors are compliant with the computer systems connected. For example, connectors are also available on the front-panel. • Firmware of user intervention. • BenQ...
SP870 Datasheet
Page 1
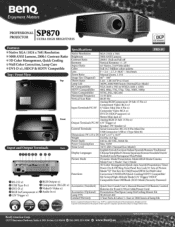
... Compatible/Auto Off/Blank (ECO-Mode)/Security Password 0 USB Type B xl DVI-D xl 0 Component (R,G,B) xl Accessories (Standard) Quick Start Guide/User's Manual/Manual CD/Remote Control 0 Video/S-Video xl Batteries for R and C/VGA Cable/Power Cord RGB In/Component xl 0 Audio In xl Accessories (Optional) Presentation Plus/Spare Lamp Kit/Ceiling Mount Kit 0 12V Trigger xl Lamp P/N 9E.0CG03.001 Limited Warranty 3-Year Parts & Labor/ 1-Year or 2000 hours of lamp life Prcwnlation C 5,000 ANS I I um D Color...
... Compatible/Auto Off/Blank (ECO-Mode)/Security Password 0 USB Type B xl DVI-D xl 0 Component (R,G,B) xl Accessories (Standard) Quick Start Guide/User's Manual/Manual CD/Remote Control 0 Video/S-Video xl Batteries for R and C/VGA Cable/Power Cord RGB In/Component xl 0 Audio In xl Accessories (Optional) Presentation Plus/Spare Lamp Kit/Ceiling Mount Kit 0 12V Trigger xl Lamp P/N 9E.0CG03.001 Limited Warranty 3-Year Parts & Labor/ 1-Year or 2000 hours of lamp life Prcwnlation C 5,000 ANS I I um D Color...


