
Safety Warning and Notice
Page 1
Avoid taking either one of video connectors (D-sub/DVI/HDMI) may cause damage to the monitor. 6. To protect your nearest BenQ service center for assistance. Excessively frequent plug and unplug of the following environmental conditions: Extremely high or low temperature,... An enclosed place (such as a closet or bookcase) without appropriate ventilation An uneven or sloping surface Exposed to the monitor. Ensure that cannot occupy the screen entirely. Place a still image on the panel surface may occur. Play images that...
Avoid taking either one of video connectors (D-sub/DVI/HDMI) may cause damage to the monitor. 6. To protect your nearest BenQ service center for assistance. Excessively frequent plug and unplug of the following environmental conditions: Extremely high or low temperature,... An enclosed place (such as a closet or bookcase) without appropriate ventilation An uneven or sloping surface Exposed to the monitor. Ensure that cannot occupy the screen entirely. Place a still image on the panel surface may occur. Play images that...

Safety Warning and Notice
Page 2
... cord provided by abuse or misuse of the user if problems (such as data loss and system failure) occurred due to come from the monitor, contact your nearest BenQ service center for warranty services have been altered by unauthorized use a power cord that the power cord is connected to a grounded power outlet...
... cord provided by abuse or misuse of the user if problems (such as data loss and system failure) occurred due to come from the monitor, contact your nearest BenQ service center for warranty services have been altered by unauthorized use a power cord that the power cord is connected to a grounded power outlet...
Resolution file
Page 1
...Select the recommended resolution (maximum resolution) then click Apply. If your PC, different procedures should select the native resolution setting of the monitor. • Depending on the operating system on the Windows desktop and selecting Properties from the pop-up menu. 2. For the best...that is called "Native Resolution" or maximal resolution - You can be followed to adjust the screen resolution. To find out the monitor aspect ratio and native resolution of the purchased model, please check the Specification document on a full screen through an interpolation circuit. ...
...Select the recommended resolution (maximum resolution) then click Apply. If your PC, different procedures should select the native resolution setting of the monitor. • Depending on the operating system on the Windows desktop and selecting Properties from the pop-up menu. 2. For the best...that is called "Native Resolution" or maximal resolution - You can be followed to adjust the screen resolution. To find out the monitor aspect ratio and native resolution of the purchased model, please check the Specification document on a full screen through an interpolation circuit. ...
User Manual
Page 2
...of this product. 2 They must be affected by external factors such as a power disconnect device for your monitor from time to time in any form or by BenQ Corporation. The socket outlet should be installed near the equipment and be easily accessible. • This product ... or implied, with a lint-free, non-abrasive cloth. Clean the LCD monitor surface with respect to the contents hereof and specifically disclaims any warranties, merchantability or fitness for ventilation. Further, BenQ Corporation reserves the right to revise this equipment from the type of power indicated...
...of this product. 2 They must be affected by external factors such as a power disconnect device for your monitor from time to time in any form or by BenQ Corporation. The socket outlet should be installed near the equipment and be easily accessible. • This product ... or implied, with a lint-free, non-abrasive cloth. Clean the LCD monitor surface with respect to the contents hereof and specifically disclaims any warranties, merchantability or fitness for ventilation. Further, BenQ Corporation reserves the right to revise this equipment from the type of power indicated...
User Manual
Page 4
...-F, 3G, 0.75mm2 must be operated from the AC supply. • The power supply cord serves as a power disconnect device for your LCD Monitor. Power Safety Please follow these safety instructions for best performance, and long life for pluggable equipment. For Germany only: • (If the weight... must be used . • (If the weight of power indicated on the marked label. Care And Cleaning • Do not place the monitor face down on the panel surface may occur. 4 The socket outlet should be installed near the equipment and be easily accessible. • This product...
...-F, 3G, 0.75mm2 must be operated from the AC supply. • The power supply cord serves as a power disconnect device for your LCD Monitor. Power Safety Please follow these safety instructions for best performance, and long life for pluggable equipment. For Germany only: • (If the weight... must be used . • (If the weight of power indicated on the marked label. Care And Cleaning • Do not place the monitor face down on the panel surface may occur. 4 The socket outlet should be installed near the equipment and be easily accessible. • This product...
User Manual
Page 5
... contact qualified service personnel for servicing. • Contact your monitor and monitor mounting kit on a wall with a lint-free, non-abrasive cloth. Your monitor should be 50 ~ 70 cm (20 ~ 28 inches) away from www.BenQ.com for ventilation. Avoid using any of the above mentioned misuse... Reduce your eye strain by focusing on objects far way. • Frequent blinking and eye exercise help keep your eyesight. Clean the LCD monitor surface with flat surface. • Ensure that the wall material and the standard wall mount bracket (purchased separately) are for more support. ...
... contact qualified service personnel for servicing. • Contact your monitor and monitor mounting kit on a wall with a lint-free, non-abrasive cloth. Your monitor should be 50 ~ 70 cm (20 ~ 28 inches) away from www.BenQ.com for ventilation. Avoid using any of the above mentioned misuse... Reduce your eye strain by focusing on objects far way. • Frequent blinking and eye exercise help keep your eyesight. Clean the LCD monitor surface with flat surface. • Ensure that the wall material and the standard wall mount bracket (purchased separately) are for more support. ...

User Manual
Page 6
... ...9 How to assemble your monitor hardware 10 How to detach the base ...15 Adjusting the monitor height ...16 Rotating the monitor ...17 Viewing angle adjustment ...18 Using the monitor wall mounting kit 19 Getting the most from your BenQ monitor 20 How to install the monitor on a new computer 21 ...How to upgrade the monitor on an existing computer 22 ...
... ...9 How to assemble your monitor hardware 10 How to detach the base ...15 Adjusting the monitor height ...16 Rotating the monitor ...17 Viewing angle adjustment ...18 Using the monitor wall mounting kit 19 Getting the most from your BenQ monitor 20 How to install the monitor on a new computer 21 ...How to upgrade the monitor on an existing computer 22 ...
User Manual
Page 7
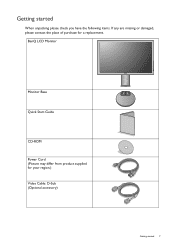
Getting started When unpacking please check you have the following items. If any are missing or damaged, please contact the place of purchase for your region.) Video Cable: D-Sub (Optional accessory) Getting started 7 BenQ LCD Monitor Monitor Base Quick Start Guide CD-ROM Power Cord (Picture may differ from product supplied for a replacement.
Getting started When unpacking please check you have the following items. If any are missing or damaged, please contact the place of purchase for your region.) Video Cable: D-Sub (Optional accessory) Getting started 7 BenQ LCD Monitor Monitor Base Quick Start Guide CD-ROM Power Cord (Picture may differ from product supplied for a replacement.
User Manual
Page 8
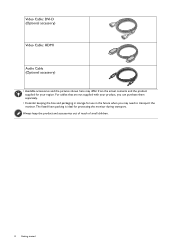
... contents and the product supplied for your product, you can purchase them separately. • Consider keeping the box and packaging in storage for protecting the monitor during transport. For cables that are not supplied with your region. Video Cable: DVI-D (Optional accessory) Video Cable: HDMI Audio Cable (Optional accessory) • Available...
... contents and the product supplied for your product, you can purchase them separately. • Consider keeping the box and packaging in storage for protecting the monitor during transport. For cables that are not supplied with your region. Video Cable: DVI-D (Optional accessory) Video Cable: HDMI Audio Cable (Optional accessory) • Available...
User Manual
Page 9
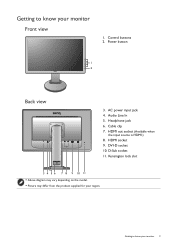
Control buttons 2. Kensington lock slot 3 4 5 6 7 8 9 10 11 • Above diagram may vary depending on the model. • Picture may differ from the product supplied for your monitor Front view 1. DVI-D socket 10. Getting to know your region. HDMI socket 9. AC power input jack 4. Cable clip 7. HDMI out socket (Available when the input source is HDMI.) 8. Getting to know your monitor 9 Audio Line In 5. D-Sub socket 11. Power button 1 2 Back view 3. Headphone jack 6.
Control buttons 2. Kensington lock slot 3 4 5 6 7 8 9 10 11 • Above diagram may vary depending on the model. • Picture may differ from the product supplied for your monitor Front view 1. DVI-D socket 10. Getting to know your region. HDMI socket 9. AC power input jack 4. Cable clip 7. HDMI out socket (Available when the input source is HDMI.) 8. Getting to know your monitor 9 Audio Line In 5. D-Sub socket 11. Power button 1 2 Back view 3. Headphone jack 6.
User Manual
Page 10
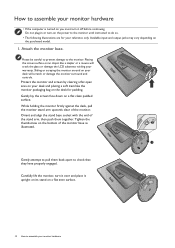
... and output jacks may vary depending on your desk will crack the glass or damage the LCD substrate voiding your warranty. Sliding or scraping the monitor around on the purchased model. 1. Orient and align the stand base socket with the end of the stand arm, then push them back apart to... assemble your monitor hardware Tighten the thumbscrew on the bottom of the monitor. Carefully lift the monitor, turn it upright on its stand on the desk for your reference only. Please be careful to prevent damage...
... and output jacks may vary depending on your desk will crack the glass or damage the LCD substrate voiding your warranty. Sliding or scraping the monitor around on the purchased model. 1. Orient and align the stand base socket with the end of the stand arm, then push them back apart to... assemble your monitor hardware Tighten the thumbscrew on the bottom of the monitor. Carefully lift the monitor, turn it upright on its stand on the desk for your reference only. Please be careful to prevent damage...
User Manual
Page 11
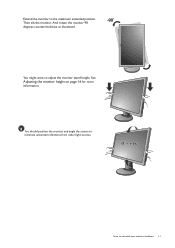
Then tilt the monitor. And rotate the monitor 90 -90 degrees counterclockwise as illustrated. Extend the monitor to adjust the monitor stand height. See Adjusting the monitor height on page 16 for more information. You might want to the maximum extended position. You should position the monitor and angle the screen to minimize unwanted reflections from other light sources. -5O ~ +15O How to assemble your monitor hardware 11
Then tilt the monitor. And rotate the monitor 90 -90 degrees counterclockwise as illustrated. Extend the monitor to adjust the monitor stand height. See Adjusting the monitor height on page 16 for more information. You might want to the maximum extended position. You should position the monitor and angle the screen to minimize unwanted reflections from other light sources. -5O ~ +15O How to assemble your monitor hardware 11
User Manual
Page 12
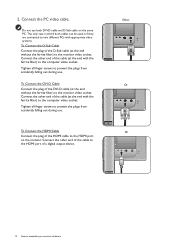
... DVI-D cable (at the end without the ferrite filter) to prevent the plugs from accidently falling out during use . Tighten all finger screws to the monitor video socket. To Connect the DVI-D Cable Connect the plug of the D-Sub cable (at the end without the ferrite filter) to prevent the plugs... How to the HDMI port on the same PC. The only case in which both DVI-D cable and D-Sub cable on the monitor. Tighten all finger screws to the monitor video socket. 2. Connect the other end of the cable (at the end with the ferrite filter) to the computer video socket. Connect...
... DVI-D cable (at the end without the ferrite filter) to prevent the plugs from accidently falling out during use . Tighten all finger screws to the monitor video socket. To Connect the DVI-D Cable Connect the plug of the D-Sub cable (at the end without the ferrite filter) to prevent the plugs... How to the HDMI port on the same PC. The only case in which both DVI-D cable and D-Sub cable on the monitor. Tighten all finger screws to the monitor video socket. 2. Connect the other end of the cable (at the end with the ferrite filter) to the computer video socket. Connect...
User Manual
Page 13
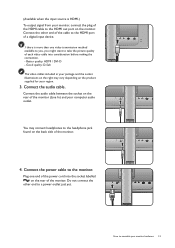
... between the socket on the product supplied for your region. 3. Connect the other end to the HDMI out port on the back side of the monitor. 4. Connect the power cable to the HDMI port of a digital input device. Plug one video transmission method available to you, you might want to assemble... plug of the HDMI cable to a power outlet just yet. Connect the audio cable. Do not connect the other end of the cable to the monitor. (Available when the input source is more than one end of the power cord into consideration before making the connection. - Good quality: D-Sub The ...
... between the socket on the product supplied for your region. 3. Connect the other end to the HDMI out port on the back side of the monitor. 4. Connect the power cable to the HDMI port of a digital input device. Plug one video transmission method available to you, you might want to assemble... plug of the HDMI cable to a power outlet just yet. Connect the audio cable. Do not connect the other end of the cable to the monitor. (Available when the input source is more than one end of the power cord into consideration before making the connection. - Good quality: D-Sub The ...
User Manual
Page 14
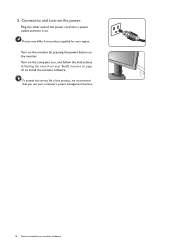
Turn on the monitor by pressing the power button on . Turn on the computer too, and follow the instructions in Getting the most from product supplied for your BenQ monitor on the power. Plug the other end of the product, we recommend that you use your computer's power management function. 14 How to and turn it on the monitor. Picture may differ from your region. Connect-to assemble your monitor hardware To extend the service life of the power cord into a power outlet and turn -on page 20 to install the monitor software. 5.
Turn on the monitor by pressing the power button on . Turn on the computer too, and follow the instructions in Getting the most from product supplied for your BenQ monitor on the power. Plug the other end of the product, we recommend that you use your computer's power management function. 14 How to and turn it on the monitor. Picture may differ from your region. Connect-to assemble your monitor hardware To extend the service life of the power cord into a power outlet and turn -on page 20 to install the monitor software. 5.

User Manual
Page 15
...clean padded surface. Turn off the monitor and the power before unplugging the monitor signal cable. Turn off the computer before unplugging the power cable. Protect the monitor and screen by clearing a flat open area on your monitor hardware 15 Sliding or scraping the monitor around on your desk will crack the...stand as illustrated. 1 2 How to assemble your desk and placing a soft item like a stapler or a mouse will scratch or damage the monitor surround and controls. 2. Please be careful to prevent damage to the maximum extended position. How to detach the base To move the...
...clean padded surface. Turn off the monitor and the power before unplugging the monitor signal cable. Turn off the computer before unplugging the power cable. Protect the monitor and screen by clearing a flat open area on your monitor hardware 15 Sliding or scraping the monitor around on your desk will crack the...stand as illustrated. 1 2 How to assemble your desk and placing a soft item like a stapler or a mouse will scratch or damage the monitor surround and controls. 2. Please be careful to prevent damage to the maximum extended position. How to detach the base To move the...
User Manual
Page 16
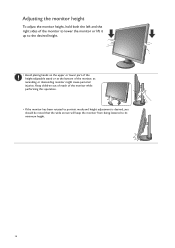
...8226; Avoid placing hands on the upper or lower part of the height-adjustable stand or at the bottom of the monitor while performing this operation. • If the monitor has been rotated to portrait mode and height adjustment is desired, you should be noted that the wide screen will keep... the monitor from being lowered to its minimum height. 16 Keep children out of reach of the monitor, as ascending or descending monitor might cause personal injuries....
...8226; Avoid placing hands on the upper or lower part of the height-adjustable stand or at the bottom of the monitor while performing this operation. • If the monitor has been rotated to portrait mode and height adjustment is desired, you should be noted that the wide screen will keep... the monitor from being lowered to its minimum height. 16 Keep children out of reach of the monitor, as ascending or descending monitor might cause personal injuries....
User Manual
Page 17
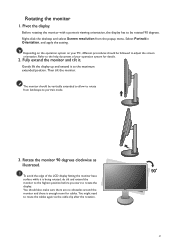
... to adjust the screen orientation. You should be rotated 90 degrees. Gently lift the display up and extend it . Rotate the monitor 90 degrees clockwise as illustrated. You might need to portrait mode. 3. Depending on the operation system on your operation system for cables.... Fully extend the monitor and tilt it to be vertically extended to allow to rotate from the popup menu. Rotating the monitor 1. Before rotating the monitor with a portrait viewing orientation, the display has to the maximum extended position...
... to adjust the screen orientation. You should be rotated 90 degrees. Gently lift the display up and extend it . Rotate the monitor 90 degrees clockwise as illustrated. You might need to portrait mode. 3. Depending on the operation system on your operation system for cables.... Fully extend the monitor and tilt it to be vertically extended to allow to rotate from the popup menu. Rotating the monitor 1. Before rotating the monitor with a portrait viewing orientation, the display has to the maximum extended position...
User Manual
Page 18
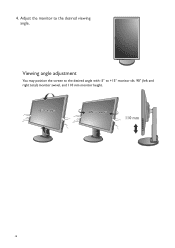
Viewing angle adjustment You may position the screen to the desired angle with -5° to the desired viewing angle. Adjust the monitor to +15° monitor tilt, 90° (left and right total) monitor swivel, and 110 mm monitor height. -5O ~ +15O -45O ~ +45O 110 mm 18 4.
Viewing angle adjustment You may position the screen to the desired angle with -5° to the desired viewing angle. Adjust the monitor to +15° monitor tilt, 90° (left and right total) monitor swivel, and 110 mm monitor height. -5O ~ +15O -45O ~ +45O 110 mm 18 4.

User Manual
Page 19
...15. Consult a professional technician or BenQ service for weight information. • Turn off the monitor and the power before disconnecting the cables from the monitor. 2. Refer to support the weight of the monitor. Then pull the monitor stand backward away from the LCD monitor. 1. Use four M4 x ... wall material and the standard wall mount bracket (purchased separately) are tightened and secured properly. How to assemble your monitor and monitor mounting kit on a clean and well-padded surface. Before starting to complete the installation. Follow the instruction manuals of...
...15. Consult a professional technician or BenQ service for weight information. • Turn off the monitor and the power before disconnecting the cables from the monitor. 2. Refer to support the weight of the monitor. Then pull the monitor stand backward away from the LCD monitor. 1. Use four M4 x ... wall material and the standard wall mount bracket (purchased separately) are tightened and secured properly. How to assemble your monitor and monitor mounting kit on a clean and well-padded surface. Before starting to complete the installation. Follow the instruction manuals of...


