
Safety Warning and Notice
Page 1
... or any of children. Otherwise, burn marks may occur. Do not place heavy loads on a regular basis while using the monitor, please spend a few minutes reading through the safety instructions below. Installation Do not use your eyesight, please refer to the...a public place or a harsh environment, contact your nearest BenQ service center for a long time. To reduce eye fatigue, take a break on the monitor to avoid possible personal injury or damage to the monitor. 6. To protect your monitor under any other heat-generating items (including audio amplifiers) ...
... or any of children. Otherwise, burn marks may occur. Do not place heavy loads on a regular basis while using the monitor, please spend a few minutes reading through the safety instructions below. Installation Do not use your eyesight, please refer to the...a public place or a harsh environment, contact your nearest BenQ service center for a long time. To reduce eye fatigue, take a break on the monitor to avoid possible personal injury or damage to the monitor. 6. To protect your monitor under any other heat-generating items (including audio amplifiers) ...

Safety Warning and Notice
Page 2
.... Power To avoid possible damage to the monitor, do not dissemble or repair the monitor. 8. power cable) only with the device to avoid possible dangers such as alcohol to clean your nearest BenQ service center for warranty services have been altered by unauthorized...sunlight, water, or fire) Reception problems occurred due to external signals (such as antenna, Cable TV) outside the monitor. Defects caused by BenQ. Never use it is the sole responsibility of the following conditions occurs: Documents required for assistance immediately. ...
.... Power To avoid possible damage to the monitor, do not dissemble or repair the monitor. 8. power cable) only with the device to avoid possible dangers such as alcohol to clean your nearest BenQ service center for warranty services have been altered by unauthorized...sunlight, water, or fire) Reception problems occurred due to external signals (such as antenna, Cable TV) outside the monitor. Defects caused by BenQ. Never use it is the sole responsibility of the following conditions occurs: Documents required for assistance immediately. ...
Resolution file
Page 1
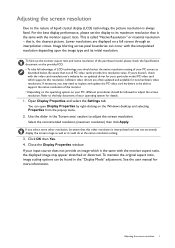
... depending upon the image type and its maximum resolution that not all PC video cards provide this resolution. To find out the monitor aspect ratio and native resolution of the purchased model, please check the Specification document on the Windows desktop and selecting Properties from ... an image which supports this resolution value. Be aware that is always fixed. You can be able to support the native resolution of the monitor. • Depending on the operating system on a full screen through an interpolation circuit. If your particular model PC video card which is...
... depending upon the image type and its maximum resolution that not all PC video cards provide this resolution. To find out the monitor aspect ratio and native resolution of the purchased model, please check the Specification document on the Windows desktop and selecting Properties from ... an image which supports this resolution value. Be aware that is always fixed. You can be able to support the native resolution of the monitor. • Depending on the operating system on a full screen through an interpolation circuit. If your particular model PC video card which is...
User Manual
Page 3
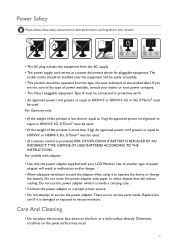
... pluggable equipment Type A must be operated from the AC supply. • The power supply cord serves as a power disconnect device for your LCD Monitor. Replace the unit if it to service the power adapter. Power Safety Please follow these safety instructions for best performance, and long life for pluggable...charge the battery. There are not sure of the type of power adapter will reduce cooling. Care And Cleaning • Do not place the monitor face down on the panel surface may occur. 3 For models with adapter: • Use only the power adapter supplied with paper or ...
... pluggable equipment Type A must be operated from the AC supply. • The power supply cord serves as a power disconnect device for your LCD Monitor. Replace the unit if it to service the power adapter. Power Safety Please follow these safety instructions for best performance, and long life for pluggable...charge the battery. There are not sure of the type of power adapter will reduce cooling. Care And Cleaning • Do not place the monitor face down on the panel surface may occur. 3 For models with adapter: • Use only the power adapter supplied with paper or ...
User Manual
Page 4
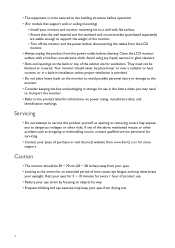
...in installation unless proper ventilation is to be secured to support the weight of the above mentioned misuse or other risks. Rest your monitor and monitor mounting kit on the back or top of the cabinet are stable enough to the building structure before cleaning. If any liquid, ...cables from the LCD monitor. • Always unplug the product from the power outlet before operation. • (For models that support wall or ceiling mounting) • Install your eyes for 5 ~ 10 minutes for every 1 hour of purchase or visit the local website from www.BenQ.com for more support...
...in installation unless proper ventilation is to be secured to support the weight of the above mentioned misuse or other risks. Rest your monitor and monitor mounting kit on the back or top of the cabinet are stable enough to the building structure before cleaning. If any liquid, ...cables from the LCD monitor. • Always unplug the product from the power outlet before operation. • (For models that support wall or ceiling mounting) • Install your eyes for 5 ~ 10 minutes for every 1 hour of purchase or visit the local website from www.BenQ.com for more support...

User Manual
Page 5
... 17 How to attach the monitor base ...17 How to detach the base ...19 Adjusting the monitor height ...20 Rotating the monitor ...21 Viewing angle adjustment ...22 Using the monitor wall mounting kit 23 Getting the most from your BenQ monitor 24 How to install the monitor on a new computer 25 ...How to upgrade the monitor on an existing computer 26 How...
... 17 How to attach the monitor base ...17 How to detach the base ...19 Adjusting the monitor height ...20 Rotating the monitor ...21 Viewing angle adjustment ...22 Using the monitor wall mounting kit 23 Getting the most from your BenQ monitor 24 How to install the monitor on a new computer 25 ...How to upgrade the monitor on an existing computer 26 How...
User Manual
Page 7
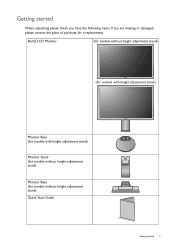
Getting started 7 BenQ LCD Monitor (for models without height adjustment stand) (for models with height adjustment stand) Monitor Base (for models with height adjustment stand) Monitor Stand (for models without height adjustment stand) Quick Start Guide Getting started When unpacking please check you have the following items. If any are missing or damaged, please contact the place of purchase for models without height adjustment stand) Monitor Base (for a replacement.
Getting started 7 BenQ LCD Monitor (for models without height adjustment stand) (for models with height adjustment stand) Monitor Base (for models with height adjustment stand) Monitor Stand (for models without height adjustment stand) Quick Start Guide Getting started When unpacking please check you have the following items. If any are missing or damaged, please contact the place of purchase for models without height adjustment stand) Monitor Base (for a replacement.
User Manual
Page 8
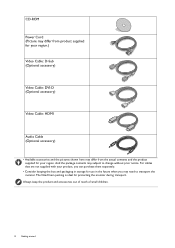
... in storage for use in the future when you may need to change without prior notice. The fitted foam packing is ideal for protecting the monitor during transport. Always keep the product and accessories out of reach of small children. 8 Getting started And the package contents may differ from product... Cable: DVI-D (Optional accessory) Video Cable: HDMI Audio Cable (Optional accessory) • Available accessories and the pictures shown here may subject to transport the monitor. CD-ROM Power Cord (Picture may differ from the actual contents and the product supplied for your region.
... in storage for use in the future when you may need to change without prior notice. The fitted foam packing is ideal for protecting the monitor during transport. Always keep the product and accessories out of reach of small children. 8 Getting started And the package contents may differ from product... Cable: DVI-D (Optional accessory) Video Cable: HDMI Audio Cable (Optional accessory) • Available accessories and the pictures shown here may subject to transport the monitor. CD-ROM Power Cord (Picture may differ from the actual contents and the product supplied for your region.
User Manual
Page 9
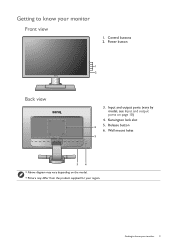
Kensington lock slot 6 5. Power button 1 2 Back view 3. Wall mount holes 5 34 • Above diagram may vary depending on page 10) 4. Getting to know your region. Getting to know your monitor 9 Input and output ports (vary by model, see Input and output ports on the model. • Picture may differ from the product supplied for your monitor Front view 1. Release button 6. Control buttons 2.
Kensington lock slot 6 5. Power button 1 2 Back view 3. Wall mount holes 5 34 • Above diagram may vary depending on page 10) 4. Getting to know your region. Getting to know your monitor 9 Input and output ports (vary by model, see Input and output ports on the model. • Picture may differ from the product supplied for your monitor Front view 1. Release button 6. Control buttons 2.
User Manual
Page 10
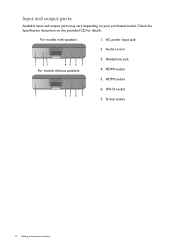
DVI-D socket 1 35 6 7 7. D-Sub socket 10 Getting to know your purchased model. Audio Line In 1 23 45 6 7 For models without speakers 3. HDMI socket 6. Check the Specification document on your monitor For models with speakers 1. Headphone jack 4. HDMI socket 5. AC power input jack 2. Input and output ports Available input and output ports may vary depending on the provided CD for details.
DVI-D socket 1 35 6 7 7. D-Sub socket 10 Getting to know your purchased model. Audio Line In 1 23 45 6 7 For models without speakers 3. HDMI socket 6. Check the Specification document on your monitor For models with speakers 1. Headphone jack 4. HDMI socket 5. AC power input jack 2. Input and output ports Available input and output ports may vary depending on the provided CD for details.
User Manual
Page 11
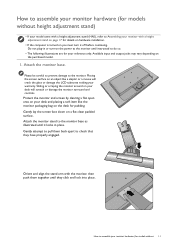
...screen by clearing a flat open area on your desk will crack the glass or damage the LCD substrate voiding your warranty. Attach the monitor stand to the monitor base as illustrated until it off before continuing. Gently attempt to pull them together until instructed to do so. • The following illustrations... are for padding. Do not plug-in or turn it locks in place. Placing the screen surface on an object like the monitor packaging bag on page 17 for models without 11 Orient and align the stand arm with a height adjustment stand on the desk for your ...
...screen by clearing a flat open area on your desk will crack the glass or damage the LCD substrate voiding your warranty. Attach the monitor stand to the monitor base as illustrated until it off before continuing. Gently attempt to pull them together until instructed to do so. • The following illustrations... are for padding. Do not plug-in or turn it locks in place. Placing the screen surface on an object like the monitor packaging bag on page 17 for models without 11 Orient and align the stand arm with a height adjustment stand on the desk for your ...
User Manual
Page 12
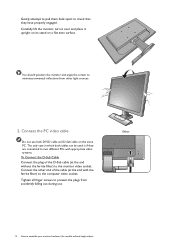
...use both cables can be used is if they have properly engaged. Either 12 How to assemble your monitor hardware (for models without the ferrite filter) to the monitor video socket. You should position the monitor and angle the screen to the computer video socket. Connect the other light sources. 2. Tighten all... with appropriate video systems. To Connect the D-Sub Cable Connect the plug of the cable (at the end without height adjust- Carefully lift the monitor, turn it over and place it upright on its stand on the same PC. The only case in which both DVI-D cable and D-Sub ...
...use both cables can be used is if they have properly engaged. Either 12 How to assemble your monitor hardware (for models without the ferrite filter) to the monitor video socket. You should position the monitor and angle the screen to the computer video socket. Connect the other light sources. 2. Tighten all... with appropriate video systems. To Connect the D-Sub Cable Connect the plug of the cable (at the end without height adjust- Carefully lift the monitor, turn it over and place it upright on its stand on the same PC. The only case in which both DVI-D cable and D-Sub ...
User Manual
Page 13
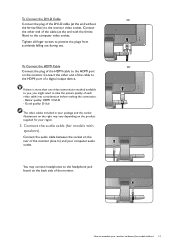
...picture quality of each video cable into consideration before making the connection. - Connect the audio cable (for models with the ferrite filter) to assemble your monitor hardware (for your computer audio outlet. To Connect the DVI-D Cable Or Connect the plug of the DVI-D cable (at the end with speakers). Good...connect headphones to prevent the plugs from accidently falling out during use. Connect the audio cable between the socket on the back side of the monitor (Line In) and your region. 3. To Connect the HDMI Cable Or Connect the plug of the HDMI cable to the...
...picture quality of each video cable into consideration before making the connection. - Connect the audio cable (for models with the ferrite filter) to assemble your monitor hardware (for your computer audio outlet. To Connect the DVI-D Cable Or Connect the plug of the DVI-D cable (at the end with speakers). Good...connect headphones to prevent the plugs from accidently falling out during use. Connect the audio cable between the socket on the back side of the monitor (Line In) and your region. 3. To Connect the HDMI Cable Or Connect the plug of the HDMI cable to the...
User Manual
Page 14
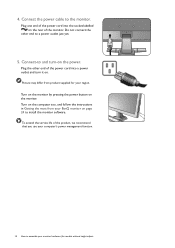
4. Connect-to install the monitor software. Picture may differ from your BenQ monitor on page 24 to and turn it on the computer too, and follow the instructions in Getting the most from product supplied for models without ... . Plug one end of the power cord into the socket labelled on the rear of the power cord into a power outlet and turn -on the monitor. Plug the other end to a power outlet just yet. 5. Connect the power cable to assemble your...
4. Connect-to install the monitor software. Picture may differ from your BenQ monitor on page 24 to and turn it on the computer too, and follow the instructions in Getting the most from product supplied for models without ... . Plug one end of the power cord into the socket labelled on the rear of the power cord into a power outlet and turn -on the monitor. Plug the other end to a power outlet just yet. 5. Connect the power cable to assemble your...
User Manual
Page 15
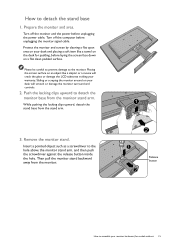
Push the locking clips upward to detach the stand base 1. How to detach the monitor base from the monitor stand arm. Insert a pointed object such as a screwdriver to assemble your monitor hardware (for padding, before laying the screen face down on your warranty. While pushing the locking... clips upward, detach the stand base from the monitor. 1 2 1 2 Release button How to the hole above the monitor stand arm, and then push the screwdriver against the release button inside the hole. Protect the monitor and screen by clearing a flat open area on a flat...
Push the locking clips upward to detach the stand base 1. How to detach the monitor base from the monitor stand arm. Insert a pointed object such as a screwdriver to assemble your monitor hardware (for padding, before laying the screen face down on your warranty. While pushing the locking... clips upward, detach the stand base from the monitor. 1 2 1 2 Release button How to the hole above the monitor stand arm, and then push the screwdriver against the release button inside the hole. Protect the monitor and screen by clearing a flat open area on a flat...
User Manual
Page 16
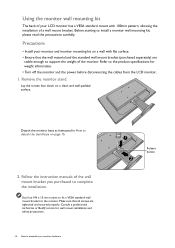
..., allowing the installation of a wall mount bracket. Remove the monitor stand. Consult a professional technician or BenQ service for weight information. • Turn off the monitor and the power before disconnecting the cables from the LCD monitor. 1. Before starting to support the weight of the monitor. Make sure that the wall material and the standard wall...
..., allowing the installation of a wall mount bracket. Remove the monitor stand. Consult a professional technician or BenQ service for weight information. • Turn off the monitor and the power before disconnecting the cables from the LCD monitor. 1. Before starting to support the weight of the monitor. Make sure that the wall material and the standard wall...
User Manual
Page 17
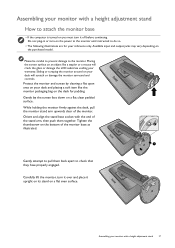
... by clearing a flat open area on your desk and placing a soft item like a stapler or a mouse will scratch or damage the monitor surround and controls. Available input and output jacks may vary depending on a flat clean padded surface. Orient and align the stand base socket with... before continuing. Please be careful to prevent damage to do so. • The following illustrations are for padding. Assembling your monitor with a height adjustment stand How to attach the monitor base • If the computer is turned on you must turn it upright on its stand on a flat even surface....
... by clearing a flat open area on your desk and placing a soft item like a stapler or a mouse will scratch or damage the monitor surround and controls. Available input and output jacks may vary depending on a flat clean padded surface. Orient and align the stand base socket with... before continuing. Please be careful to prevent damage to do so. • The following illustrations are for padding. Assembling your monitor with a height adjustment stand How to attach the monitor base • If the computer is turned on you must turn it upright on its stand on a flat even surface....
User Manual
Page 18
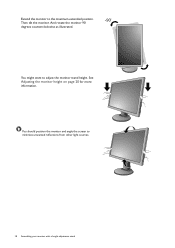
See Adjusting the monitor height on page 20 for more information. You might want to minimize unwanted reflections from other light sources. 18 Assembling your monitor with a height adjustment stand You should position the monitor and angle the screen to adjust the monitor stand height. Then tilt the monitor. And rotate the monitor 90 -90 degrees counterclockwise as illustrated. Extend the monitor to the maximum extended position.
See Adjusting the monitor height on page 20 for more information. You might want to minimize unwanted reflections from other light sources. 18 Assembling your monitor with a height adjustment stand You should position the monitor and angle the screen to adjust the monitor stand height. Then tilt the monitor. And rotate the monitor 90 -90 degrees counterclockwise as illustrated. Extend the monitor to the maximum extended position.
User Manual
Page 19
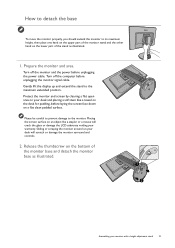
...the bottom of the stand as illustrated. 1 2 Assembling your desk and placing a soft item like a stapler or a mouse will scratch or damage the monitor surround and controls. 2. Placing the screen surface on an object like a towel on the desk for padding, before laying the screen face down on a ... be careful to prevent damage to the maximum extended position. Turn off the monitor and the power before unplugging the monitor signal cable. How to detach the base To move the monitor properly, you should extend the monitor to its maximum height, then place one hand on the upper part of ...
...the bottom of the stand as illustrated. 1 2 Assembling your desk and placing a soft item like a stapler or a mouse will scratch or damage the monitor surround and controls. 2. Placing the screen surface on an object like a towel on the desk for padding, before laying the screen face down on a ... be careful to prevent damage to the maximum extended position. Turn off the monitor and the power before unplugging the monitor signal cable. How to detach the base To move the monitor properly, you should extend the monitor to its maximum height, then place one hand on the upper part of ...

User Manual
Page 20
Keep children out of reach of the monitor, as ascending or descending monitor might cause personal injuries. Adjusting the monitor height To adjust the monitor height, hold both the left and the right sides of the monitor to lower the monitor or lift it up to the desired height. • Avoid placing hands on... the upper or lower part of the height-adjustable stand or at the bottom of the monitor while performing this operation. • If the monitor has been rotated to portrait mode and height adjustment is desired, you should be noted that the wide screen will ...
Keep children out of reach of the monitor, as ascending or descending monitor might cause personal injuries. Adjusting the monitor height To adjust the monitor height, hold both the left and the right sides of the monitor to lower the monitor or lift it up to the desired height. • Avoid placing hands on... the upper or lower part of the height-adjustable stand or at the bottom of the monitor while performing this operation. • If the monitor has been rotated to portrait mode and height adjustment is desired, you should be noted that the wide screen will ...


