User Manual
Page 3
... ...5 Safety instructions 6 Overview ...9 Shipping contents 9 Remote control batteries 9 BenQ PE8720 projector features 10 Projector exterior view 11 Front and upper side view 11 Rear view ...11 Under and side view 11 Connector panel ...11 Controls and functions 12 Control panel ...12 Remote control ...13 Positioning your projector 14 Choosing a location 14 Obtaining a preferred projected image size 15 Installation for a 16:9 ratio screen 15 Installation for a 4:3 ratio screen 16 Shifting the projection lens vertically 16 Connecting with video equipment 17 Connecting a computer...
... ...5 Safety instructions 6 Overview ...9 Shipping contents 9 Remote control batteries 9 BenQ PE8720 projector features 10 Projector exterior view 11 Front and upper side view 11 Rear view ...11 Under and side view 11 Connector panel ...11 Controls and functions 12 Control panel ...12 Remote control ...13 Positioning your projector 14 Choosing a location 14 Obtaining a preferred projected image size 15 Installation for a 16:9 ratio screen 15 Installation for a 4:3 ratio screen 16 Shifting the projection lens vertically 16 Connecting with video equipment 17 Connecting a computer...
User Manual
Page 4
... video memory 23 Turning the power off 23 Menus ...24 On Screen Display (OSD) structure 24 Using the menus 25 Picture menu 26 Display menu 27 Options menu 28 Setup menu 28 Advance menu 29 Additional information 30 Care of the projector 30 Cleaning the lens ...30 Cleaning the projector case 30 Storing the projector 30 Transporting the projector 30 Cleaning and replacing the dust filter 30 Installing the cable connector-panel cover 32 Replacing the lamp 33 Indicators ...34 Troubleshooting 35 Specifications...
... video memory 23 Turning the power off 23 Menus ...24 On Screen Display (OSD) structure 24 Using the menus 25 Picture menu 26 Display menu 27 Options menu 28 Setup menu 28 Advance menu 29 Additional information 30 Care of the projector 30 Cleaning the lens ...30 Cleaning the projector case 30 Storing the projector 30 Transporting the projector 30 Cleaning and replacing the dust filter 30 Installing the cable connector-panel cover 32 Replacing the lamp 33 Indicators ...34 Troubleshooting 35 Specifications...

User Manual
Page 5
... you for EMC (Electro Magnetic Compatibility) and fulfills these requirements. Connect the equipment into an outlet on the finish. English PE8720-en.book Page 5 Friday, May 13, 2005 5:19 PM Safety, regulatory and legal information Thank you with an enjoyable home theater viewing experience. To prevent the projector from a cold location to follow the cleaning product's safety instructions.
... you for EMC (Electro Magnetic Compatibility) and fulfills these requirements. Connect the equipment into an outlet on the finish. English PE8720-en.book Page 5 Friday, May 13, 2005 5:19 PM Safety, regulatory and legal information Thank you with an enjoyable home theater viewing experience. To prevent the projector from a cold location to follow the cleaning product's safety instructions.
User Manual
Page 7
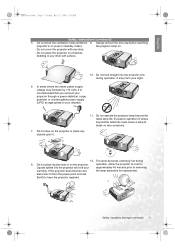
... power supply (UPS) as appropriate to break on the projector or place any other soft surface. 10. Always remove the lens cap before switching projector is recommended that you connect your sight. 6. Do not block the ventilation holes whilst the 9. Do not place liquids near or on . - Do not cover the projector with any item; - The lamp becomes extremely hot during operation...
... power supply (UPS) as appropriate to break on the projector or place any other soft surface. 10. Always remove the lens cap before switching projector is recommended that you connect your sight. 6. Do not block the ventilation holes whilst the 9. Do not place liquids near or on . - Do not cover the projector with any item; - The lamp becomes extremely hot during operation...
User Manual
Page 9
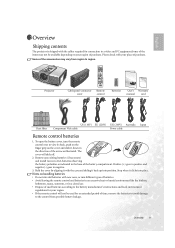
... and sliding it clicks into position. Some of the arrow as indicated in the direction of the accessories may not be used batteries according to region. PE8720 Projector 2 3 1 ENTER CT Cable panel-connector Remote cover control 8720 PE8720 batteries User's Warranty manual card Dust filter US (110V) EU (220V) UK (240V) Australia Component Vide cable Power cable Japan Remote control batteries 1. To open the battery cover, turn the remote control over to negative. 3.
... and sliding it clicks into position. Some of the arrow as indicated in the direction of the accessories may not be used batteries according to region. PE8720 Projector 2 3 1 ENTER CT Cable panel-connector Remote cover control 8720 PE8720 batteries User's Warranty manual card Dust filter US (110V) EU (220V) UK (240V) Australia Component Vide cable Power cable Japan Remote control batteries 1. To open the battery cover, turn the remote control over to negative. 3.
User Manual
Page 10
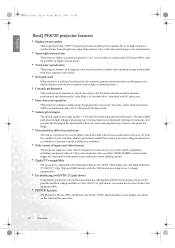
... annoying blurring or spots in the projected image. • Motorized lens shift, focus and zoom The remote control can be used to adjust vertical lens shift, picture focus, and picture zoom size, all from the comfort of your video and PC equipment, including component video, S-Video, and composite video, as well as HDMI, RGBHD, and an output trigger for connection to automated screen and environment lighting systems. • Digital TV compatibility The projector is compatible with...
... annoying blurring or spots in the projected image. • Motorized lens shift, focus and zoom The remote control can be used to adjust vertical lens shift, picture focus, and picture zoom size, all from the comfort of your video and PC equipment, including component video, S-Video, and composite video, as well as HDMI, RGBHD, and an output trigger for connection to automated screen and environment lighting systems. • Digital TV compatibility The projector is compatible with...

User Manual
Page 11
... port for detail) 10. Indicator lights 6 5. Vent (heated air exhaust) Rear view 9 Under and side view 9. Ceiling mounting holes 14. RGB High Definition inputs (BNC) supports RGBHV video or PC signal 21. 12VDC output terminal 22. Kensington lock slot 15. Main AC power switch 11. Dust filter grill (cool air intake) 7 6. Component video inputs (BNC) support Y/PB/PR, Y/CB/CR, or RGB video signal 20. HDMI port 16. Connector panel (see below for wired remote control Overview 11 PE8720...
... port for detail) 10. Indicator lights 6 5. Vent (heated air exhaust) Rear view 9 Under and side view 9. Ceiling mounting holes 14. RGB High Definition inputs (BNC) supports RGBHV video or PC signal 21. 12VDC output terminal 22. Kensington lock slot 15. Main AC power switch 11. Dust filter grill (cool air intake) 7 6. Component video inputs (BNC) support Y/PB/PR, Y/CB/CR, or RGB video signal 20. HDMI port 16. Connector panel (see below for wired remote control Overview 11 PE8720...
User Manual
Page 12
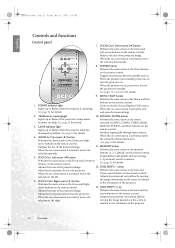
Turns on the remote control. ZOOM-In / Up-arrow (c) button Performs the same action as the memory selection upwards. Enlarges the size of the projected image. 12. the image downwards on the screen in relation to the orientation of the projected image. POWER indicator light Lights up Adjusts the focus of the projector 12 Overview When the on -screen menu is activated, exits and saves the menu settings. 2. selection (COMP1, COMP2, VIDEO, HDMI, 3. See page 25...
Turns on the remote control. ZOOM-In / Up-arrow (c) button Performs the same action as the memory selection upwards. Enlarges the size of the projected image. 12. the image downwards on the screen in relation to the orientation of the projected image. POWER indicator light Lights up Adjusts the focus of the projector 12 Overview When the on -screen menu is activated, exits and saves the menu settings. 2. selection (COMP1, COMP2, VIDEO, HDMI, 3. See page 25...

User Manual
Page 13
... the projector. Pressing any changes made using the On-Screen Display (OSD) menu. PE8720-en.book Page 13 Friday, May 13, 2005 5:19 PM English Remote control 1. See page 20 for details. 7. MEMORY buttons (1, 2, 3 and DEFAULT) 12 11 Restores picture settings saved in the 14 direction of the currently active window with the + or - buttons. See page 22. 13. Picture enhancement buttons (ZOOM, FOCUS, LENS) Displays the setting bars for the current input source.
... the projector. Pressing any changes made using the On-Screen Display (OSD) menu. PE8720-en.book Page 13 Friday, May 13, 2005 5:19 PM English Remote control 1. See page 20 for details. 7. MEMORY buttons (1, 2, 3 and DEFAULT) 12 11 Restores picture settings saved in the 14 direction of the currently active window with the + or - buttons. See page 22. 13. Picture enhancement buttons (ZOOM, FOCUS, LENS) Displays the setting bars for the current input source.
User Manual
Page 14
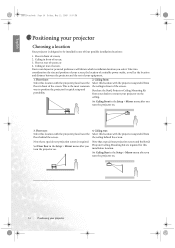
... of your screen, the location of a suitable power outlet, as well as the location and distance between the projector and the rest of screen; Floor rear: 4. Floor at rear of four possible installation locations: 1. Set Ceiling Front in the Setup > Mirror menu after you turn the projector on the ceiling. Note that a special rear projection screen is the most common way to mount your projector Take into consideration the size and...
... of your screen, the location of a suitable power outlet, as well as the location and distance between the projector and the rest of screen; Floor rear: 4. Floor at rear of four possible installation locations: 1. Set Ceiling Front in the Setup > Mirror menu after you turn the projector on the ceiling. Note that a special rear projection screen is the most common way to mount your projector Take into consideration the size and...
User Manual
Page 19
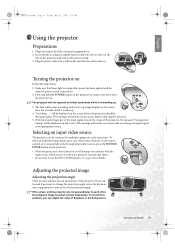
... projector on . Press and hold the POWER button on the screen before the projector identifies the input signal. If the horizontal frequency of the input signal exceeds the range of the projector, the message "Unsupported timing" will be displayed on the projector or remote control to multiple equipment at the same time. Plug in , plug the supplied power cable into a wall socket and turn on Follow the steps below. 1. Adjusting the projected image Adjusting the projection...
... projector on . Press and hold the POWER button on the screen before the projector identifies the input signal. If the horizontal frequency of the input signal exceeds the range of the projector, the message "Unsupported timing" will be displayed on the projector or remote control to multiple equipment at the same time. Plug in , plug the supplied power cable into a wall socket and turn on Follow the steps below. 1. Adjusting the projected image Adjusting the projection...

User Manual
Page 20
... of the image input source. To reduce the image size, press the d button on the projector or the e button on the remote control, or in a commercial cinema). • Preset Home Theater Mode: is stretched equally, or non-linearly, which distorts the image. 20 Using the projector You do not need 2. Selecting the aspect ratio The "aspect ratio" is pressed, an adjustment bar " e Zoom f " displays on the screen. English PE8720-en...
... of the image input source. To reduce the image size, press the d button on the projector or the e button on the remote control, or in a commercial cinema). • Preset Home Theater Mode: is stretched equally, or non-linearly, which distorts the image. 20 Using the projector You do not need 2. Selecting the aspect ratio The "aspect ratio" is pressed, an adjustment bar " e Zoom f " displays on the screen. English PE8720-en...

User Manual
Page 23
... are four video settings: MEMORY 1, MEMORY 2, MEMORY 3, and DEFAULT. Press POWER again. • The Power indicator light flashes green and the fans run for the current input source. • For information about two minutes to cool the lamp. These settings do not affect the projection settings, operation, or performance. • Language in Setup menu sets your preferences. Saving and loading the video memory • Press the video memory buttons on the remote control or MEMORY...
... are four video settings: MEMORY 1, MEMORY 2, MEMORY 3, and DEFAULT. Press POWER again. • The Power indicator light flashes green and the fans run for the current input source. • For information about two minutes to cool the lamp. These settings do not affect the projection settings, operation, or performance. • Language in Setup menu sets your preferences. Saving and loading the video memory • Press the video memory buttons on the remote control or MEMORY...

User Manual
Page 26
... information. 8. Filter: Turn the video and data filters on or off. The higher the setting, the less the noise. 6. Sharpness: Adjusts the picture sharpness. The higher the value, the sharper the picture. 7. See page 20 for information about storing the Color Temperature User 1 and 2. • Color Enhancement Red: Adjusts red hues independently. Green: Adjusts green hues independently. The higher the setting, the greater the intensity of the image. Blue: Adjusts blue hues independently. Yellow: Adjusts yellow hues...
... information. 8. Filter: Turn the video and data filters on or off. The higher the setting, the less the noise. 6. Sharpness: Adjusts the picture sharpness. The higher the value, the sharper the picture. 7. See page 20 for information about storing the Color Temperature User 1 and 2. • Color Enhancement Red: Adjusts red hues independently. Green: Adjusts green hues independently. The higher the setting, the greater the intensity of the image. Blue: Adjusts blue hues independently. Yellow: Adjusts yellow hues...

User Manual
Page 28
... is no input signal detected. 2. Use this pattern when installing the projector, even if there is hotter than 40°C. Lamp • Lamp Type: Sets 250W or 200W as the power type of up to adjust the image size and the focus. 7. Lamp Rest Rate: Shows the percentage of the OSD. 5. Dust Filter • Dust Filter Hours: Shows the total time of time the OSD will be displayed with 0 IRE...
... is no input signal detected. 2. Use this pattern when installing the projector, even if there is hotter than 40°C. Lamp • Lamp Type: Sets 250W or 200W as the power type of up to adjust the image size and the focus. 7. Lamp Rest Rate: Shows the percentage of the OSD. 5. Dust Filter • Dust Filter Hours: Shows the total time of time the OSD will be displayed with 0 IRE...
User Manual
Page 30
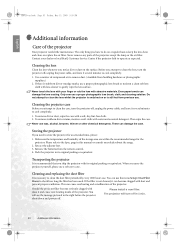
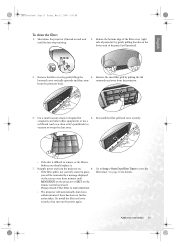
... air filter. Only ever use the menu Setup> Dust Filter Hours to cool completely. 1. Retract the adjuster feet. 3. You can use a proper photographic lens brush, cloth, and cleaning solution. The projector will see the message pictured to the right before the projector shuts down and powers off , unplug the power cable, and leave it several minutes to check how long the filter has been used. Make sure the temperature and humidity of the projector. Remove...
... air filter. Only ever use the menu Setup> Dust Filter Hours to cool completely. 1. Retract the adjuster feet. 3. You can use a proper photographic lens brush, cloth, and cleaning solution. The projector will see the message pictured to the right before the projector shuts down and powers off , unplug the power cable, and leave it several minutes to check how long the filter has been used. Make sure the temperature and humidity of the projector. Remove...
User Manual
Page 31
...) or use a soft brush (such as illustrated). 3. Go to Setup > Reset Dust Filter Timer to remove or the filter is pressed. Re-install the filter grill and cover securely. Remove the filter cover by gently pulling the tabs on the screen every three minutes until the fans stop running. 2. See page 28 for 6. Additional information 31 Re-install the filter and cover securely, then turn the projector on the remote control is...
...) or use a soft brush (such as illustrated). 3. Go to Setup > Reset Dust Filter Timer to remove or the filter is pressed. Re-install the filter grill and cover securely. Remove the filter cover by gently pulling the tabs on the screen every three minutes until the fans stop running. 2. See page 28 for 6. Additional information 31 Re-install the filter and cover securely, then turn the projector on the remote control is...
User Manual
Page 33
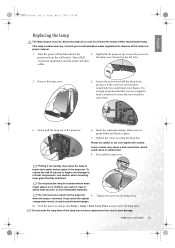
... your hand into Setup > Lamp > Reset Lamp Timer menu to internal components, use a magnetichead screwdriver to not over-tighten the screws. Make sure it could cause damage. Allow the projector to dispose of this could cause blurred images. Pulling it , near or above heat sources, or near flammable materials. connected equipment and disconnect all the lamp cover (located on the left side). Turn the power on it...
... your hand into Setup > Lamp > Reset Lamp Timer menu to internal components, use a magnetichead screwdriver to not over-tighten the screws. Make sure it could cause damage. Allow the projector to dispose of this could cause blurred images. Pulling it , near or above heat sources, or near flammable materials. connected equipment and disconnect all the lamp cover (located on the left side). Turn the power on it...
User Manual
Page 34
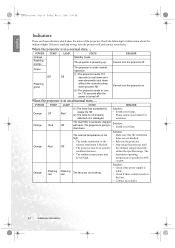
..., May 13, 2005 5:19 PM Indicators There are not working. POWER Orange Flashing orange Green TEMP Off Flashing green LAMP Off STATE Standby mode. Cannot turn the projector off and contact your dealer. 34 Additional information The projector is in a poorly ventilated location. • The ambient temperature may be in an abnormal state, ... Solution: • Install a new filter. Or (2) The projector needs to shut down process. When the projector is going to cool for...
..., May 13, 2005 5:19 PM Indicators There are not working. POWER Orange Flashing orange Green TEMP Off Flashing green LAMP Off STATE Standby mode. Cannot turn the projector off and contact your dealer. 34 Additional information The projector is in a poorly ventilated location. • The ambient temperature may be in an abnormal state, ... Solution: • Install a new filter. Or (2) The projector needs to shut down process. When the projector is going to cool for...
User Manual
Page 35
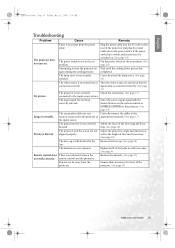
...) Check the connection. (See page 17) Select the correct input signal with the Source buttons on the remote control or SOURCE / ENTER on the projector. (See page 19) Correctly connect the cables to the power outlet. Plug the power cable into the AC inlet on the rear of the projector, and plug the power cable into to the appropriate terminals. (See page 17) Adjust the focus of the lens using the focus ring...
...) Check the connection. (See page 17) Select the correct input signal with the Source buttons on the remote control or SOURCE / ENTER on the projector. (See page 19) Correctly connect the cables to the power outlet. Plug the power cable into the AC inlet on the rear of the projector, and plug the power cable into to the appropriate terminals. (See page 17) Adjust the focus of the lens using the focus ring...


