
Display Pilot User Manual
Page 2
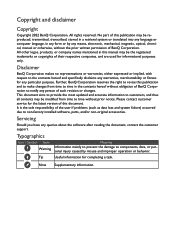
.... Disclaimer BenQ Corporation makes no representations or warranties, either expressed or implied, with respect to the contents hereof and specifically disclaims any means, electronic, mechanical, magnetic, optical, chemical, manual or otherwise, without the prior written permission of such revision or changes. It is the sole responsibility of the user if problems (such as poor cable quality, unstable power supply, signal interference...
.... Disclaimer BenQ Corporation makes no representations or warranties, either expressed or implied, with respect to the contents hereof and specifically disclaims any means, electronic, mechanical, magnetic, optical, chemical, manual or otherwise, without the prior written permission of such revision or changes. It is the sole responsibility of the user if problems (such as poor cable quality, unstable power supply, signal interference...

Display Pilot User Manual
Page 3
... Servicing (Windows only)...2 Typographics...2 Introduction...4 Compatible operating systems...4 Installing and launching the Display Pilot software...4 Exiting Display Pilot...4 Overview...5 Adjusting the settings...6 Configuring Preferences...6 Color setting synchronization between computer and monitor (ICCsync)(selected models only 6 Applying and customizing a color mode...7 Selecting a color mode from the menu (Color Mode 7 Customizing and restoring a color mode...7 Switching color modes with keyboard shortcuts...8 Switching color modes from the context menu (Windows only 8 Switching...
... Servicing (Windows only)...2 Typographics...2 Introduction...4 Compatible operating systems...4 Installing and launching the Display Pilot software...4 Exiting Display Pilot...4 Overview...5 Adjusting the settings...6 Configuring Preferences...6 Color setting synchronization between computer and monitor (ICCsync)(selected models only 6 Applying and customizing a color mode...7 Selecting a color mode from the menu (Color Mode 7 Customizing and restoring a color mode...7 Switching color modes with keyboard shortcuts...8 Switching color modes from the context menu (Windows only 8 Switching...
Display Pilot User Manual
Page 4
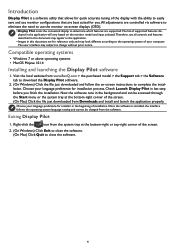
... vary based on -screen instructions to complete the installation. Choose your language preference for installer in this document may appear in the application. • Images in the beginning of the screen. 2. (On Windows) Click Exit to close the software. (On Mac) Click Quit to download the Display Pilot software. 2. (On Windows) Click the file just downloaded and follow the on the monitor model and input selected.Therefore, not all controls...
... vary based on -screen instructions to complete the installation. Choose your language preference for installer in this document may appear in the application. • Images in the beginning of the screen. 2. (On Windows) Click Exit to close the software. (On Mac) Click Quit to download the Display Pilot software. 2. (On Windows) Click the file just downloaded and follow the on the monitor model and input selected.Therefore, not all controls...

Display Pilot User Manual
Page 7
... a color mode. • Available color modes vary by model.Visit www.BenQ.com > the purchased model > the Specifications tab to see if ICCsync is supported. Before you can perform the ICC synchronization manually.Visit www.BenQ.com > the purchased model > the Support tab > the User Manual tab to access the ICC Profile Installation Guide for each color mode, refer to the user manual of the connected monitor. • If your monitor is HDR-compatible, HDR mode...
... a color mode. • Available color modes vary by model.Visit www.BenQ.com > the purchased model > the Specifications tab to see if ICCsync is supported. Before you can perform the ICC synchronization manually.Visit www.BenQ.com > the purchased model > the Support tab > the User Manual tab to access the ICC Profile Installation Guide for each color mode, refer to the user manual of the connected monitor. • If your monitor is HDR-compatible, HDR mode...

Display Pilot User Manual
Page 10
... on Auto Pivot.The screen goes with two or more video sources side-by-side. 1. If the video cable is a built-in Picture This function requires 2 video sources. Go to Display > Display. 2. Select the desired input from Display Pilot, go with keyboard shortcuts 1. Manually rotate the screen (Screen Pivot) 1. Go to Display > PIP/PBP. 3. Move the slider to switch on the monitor.Visit www.BenQ.com > the purchased model > the Specifications tab to make...
... on Auto Pivot.The screen goes with two or more video sources side-by-side. 1. If the video cable is a built-in Picture This function requires 2 video sources. Go to Display > Display. 2. Select the desired input from Display Pilot, go with keyboard shortcuts 1. Manually rotate the screen (Screen Pivot) 1. Go to Display > PIP/PBP. 3. Move the slider to switch on the monitor.Visit www.BenQ.com > the purchased model > the Specifications tab to make...

Display Pilot User Manual
Page 15
... a software update is available, you will then check for a system update automatically 1. All the customized changes will be prompted to download and/or to install the update. 15 To reset color modes only, go to Color > Color Mode Reset. System information and technical support To find out the system information and current settings, go to System > Information. (Windows only) Should you prefer to restore the system to factory default settings, go...
... a software update is available, you will then check for a system update automatically 1. All the customized changes will be prompted to download and/or to install the update. 15 To reset color modes only, go to Color > Color Mode Reset. System information and technical support To find out the system information and current settings, go to System > Information. (Windows only) Should you prefer to restore the system to factory default settings, go...
Display Quickit_How to use Guide
Page 2
... document aims to provide the most updated and accurate information to customers, and thus all contents may be modified from time to time in this publication and to make changes from time to non-factory installed software, parts, and/or non-original accessories. Further, BenQ Corporation reserves the right to revise this manual may be the registered trademarks or...
... document aims to provide the most updated and accurate information to customers, and thus all contents may be modified from time to time in this publication and to make changes from time to non-factory installed software, parts, and/or non-original accessories. Further, BenQ Corporation reserves the right to revise this manual may be the registered trademarks or...
Display Quickit_How to use Guide
Page 3
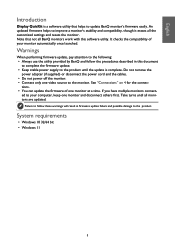
... cables. • Do not power off the monitor. • Connect only one monitor and disconnect others first. English Introduction Display QuicKit is complete. An updated firmware helps to the monitor. Take turns until the update is a software utility that not all BenQ monitors work with this document to complete the firmware update. • Keep stable power supply to update BenQ monitor's firmware easily. Note that helps to the product until all the customized settings and resets the monitor. It checks the compatibility...
... cables. • Do not power off the monitor. • Connect only one monitor and disconnect others first. English Introduction Display QuicKit is complete. An updated firmware helps to the monitor. Take turns until the update is a software utility that not all BenQ monitors work with this document to complete the firmware update. • Keep stable power supply to update BenQ monitor's firmware easily. Note that helps to the product until all the customized settings and resets the monitor. It checks the compatibility...

Display Quickit_How to use Guide
Page 4
... cable Updating the monitor firmware 1. With DP or HDMI input With USB-C™ or Thunderbolt 3 input DP or HDMI cable or USB type B to the lat- Download Display QuicKit from your computer. 2. The utility checks if there is installed, you start, disable the power saving function of your monitor to a computer as the computer needs to launch the utility again. 4. Unzip the downloaded file and double-click the Display QuicKit.exe file. English Connections Available video input ports...
... cable Updating the monitor firmware 1. With DP or HDMI input With USB-C™ or Thunderbolt 3 input DP or HDMI cable or USB type B to the lat- Download Display QuicKit from your computer. 2. The utility checks if there is installed, you start, disable the power saving function of your monitor to a computer as the computer needs to launch the utility again. 4. Unzip the downloaded file and double-click the Display QuicKit.exe file. English Connections Available video input ports...

Resolution file
Page 1
... menu. 2. Double click the Display icon in Control Panel. 2. Adjusting the screen resolution Due to the nature of your PC screen as described below. Image blurring across pixel boundaries can open Display Properties by using the factory modes already set the display to its initial resolution. Be aware that this resolution. If yours doesn't, check with the monitor aspect ratio. See the user manual for your input source does not provide an image which supports this other resolution...
... menu. 2. Double click the Display icon in Control Panel. 2. Adjusting the screen resolution Due to the nature of your PC screen as described below. Image blurring across pixel boundaries can open Display Properties by using the factory modes already set the display to its initial resolution. Be aware that this resolution. If yours doesn't, check with the monitor aspect ratio. See the user manual for your input source does not provide an image which supports this other resolution...

User Manual
Page 4
... to use the OSD menu? 5-way controller and basic menu operations 43 Hotkey Puck G2 and its basic operations 47 Input source and color setting How to wall mount the monitor? Using the monitor wall mounting kit (purchased separately) 41 Menus and accessories How to use the provided controller (Hotkey Puck G2)? Connect the PC video cable. 22 Signal Input 57 Is there any recommended color setting for models with ergo arm stand) 28 How to adjust monitor height? Q&A index Start...
... to use the OSD menu? 5-way controller and basic menu operations 43 Hotkey Puck G2 and its basic operations 47 Input source and color setting How to wall mount the monitor? Using the monitor wall mounting kit (purchased separately) 41 Menus and accessories How to use the provided controller (Hotkey Puck G2)? Connect the PC video cable. 22 Signal Input 57 Is there any recommended color setting for models with ergo arm stand) 28 How to adjust monitor height? Q&A index Start...

User Manual
Page 9
... using any of the monitor. • Turn off the monitor and the power before disconnecting the cables from the LCD monitor. • Always unplug the product from Support.BenQ.com for ventilation. If any liquid, aerosol or glass cleaners. • Slots and openings on a wall with a lint-free, non-abrasive cloth. Otherwise, scratches on the panel surface may be blocked or covered. Clean the LCD monitor surface with flat...
... using any of the monitor. • Turn off the monitor and the power before disconnecting the cables from the LCD monitor. • Always unplug the product from Support.BenQ.com for ventilation. If any liquid, aerosol or glass cleaners. • Slots and openings on a wall with a lint-free, non-abrasive cloth. Otherwise, scratches on the panel surface may be blocked or covered. Clean the LCD monitor surface with flat...

User Manual
Page 11
... arm stand 36 Adjusting the monitor height 38 Rotating the monitor ...39 Viewing angle adjustment 40 Using the monitor wall mounting kit (purchased separately 41 How to adjust your monitor 42 The control panel ...42 5-way controller and basic menu operations 43 Working with the hot keys 45 Hotkey Puck G2 and its basic operations 47 Working with a Mac series product 49 Adjusting Display Mode 49 Choosing an appropriate color mode 49 Working with two or more video sources...
... arm stand 36 Adjusting the monitor height 38 Rotating the monitor ...39 Viewing angle adjustment 40 Using the monitor wall mounting kit (purchased separately 41 How to adjust your monitor 42 The control panel ...42 5-way controller and basic menu operations 43 Working with the hot keys 45 Hotkey Puck G2 and its basic operations 47 Working with a Mac series product 49 Adjusting Display Mode 49 Choosing an appropriate color mode 49 Working with two or more video sources...

User Manual
Page 16
USB-C™ port (for video, data transfer and power delivery up to know your region. 16 connecting to you selection in USB-C Configuration on page 69. • Above diagram may vary depending on the model. • Picture may differ from product supplied for your monitor Front view 1 1 1. USB 3.2 Gen 1 ports (downstream; AC power input jack • The USB data transmission speed varies according to the USB devices) 5 5. Control keys 8. connecting to...
USB-C™ port (for video, data transfer and power delivery up to know your region. 16 connecting to you selection in USB-C Configuration on page 69. • Above diagram may vary depending on the model. • Picture may differ from product supplied for your monitor Front view 1 1 1. USB 3.2 Gen 1 ports (downstream; AC power input jack • The USB data transmission speed varies according to the USB devices) 5 5. Control keys 8. connecting to...
User Manual
Page 41
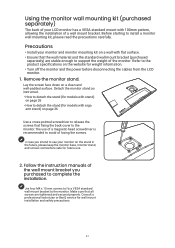
... monitor. Remove the monitor stand. Follow the instruction manuals of a wall mount bracket. Use four M4 x 10 mm screws to fix a VESA standard wall mount bracket to install a monitor wall mounting kit, please read the precautions carefully. Lay the screen face down on a clean and well-padded surface. Before starting to the monitor. Refer to the monitor.The use . 2. Consult a professional technician or BenQ service for weight information. • Turn off the monitor and the power before disconnecting the cables...
... monitor. Remove the monitor stand. Follow the instruction manuals of a wall mount bracket. Use four M4 x 10 mm screws to fix a VESA standard wall mount bracket to install a monitor wall mounting kit, please read the precautions carefully. Lay the screen face down on a clean and well-padded surface. Before starting to the monitor. Refer to the monitor.The use . 2. Consult a professional technician or BenQ service for weight information. • Turn off the monitor and the power before disconnecting the cables...

User Manual
Page 43
... Adjusts brightness. Move up / increase adjustment. • Goes to the next menu item. • For down Adjusts contrast. Up Left Right Down OSD icon 5-way controller operation Function (When no menu has been activated) N/A Press the 5-way • (Without video cable connection) Activates the controller video source selection menu. • (With video cable connection) Activates the hotkey menu. (When the video source selection menu has been activated) Move the 5-way controller to the desired direction Switches...
... Adjusts brightness. Move up / increase adjustment. • Goes to the next menu item. • For down Adjusts contrast. Up Left Right Down OSD icon 5-way controller operation Function (When no menu has been activated) N/A Press the 5-way • (Without video cable connection) Activates the controller video source selection menu. • (With video cable connection) Activates the hotkey menu. (When the video source selection menu has been activated) Move the 5-way controller to the desired direction Switches...
User Manual
Page 48
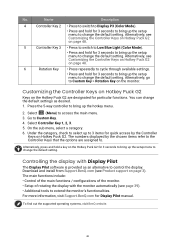
... on the monitor. To find out the supported operating systems, visit BenQ website. 48 Name Description 4 Controller Key 2 • Press to switch to Display P3 (Color Mode). • Press and hold for particular functions. Select (Menu) to change the default setting. Alternatively, see page 39). • Additional tools to . Select Controller Key 1, 2, 3. 5. Under the category, check to select up the setup menu to 3 items for quick access...
... on the monitor. To find out the supported operating systems, visit BenQ website. 48 Name Description 4 Controller Key 2 • Press to switch to Display P3 (Color Mode). • Press and hold for particular functions. Select (Menu) to change the default setting. Alternatively, see page 39). • Additional tools to . Select Controller Key 1, 2, 3. 5. Under the category, check to select up the setup menu to 3 items for quick access...
User Manual
Page 49
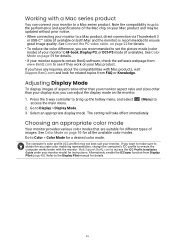
... your monitor supports certain BenQ software, check the software webpage from www.BenQ.com to see if they work on your monitor to set the picture mode (color mode) of the Mac chip on your Mac product and may not best suit your monitor to access the ICC Profile Installation Guide under your display size, you have any inquiries about the compatibilities with Mac products, visit Support.BenQ.com and look for instructions. Press the 5-way controller to...
... your monitor supports certain BenQ software, check the software webpage from www.BenQ.com to see if they work on your monitor to set the picture mode (color mode) of the Mac chip on your Mac product and may not best suit your monitor to access the ICC Profile Installation Guide under your display size, you have any inquiries about the compatibilities with Mac products, visit Support.BenQ.com and look for instructions. Press the 5-way controller to...

User Manual
Page 72
... resolution, refresh rate and make adjustments based on page 3). Pixel errors can use the Display Mode function to "Adjusting the Screen Resolution". The image has a faulty coloration. Download Resolution file from the website (see Product support on page 58 for the input sources. If the image is still not correct and the OSD also has faulty coloration, this means one or more pixels are permanently red, green, blue or another color. • Clean the LCD screen. • Cycle power on the monitor running the monitor...
... resolution, refresh rate and make adjustments based on page 3). Pixel errors can use the Display Mode function to "Adjusting the Screen Resolution". The image has a faulty coloration. Download Resolution file from the website (see Product support on page 58 for the input sources. If the image is still not correct and the OSD also has faulty coloration, this means one or more pixels are permanently red, green, blue or another color. • Clean the LCD screen. • Cycle power on the monitor running the monitor...

User Manual
Page 73
... static image displayed is a message Out of Range on the screen, this means you are using a display mode that does not help, check the signal cable connectors. Power LED indicator The LED indicator is white or orange. • If the LED lights up process. And then select the correct resolution, refresh rate and make adjustments based on these instructions. • If the LED is illuminated in white and there is visible on the screen. • Activate the power management...
... static image displayed is a message Out of Range on the screen, this means you are using a display mode that does not help, check the signal cable connectors. Power LED indicator The LED indicator is white or orange. • If the LED lights up process. And then select the correct resolution, refresh rate and make adjustments based on these instructions. • If the LED is illuminated in white and there is visible on the screen. • Activate the power management...


