
User Manual
Page 3
... Panel 8 Controls and Functions 9 External Control Panel 9 Remote Control Description 10 Remote Control Effective Range 11 Installing or Replacing the Battery 11 Connection 12 Connecting to a Laptop or Desktop Computer 12 Connecting Equipment to the Component Video Input 13 Connecting Video and S-Video Devices 13 Connecting to Display Devices 14 Installation 15 Choosing a Location 15 Adjusting the Height 16 Screen Size 16 Operation 18 Startup 18 Shutdown 19 Digital Keystone Correction 20 Source Selection 21 Auto Adjustment 21 Blank 22 Zoom / Focusing 22 Slide Operation...
... Panel 8 Controls and Functions 9 External Control Panel 9 Remote Control Description 10 Remote Control Effective Range 11 Installing or Replacing the Battery 11 Connection 12 Connecting to a Laptop or Desktop Computer 12 Connecting Equipment to the Component Video Input 13 Connecting Video and S-Video Devices 13 Connecting to Display Devices 14 Installation 15 Choosing a Location 15 Adjusting the Height 16 Screen Size 16 Operation 18 Startup 18 Shutdown 19 Digital Keystone Correction 20 Source Selection 21 Auto Adjustment 21 Blank 22 Zoom / Focusing 22 Slide Operation...
User Manual
Page 4
... Cleaning the Lens 33 Cleaning the Projector Case 33 Storing the Projector 33 Transporting the projector 33 Lamp Information 34 Warning Message 34 Replacing the Lamp 34 Temp Information 36 Indicators ...36 Service Information 38 Accessories (included in the standard package 38 Optional Accessories (not included in the standard package 38 Ordering Parts or Getting Information 38 Troubleshooting 39 Specifications 40 Projector Specifications 40 Timing Chart 41 Supported Timing for PC Input 41 Supported Timing...
... Cleaning the Lens 33 Cleaning the Projector Case 33 Storing the Projector 33 Transporting the projector 33 Lamp Information 34 Warning Message 34 Replacing the Lamp 34 Temp Information 36 Indicators ...36 Service Information 38 Accessories (included in the standard package 38 Optional Accessories (not included in the standard package 38 Ordering Parts or Getting Information 38 Troubleshooting 39 Specifications 40 Projector Specifications 40 Timing Chart 41 Supported Timing for PC Input 41 Supported Timing...
User Manual
Page 5
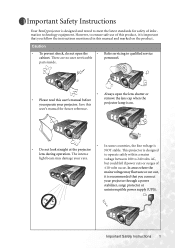
... light beam may fluctuate or cut out, it is important that you connect your projector through a power stabilizer, surge protector or uninterruptible power supply (UPS). parts inside. • Always open the • Refer servicing to 240 volts AC, but could fail if power cuts or surges of ±10 volts occur. Important Safety Instructions 1 Save this remove the lens cap when the projector lamp is...
... light beam may fluctuate or cut out, it is important that you connect your projector through a power stabilizer, surge protector or uninterruptible power supply (UPS). parts inside. • Always open the • Refer servicing to 240 volts AC, but could fail if power cuts or surges of ±10 volts occur. Important Safety Instructions 1 Save this remove the lens cap when the projector lamp is...
User Manual
Page 6
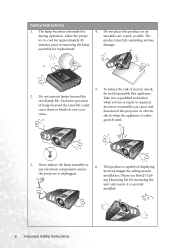
... displaying inverted images for approximately 45 product may fall, sustaining serious minutes prior to a qualified technician when service or repair is required. do not disassemble this product on rare occasions. Allow the projec- Take it is subse- quently used. 3. Never replace the lamp assembly or any electronic components unless the projector is capable of electric shock, 2. Excessive operation of the projector...
... displaying inverted images for approximately 45 product may fall, sustaining serious minutes prior to a qualified technician when service or repair is required. do not disassemble this product on rare occasions. Allow the projec- Take it is subse- quently used. 3. Never replace the lamp assembly or any electronic components unless the projector is capable of electric shock, 2. Excessive operation of the projector...
User Manual
Page 9
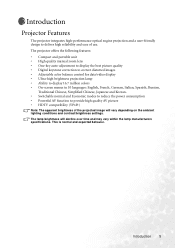
... apparent brightness of use. This is normal and expected behavior. Introduction 5 The projector offers the following features: • Compact and portable unit • High quality manual zoom lens • One-key auto-adjustment to display the best picture quality • Digital keystone correction to correct distorted images • Adjustable color balance control for data/video display • Ultra-high brightness projection lamp • Ability to display 16.7 million colors • On-screen menus in 10...
... apparent brightness of use. This is normal and expected behavior. Introduction 5 The projector offers the following features: • Compact and portable unit • High quality manual zoom lens • One-key auto-adjustment to display the best picture quality • Digital keystone correction to correct distorted images • Adjustable color balance control for data/video display • Ultra-high brightness projection lamp • Ability to display 16.7 million colors • On-screen menus in 10...
User Manual
Page 10
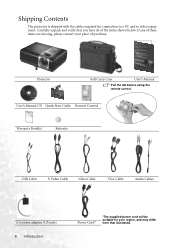
.... Projector Soft Carry Case User's Manual Pull the tab before using the remote control. If any of these items are missing, please contact your region, and may differ from that you have all of purchase. Carefully unpack and verify that illustrated. User's Manual CD Quick Start Guide Remote Control Warranty Booklet Batteries USB Cable S-Video Cable Video Cable VGA Cable Audio Cables 3-2 power adaptor (US only) 6 Introduction Power Cord* *The supplied power cord will be suitable for connection to...
.... Projector Soft Carry Case User's Manual Pull the tab before using the remote control. If any of these items are missing, please contact your region, and may differ from that you have all of purchase. Carefully unpack and verify that illustrated. User's Manual CD Quick Start Guide Remote Control Warranty Booklet Batteries USB Cable S-Video Cable Video Cable VGA Cable Audio Cables 3-2 power adaptor (US only) 6 Introduction Power Cord* *The supplied power cord will be suitable for connection to...
User Manual
Page 11
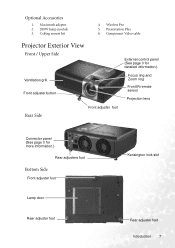
Presentation Plus 6. Optional Accessories 1. Ceiling mount kit 4. Component Video cable Projector Exterior View Front / Upper Side Ventilation grill Front adjuster button Rear Side Front adjuster foot External control panel (See page 9 for detailed information.) Focus ring and Zoom ring Front IR remote sensor Projection lens Connector panel (See page 8 for more information.) Rear adjusters foot Bottom Side Front adjuster foot Lamp door Rear adjuster foot Kensington lock slot Rear adjuster foot Introduction 7 Macintosh adapter 2. 200W lamp module 3. Wireless Pro 5.
Presentation Plus 6. Optional Accessories 1. Ceiling mount kit 4. Component Video cable Projector Exterior View Front / Upper Side Ventilation grill Front adjuster button Rear Side Front adjuster foot External control panel (See page 9 for detailed information.) Focus ring and Zoom ring Front IR remote sensor Projection lens Connector panel (See page 8 for more information.) Rear adjusters foot Bottom Side Front adjuster foot Lamp door Rear adjuster foot Kensington lock slot Rear adjuster foot Introduction 7 Macintosh adapter 2. 200W lamp module 3. Wireless Pro 5.
User Manual
Page 13
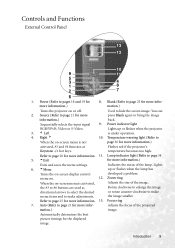
... 25 for more information. 13. Adjusts the focus of the image. Controls and Functions External Control Panel 13 12 10 9 11 5 3 4 1 8 2 7 6 1. developed a problem. 12. Automatically determines the best picture timings for more infor- You can 2. Sequentially selects the input signal 9. temperature becomes too high. Introduction 9 the image smaller. Auto (Refer to page 21 for the displayed image. Lamp indicator light (Refer to #6 buttons are used as Flashes red if the projector's Keystone -/+ hot keys. the #3 to...
... 25 for more information. 13. Adjusts the focus of the image. Controls and Functions External Control Panel 13 12 10 9 11 5 3 4 1 8 2 7 6 1. developed a problem. 12. Automatically determines the best picture timings for more infor- You can 2. Sequentially selects the input signal 9. temperature becomes too high. Introduction 9 the image smaller. Auto (Refer to page 21 for the displayed image. Lamp indicator light (Refer to #6 buttons are used as Flashes red if the projector's Keystone -/+ hot keys. the #3 to...
User Manual
Page 14
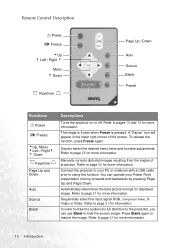
.... Remote Control Description II Power II/ Freeze 5Up 3 Left / Right 4 Menu 6 Down Keystone Page Up / Down Auto Source Blank Preset Functions II Power II/ Freeze 5Up, Menu 3Left / Right4, 6 Down Keystone Page Up and Down Auto Source Blank Descriptions Turns the projector on or off. To release the function, press Freeze again. Refer to hide the screen image. Refer to using this function. Connect the projector to your Power Point...
.... Remote Control Description II Power II/ Freeze 5Up 3 Left / Right 4 Menu 6 Down Keystone Page Up / Down Auto Source Blank Preset Functions II Power II/ Freeze 5Up, Menu 3Left / Right4, 6 Down Keystone Page Up and Down Auto Source Blank Descriptions Turns the projector on or off. To release the function, press Freeze again. Refer to hide the screen image. Refer to using this function. Connect the projector to your Power Point...
User Manual
Page 22
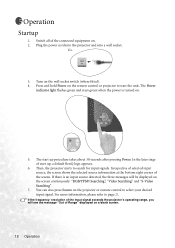
... of selected input source, the screen shows the selected source information at the bottom right corner of the input signal exceeds the projector's operating range, you will be displayed on the remote control or projector to select your desired input signal. You can also press Source on . 5. The Power indicator light flashes green and stays green when the power is no input source detected, the three messages will see the message "Out of start up , a default BenQ logo appears...
... of selected input source, the screen shows the selected source information at the bottom right corner of the input signal exceeds the projector's operating range, you will be displayed on the remote control or projector to select your desired input signal. You can also press Source on . 5. The Power indicator light flashes green and stays green when the power is no input source detected, the three messages will see the message "Out of start up , a default BenQ logo appears...

User Manual
Page 26
... with a USB cable prior to using the lens' zoom ring. Press Blank again to hide the screen image. Connect the projector to your PC or notebook with video/ S-video signal connected, the background sound still can set the blank time in Advance --> Blank Time menu to let the projector shut down automatically after a period of the screen when the image is no action taken on page 17. BLANK Zoom / Focusing Adjust the projected image to your Power Point...
... with a USB cable prior to using the lens' zoom ring. Press Blank again to hide the screen image. Connect the projector to your PC or notebook with video/ S-video signal connected, the background sound still can set the blank time in Advance --> Blank Time menu to let the projector shut down automatically after a period of the screen when the image is no action taken on page 17. BLANK Zoom / Focusing Adjust the projected image to your Power Point...

User Manual
Page 36
Shows the native resolution of hours the lamp has been used. Lamp Hour Displays the number of the input signal. As above . PC signal / Component Video input FUNCTION Source Resolution DESCRIPTION Shows the current signal source. Shows the Video input system format, NTSC, SECAM or PAL. Video / S-Video signal input FUNCTION Source System Preset Mode Lamp Hour DESCRIPTION As above . 32 Operation Preset Mode Shows the selected mode in Picture menu. As above. 5. Information Menu This menu shows you the current operating status of the projector.
Shows the native resolution of hours the lamp has been used. Lamp Hour Displays the number of the input signal. As above . PC signal / Component Video input FUNCTION Source Resolution DESCRIPTION Shows the current signal source. Shows the Video input system format, NTSC, SECAM or PAL. Video / S-Video signal input FUNCTION Source System Preset Mode Lamp Hour DESCRIPTION As above . 32 Operation Preset Mode Shows the selected mode in Picture menu. As above. 5. Information Menu This menu shows you the current operating status of the projector.

User Manual
Page 37
... extended time, please follow the instructions below. These can damage the case. Storing the Projector If you clean the case, turn the projector off and unplug the power cord. When you have to gently wipe the lens surface. Pack the projector in the manual or consult your dealer if other chemical detergents. Then wipe the case. Remove the batteries from the remote control. To remove...
... extended time, please follow the instructions below. These can damage the case. Storing the Projector If you clean the case, turn the projector off and unplug the power cord. When you have to gently wipe the lens surface. Pack the projector in the manual or consult your dealer if other chemical detergents. Then wipe the case. Remove the batteries from the remote control. To remove...
User Manual
Page 38
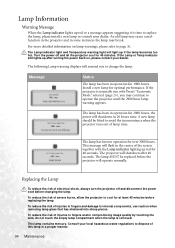
.... If the projector is normally run with the Lamp indicator lighting up red for 1980 hours. To reduce the risk of lamp time. Turn the power off and disconnect the power cord before changing the lamp. The projector will operate normally. The lamp MUST be fitted to fingers and/or compromising image quality by touching the lens, do not touch the empty lamp compartment when the lamp is removed. Replacing the Lamp To reduce...
.... If the projector is normally run with the Lamp indicator lighting up red for 1980 hours. To reduce the risk of lamp time. Turn the power off and disconnect the power cord before changing the lamp. The projector will operate normally. The lamp MUST be fitted to fingers and/or compromising image quality by touching the lens, do not touch the empty lamp compartment when the lamp is removed. Replacing the Lamp To reduce...

User Manual
Page 39
Turn the power off and disconnect the projector from the wall socket. Then loosen the screws and remove the lamp cover. Step 3. Loosen the screw that holds the lamp to another end as this could result in locations where water might splash on with the lamp cover removed. It is replaced, reset the total lamp operation time. Do not insert your fingers. Insert a new lamp. Re-install the lamp cover and tighten the screw. Move...
Turn the power off and disconnect the projector from the wall socket. Then loosen the screws and remove the lamp cover. Step 3. Loosen the screw that holds the lamp to another end as this could result in locations where water might splash on with the lamp cover removed. It is replaced, reset the total lamp operation time. Do not insert your fingers. Insert a new lamp. Re-install the lamp cover and tighten the screw. Move...
User Manual
Page 40
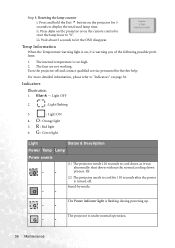
... Power indicator light is too high. 2. Press and hold the Exit 5 button on the remote control to reset the lamp hour to "0". Wait about 5 seconds to cool down as it is turned off and contact qualified service personnel for 5 seconds to cool for 110 seconds after the power is warning you of the following possible problems: 1. R : Red light 6. Or (2) The projector needs to display the total used lamp time. iii. Press Auto on...
... Power indicator light is too high. 2. Press and hold the Exit 5 button on the remote control to reset the lamp hour to "0". Wait about 5 seconds to cool down as it is turned off and contact qualified service personnel for 5 seconds to cool for 110 seconds after the power is warning you of the following possible problems: 1. R : Red light 6. Or (2) The projector needs to display the total used lamp time. iii. Press Auto on...
User Manual
Page 42
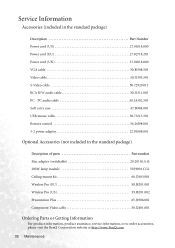
... of parts Part number Mac adapter (switchable 20.20118.A15 200W lamp module 59.J9901.CG1 Ceiling mount kit 60.J7683.001 Wireless Pro (EU 59.J8201.001 Wireless Pro (US 59.J8201.002 Presentation Plus 65.J9306.001 Component Video cable 50.J2401.001 Ordering Parts or Getting Information For product information, product assistance, service information, or to order accessories, please visit the BenQ Corporation website...
... of parts Part number Mac adapter (switchable 20.20118.A15 200W lamp module 59.J9901.CG1 Ceiling mount kit 60.J7683.001 Wireless Pro (EU 59.J8201.001 Wireless Pro (US 59.J8201.002 Presentation Plus 65.J9306.001 Component Video cable 50.J2401.001 Ordering Parts or Getting Information For product information, product assistance, service information, or to order accessories, please visit the BenQ Corporation website...
User Manual
Page 43
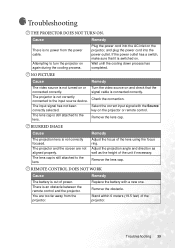
.... REMOTE CONTROL DOES NOT WORK Cause The battery is no power from the projector. Cause There is out of the lens using the focus ring. If the power outlet has a switch, make sure that it is switched on and check that the signal cable is still attached to turn the projector on or connected correctly. Turn the video source on . Select the correct input signal with a new one. The lens cap is connected correctly. The projector...
.... REMOTE CONTROL DOES NOT WORK Cause The battery is no power from the projector. Cause There is out of the lens using the focus ring. If the power outlet has a switch, make sure that it is switched on and check that the signal cable is still attached to turn the projector on or connected correctly. Turn the video source on . Select the correct input signal with a new one. The lens cap is connected correctly. The projector...
Projector Line Brochure
Page 1
...; Powered zoom • Professional AV input (HDMI) • PIP, POP • HDTV compatible (YPbPr) • User memory setting • Ben() proprietary Senseye technology • 30 Color Management • HD ready • [lust proof with Air-Filter • Motorized IRIS adjustment • Powered lens shift • User's manual • Remote control • AAA batteries • Warranty information booklet • PWR cord • Component cable • Micro dust filter • Ceiling mounting kit...
...; Powered zoom • Professional AV input (HDMI) • PIP, POP • HDTV compatible (YPbPr) • User memory setting • Ben() proprietary Senseye technology • 30 Color Management • HD ready • [lust proof with Air-Filter • Motorized IRIS adjustment • Powered lens shift • User's manual • Remote control • AAA batteries • Warranty information booklet • PWR cord • Component cable • Micro dust filter • Ceiling mounting kit...

Projector Line Brochure
Page 2
...Vivid Mode • Economic Mode Video input • Gaming Mode • Video Mode • Cinema Mode • Economic Mode • Wireless presentation • Auto adjustment • Freeze • Blank • 8 sets of preset mode • Progressive scan • Digital zoom • Wireless mouse • User's manual • Quick start guide • Manual CD • Remote control • Soft carry case • AAA batteries • VGA cable • VGA-Component cable • S-Video cable • Mac adapter • Ceiling mounting kit • Presentation Plus • Lamp...
...Vivid Mode • Economic Mode Video input • Gaming Mode • Video Mode • Cinema Mode • Economic Mode • Wireless presentation • Auto adjustment • Freeze • Blank • 8 sets of preset mode • Progressive scan • Digital zoom • Wireless mouse • User's manual • Quick start guide • Manual CD • Remote control • Soft carry case • AAA batteries • VGA cable • VGA-Component cable • S-Video cable • Mac adapter • Ceiling mounting kit • Presentation Plus • Lamp...


