
MW817ST User Manual
Page 2
... projected image size 14 Connection 16 Connecting video source devices........17 Operation 18 Starting up the projector 18 Adjusting the projected image 19 Using the menus 21 Securing the projector 22 Switching input signal 25 Magnifying and searching for details ...26 Selecting the aspect ratio 26 Optimizing the image 28 Setting the presentation timer 31 Remote paging operations 32 Freezing the image 32 Hiding the image 32 Locking control keys 32 Operating in a high altitude environment 33 Adjusting the sound 33 Shutting...
... projected image size 14 Connection 16 Connecting video source devices........17 Operation 18 Starting up the projector 18 Adjusting the projected image 19 Using the menus 21 Securing the projector 22 Switching input signal 25 Magnifying and searching for details ...26 Selecting the aspect ratio 26 Optimizing the image 28 Setting the presentation timer 31 Remote paging operations 32 Freezing the image 32 Hiding the image 32 Locking control keys 32 Operating in a high altitude environment 33 Adjusting the sound 33 Shutting...
MW817ST User Manual
Page 3
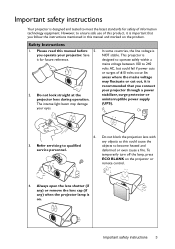
... open the lens shutter (if any) or remove the lens cap (if any objects as this could fail if power cuts or surges of ±10 volts occur. Please read this manual and marked on the product. Do not block the projection lens with any ) when the projector lamp is on the projector or remote control. 4. Important safety instructions 3 you operate your eyes. The intense light...
... open the lens shutter (if any) or remove the lens cap (if any objects as this could fail if power cuts or surges of ±10 volts occur. Please read this manual and marked on the product. Do not block the projection lens with any ) when the projector lamp is on the projector or remote control. 4. Important safety instructions 3 you operate your eyes. The intense light...

MW817ST User Manual
Page 6
... possible damage to have the projector serviced. 19. Safety Instructions (Continued) 17. Do not step on the projector. Use only BenQ's Ceiling Mount Kit for ceiling mount installation. Manage in accidents and possible injury. 18. Liquids spilled into the projector may fall from the place you to person and property. If you also purchase a separate Kensington lock compatible security cable and attach it is...
... possible damage to have the projector serviced. 19. Safety Instructions (Continued) 17. Do not step on the projector. Use only BenQ's Ceiling Mount Kit for ceiling mount installation. Manage in accidents and possible injury. 18. Liquids spilled into the projector may fall from the place you to person and property. If you also purchase a separate Kensington lock compatible security cable and attach it is...

MW817ST User Manual
Page 10
... to Turns on . Right/ 2. POWER Toggles the projector between standby 4. ECO BLANK Selects an available picture setup mode. menu, 11. Used to previous OSD exits and saves menu settings. LAMP indicator light Increases the projector volume. SOURCE Displays the source selection bar. 10 Introduction Lights up red if the projector's temperature becomes too high. 7. Activates the selected On-Screen Display (OSD) menu item. 13. Auto 13 8 Automatically determines the best picture timings for the displayed image. Indicates the status of the projected image. 10...
... to Turns on . Right/ 2. POWER Toggles the projector between standby 4. ECO BLANK Selects an available picture setup mode. menu, 11. Used to previous OSD exits and saves menu settings. LAMP indicator light Increases the projector volume. SOURCE Displays the source selection bar. 10 Introduction Lights up red if the projector's temperature becomes too high. 7. Activates the selected On-Screen Display (OSD) menu item. 13. Auto 13 8 Automatically determines the best picture timings for the displayed image. Indicates the status of the projected image. 10...

MW817ST User Manual
Page 11
... displayed image. 12 11. SOURCE Displays the source selection bar. 1. SMART ECO 13. Digital Zoom (+, -) Operate your own timer setting. 15. page up Displays the lamp mode selection bar. 5. MENU/EXIT Turns on . 2. Goes back to make adjustments. 16 12. Introduction 11 Left 4. Timer On Activates or displays an on-screen timer based on your display software program Magnifies or reduces the projected picture (on a connected PC) which responds to hide the screen picture. 16. Remote control 9. Used to size. Adjusts the sound...
... displayed image. 12 11. SOURCE Displays the source selection bar. 1. SMART ECO 13. Digital Zoom (+, -) Operate your own timer setting. 15. page up Displays the lamp mode selection bar. 5. MENU/EXIT Turns on . 2. Goes back to make adjustments. 16 12. Introduction 11 Left 4. Timer On Activates or displays an on-screen timer based on your display software program Magnifies or reduces the projected picture (on a connected PC) which responds to hide the screen picture. 16. Remote control 9. Used to size. Adjusts the sound...

MW817ST User Manual
Page 17
... the signal cables have been connected correctly. Connection 17 The built-in home theater or home cinema applications. Refer to your notebook's documentation to find your notebook's key combination. • The D-Sub output only works when an appropriate D-Sub input is made to YUV. Also check that you connect the projector to a DVD player via the projector's HDMI input and the projected picture displays wrong colors, please change the color...
... the signal cables have been connected correctly. Connection 17 The built-in home theater or home cinema applications. Refer to your notebook's documentation to find your notebook's key combination. • The D-Sub output only works when an appropriate D-Sub input is made to YUV. Also check that you connect the projector to a DVD player via the projector's HDMI input and the projected picture displays wrong colors, please change the color...
MW817ST User Manual
Page 18
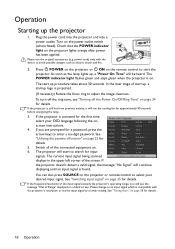
... the connected equipment on the projector lights orange after power has been applied. Switch all of Range" displayed on a blank screen. power cord) only with the device to avoid possible dangers such as the lamp lights up , a startup logo is compatible with the projector's resolution or set the input signal to enter a six-digit password. If the frequency/resolution of the screen. If the projector is found. You can also press SOURCE on...
... the connected equipment on the projector lights orange after power has been applied. Switch all of Range" displayed on a blank screen. power cord) only with the device to avoid possible dangers such as the lamp lights up , a startup logo is compatible with the projector's resolution or set the input signal to enter a six-digit password. If the frequency/resolution of the screen. If the projector is found. You can also press SOURCE on...
MW817ST User Manual
Page 23
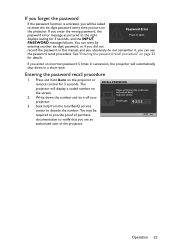
... asked to enter the six-digit password every time you turn off your Please write down the number and turn on page 23 for 3 seconds, and the INPUT PASSWORD message follows. Seek help from the local BenQ service center to the right Please try again. Recall Code: 0 2 1 2 3. Press and hold Auto on the screen. 2. Operation 23 If you can use the password recall procedure. projector. displays lasting for details. See...
... asked to enter the six-digit password every time you turn off your Please write down the number and turn on page 23 for 3 seconds, and the INPUT PASSWORD message follows. Seek help from the local BenQ service center to the right Please try again. Recall Code: 0 2 1 2 3. Press and hold Auto on the screen. 2. Operation 23 If you can use the password recall procedure. projector. displays lasting for details. See...
MW817ST User Manual
Page 24
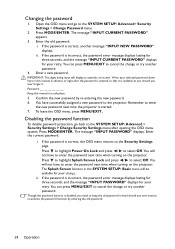
... time when turning on -screen. Press MODE/ENTER. The message "INPUT CURRENT PASSWORD" appears. 3. You will display as asterisks on the projector. If the password is correct, another password. i. Confirm the new password by entering the old password. 24 Operation If the password is incorrect, the password error message displays lasting for three seconds, and the message "INPUT PASSWORD" displays for your retry. Password Keep this manual in advance or right after opening the OSD menu system. IMPORTANT: The digits...
... time when turning on -screen. Press MODE/ENTER. The message "INPUT CURRENT PASSWORD" appears. 3. You will display as asterisks on the projector. If the password is correct, another password. i. Confirm the new password by entering the old password. 24 Operation If the password is incorrect, the password error message displays lasting for three seconds, and the message "INPUT PASSWORD" displays for your retry. Password Keep this manual in advance or right after opening the OSD menu system. IMPORTANT: The digits...
MW817ST User Manual
Page 25
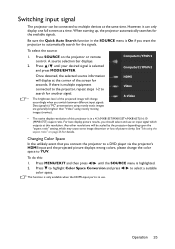
... of the projected image will display at this : 1. Operation 25 Switching input signal The projector can only display one full screen at the same time. Be sure the Quick Auto Search function in a 4:3 (MX815ST/MX815ST+/MX816ST)/16:10 (MW817ST) aspect ratio. If there is in the SOURCE menu is selected and press MODE/ENTER. Data (graphic) "PC" presentations using mostly static images are generally brighter than "Video" using mostly moving images (movies...
... of the projected image will display at this : 1. Operation 25 Switching input signal The projector can only display one full screen at the same time. Be sure the Quick Auto Search function in a 4:3 (MX815ST/MX815ST+/MX816ST)/16:10 (MW817ST) aspect ratio. If there is in the SOURCE menu is selected and press MODE/ENTER. Data (graphic) "PC" presentations using mostly static images are generally brighter than "Video" using mostly moving images (movies...
MW817ST User Manual
Page 31
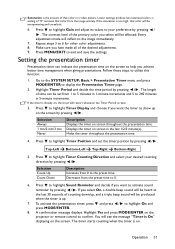
... MENU/EXIT to highlight On and press MODE/ENTER. 8. Press to highlight Timer Position and set from 0 to 6 for other color adjustments. 8. To activate the presentation timer, press and press / to exit and save the settings. A confirmation message displays. Every adjustment made all of the desired adjustments. 9. Repeat steps 3 to the preset time. The length of time can indicate the presentation time on the projector or remote control to display...
... MENU/EXIT to highlight On and press MODE/ENTER. 8. Press to highlight Timer Position and set from 0 to 6 for other color adjustments. 8. To activate the presentation timer, press and press / to exit and save the settings. A confirmation message displays. Every adjustment made all of the desired adjustments. 9. Repeat steps 3 to the preset time. The length of time can indicate the presentation time on the projector or remote control to display...
MW817ST User Manual
Page 32
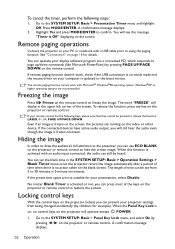
... mouse driver on your display software program (on a connected PC) which responds to the SYSTEM SETUP: Basic > Panel Key Lock menu, and select On by children, for example). No matter Blank Timer is activated with an audio input connected, the audio can use ECO BLANK on page 16 for your remote control has the following steps: 1. Press MODE/ENTER. See "Connection" on the projector or remote control to hide the screen image. Windows®...
... mouse driver on your display software program (on a connected PC) which responds to the SYSTEM SETUP: Basic > Panel Key Lock menu, and select On by children, for example). No matter Blank Timer is activated with an audio input connected, the audio can use ECO BLANK on page 16 for your remote control has the following steps: 1. Press MODE/ENTER. See "Connection" on the projector or remote control to hide the screen image. Windows®...

MW817ST User Manual
Page 33
... should switch to High Altitude mode to highlight High Altitude Mode and press / select On. To activate the High Altitude Mode: 1. A confirmation message displays. 3. Highlight Yes and press MODE/ENTER. If you press POWER to turn off the sound: 1. Adjusting the sound The sound adjustments made a correct connection to the projector audio input. See "Connection" on page 16 for how the audio input is designed to improve overall system cooling and performance. The Audio Settings page displays...
... should switch to High Altitude mode to highlight High Altitude Mode and press / select On. To activate the High Altitude Mode: 1. A confirmation message displays. 3. Highlight Yes and press MODE/ENTER. If you press POWER to turn off the sound: 1. Adjusting the sound The sound adjustments made a correct connection to the projector audio input. See "Connection" on page 16 for how the audio input is designed to improve overall system cooling and performance. The Audio Settings page displays...

MW817ST User Manual
Page 37
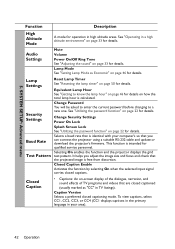
... Lamp Settings Lamp Mode Normal/Economic/SMART ECO Reset Lamp Timer Equivalent Lamp Hour Security Settings Change Password Change Security Power On Lock Settings Splash Screen Lock Baud Rate 2400/4800/9600/14400/19200/ 38400/57600/115200 Test Pattern On/Off Closed Caption Closed Caption Enable On/Off Caption Version CC1/CC2/CC3/CC4 Network On/Off Standby Monitor Out On/Off Settings Audio Pass Off/Computer 1/Computer 2/ Through Video,S-Video/HDMI Status DHCP IP Address Wired LAN...
... Lamp Settings Lamp Mode Normal/Economic/SMART ECO Reset Lamp Timer Equivalent Lamp Hour Security Settings Change Password Change Security Power On Lock Settings Splash Screen Lock Baud Rate 2400/4800/9600/14400/19200/ 38400/57600/115200 Test Pattern On/Off Closed Caption Closed Caption Enable On/Off Caption Version CC1/CC2/CC3/CC4 Network On/Off Standby Monitor Out On/Off Settings Audio Pass Off/Computer 1/Computer 2/ Through Video,S-Video/HDMI Status DHCP IP Address Wired LAN...

MW817ST User Manual
Page 41
... Timer Sets the auto-shutdown timer. Operation Settings Auto Power Off Allows the projector to turn off automatically if no input signal is feed through the power cord. See "Locking control keys" on page 32 for details. Quick Cooling Enables or disables the Quick Cooling function. See "Setting Auto Power Off" on page 46 for details. Blank Timer Sets the image blank time when the Blank feature is fed through the VGA cable. Panel Key Lock Background Color...
... Timer Sets the auto-shutdown timer. Operation Settings Auto Power Off Allows the projector to turn off automatically if no input signal is feed through the power cord. See "Locking control keys" on page 32 for details. Quick Cooling Enables or disables the Quick Cooling function. See "Setting Auto Power Off" on page 46 for details. Blank Timer Sets the image blank time when the Blank feature is fed through the VGA cable. Panel Key Lock Background Color...
MW817ST User Manual
Page 42
... helps you can connect the projector using a suitable RS-232 cable and update or download the projector's firmware. Change Security Settings Power On Lock Splash Screen Lock See "Utilizing the password function" on page 22 for details. SYSTEM SETUP: Advanced menu Function Description High Altitude Mode A mode for qualified service personnel. Equivalent Lamp Hour See "Getting to a new one. This function is intended for operation in your computer's so that you adjust the image size and focus and check that is free...
... helps you can connect the projector using a suitable RS-232 cable and update or download the projector's firmware. Change Security Settings Power On Lock Splash Screen Lock See "Utilizing the password function" on page 22 for details. SYSTEM SETUP: Advanced menu Function Description High Altitude Mode A mode for qualified service personnel. Equivalent Lamp Hour See "Getting to a new one. This function is intended for operation in your computer's so that you adjust the image size and focus and check that is free...

MW817ST User Manual
Page 43
... is correctly connected to provide the network function when it is selected since the HDMI cable carries audio signal. Returns all settings to use. Press / to choose the source that you wish to the factory preset values. Mac Address Displays the mac adress of this function slightly increases the standby power consumption. Operation 43 When you select Computer 1 or Computer 2, audio signal can play sound when it is in standby mode and...
... is correctly connected to provide the network function when it is selected since the HDMI cable carries audio signal. Returns all settings to use. Press / to choose the source that you wish to the factory preset values. Mac Address Displays the mac adress of this function slightly increases the standby power consumption. Operation 43 When you select Computer 1 or Computer 2, audio signal can play sound when it is in standby mode and...

MW817ST User Manual
Page 46
... input signal is selected, the light output will be set Auto Power Off, go into the SYSTEM SETUP: Basic > Operation Settings > Auto Power Off menu and press / . To obtain the lamp hour information: 1. You can also get the lamp hour information on the menu. 4. If the preset time lengths are not suitable for more information on Economic mode. The projector will see the Equivalent Lamp Hour information displaying on the INFORMATION menu. Extending lamp life The projection lamp...
... input signal is selected, the light output will be set Auto Power Off, go into the SYSTEM SETUP: Basic > Operation Settings > Auto Power Off menu and press / . To obtain the lamp hour information: 1. You can also get the lamp hour information on the menu. 4. If the preset time lengths are not suitable for more information on Economic mode. The projector will see the Equivalent Lamp Hour information displaying on the INFORMATION menu. Extending lamp life The projection lamp...

MW817ST User Manual
Page 48
... projector. Remove the lamp cover from the projector. 6. Lift the handle so that secures the lamp. 7. Remove the protection film. • Do not turn the projector off and disconnect the projector from the power outlet. Turn the power off and disconnect the power cord before changing the lamp. • To reduce the risk of severe burns, allow the projector to cool for at least 45 minutes before replacing the lamp...
... projector. Remove the lamp cover from the projector. 6. Lift the handle so that secures the lamp. 7. Remove the protection film. • Do not turn the projector off and disconnect the projector from the power outlet. Turn the power off and disconnect the power cord before changing the lamp. • To reduce the risk of severe burns, allow the projector to cool for at least 45 minutes before replacing the lamp...

MW817ST User Manual
Page 52
...) of the lens using the focus ring. Remote control does not work Cause Remedy The battery is connected correctly. Plug the power cord into the power outlet. Wait until the cooling down process has completed. Turn the video source on the projector, and plug the power cord into the AC power jack on and check that it is switched on . Select the correct input signal with a new one. Adjust the projection angle and direction...
...) of the lens using the focus ring. Remote control does not work Cause Remedy The battery is connected correctly. Plug the power cord into the power outlet. Wait until the cooling down process has completed. Turn the video source on the projector, and plug the power cord into the AC power jack on and check that it is switched on . Select the correct input signal with a new one. Adjust the projection angle and direction...


